How to Build a Sturdy Shop Table
Peter Polcyn's custom grid-top assembly table makes it easy to clamp workpieces and keep sawdust out of your way.
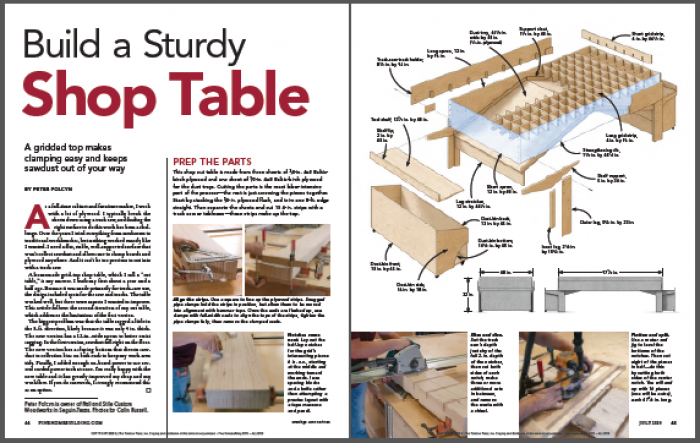
In this video, we follow along as Peter Polcyn of Rail and Stile Custom Woodworks builds a new shop cut table to replace his original prototype—an upgrade that will bring better stability and more functionality to his already-awesome design.
Making the parts
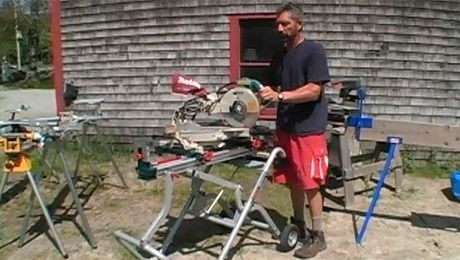
Before ripping the parts for the tabletop grid, Peter lines up the three sheets of 3/4-in. Baltic-birch plywood he’ll use to make the table and uses a track saw to cut a clean, uniform edge to work from. He then moves to the tablesaw to rip the 4-in. members that will make up the torsion-box grid. For now, he keeps everything at the 8-ft. length as he’ll bisect and trim boards later in the process.
Once cut, he stacks the pieces on-end on top of four evenly spaced clamps, squares up the ends, and then uses culls at each clamp point to crank the pieces into a uniform sandwich before tightening the clamps. This is a key step to ensure the dados will line up and be uniform.
For layout, he starts with a center mark, so he can work in each direction rather than starting at one end and telegraphing any inconsistencies across the entire stack. Then he sets a digital caliper to half the width of the dados and makes a mark. This gives him the outside edge of the first center dado, which he’ll reference to lay out the rest.
For this step, he cuts two blocks that represent the inner and outer position of each corresponding dado. Here the plywood cutoff represents the dado. Once it’s all laid out, he follows up with a pencil for a good visual reference. Then he bisects the board, marking the depth of the dado.
He cuts the dados with multiple passes—and to move with ease and accuracy, cutting right up to and in-between the lines, he uses a guiderail square attached to the track. Once all the cuts are made, he follows up with a mallet and chisel to break out the bulk of material.
Then he fabricates a router jig for the final pass. Before using it, he squares it up and positions it on the stack and installs guide blocks to the underside. Then he double checks the depth and sets the router bit before routing out the base of each dado.
He cuts to either side of the center dado leaving two flush ends. He cuts two stacks of four, leaving him with 16 cross members, but the table only needs 15, leaving one extra.
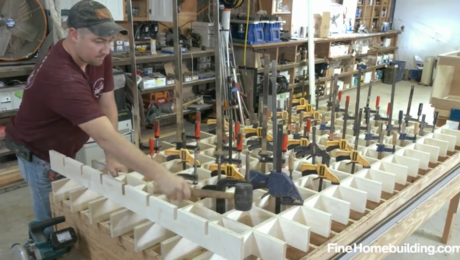
Assemble the grid
To assemble the grid, he lays out and dry fits a few parts to ensure he’s got it right. Once satisfied, he adds a dab of glue to each connection point, then fits the parts together, driving them home with rubber persuader.
As the assembly progresses, he adds clamps at regular intervals to keep the joints tight while the glue sets up. And just like every other large glue-up I’ve witnessed, it doesn’t take long before every clamp in the shop is being used.
While that sets up, Peter rips the 12-in. perimeter boards, then breaks out his track saw to clean up and trim the edges of the grid before installing them.
Peter tacks the perimeter in place, and drills pilot holes before fastening with screws. He installs them at least an inch below the table top to avoid cutting into them later when the table is in use.
Legs, dust collection, and shelving
Next, he moves on to the legs, which are made from the same Baltic-birch plywood. Then he installs the storage shelves on each end of the table, screwing them in place and adding a lip to the edge.
Before bracing the shelves and tying the legs together with a stretcher, he moves on to dust collection where diagonal nailers are installed to support the 1/2-in. prefinished Baltic-birch plywood.
To avoid sagging, he adds a support across the bottom before fitting and fastening the first pan. Then he runs through the same program on the other end. Combined, the two V-shaped trays/pans will direct dust and debris away from center, towards each end with the prefinished surfaces helping the dust to move freely.
To support the shelves, he fashions angled brackets that reach back onto the torsion box. In addition to supporting the shelves, they also help support the legs as well as close the open gap along the sides of the collection trays.
Then, he installs an inner leg. These add some bulk to the legs, but also act as nailers for the stretcher that unifies the leg assembly into a solid system.
Once tipped upright, Peter leaps up on to the table, using the weight of his 6-ft.-plus frame to demonstrate its strength … then he does the same with the shelving, and I was more than impressed that shelf did not budge.
Outfitting the table
Next up, he outfits both sides of the table with brackets for his track-saw tracks. He installs them with individual blocks rather than a long strip of wood that would collect dust. These are aligned with every other cross member, about every 12 in. These are tacked and screwed in place, giving the assembly the strength to double as a solid shelf for clamping and planing.
Next, he constructs two simple dust-collection boxes outfitted with casters. These are built with angled sides to tuck neatly under the shelving where they capture the sawdust sliding it’s way off the collection trays.
Finally, he installs a 4-ft. power strip along one end, giving him the ability to keep multiple tools plugged in and at the ready while working.
And here she is: the Polcyn Cut Table 2.0.
Fine-tuning the table
Of course, when I arrived home, Peter had already sent me pictures as he’d modified the shelf by tucking a handy drawer underneath and cutting down the rolling box to accommodate it. I guess customizing and tweaking is a neverending process.
Bonus: Visualize and customize this table before you build
Peter gave us a copy of the Sketchup model, featuring two variations of the custom cutting table, that he used to plan the build of the final table. You can download the model and view it in Sketchup to help you build your own table, or you can customize the model to match your needs before you build.


View Comments
Ha ha, I need a nice sturdy shop table to build that sturdy shop table, and I don't anticipate ever owning that many clamps. :( Cool though.
Really nice table. And nice video documenting how it was made. Thanks!
I don't see a link to the 3D Sketchup model as promised in the magazine. Where is the 3D model? Also...
I am intrigued by the design of this table, but I have a question. This has sloped dust trays to send sawdust toward collection bins, but sawdust collects on all surfaces, no matter what the slope is. I was wondering how effective these trays truly are. I am sure it keeps the floor cleaner, but is it worth digging the dust off the trays to a bin? Is an air hose recommended equipment?