Repairing Holes in Drywall - Fine Homebuilding FHB Logo Facebook LinkedIn Email Pinterest Twitter Instagram Plus Icon Close Icon Navigation Search Icon Arrow Down Icon Video Guide Icon Article Guide Icon Modal Close Icon Guide Search Icon Skip to content
Main Menu
Subscribe

In every issue you'll find...

  • Expert insights on techniques and principles
  • Unbiased tool reviews
  • Step-by-step details to master the job
  • Field-tested advice and know-how
Subscribe Now!
Subscribe
  • How-To
  • Design
  • Tools & Materials
  • Videos
  • Blogs
  • Forum
  • Magazine
  • Members
  • FHB House
  • Podcast
  • Join
  • Log In
Main Menu Subscribe

Fine Homebuilding Project Guides

Drywall

Guide Home
Chapter
  • Drywall Basics
  • Tools and Materials
  • Hanging Drywall
  • Taping and Sanding
  • Special Installations
  • Drywall Repairs
  • Plaster
How-To

Repairing Holes in Drywall

Here's how to fix everything from a ding from a doorknob to a much larger patch job.

By Myron R. Ferguson
Article Image
Keep the toolbox stocked: The author likes to keep drywall repair kits handy. Shown here are precut patches for small holes, metal clips for larger areas, and precut patch kits for electrical outlets.

Holes in the drywall surface that result from long-term wear and tear can range from small nail punctures to large gouges. The extent of the repair depends on the size of the hole. Nail holes, nicks, and small dents can simply be covered with compound; small holes require paper or mesh tape for reinforcement; and larger holes may require the use of furring strips to support a drywall patch.

Repairing small holes

A small nail hole (such as that left when a picture hung on a wall is repositioned) can usually be filled with just one or two coats of compound. Remove any loose material first and depress the area around the hole slightly with the handle of a utility knife.

Small holes or dents created when a blunt object, such as a doorknob, hits a wall can usually be repaired without major work. Completely cover the damaged area with mesh tape, crossing the tape over the hole. Depending on the size of the hole, you may be able to fill it with joint compound before applying the tape. Next, apply joint compound over the tape with just enough trowel pressure to force compound through the tape. Feather the edges of the compound and do not build up the center too much; otherwise, you’ll create a bump that will be visible in certain lighting. Apply the second and third coats, feathering the area further and keeping the center even.
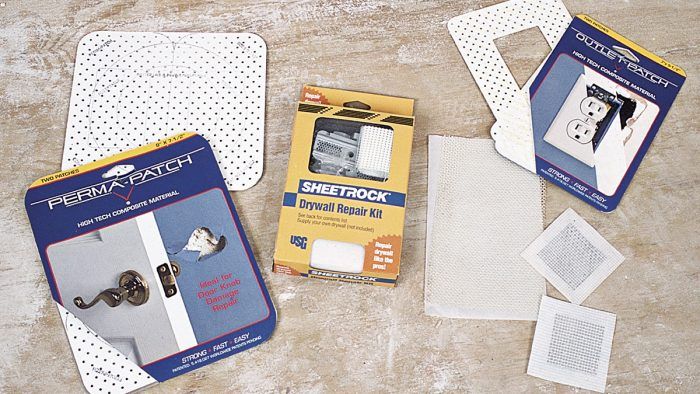
 

Repairing Small Holes

Small holes—whether from doorknobs, removed nails, or moving accidents—can be patched with a store-bought patch or with mesh tape.

self-repair patch
Patch the hole: To repair a small hole (under 2 in. or so in diameter), cover it with a self-repair patch or crisscross the hole with layers of mesh tape.

Patch the hole
Mesh tape should be pressed in slightly to create an indentation.

Cover it with compound
Cover it with compound: Apply joint compound to the patch. If working with mesh tape, use a taping knife to force some of the compound through the mesh and into the hole. Finish with two additional coats of compound.


Repairing large holes

If an area is badly damaged, cut it back until you reach solid drywall. To make the repair, cut a drywall patch and use it as a template to form the damaged area into a square, rectangle, or circle. Once the damaged area is removed, the opening will probably be too large to repair with mesh tape and compound alone. An actual piece of drywall will be used and it has to be attached in some way. To provide a fastening surface for the patch, use a furring strip (or strips) cut about 6 in. longer than the hole. Slide the furring into the hole and secure it in place with drywall screws fastened through the panel and into the furring. Cut and shape the patch to fit the hole, and then screw the patch onto the furring.


Store-bought drywall clips
Store-bought drywall clips: Wood furring or scraps of plywood are the most common materials for backing up large holes when another piece of drywall must be fitted into place, but you can also use metal drywall clips.

Now you’re ready to tape the patch. First, fill in any large gaps with joint compound, and then cover the edges with fiberglass-mesh tape. Cover the tape with a thin layer of joint compound. Once again, be sure to feather the edges properly and be careful not to build up the patched area too much. Larger holes require at least three coats of joint compound to be concealed properly. Because the patch is secured to the panel and is a solid part of the drywall, it is unlikely to crack or come loose. For really large holes, furring strips won’t be effective and you’ll have to cut the drywall back to the nearest framing member and add cross framing, as when eliminating a door or window.


Repairing Large Openings

Large holes—anything larger than your hand—should be trimmed back to solid drywall, furred out, and patched.

Assess the situation
Assess the situation: This looks like a great deal of damage, but if you use the right techniques, repairing a large hole isn’t that difficult.

Position a drywall patch
Position a drywall patch: Cut a drywall patch a little larger than the opening. Hold the patch over the damaged area and trace its outline on the wall.

Keep the edges clean
Keep the edges clean: Use a utility saw to cut out the damaged area.

Fur out the opening
Fur out the opening: Slip furring strips into the squared-up hole and attach them to the drywall with screws.

Attach the patch
Attach the patch: Position the drywall patch and screw it to the furring.

Add compound and tape
Add compound and tape: Fill gaps around the patch with joint compound, then cover the seams with mesh tape and a coat of joint compound.

Smooth it out
Smooth it out: Cover the entire patch with a second coat of joint compound, feathering the edges to avoid creating a bump.


Sign up for eletters today and get the latest how-to from Fine Homebuilding, plus special offers.

Sign Up
X
X
Previous: Repairing Popped Drywall Fasteners Next: How to Patch a Large Hole in Drywall

Guide

Drywall

Chapter

Drywall Repairs

Log in or create an account to post a comment.

Sign up Log in

Become a member and get full access to FineHomebuilding.com

Drywall

Drywall

Trusted, comprehensive guidance for choosing, hanging, taping, sanding, and repairing drywall—the right way

View Project Guide

View All Project Guides »

Become a member and get unlimited site access, including the Drywall Project Guide.

Start Free Trial

Drywall Basics
  • Types and Uses of Drywall
  • Planning the Job
Tools and Materials
  • Hanging Tools
  • Taping Tools and Materials
  • Sanding and Finishing Tools and Materials
Hanging Drywall
  • Prep for Hanging
  • Measuring and Cutting Drywall
  • Guidelines for Hanging and Fastening Drywall
  • Hanging Ceilings
  • Hanging Walls
  • Hanging Airtight Drywall
  • Trim Accessories/Corner Beads
Taping and Sanding
  • Taping Basics
  • Taping Seams
  • Taping Inside and Outside Corners
  • Sanding
Special Installations
  • Tricky Transitions
  • Curved Surfaces
  • Other Special Installations
  • Decorating with Drywall
Drywall Repairs
  • Patching Holes, Cracks, and More
Plaster
  • Working with Lime Plaster
  • Plaster Repair
  • Classic Plaster Techniques

Fine Homebuilding

Follow

Newsletter

Get home building tips, offers, and expert advice in your inbox

Sign Up See all newsletters

Membership & Magazine

  • Online Archive
  • Start Free Trial
  • Magazine Subscription
  • Magazine Renewal
  • Gift a Subscription
  • Customer Support
  • Manage Preferences

Taunton Network

  • Green Building Advisor
  • Fine Woodworking
  • Fine Gardening
  • Threads
  • About
  • Contact
  • Advertise
  • Privacy Policy
  • Careers
  • Copyright
  • Terms of Use
  • Accessibility

© 2021 The Taunton Press, Inc. All rights reserved.

    Main Menu

  • How-To
  • Design
  • Tools & Materials
  • Video
  • Blogs
  • Forum
  • Reader Projects
  • Magazine
  • Members
  • FHB House
  • Podcasts

  • FHB Podcast
  • ProTalk
  • Account

  • Log In
  • Join

    Podcasts

  • FHB Podcast
  • ProTalk
  • Popular Topics

  • Kitchens
  • Business
  • Bedrooms
  • Roofs
  • Architecture and Design
  • Green Building
  • Decks
  • Framing
  • Safety
  • Remodeling
  • Bathrooms
  • Windows
  • Tilework
  • Ceilings
  • HVAC

    Magazine

  • Current Issue
  • Past Issues
  • Magazine Index
  • Subscribe
  • Online Archive
  • Author Guidelines

    All Access

  • Member Home
  • Start Free Trial
  • Gift Membership

    Shop the Store

  • Books
  • DVDs
  • Taunton Workshops

    More

  • FHB Ambassadors
  • Reader Projects
  • Podcast
  • Customer Support

    Account

  • Log In
  • Join

Newsletter

Get home building tips, offers, and expert advice in your inbox

Sign Up See all newsletters

Follow

Join All Access

Become a member and get instant access to thousands of videos, how-tos, tool reviews, and design features.

Start Your Free Trial

Subscribe

FHB Magazine

Start your subscription today and save up to 52%

Subscribe

We hope you’ve enjoyed your free articles. To keep reading, become a member today.

Get complete site access to expert advice, how-to videos, Code Check, and more, plus the print magazine.

Start your FREE trial

Already a member? Log in