FHB Logo Facebook LinkedIn Email Pinterest Twitter Instagram Plus Icon Close Icon Navigation Search Icon Navigation Search Icon Arrow Down Icon Video Guide Icon Article Guide Icon Modal Close Icon Guide Search Icon Skip to content
Subscribe
Log In
  • How-To
  • Design
  • Tools & Materials
  • Videos
  • Blogs
  • Forum
  • Magazine
  • Members
  • FHB House
  • Podcast
Log In

Fine Homebuilding Project Guides

Drywall

Guide Home
Chapter
  • Drywall Basics
  • Tools and Materials
  • Hanging Drywall
  • Taping and Sanding
  • Special Installations
  • Drywall Repairs
  • Plaster
How-To

Taping and Finishing Drywall Corners

The trick is to work on half of a corner at a time.

By Myron R. Ferguson Issue 246 - Oct/Nov 2014
1. Fill the corners with mud. First, coat the side whose edge is covered by the abutting sheet so that coating the second edge fills any small gaps. Fill gaps larger than 1⁄4 in. with setting compound.

When taping and finishing drywall, people seem to struggle most with inside corners. The temptation is to try to work on both sides of a corner at once. If you do that, while you are working one side, the edge of the taping knife or the wet drywall compound (mud) that can build up on its edge will mess up the mud on the other side. It can lead to an even bigger  mess at the point where the wall meets the ceiling and three corners come together.

There is a trick to it, but before tackling the corners, tape the flats. Then bed the tape in all three corners (two ceiling and one wall), finish-coat one side of each, let dry, and finish-coat the other sides. You can generally do half of a corner one day, and the other half the next. In humid conditions, it can take longer for the mud to dry.

The drying time can be problematic on small jobs that you could otherwise finish in a day. To speed things up, use setting compound instead of regular drywall mud from a bucket. Setting compound, which comes as a powder that you mix with water, is available in several formulations that harden in times ranging from 20 to 90 minutes. Setting compound might not be worth the time and expense on a larger job that will take multiple days anyway, but it can let you finish a small job in time for supper.

Embed the tape

positioning drywall tape
2. Crease and position the tape. Tear the end that goes into the corner to a point to avoid building up layers of tape. Press the tape lightly into place with your fingers.

embedding drywall tape
3. Embed the tape with a taping knife. Center the tape with a light pass of the knife, then apply more pressure to smooth the tape and remove excess mud behind it. Tapping the tape with your finger should leave only a slight indentation.
4. Check for bubbles. Squeeze out any bubbles with a taping knife. The tape should be firmly embedded, with its creases straight and with no excess mud on the wall.

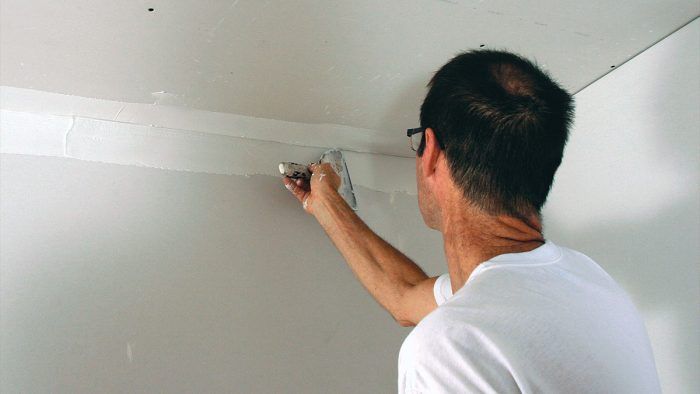
Finish-coat one side

5. Cover one side with mud. First, scrape off any chunks or ridges of dried mud that might interfere, then spread on enough new mud to completely cover the tape.

6. Remove the excess. Letting its inner edge ride against the corner, hold the knife at a steep angle. Feather the mud by applying pressure to the outside edge.

smooth out drywall tape
7. Smooth it out. Hold the knife at a shallow angle for the final pass, smoothing out imperfections to minimize the need for sanding.

drying drywall mud
8. Allow the mud to dry. With one side of each corner finish-coated, scrape off any chunks after the mud has dried.

Finish-coat the next side

drywall finish coat
9. Repeat the process. Finishing the second side involves the same steps as finishing the first side. Use the first side to guide the knife, and smooth the new mud in several passes.

smooth drywall finish
10. All corners are coated. There may be a few small chunks of mud standing proud. When the mud dries, scrape or sand it smooth. It’s now ready to be primed.

Choose the right taping knife

Stiffer knives do a better job of removing excess mud and of creating a smooth surface than more flexible knives. Unlike with flat joints, where a variety of taping-knife widths are called for, when taping corners, one 6-in. knife is all that you need.

drywall knife flexibility
Flexible knife is OK

stiff drywall knife
Stiffer knife is better


Photos by Andy Engel

Sign up for eletters today and get the latest how-to from Fine Homebuilding, plus special offers.

Signing you up...

This site is protected by reCAPTCHA and the Google Privacy Policy and Terms of Service apply.
See all newsletters
See all newsletters
Previous: Taping Inside Corners Next: Finishing a Drywall Inside Corner

Guide

Drywall

Chapter

Taping and Sanding

Log in or create an account to post a comment.

Sign up Log in

Become a member and get full access to FineHomebuilding.com

Drywall

Drywall

Trusted, comprehensive guidance for choosing, hanging, taping, sanding, and repairing drywall—the right way

View Project Guide

View All Project Guides »

Become a member and get unlimited site access, including the Drywall Project Guide.

Start Free Trial

Drywall Basics
  • Types and Uses of Drywall
  • Planning the Job
Tools and Materials
  • Hanging Tools
  • Taping Tools and Materials
  • Sanding and Finishing Tools and Materials
Hanging Drywall
  • Prep for Hanging
  • Measuring and Cutting Drywall
  • Guidelines for Hanging and Fastening Drywall
  • Hanging Ceilings
  • Hanging Walls
  • Hanging Airtight Drywall
  • Trim Accessories/Corner Beads
Taping and Sanding
  • Taping Basics
  • Taping Seams
  • Taping Inside and Outside Corners
  • Sanding
Special Installations
  • Tricky Transitions
  • Curved Surfaces
  • Other Special Installations
  • Decorating with Drywall
Drywall Repairs
  • Patching Holes, Cracks, and More
Plaster
  • Working with Lime Plaster
  • Plaster Repair
  • Classic Plaster Techniques

Fine Homebuilding

Follow

  • twitter
  • facebook
  • instagram
  • pinterest

Newsletter

Get home building tips, offers, and expert advice in your inbox

Signing you up...

This site is protected by reCAPTCHA and the Google Privacy Policy and Terms of Service apply.
See all newsletters
See all newsletters

Membership & Magazine

  • Online Archive
  • Start Free Trial
  • Magazine Subscription
  • Magazine Renewal
  • Gift a Subscription
  • Customer Support
  • Privacy Preferences

Taunton Network

  • Green Building Advisor
  • Fine Woodworking
  • Fine Gardening
  • Threads
  • About
  • Contact
  • Advertise
  • Careers
  • Copyright
  • Terms of Use
  • Site Map
  • Do not sell or share my information
  • Privacy Policy
  • Accessibility
  • California Privacy Rights

© 2023 The Taunton Press, Inc. All rights reserved.

X
X
This is a dialog window which overlays the main content of the page. The modal window is a 'site map' of the most critical areas of the site. Pressing the Escape (ESC) button will close the modal and bring you back to where you were on the page.

Main Menu

  • How-To
  • Design
  • Tools & Materials
  • Video
  • Blogs
  • Forum
  • Reader Projects
  • Magazine
  • Members
  • FHB House

Podcasts

  • FHB Podcast
  • ProTalk

Webinars

  • Upcoming and On-Demand

Podcasts

  • FHB Podcast
  • ProTalk

Webinars

  • Upcoming and On-Demand

Popular Topics

  • Kitchens
  • Business
  • Bedrooms
  • Roofs
  • Architecture and Design
  • Green Building
  • Decks
  • Framing
  • Safety
  • Remodeling
  • Bathrooms
  • Windows
  • Tilework
  • Ceilings
  • HVAC

Magazine

  • Current Issue
  • Past Issues
  • Magazine Index
  • Subscribe
  • Online Archive
  • Author Guidelines

All Access

  • Member Home
  • Start Free Trial
  • Gift Membership

Shop the Store

  • Books
  • DVDs
  • Taunton Workshops

More

  • FHB Ambassadors
  • Reader Projects
  • Podcast
  • FHB House
  • Customer Support

Account

  • Log In
  • Join

Newsletter

Get home building tips, offers, and expert advice in your inbox

Signing you up...

This site is protected by reCAPTCHA and the Google Privacy Policy and Terms of Service apply.
See all newsletters
See all newsletters

Follow

  • twitter
  • facebook
  • instagram
  • pinterest

Join All Access

Become a member and get instant access to thousands of videos, how-tos, tool reviews, and design features.

Start Your Free Trial

Subscribe

FHB Magazine

Start your subscription today and save up to 70%

Subscribe

We hope you’ve enjoyed your free articles. To keep reading, become a member today.

Get complete site access to expert advice, how-to videos, Code Check, and more, plus the print magazine.

Start your FREE trial

Already a member? Log in