
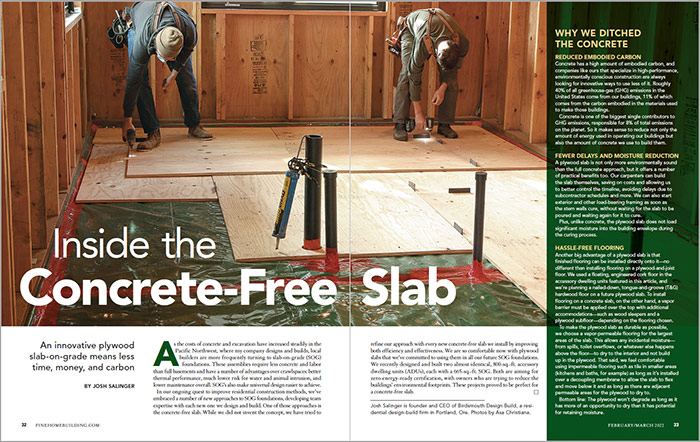
Assembling a Concrete-Free Slab
An innovative plywood slab-on-grade means less time, money, and carbon
As the costs of concrete and excavation have increased steadily in the Pacific Northwest, where my company designs and builds, local builders are more frequently turning to slab-on-grade foundations. These assemblies require less concrete and labor than full basements and have a number of advantages over crawlspaces: better thermal performance, much lower risk for water and animal intrusion, and lower maintenance overall. Slab-on grade foundations also make universal design easier to achieve. In our ongoing quest to improve residential construction methods, we’ve embraced a number of new approaches to slab-on grade foundations, developing team expertise with each new one we design and build. One of those approaches is the concrete-free slab.
While we did not invent the concept, we have tried to refine our approach with every new concrete-free slab we install by improving both efficiency and effectiveness. We are so comfortable now with plywood slabs that we’ve committed to using them in all our future slab-on grade foundations. We recently designed and built two almost identical, 800-sq.-ft. accessory dwelling units (ADUs), each with a 665-sq.-ft. slab-on grade. Both are aiming for zero-energy-ready certification, with owners who are trying to reduce the buildings’ environmental footprints. These projects proved to be perfect for a concrete-free slab.
WHY WE DITCHED THE CONCRETEREDUCED EMBODIED CARBON Concrete has a high amount of embodied carbon, and companies like ours that specialize in high-performance, environmentally conscious construction are always looking for innovative ways to use less of it. Roughly 40% of all greenhouse-gas (GHG) emissions in the United States come from our buildings, 11% of which comes from the carbon embodied in the materials used to make those buildings. Concrete is one of the biggest single contributors to GHG emissions, responsible for 8% of total emissions on the planet. So it makes sense to reduce not only the amount of energy used in operating our buildings but also the amount of concrete we use to build them. FEWER DELAYS AND MOISTURE REDUCTION A plywood slab is not only more environmentally sound than the full concrete approach, but it offers a number of practical benefits too. Our carpenters can build the slab themselves, saving on costs and allowing us to better control the timeline, avoiding delays due to subcontractor schedules and more. We can also start exterior and other load-bearing framing as soon as the stem walls cure, without waiting for the slab to be poured and waiting again for it to cure. Plus, unlike concrete, the plywood slab does not load significant moisture into the building envelope during the curing process. HASSLE-FREE FLOORING Another big advantage of a plywood slab is that finished flooring can be installed directly onto it—no different than installing flooring on a plywood-and-joist floor. We used a floating, engineered cork floor in the accessory dwelling units featured in this article, and we’re planning a nailed-down, tongue-and-groove (T&G) hardwood floor on a future plywood slab. To install flooring on a concrete slab, on the other hand, a vapor barrier must be applied over the top with additional accommodations—such as wood sleepers and a plywood subfloor—depending on the flooring chosen. To make the plywood slab as durable as possible, we choose a vapor-permeable flooring for the largest areas of the slab. This allows any incidental moisture—from spills, toilet overflows, or whatever else happens above the floor—to dry to the interior and not build up in the plywood. That said, we feel comfortable using impermeable flooring such as tile in smaller areas (kitchens and baths, for example) as long as it’s installed over a decoupling membrane to allow the slab to flex and move below it and as long as there are adjacent permeable areas for the plywood to dry to. Bottom line: The plywood won’t degrade as long as it has more of an opportunity to dry than it has potential for retaining moisture. |
Start off on the right footing
Building codes in our climate zone (4C) require a minimum R-15 thermal break at the edge of a concrete slab, where up to 60% of heat loss occurs. Compared to concrete, however, a plywood slab-on-grade has very little thermal loss at the edges because it’s only 1-1⁄2 in. thick, and it’s made of wood. One could reasonably argue that the standard level of slab-edge insulation isn’t as necessary with a plywood slab-on grade. However, making this argument to your local building inspector might not be worth the headache; the code has no guidance on anything other than concrete slabs.
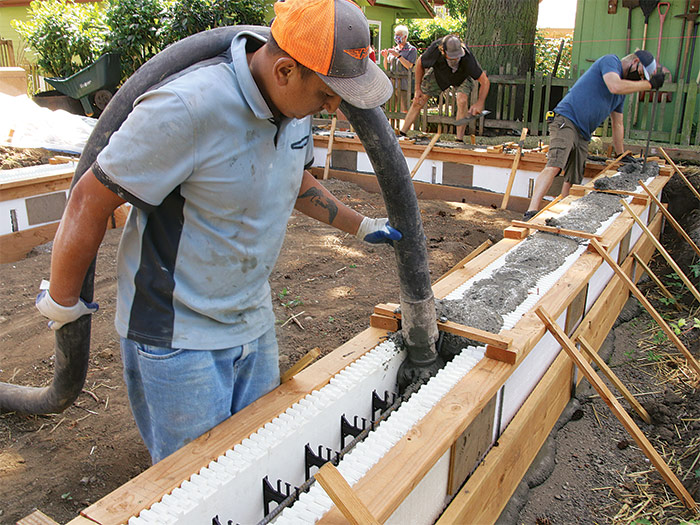
We use a stem wall made from insulated concrete forms (ICFs). Made of reinforced foamboard that stays in place after the pour, ICFs (ours are made by BuildBlock Building Systems) provide a two-sided thermal break that creates a very high-performing slab-on grade and surpasses code requirements. A typical R-15 slab-edge thermal break translates to roughly 3 in. of GPS or XPS foam. Here are two additional options if you’d rather not use ICFs for a concrete-free slab.
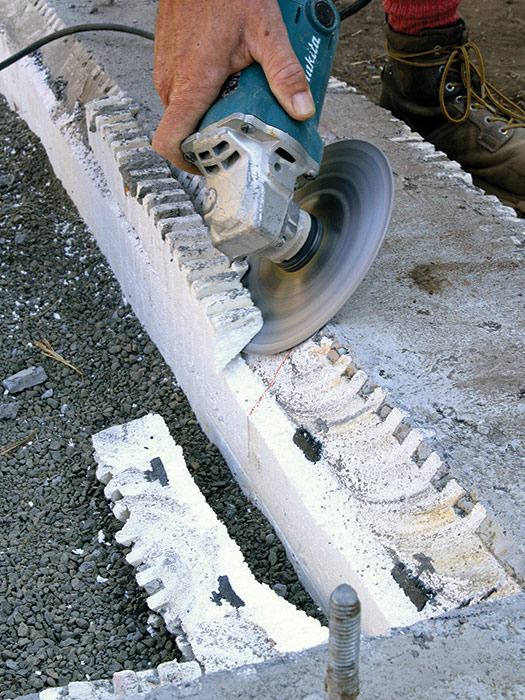
One thing to consider is that the foam, located where the slab and stem wall connect, can make it difficult to fasten hardwood flooring or carpet at the edges. With the ICFs we ordered for this project, each foam layer is only 2-1⁄2 in. thick, making the problem area a bit thinner to start with. To erase the problem almost entirely, we bevel the interior side of the ICF at 45°, allowing us to run the plywood slab very close to the wall while still meeting code.
We also like ICFs because we don’t have to own and store concrete forms and the associated materials, nor rely on outside foundation subs. Instead, we can form and pour foundations on our own schedule, using our own crew, which has become quite adept with these systems. In addition, ICFs are small, lightweight, and portable, making them especially useful for smaller structures with limited access, such as the accessory dwelling units (ADUs) we build in Portland’s dense historical neighborhoods.
|
|
|
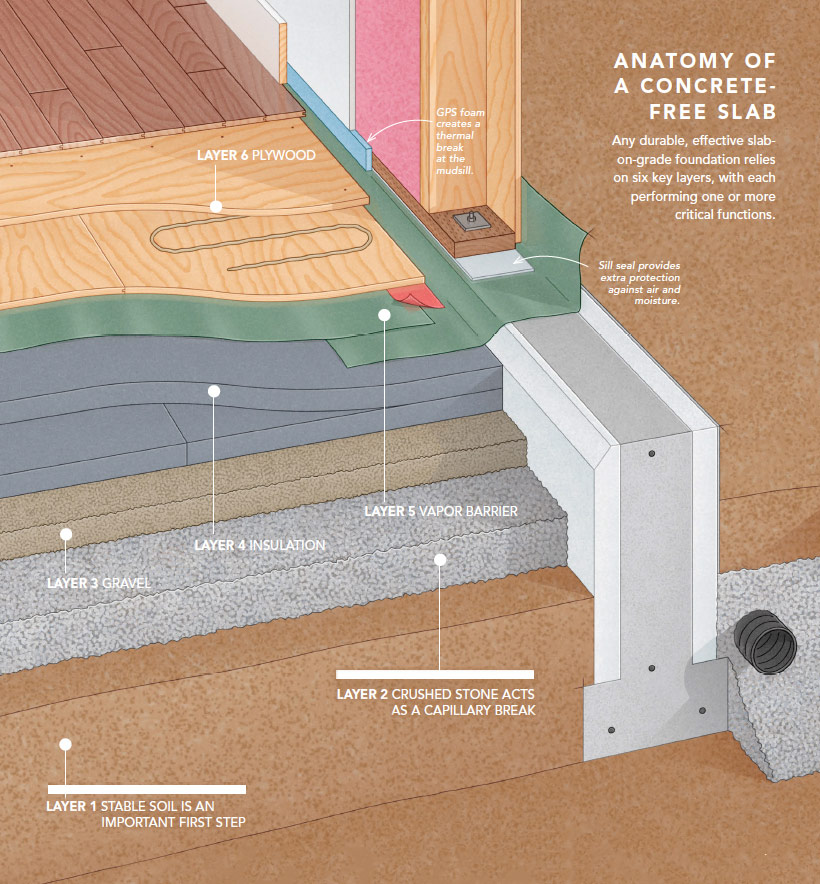
LAYER 2: CRUSHED STONE ACTS AS A CAPILLARY BREAK The second layer consists of a minimum of 4 in. of compacted, 3⁄4-in. crushed stone with no fines. Its primary function is to act as a capillary break, preventing moisture from being wicked up through the slab and into the building. This second layer also functions as a “pressure field extender” for the soil-gas ventilation system, with perforated pipes either passively or actively keeping radon from entering the home, depending on local requirements.
Drawing: Peter Wojcieszek
LAYER 3: Gravel keeps things level under the concrete-free slab
On a concrete-free slab-on grade, we add a 2-in. to 3-in. layer of 1⁄4-in.-minus gravel above the capillary-break stone. This layer is much easier to screed level and flat so that we can then set our foam-insulation layers in full contact without any voids or settling, which could create bouncy or uneven floors. We set a laser line on the wall for reference and use a grading rake to get the gravel close to level; we check it with a tape measure. After that we use a 2×4 as a screed, working it back and forth to set the grade perfectly flat, 6-1⁄4 in. below the stem wall.
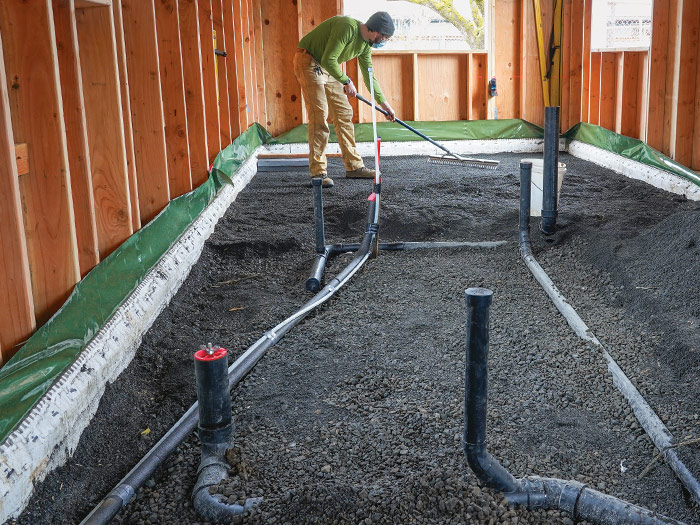
Since the grade of each ADU was high enough relative to the plumbing hookups at the main house, we were able to run the water supply and sewer connections below the footing. After framing we invited our plumber in to trench the gravel and install the radon, supply, and drain lines from their connection points under the footing to their interior stub-outs. As he dug, we were sure to keep the 3⁄4-in. stone in separate piles from the 1⁄4-in. gravel. We also made sure the plumber set the horizontal runs lower than the grade of the gravel so we wouldn’t have to carve out the foam around the pipes.
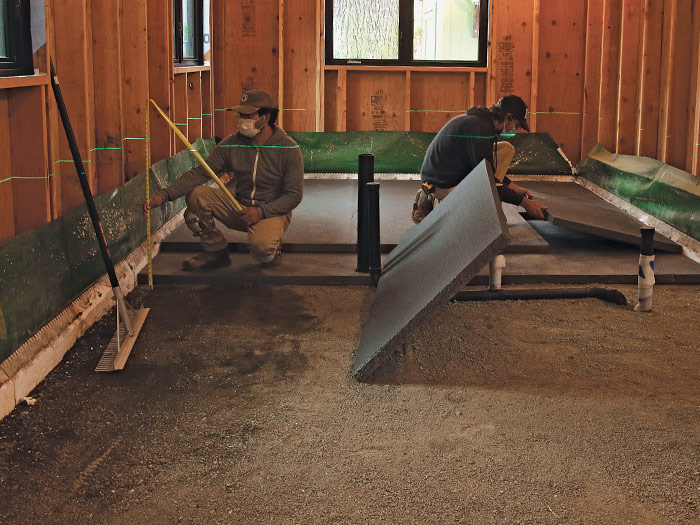
LAYER 4: Rigid foam eliminates cold feet
We run rigid insulation horizontally under the entire slab, just as we did before we switched from concrete to plywood. It’s not very costly to do in comparison to the usual approaches, and the benefits to the homeowner are significant. The first is comfort. People don’t want to feel cold underfoot, and they tend to complain if they do—something every builder wants to avoid. A full layer of insulation under the slab mitigates this problem significantly. Just as importantly, there is a big benefit in energy efficiency. For the floating plywood slab, this continuous insulation layer is essential, providing a flat, stable surface for the floating raft of T&G plywood. We use two layers of 2-in.-thick graphite polystyrene (GPS) foamboard, oriented perpendicular to one another with the seams offset to ensure minimal air gaps.
LAYER 5: 10-mil poly blocks moisture migration through the concrete-free slab
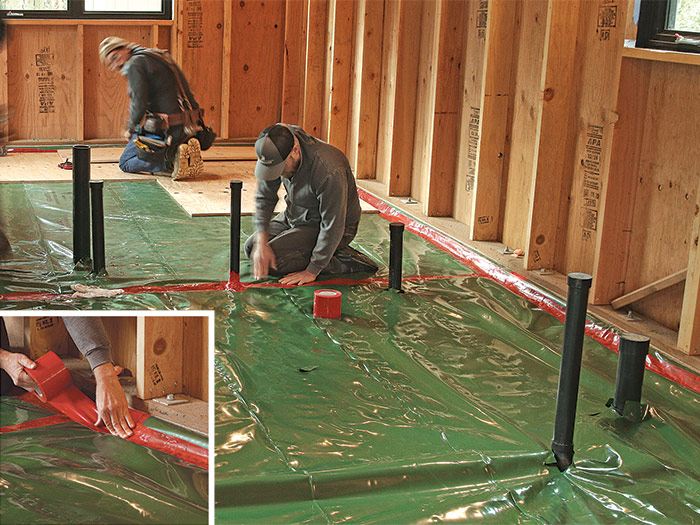
The fifth layer—above the insulation and directly below the slab itself, is a polyethylene sheet that acts as a Class 1 vapor barrier. The vapor barrier isolates the concrete-free slab from the ground and the water and vapor it contains. Regardless of climate, the relative humidity of the ground always approaches 100%. If this layer were omitted, the concrete or plywood would draw moisture into the building, inviting rot, mold, and humidity issues.
The 10-mil polyethylene sheet we use—W.R. Meadows SealTight Perminator— is a big reason we feel the concrete-free slab is a durable, long-term approach. It’s critical to use compatible tapes for sealing the seams and to ensure complete adhesion. Any penetrations, such as plumbing or radon vents, must be taped completely from pipe to poly without gaps, folds, or other sloppy work.
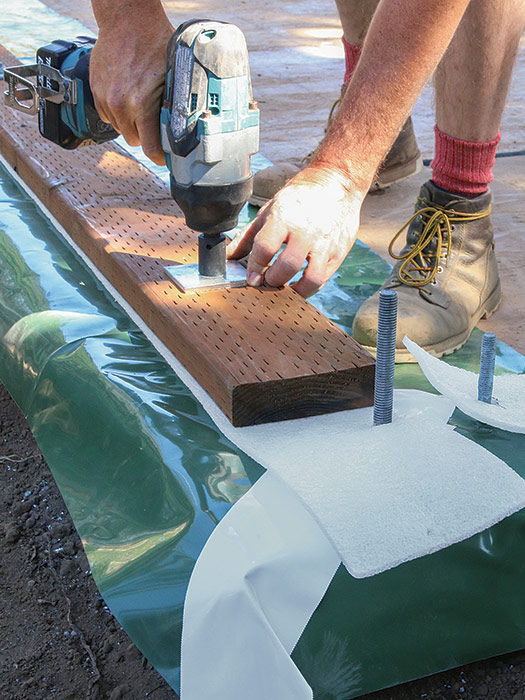
In our approach to the foundation-and-wall connection, this layer also doubles as the air barrier. Although there are other perfectly great ways to detail an air barrier from the sheathing to the stem wall, we run ours below the mudsill. This is not only effective, but it’s also efficient for our crew. The connection is as simple as draping a 20-in.-wide strip of poly over the stem walls prior to installing the mudsill. We add a strip of sill seal on top to help take out some of the inconsistencies in the stem wall and to act as a secondary capillary break.
The wide strip of vapor barrier is tacked up temporarily on the inside walls to keep it out of the way. Once the insulation layer is installed, we simply roll out the vapor barrier in the field and then tape down the flap at the perimeter to complete a continuous vapor and air seal. On the exterior, the overlap is brought up over the sheathing and tacked in place. In order to create a continuous air barrier and avoid potential water damage, it’s important to lap over and seal the vapor barrier with a self-adhered or liquid-applied membrane rather than a mechanically applied WRB. Our self-adhered water-resistive-barrier membrane gets lapped over it and sealed to create a continuous air barrier.
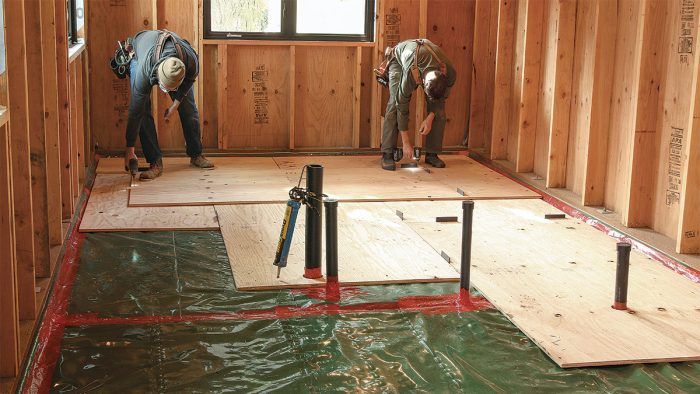
LAYER 6: Two layers of plywood is the last step to finish the concrete-free slab before interior walls go up
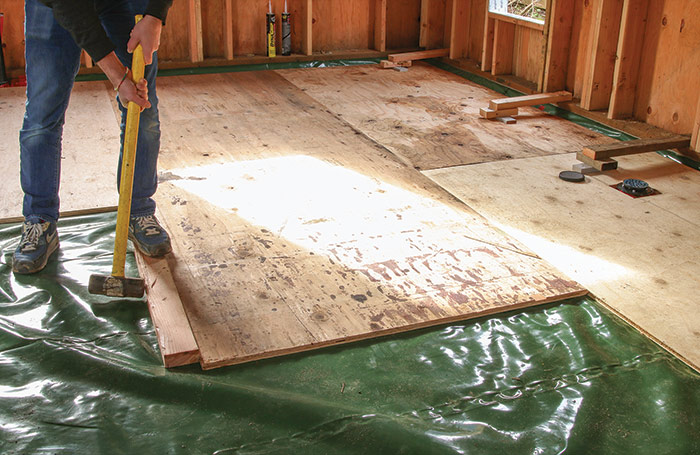
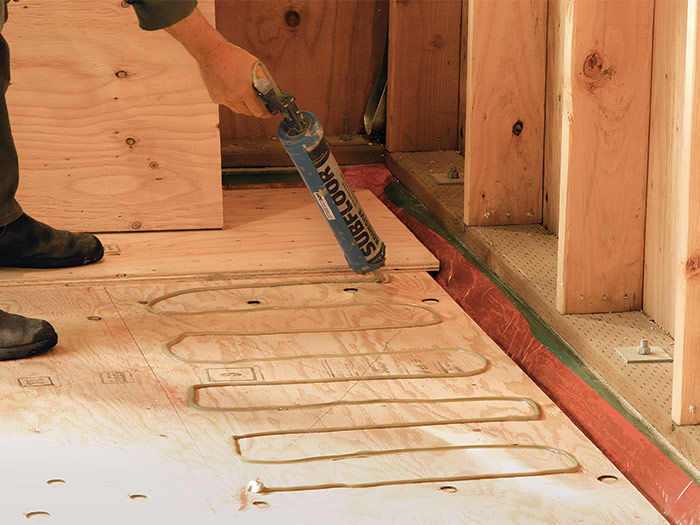
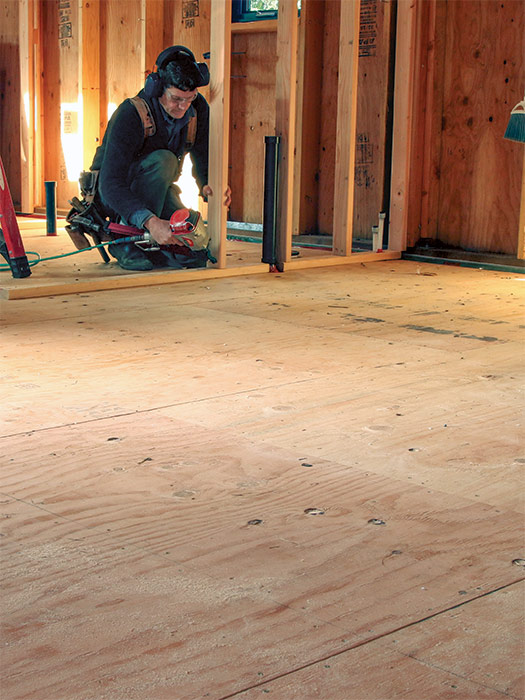
The sixth and final layer, resting on the vapor barrier, is the material that creates the concrete-free slab. This is the strong surface layer that takes the place of traditional rebar and concrete. The plywood is standard 3⁄4-in. T&G CDX subfloor material. Pressure-treated plywood is not only unnecessary but would add chemicals and VOCs to the interior environment. We install two layers, with the second set perpendicular to the first and the joints offset.
We had the opportunity to test the performance of both T&G and regular plywood in two identical buildings. We found that the T&G floor was more robust but took more effort to install. Moving forward, we will be using T&G, but you can use the approach that works best for your situation.
For the first layer, we leave a 1⁄2-in. gap between the outside edges and the stem wall to allow the T&G plywood to expand and contract. To maintain that gap as the edges are connected, we install temporary braces between the first row and the framing. The top layer can overhang the bottom layer slightly, because the edges of the ICFs were cut back earlier. The two layers are allowed to float on the layers below and are joined together with construction adhesive and 1-1⁄4-in. screws, sized so they don’t penetrate the vapor barrier below.

From Fine Homebuilding #305
To view the entire article, please click the View PDF button below.
Photos by Asa Christiana.
RELATED LINKS

View Comments
What is the technique for termites and other burrowing insects? My county inspector would more than frown on this construction technique in our area of North Georgia where termites are endemic.
It is something to be cognizant of, for sure. We don't have termite issues here in the Pacific Northwest so I am far from an expert on this particular animal. They would have to burrow down and under the stem wall and footing and then up through the gravel, foam and vapor barrier. The plywood will be dry, so I'm not sure why they would be attracted to it in the first place. If there is a termite detail at the mudsill that will protect the inside of the home just as well as any other slab style foundation. This may admittedly be tough to convince an inspector, but I'm not aware of any code issues that this would trip in regards to termites. If anyone out there has any good information or feedback on termites, it would be great to hear.
Hi Josh. I like the whole idea. A couple of quick questions:
1. I assume you did your stem wall and then infilled with your stone layers. What were the logistical issues with building your walls on top of the crushed stone?...not really a hard and flat surface. Did you temporarily lay down plywood to work and walk on?
2. Why didn't you put your poly membrane under the insulation thereby eliminating the need to worry about puncturing or tearing the poly as you were installing the sub-flooring material. Could also use longer screws on the 2nd layer that would just go into the insulation
3. Why did you use T&G plywood instead of Advantec OSB which I would think is flatter and more stable
Thanks for your comments. I am looking to do this kind of an install on an upcoming project. That's why I ask. Any other suggestions/comments would be welcome!
Jonathan Scholl
DOVETAIL Group LLC
This is a very interesting concept. Seems like getting things level would be challenging by simply raking-tamping gravel. I can see possible problems with wood destroying insects such as subterranean termites. Be interesting to see how this design holds up to water-moisture penetration.