FHB Logo Facebook LinkedIn Email Pinterest Twitter X Instagram Tiktok YouTube Plus Icon Close Icon Navigation Search Icon Navigation Search Icon Arrow Down Icon Video Guide Icon Article Guide Icon Modal Close Icon Guide Search Icon Skip to content
Subscribe
Log In
  • How-To
  • Design
  • Tools & Materials
  • Restoration
  • Videos
  • Blogs
  • Forum
  • Magazine
  • Members
  • FHB House
  • Podcast
Log In

Fine Homebuilding Project Guides

Tiling

Guide Home
  • Selecting Tile
  • Tools & Techniques
  • Installation Materials
  • Preparation
  • Tiling Floors
  • Tiling Walls & Backsplashes
  • Tiling Showers
  • Grouting, Sealing & Caulking
  • Maintenance & Repair
How-To

For Great Tile Floors, Layout Is Everything

Take time to snap a few chalklines and find where the cuts are, and tiling becomes an easier task with better results.

By David Hart Issue 214
  • X
  • facebook
  • linkedin
  • pinterest
  • email
  • add to favorites Log in or Sign up to save your favorite articles

Have you ever noticed the hallmarks of a bad tile layout? Slivers of tile at doorways or a line of tile that’s not parallel to a long wall? I certainly have. A great tile installation doesn’t start with the mortar, the wet saw, or even the grout. It starts with a proper layout. Not only will a well-planned tile floor or wall look better, but it also can save money by reducing waste.

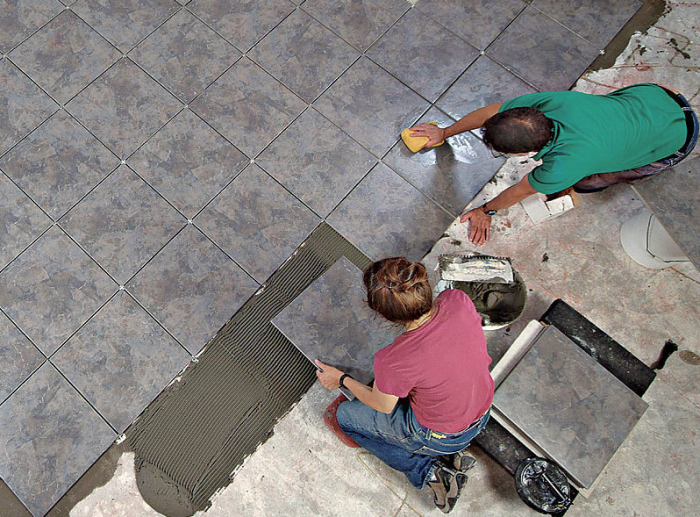
I spend up to a day laying out a tile job before I do anything else. Essentially, I create a grid on the floor that tells me where the tiles will land. By determining a layout and shifting it as necessary, I can reduce cutting and eliminate the most difficult cuts, such as those around vents, outlets, and plumbing fixtures. Of course, I’ll still have to cut around those obstacles, but with careful planning, I can make sure they don’t fall inside a single tile, which can take far longer than making a couple of straight or U-shaped cuts in adjoining tiles. The whole idea is to streamline the process for the installer, which almost always yields a better tile job.

Establish a reference

To create a layout grid, you need to know the size of the tiles. This determines the size of the grid squares. From there, you can establish horizontal and vertical reference lines, and superimpose the grid on the floor.

I start by laying a few tiles side by side along a straightedge, each separated by the width of the grout joint that I plan to use, and then measuring the length of the group plus a line of grout on one outside edge. I’m aiming for a unit of measure that’s between 24 in. and 36 in., a distance I can comfortably reach on a typical floor installation.

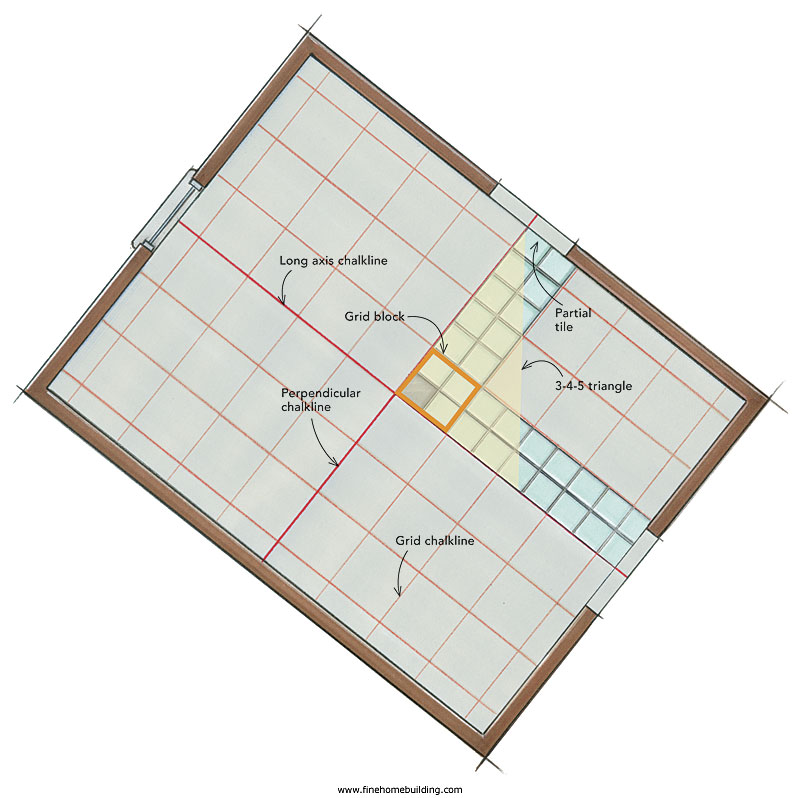
Once I determine the unit measurement, I snap a reference chalkline parallel to the longest straight wall in the room. That reference line can be any distance from any wall, including a centerline between two main walls, or the reference line can be the cumulative measurement of tiles and grout joints from a single wall.

Next, I measure from that line to various stops, such as walls, entryways, and cabinet bases, to determine the cuts I’ll have. I always plan for at least half a tile at the most obvious places—doorways and long, visible walls, for example. In some cases, it’s impossible to have large pieces everywhere, so I place narrow pieces in closets, under cabinet toe kicks, or behind toilets.

If my first reference line doesn’t give me a layout that works, I erase the line with a damp sponge, adjust the location, and snap a new one. Then I snap lines at the unit-measure increments parallel to my reference line. It’s critical to make sure the measurements are precise; a 1⁄4-in. or even 1⁄8-in. error can throw off the entire layout.

Transfer the grid to the floor

Before I snap final lines, I review where the cuts will fall and then determine the best starting point. I choose an arbitrary point on my primary reference line and then measure in unit-measure increments to determine the locations of the cut tiles so that the largest pieces are in the most visible areas.

Once I determine my reference point on the vertical lines, I make a right triangle using the simple 3-4-5 rule governing right triangles. I use the longest combination of numbers, which will give me a longer perpendicular line. This serves as my primary horizontal line. I then snap lines at unit-measure increments, creating a grid of equal blocks on the entire floor. With that grid, I can start anywhere on the floor, as long as I remember that the tiles in each square must be started in the same corner. That allows me to fill in places that I might not be able to reach if I work in a continuous path—inside small closets, under appliances, and in tight corners.

A GRID REVEALS THE LAYOUT BEFORE INSTALLATION

layout tiles for floors
Detail of orange square in the center of room grid.

measurements

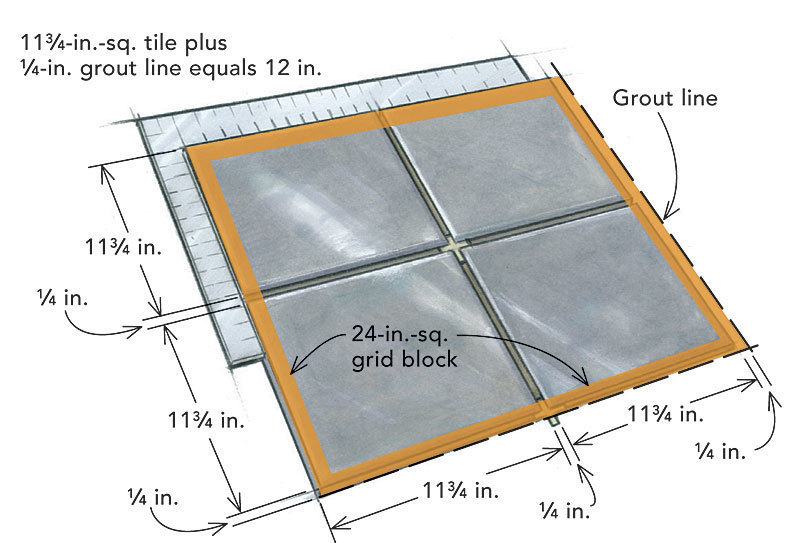
Find the unit of measure first Arrange several tiles into a square block that will form the basis of the grid. The ideal block dimensions range from 24 in. to 32 in. sq. Include space for grout lines on two adjoining sides of each tile in the measurement. In this example, four tiles create a 24-in.-sq. block.

Create reference lines on the floor Once the block size is known, measure and snap a chalkline along the axis of the room’s length. Ideally, the line should be parallel to both walls. Next, pick the widest area of the room and, using a Pythagorean principle (that of the 3-4-5 triangle), establish a perpendicular line to the first. The larger the triangle, the more accurate the perpendicular line.

Check the measurements and adjust Using the block as a unit of measurement, check the distances from the reference lines to the focal points. The ideal is to end with a half tile or more. Adjust the line (and grid layout) if the partial tile is less than half. When the layout is adjusted, snap a grid of chalklines that define each block or a multiple of blocks.

tile orientation

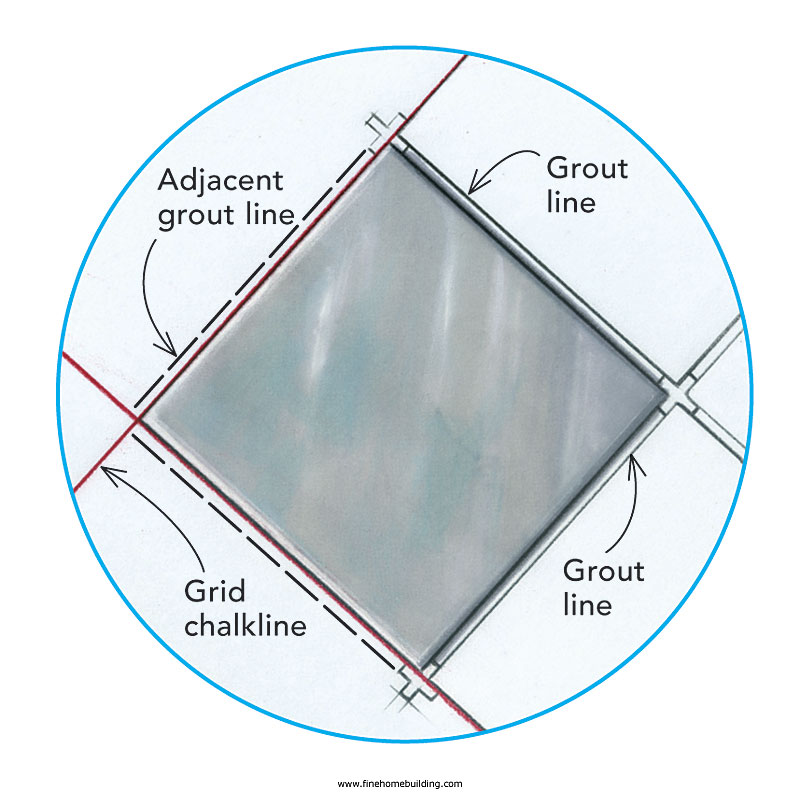
Orient tiles from the same point When tiles are installed within the grid, they all must be aligned to the same corner of each square. For instance, if the top and left sides are placed directly on the chalkline, space for a grout line will be included in the measurement at the bottom and right of the tile so that they integrate with the adjacent tile block. This way, installers can start in different parts of a room, and when they meet, their work will match. 

Diagonal grids start the same

Floors installed on a diagonal take a little more time to lay out, but the steps are basically the same. To start, I mark a centerline down the longest portion of the room and then snap a perpendicular line. Next, I measure an equal distance down one side of the horizontal line from the centerpoint and one side of the vertical line, and snap a chalkline through those marks. That gives me a diagonal reference line to determine cuts throughout the room. After I snap a series of lines, I can then go back and put down more lines to create a grid, following the same steps I use for tiles laid parallel to the room. Determining cuts on a diagonal can be much more time-consuming, and I often spend far more time working on the initial layout.

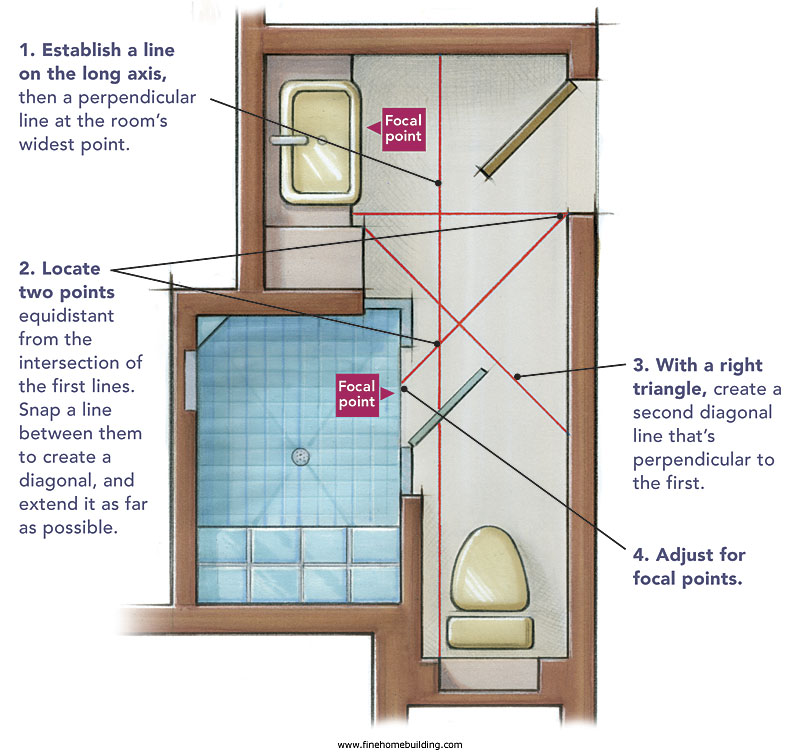
DIAGONAL LAYOUT IN A SMALL BATH

In this example, 6-in.-sq. tiles are to be installed in a diagonal 18-in. grid. The focal points are at the sink and shower door. Smaller cut pieces of tile can be hidden behind the toilet. 

small bath tile floors

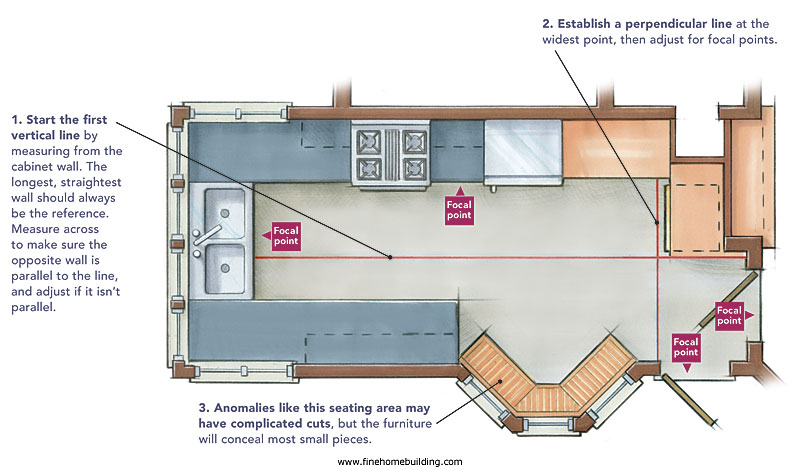
A SIMPLE GALLEY KITCHEN

In this example, 12-in. tiles in a 24-in. grid are laid over a long narrow plan. The focal points are at the sink, the cabinet kick spaces, and the doorways. The potential complicating factor here is the hexagonal eating nook. 

simple galley kitchen

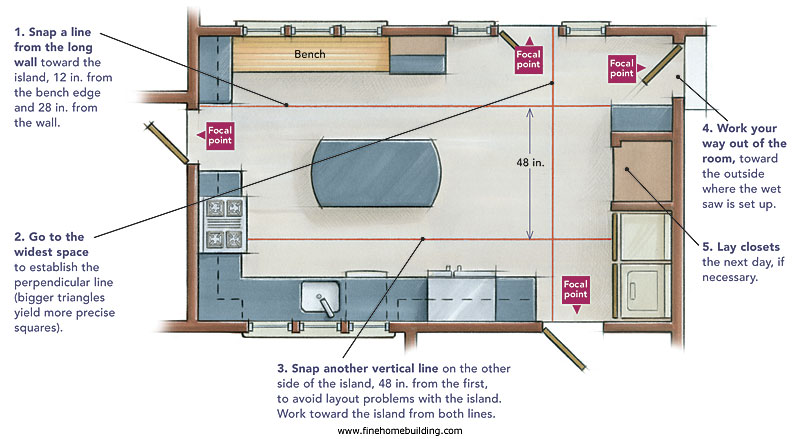
A LARGER KITCHEN WITH OBSTRUCTIONS

In kitchens, independent structures like islands can cause problems. Again, 12-in. tiles are used to form a 24-sq.-in. grid. The focal points are determined by sightlines from entrances and at the doorways themselves.

kitchen with obstruction tile floors

A word about choosing tile

Many people say larger tiles make a smaller room look larger. I don’t buy that theory, but then again, I’m just a tile installer. To me, a room doesn’t look larger or smaller based on the size of the tile. I’m not a big fan of diagonal installations, either. The lines just get too overwhelming. Maybe that’s just me, because plenty of people like a diagonal layout. The fact is, tile size, patterns, and layout are really a matter of personal taste. When dealing with a client, I do a dry run and lay a bunch of tiles on the floor both ways (straight and diagonal), then let the client decide between them.

My personal preference is for larger tiles. I think they look better, especially in larger rooms, but I’ve also done some installations with 18-in. by 18-in. tiles in smaller bathrooms and kitchens that looked great. Smaller tiles in big rooms, however, just look too busy; there are too many grout lines. Ultimately, what’s really important is for the floor to look as though it has been there forever.

David Hart is a tile contractor in Rice, Va. Drawings by Bob La Pointe. Photo: Sandor Nagyszalanczy.

From Fine Homebuilding #214

Download a PDF of this article.

View PDF
Previous: Floor Tile Layout Next: Foyer Tile Installation, Part 1: Planning and Subfloor

Guide

Tiling

Chapter

Tiling Floors

Sign up for eletters today and get the latest how-to from Fine Homebuilding, plus special offers.

Signing you up...

This site is protected by reCAPTCHA and the Google Privacy Policy and Terms of Service apply.
See all newsletters
See all newsletters

Log in or create an account to post a comment.

Sign up Log in

Become a member and get full access to FineHomebuilding.com

Tiling

Tiling

Trusted, comprehensive guidance from the pros for a great-looking tile job in any room of the house

View Project Guide

View All Project Guides »

Become a member and get unlimited site access, including the Tiling Project Guide.

Start Free Trial

Selecting Tile
  • The Basics
  • Tile Options
Tools & Techniques
  • Job-Preparation Tools
  • Cutting Tiles
  • Setting & Grouting Tools
Installation Materials
  • Membranes & Substrates
  • Adhesives & Mortars
  • Grout
  • Sealers & Caulk
  • Spacers, Hardware & Trim
Preparation
  • The Prep Job
  • Repairs & Surface Prep
  • Installing Backerboard
Tiling Floors
  • Layout & Installation
  • Setting Specialty Tiles
Tiling Walls & Backsplashes
  • Preparation
  • Backsplashes
  • Walls
Tiling Showers
  • Tile Shower Basics
  • Waterproofing
  • Shower Pans
  • Shower Drains
  • Shower Niches
  • Video Series: Tile a Shower
  • Video Series: Tile a Barrier-Free Bathroom
Grouting, Sealing & Caulking
  • Grouting
  • Caulking
  • Sealing
Maintenance & Repair
  • Maintenance
  • Tile Repair
  • Grout Repair

Fine Home Building

Newsletter Sign-up

  • Fine Homebuilding

    Home building tips, offers, and expert advice in your inbox.

  • Green Building Advisor

    Building science and energy efficiency advice, plus special offers, in your inbox.

  • Old House Journal

    Repair, renovation, and restoration tips, plus special offers, in your inbox.

Signing you up...

This site is protected by reCAPTCHA and the Google Privacy Policy and Terms of Service apply.
See all newsletters

Follow

  • Fine Homebuilding

    Dig into cutting-edge approaches and decades of proven solutions with total access to our experts and tradespeople.

    Start Free Trial Now
    • Facebook
    • Instagram
    • X
    • LinkedIn
  • GBA Prime

    Get instant access to the latest developments in green building, research, and reports from the field.

    Start Free Trial Now
    • Facebook
    • YouTube
  • Old House Journal

    Learn how to restore, repair, update, and decorate your home.

    Subscribe Now
    • Facebook
    • Instagram
    • X

Membership & Magazine

  • Online Archive
  • Start Free Trial
  • Magazine Subscription
  • Magazine Renewal
  • Gift a Subscription
  • Customer Support
  • Privacy Preferences
  • About
  • Contact
  • Advertise
  • Careers
  • Terms of Use
  • Site Map
  • Do not sell or share my information
  • Privacy Policy
  • Accessibility
  • California Privacy Rights

© 2025 Active Interest Media. All rights reserved.

Fine Homebuilding receives a commission for items purchased through links on this site, including Amazon Associates and other affiliate advertising programs.

  • Home Group
  • Antique Trader
  • Arts & Crafts Homes
  • Bank Note Reporter
  • Cabin Life
  • Cuisine at Home
  • Fine Gardening
  • Fine Woodworking
  • Green Building Advisor
  • Garden Gate
  • Horticulture
  • Keep Craft Alive
  • Log Home Living
  • Military Trader/Vehicles
  • Numismatic News
  • Numismaster
  • Old Cars Weekly
  • Old House Journal
  • Period Homes
  • Popular Woodworking
  • Script
  • ShopNotes
  • Sports Collectors Digest
  • Threads
  • Timber Home Living
  • Traditional Building
  • Woodsmith
  • World Coin News
  • Writer's Digest
Active Interest Media logo
X
X
This is a dialog window which overlays the main content of the page. The modal window is a 'site map' of the most critical areas of the site. Pressing the Escape (ESC) button will close the modal and bring you back to where you were on the page.

Main Menu

  • How-To
  • Design
  • Tools & Materials
  • Video
  • Blogs
  • Forum
  • Project Guides
  • Reader Projects
  • Magazine
  • Members
  • FHB House

Podcasts

  • FHB Podcast
  • ProTalk

Webinars

  • Upcoming and On-Demand

Podcasts

  • FHB Podcast
  • ProTalk

Webinars

  • Upcoming and On-Demand

Popular Topics

  • Kitchens
  • Business
  • Bedrooms
  • Roofs
  • Architecture and Design
  • Green Building
  • Decks
  • Framing
  • Safety
  • Remodeling
  • Bathrooms
  • Windows
  • Tilework
  • Ceilings
  • HVAC

Magazine

  • Current Issue
  • Past Issues
  • Magazine Index
  • Subscribe
  • Online Archive
  • Author Guidelines

All Access

  • Member Home
  • Start Free Trial
  • Gift Membership

Online Learning

  • Courses
  • Project Guides
  • Reader Projects
  • Podcast

More

  • FHB Ambassadors
  • FHB House
  • Customer Support

Account

  • Log In
  • Join

Newsletter

Get home building tips, offers, and expert advice in your inbox

Signing you up...

This site is protected by reCAPTCHA and the Google Privacy Policy and Terms of Service apply.
See all newsletters
See all newsletters

Follow

  • X
  • YouTube
  • instagram
  • facebook
  • pinterest
  • Tiktok

Join All Access

Become a member and get instant access to thousands of videos, how-tos, tool reviews, and design features.

Start Your Free Trial

Subscribe

FHB Magazine

Start your subscription today and save up to 70%

Subscribe

You have 1 free article remaining.

Get complete site access, including thousands of videos, how-to tips, tool reviews, and design features.

Start your FREE trial

Already a member? Log in

We hope you’ve enjoyed your free articles. To keep reading, become a member today.

Get complete site access to expert advice, how-to videos, Code Check, and more, plus the print magazine.

Start your FREE trial

Already a member? Log in

Privacy Policy Update

We use cookies, pixels, script and other tracking technologies to analyze and improve our service, to improve and personalize content, and for advertising to you. We also share information about your use of our site with third-party social media, advertising and analytics partners. You can view our Privacy Policy here and our Terms of Use here.

Cookies

Analytics

These cookies help us track site metrics to improve our sites and provide a better user experience.

Advertising/Social Media

These cookies are used to serve advertisements aligned with your interests.

Essential

These cookies are required to provide basic functions like page navigation and access to secure areas of the website.

Delete My Data

Delete all cookies and associated data