FHB Logo Facebook LinkedIn Email Pinterest Twitter Instagram Plus Icon Close Icon Navigation Search Icon Navigation Search Icon Arrow Down Icon Video Guide Icon Article Guide Icon Modal Close Icon Guide Search Icon Skip to content
Subscribe

In every issue you'll find...

  • Expert insights on techniques and principles
  • Unbiased tool reviews
  • Step-by-step details to master the job
  • Field-tested advice and know-how
Subscribe Now!
Subscribe
  • How-To
  • Design
  • Tools & Materials
  • Videos
  • Blogs
  • Forum
  • Magazine
  • Members
  • FHB House
  • Podcast
  • Join
  • Log In
Subscribe

Fine Homebuilding Project Guides

Plumbing

Guide Home
Chapter
  • Plumbing Basics
  • Bathrooms
  • Kitchens
  • Roughing In
  • Water Heaters, Washers, and More
  • Maintenance and Repair

A Vessel-Sink Conversion

Convert a suitable piece of furniture into a vanity for a vessel sink and then install and hook up the sink.

By Rex Cauldwell

A popular trend in interior design is cabinetry that looks like furniture. You can cash in on this trend—and save yourself some cash—by picking an attractive piece of furniture and converting it into a vanity for a vessel sink.

Vessel-Sink Lockdown Specs

Vessel-Sink Lockdown Specs


Typical Vanity Rough-In

Typical Vanity Rough-In
Typically, the vanity drain is dead center (left to right), but it needs to be offset to the side by several inches if an AAV is to be used or if the drain will be in the way of a drawer.

Installing the vanity

Although the shortest vanity will be around 19 in. long, the longest can go on as long as your pocketbook, but installation is the same. First rough in the plumbing if it’s not already in place, using either the typical plan shown (at left) or a custom plan from the manufacturer. Then install the faucets and water lines on the sink and glue the sink to the frame. Last, screw the back into the wall and hook up the plumbing.

Sizing the sink recess. Open a hole large enough for the drain assembly. Some sinks will require additional holes for studs.

Some sinks will require additional holes for studs

photo courtesy of Kohler


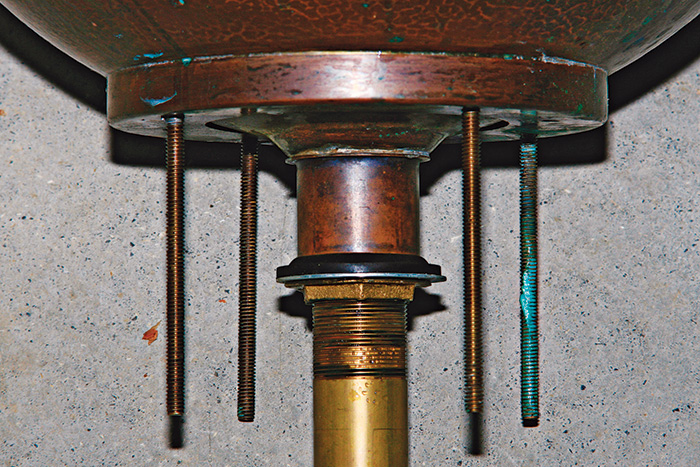
Others will need a large area cut out for the bottom of the sink. Oval glass vessels will need metal bases to give them flat supporting surfaces. Make sure to install a high-tower faucet. They are several inches taller than standard faucets.

Installing the sink

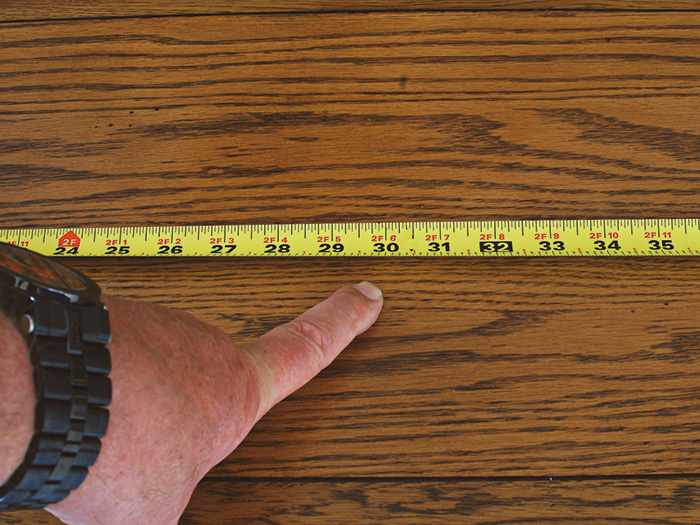
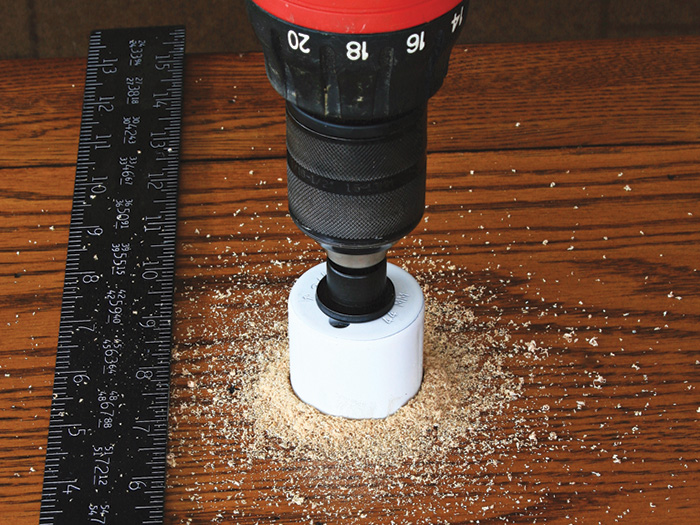
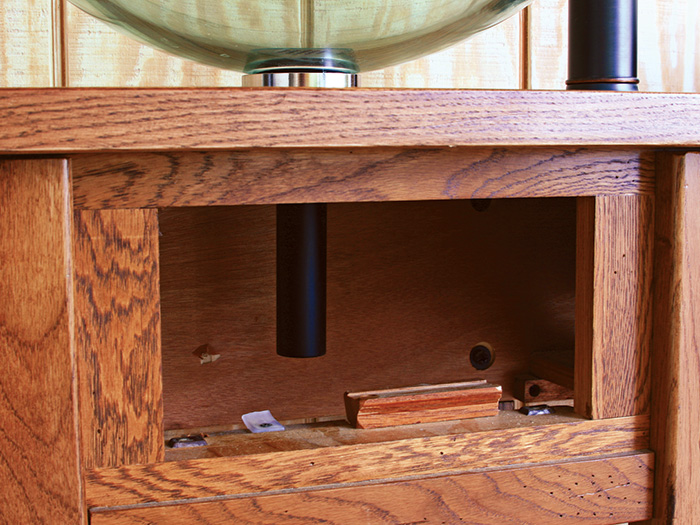
First, find a piece of furniture that matches the decor of the room. Mark the location of the bowl, typically dead center on the top of the piece. Make sure, however, that the bowl does not extend beyond the back of the furniture where it will bump into the wall 1. Using a hole saw, drill a hole large enough to accommodate the tail piece and drain assembly 2. (For large bottom concave sinks, cut the hole with a jigsaw.) Then with a homemade or manufacturer’s template, drill holes for studs if your sink requires them. Attach the tail piece to the sink 3. Then set the tail piece into the hole and note any parts of the vanity that will block the drain or water lines 4. Drill through or remove anything that’s in the way, but don’t weaken the structure unless you can reinforce it later. If you make a drawer inoperable in this process, you can remove the drawer front and glue it back on the cabinet. Guided by the manufacturer’s specs, mark the location for the faucet and drill its hole with a hole saw, typically just big enough for the supply tubes and the attachment rod. Insert the faucet and tighten it down 5. Slide your new vanity into position, attach the P-trap and water lines, turn the water on and check for leaks.

Mark the location for the center of the vessel
1. Mark the location for the center of the vessel.


drill a hole to accommodate drain
2. Measure the drain nut and drill a hole to accommodate it and any studs.


Fasten the tail piece to the sink
3. Fasten the tail piece to the sink, including the metal base for an oval glass vessel.


Remove any structural parts that are in the way
4. Remove any structural parts that are in the way of the drain tail piece. Install the sink and drill the hole for the high tower faucet.


Install the high-tower faucet
5. Install the high-tower faucet, slide the vanity into position, admire, then attach the water and drain lines.

Taunton's Plumbing Complete bookExcerpted from Taunton’s Plumbing Complete by Rex Cauldwell.

Available at Amazon.com.

Also available for download.

Sign up for eletters today and get the latest how-to from Fine Homebuilding, plus special offers.

Sign Up
Previous: How to Remove an Old Bathroom Sink Next: Replacing a Bathtub

Guide

Plumbing

Chapter

Bathrooms

Log in or create an account to post a comment.

Sign up Log in

Become a member and get full access to FineHomebuilding.com

Plumbing

Plumbing

Trusted, comprehensive guidance from the pros for tackling any plumbing project

View Project Guide

View All Project Guides »

Become a member and get unlimited site access, including the Plumbing Project Guide.

Start Free Trial

Plumbing Basics
  • Plumbing Systems
  • Materials
  • Plumbing Tools
Bathrooms
  • Sinks
  • Showers & Tubs
  • Toilets
Kitchens
  • Kitchen Sinks
  • Water Filtration
  • Appliances
Roughing In
  • Layout
  • Installation
  • Copper Pipe
  • PEX Tubing
  • PVC Drainpipe
Water Heaters, Washers, and More
  • Water Heaters
  • Whole-House Filters
  • Sump Pumps
  • Washers
  • Sprinkler Systems
Maintenance and Repair
  • Sinks
  • Toilets
  • Showers & Tubs
  • Systems

Fine Homebuilding

Follow

  • twitter
  • facebook
  • instagram
  • pinterest

Newsletter

Get home building tips, offers, and expert advice in your inbox

Sign Up
This site is protected by reCAPTCHA and the Google Privacy Policy and Terms of Service apply.
See all newsletters

Membership & Magazine

  • Online Archive
  • Start Free Trial
  • Magazine Subscription
  • Magazine Renewal
  • Gift a Subscription
  • Customer Support
  • Privacy Preferences

Taunton Network

  • Green Building Advisor
  • Fine Woodworking
  • Fine Gardening
  • Threads
  • About
  • Contact
  • Advertise
  • Careers
  • Copyright
  • Terms of Use
  • Site Map
  • Do not sell my information
  • Privacy Policy
  • Accessibility
  • California Privacy Rights

© 2022 The Taunton Press, Inc. All rights reserved.

X
X
This is a dialog window which overlays the main content of the page. The modal window is a 'site map' of the most critical areas of the site. Pressing the Escape (ESC) button will close the modal and bring you back to where you were on the page.

Main Menu

  • How-To
  • Design
  • Tools & Materials
  • Video
  • Blogs
  • Forum
  • Reader Projects
  • Magazine
  • Members
  • FHB House

Podcasts

  • FHB Podcast
  • ProTalk

Webinars

  • Upcoming and On-Demand

Account

  • Log In
  • Join

Podcasts

  • FHB Podcast
  • ProTalk

Webinars

  • Upcoming and On-Demand

Popular Topics

  • Kitchens
  • Business
  • Bedrooms
  • Roofs
  • Architecture and Design
  • Green Building
  • Decks
  • Framing
  • Safety
  • Remodeling
  • Bathrooms
  • Windows
  • Tilework
  • Ceilings
  • HVAC

Magazine

  • Current Issue
  • Past Issues
  • Magazine Index
  • Subscribe
  • Online Archive
  • Author Guidelines

All Access

  • Member Home
  • Start Free Trial
  • Gift Membership

Shop the Store

  • Books
  • DVDs
  • Taunton Workshops

More

  • FHB Ambassadors
  • Reader Projects
  • Podcast
  • Customer Support

Account

  • Log In
  • Join

Newsletter

Get home building tips, offers, and expert advice in your inbox

Sign Up See all newsletters

Follow

  • twitter
  • facebook
  • instagram
  • pinterest

Join All Access

Become a member and get instant access to thousands of videos, how-tos, tool reviews, and design features.

Start Your Free Trial

Subscribe

FHB Magazine

Start your subscription today and save up to set_percent%

Subscribe

We hope you’ve enjoyed your free articles. To keep reading, become a member today.

Get complete site access to expert advice, how-to videos, Code Check, and more, plus the print magazine.

Start your FREE trial

Already a member? Log in