Pipe Placement 101
Ensure your plumbing connections are in the right spots with this guide to kitchen and bath rough-in.

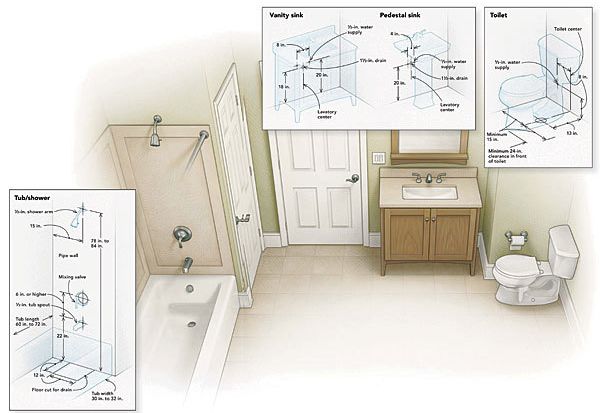
Synopsis: Plumber Brad Casebier provides this guide to kitchen and bath rough-in, which works with about 80% of the entry-level to mid-level fixtures he and his crew install. For the bathroom, diagrams show rough-in locations for a tub/shower, a vanity sink, a pedestal sink, and a toilet. For the kitchen, rough-in locations are shown for a sink, and a second drawing shows how to place an ice maker. For each room, Casebier provides a list of “gotchas,” or situations you can avoid with a proper rough-in. He also includes guidance and “gotchas” for roughing in a laundry room. A chart shows specific Uniform Plumbing Code and International Residential Code requirements for securing seven different types of pipe and tubing in both horizontal and vertical spaces. A second chart shows the UPC and IRC requirements for minimum trap size for 14 different fixtures.
As a plumbing contractor, I am responsible for making sure that the water-supply lines and drainpipes are where they are supposed to be when my crew and I show up to set the fixtures. The best way to ensure a correct rough-in is to follow the instructions for each individual fixture specified in the “cut sheets,” or product diagrams. These measured drawings, which show locations for supply and waste lines, are available at manufacturers’ websites and from suppliers that sell the product line.
If you’re working on a relatively basic kitchen or bath, you can use the typical dimensions shown here, which work with 80% or more of the entry-level to mid-level fixtures we install. There are exceptions to these rules, however, especially with high-end products. I always encourage clients to make selections early; I also remind them that any changes later will result in extra charges and that the extras don’t stop with me. A big redo can involve several trades—including carpenters, drywallers, and tile setters—and can cost hundreds, even thousands, of dollars. It also can mean a delay in the project, which can affect financing and occupancy.
Here are some of the kitchen, bath, and laundry-room plumbing problems we see regularly. Described as gotchas, these items often fall through the cracks and lead to problems down the road.
Bathroom rough-in
The safest bet is to select bath fixtures before any plumbing work starts. If you must get the rough-in underway, these dimensions work for most entry- and mid-level fixtures.
Common bathroom gotchas
Even though a bathroom is usually the smallest room in a house, a lot can go wrong when you’re building it. Use this list to avoid some of the most common bathroom-plumbing missteps.
Too-tight toilet. While code requires only a 30-in. space for a toilet, 15 in. from a cabinet or adjacent wall can make you feel claustrophobic. Try for at least a 34-in. opening, and make sure there’s space for the paper holder. Roughing in 13 in. instead of 12 in. from the back wall leaves room for the trim and the drywall.
A rockin’ throne. Wobbly toilets ruin wax seals in short order. Add extra blocking around the waste riser, and make sure the toilet is shimmed and caulked at trim-out.
No room for the escutcheon. It’s best to know the type of base trim that will be installed. A tall baseboard can interfere with the trim ring around the toilet stub-out. The same thing can happen when supply lines are too close to cabinet backs and sides.
Sacrificed structural members. Plumbed with a 3-in. waste line, toilets are generally placed 12 in. from the wall, but 10-in. and 14-in. rough-in models are available for working around beams and other obstructions.
Too-low tub spout. Tub fillers, including the curving end, must be at least 1 in. above the tub’s flood level; this fix is expensive when the tile is involved.
Closet flange foul-up. Flooring choices can change during construction, so you should mount the toilet flange after the finished floor is down. The author’s favorite flange is the TKO from Sioux Chief. Use stainless screws to mount it, and you’ll have a lifetime flange.
Kitchen rough-in
Most folks focus on cabinets, countertops, and appliances when planning a kitchen, but the plumbing is equally important. Get the pipes in the wrong spot, and you’ll be tearing into finished work.
Common kitchen gotchas
Used for everything from meal prep to family arbitration, the kitchen is often the center of a family’s life. Avoid these problems, and your kitchen will be the site of domestic bliss.
Changed cabinet layout. Plumbing rough-in is often based on the floor plan, but cabinet layout is often changed by cabinetmakers or kitchen designers brought in later. Make sure your layout is based on the most up-to-date information possible.
No room for garbage disposal. Rough-in kitchen drains so that the trap is about 8 in. off-center (opposite from where the disposal will hang); this will ensure plenty of room for connections.
Keep supply lines about 20 in. above the floor for the same reason.
Noisy gas lines. Make sure any corrugated stainless-steel tubing (CSST) used for a gas oven and cooktop is sized adequately; otherwise, the pipe can make an annoying whistling sound every time the appliance is used.
Forgetting the fridge. Add a water-supply box with a valve behind the fridge for the ice maker and water dispenser. Some high-end refrigerators have specific locations, but flipping the box upside down and setting it on top of the bottom plate generally works fine.
Poorly placed pot filler. It’s customary to set pot fillers 54 in. high and on the left third of the cooktop, but it’s a good idea to ask the family chefs if they have a specific pot they plan to use with the filler.
Air-starved islands. It can be tricky to vent sinks in kitchen islands. If you’re considering an island sink, check the local plumbing code.
Laundry rough-in
A burst washing machine hose can cause thousands of dollars in damage. Keep shutoffs accessible, and close them whenever the equipment is inactive. Also, include an overflow pan (with a drain) when the laundry area is in finished living space.
Common laundry-room gotchas
Laundry areas have become much more than spaces for washers and dryers, but this added complexity has created a host of potential problems.
Inaccessible shutoffs. Washing machine outlet boxes are typically set at 42 in., but this can be a problem when you want a counter-top over a front loader. You might have to set the box in a remote location to keep it accessible.
The nonutility sink. We like to rough-in utility-sink drains between 10 in. and 12 in., because the depth of the basin is often unknown and because a lower drain gives you greater flexibility.
Noisy gas lines. As in kitchens, make sure any corrugated stainless-steel tubing (CSST) used for a gas dryer is sized adequately. If it isn’t, it might produce a whistling noise when the appliance is used.
No plan for filtration. Installing a water softener or filter is expensive if there is no water-softener loop or drain installed. It’s cheap enough to stub out a 2-in. drain, 24 in. above the floor. Form a loop outside the drywall with the supply and return lines, and include a ball valve for easier connections later.
The forgotten vent. Remember that dryers need a vent, and the closer the vent is to an exterior wall, the better. Vents under ground-level decks are bad practice, as are uninsulated vents running through unconditioned spaces in cold and mixed climates.
Which pipe and strapping are right?
When it comes to drain, waste, and vent applications (DWV), both PVC and ABS have great long-term performance, although we see more PVC in Texas because it seems to handle summertime heat without softening better than ABS. We still use cast iron for some second-floor plumbing and on the drops from the second to the first floor because cast iron is better at muffling drain sounds.
Supply piping continues to be a rodeo. I have had great success with Rehau PEX and Viega PEX, but copper still is used in quite a few of our projects.
When it comes to gas pipe, old-school schedule-40 steel is still my favorite choice. Corrugated stainless-steel tubing (CSST) has its place, but we rarely use it.
It may not be the sexiest product, but “strap iron” is the staple of all residential plumbers for securing DWV and gas systems. There are many fancy products that we use as well, but the main thing is to be sure that pipes are secured every 4 ft. horizontally. This rule of thumb covers most products. See the table below for specific UPC and IRC requirements.
To view the entire article, please click the View PDF button below.
Fine Homebuilding Recommended Products
Fine Homebuilding receives a commission for items purchased through links on this site, including Amazon Associates and other affiliate advertising programs.

Musings of an Energy Nerd: Toward an Energy-Efficient Home

A House Needs to Breathe...Or Does It?: An Introduction to Building Science

Homebody: A Guide to Creating Spaces You Never Want to Leave


