FHB Logo Facebook LinkedIn Email Pinterest Twitter Instagram Plus Icon Close Icon Navigation Search Icon Navigation Search Icon Arrow Down Icon Video Guide Icon Article Guide Icon Modal Close Icon Guide Search Icon Skip to content
Subscribe

In every issue you'll find...

  • Expert insights on techniques and principles
  • Unbiased tool reviews
  • Step-by-step details to master the job
  • Field-tested advice and know-how
Subscribe Now!
Subscribe
  • How-To
  • Design
  • Tools & Materials
  • Videos
  • Blogs
  • Forum
  • Magazine
  • Members
  • FHB House
  • Podcast
  • Join
  • Log In
Subscribe

Fine Homebuilding Project Guides

Plumbing

Guide Home
Chapter
  • Plumbing Basics
  • Bathrooms
  • Kitchens
  • Roughing In
  • Water Heaters, Washers, and More
  • Maintenance and Repair
Ask the Experts

Tying Into an Existing Drain Line

Rubber couplings are a popular code-approved option, but plumber Tom Cardillo prefers the added stiffness and durability of a permanent connection whenever possible.

By Tom Cardillo Issue 274 - April/May 2018

I’m roughing in the drain-waste-vent (DWV) plumbing for a new second-floor bathroom in my house. I used solvent-weld fittings for the DWV lines in the bathroom floor, and was planning to do the same when tying into the 4-in.-diameter PVC waste line that runs along (and out) my basement wall. But because the drain line is locked into place, I realized I can’t just cut out a section, slide in a glued fitting, and pull the two halves together again. Is a rubber fitting the best bet to solve this problem?

—Jay, via email

Plumber Tom Cardillo: Tying into an existing drain line that has no wiggle room can be tricky. Solvent-weld fittings are meant to slide over the outside of a pipe, which you can’t do if the pipe is fixed in place. In these cases, I rely on solvent-weld slip couplings. Rubber couplings are a popular code-approved option, but I prefer the added stiffness and durability of a permanent connection whenever I can get it, and consider the rubber options to be a last resort. But whether using plastic or rubber couplings, the first part of the sequence is the same.

Before cutting into the existing pipe, it’s best to take precautions to ensure that absolutely no water is in the pipe. It only takes a small amount of water to spoil a joint that’s being glued. I always like to shut the water main for the whole house to be sure.

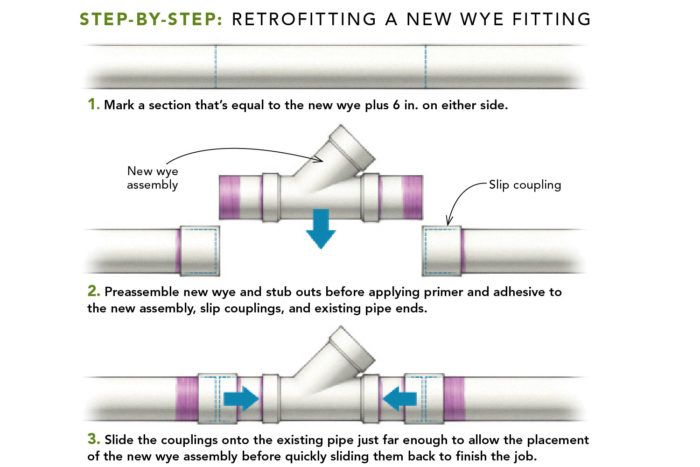
Mark and cut a section out of the existing drain line that’s 12 in. longer than the wye fitting you want to install. Either a reciprocating saw with a fine-tooth blade or handsaw made for cutting PVC will work. I prefer the handsaw because there’s less shaking and vibration, and accuracy is far better when you can watch each saw stroke.

After cutting, let any residual water drip out. While you’re waiting, cut two pieces of new PVC pipe to approximately 7-1/2 in. each, which will leave enough pipe to slide into the socket of both the wye and the coupling. Dry-fit the new wye assembly and test-fit it in the open section that you cut out of the drain line. (Note: when tapping into a horizontal drain, always use a wye fitting, never a tee wye). You want 1⁄4-in. gaps on either side—just enough to insert the piece and slide the fittings into place. If the gap is too wide, just cut a longer piece for one side of the wye and recheck.

When you’ve confirmed it will fit properly, prime one end of each pipe piece and both mating sockets of the wye fitting before immediately applying cement to the same areas. Push the pieces into each side of the wye and give them a quarter-turn twist.
Here’s where it gets tricky—you need to prep and manage multiple glued connections in a matter of seconds. You must prime the couplings, the pipe ends of the existing drain, and the pipe ends of the new wye assembly you just made. Then apply a generous amount of glue to the same areas. As fast as possible, slip a coupling on each end of existing drain pipe, pushing each coupling up far enough to allow the new wye assembly to fit into place. Once in position, slide the couplings back down onto the wye assembly so the center of each coupling is over the 1/4-in. gap you left, again adding a quarter-turn twist. The new drain line can be tied into the remaining opening in the wye, and you should be in business.

Sign up for eletters today and get the latest how-to from Fine Homebuilding, plus special offers.

Signing you up...

This site is protected by reCAPTCHA and the Google Privacy Policy and Terms of Service apply.
See all newsletters
See all newsletters
Previous: Fixing Leaky Copper Next: Tankless Water-Heater Maintenance

Guide

Plumbing

Chapter

Maintenance and Repair

View Comments

  1. User avater
    kurt99 | Feb 18, 2022 09:38pm | #1

    I know that I am not a professional plumber, but I have done enough with pvc pipe I know that I would not attempt an all glued solution with out three people, each with their own primer and glue. One to prime, glue and handle each coupling and one to position the wye assembly. If I attempted it by myself, I know the results would be;
    Step 1) as directed above;
    Step 2) cut out new couplings that seized before they were placed in the correct positions and the incorrectly aligned wye assembly;
    Step 3) make a new, longer wye assembly to fit the larger gap in the original pipe and assemble with rubber couplings that will allow me as long as necessary to properly align everything.

  2. bobbomax | Mar 01, 2022 08:17pm | #2

    I think I'd put the slip couplings on the existing line, pull them several inches back from the joints and mark the existing pipe for the final position of outboard ends of the couplings. Then I'd slide one coupling over the existing line and the new wye assembly (dry fit), in order to support the wye assembly. Then I'd apply glue to the area occupied by the coupling on each side of the other joint, both the running line and the wye assembly and then quickly move the slip coupling over the joint, using the marking for positioning. Then I'd do the same with the other joint. Cardillo's text indicates he's comfortable with sliding the slip couplings into place before the glue sets.

Log in or create an account to post a comment.

Sign up Log in

Become a member and get full access to FineHomebuilding.com

Plumbing

Plumbing

Trusted, comprehensive guidance from the pros for tackling any plumbing project

View Project Guide

View All Project Guides »

Become a member and get unlimited site access, including the Plumbing Project Guide.

Start Free Trial

Plumbing Basics
  • Plumbing Systems
  • Materials
  • Plumbing Tools
Bathrooms
  • Sinks
  • Showers & Tubs
  • Toilets
Kitchens
  • Kitchen Sinks
  • Water Filtration
  • Appliances
Roughing In
  • Layout
  • Installation
  • Copper Pipe
  • PEX Tubing
  • PVC Drainpipe
Water Heaters, Washers, and More
  • Water Heaters
  • Whole-House Filters
  • Sump Pumps
  • Washers
  • Sprinkler Systems
Maintenance and Repair
  • Sinks
  • Toilets
  • Showers & Tubs
  • Systems

Fine Homebuilding

Follow

  • twitter
  • facebook
  • instagram
  • pinterest

Newsletter

Get home building tips, offers, and expert advice in your inbox

Signing you up...

This site is protected by reCAPTCHA and the Google Privacy Policy and Terms of Service apply.
See all newsletters
See all newsletters

Membership & Magazine

  • Online Archive
  • Start Free Trial
  • Magazine Subscription
  • Magazine Renewal
  • Gift a Subscription
  • Customer Support
  • Privacy Preferences

Taunton Network

  • Green Building Advisor
  • Fine Woodworking
  • Fine Gardening
  • Threads
  • About
  • Contact
  • Advertise
  • Careers
  • Copyright
  • Terms of Use
  • Site Map
  • Do not sell or share my information
  • Privacy Policy
  • Accessibility
  • California Privacy Rights

© 2023 The Taunton Press, Inc. All rights reserved.

X
X
This is a dialog window which overlays the main content of the page. The modal window is a 'site map' of the most critical areas of the site. Pressing the Escape (ESC) button will close the modal and bring you back to where you were on the page.

Main Menu

  • How-To
  • Design
  • Tools & Materials
  • Video
  • Blogs
  • Forum
  • Reader Projects
  • Magazine
  • Members
  • FHB House

Podcasts

  • FHB Podcast
  • ProTalk

Webinars

  • Upcoming and On-Demand

Account

  • Log In
  • Join

Podcasts

  • FHB Podcast
  • ProTalk

Webinars

  • Upcoming and On-Demand

Popular Topics

  • Kitchens
  • Business
  • Bedrooms
  • Roofs
  • Architecture and Design
  • Green Building
  • Decks
  • Framing
  • Safety
  • Remodeling
  • Bathrooms
  • Windows
  • Tilework
  • Ceilings
  • HVAC

Magazine

  • Current Issue
  • Past Issues
  • Magazine Index
  • Subscribe
  • Online Archive
  • Author Guidelines

All Access

  • Member Home
  • Start Free Trial
  • Gift Membership

Shop the Store

  • Books
  • DVDs
  • Taunton Workshops

More

  • FHB Ambassadors
  • Reader Projects
  • Podcast
  • Customer Support

Account

  • Log In
  • Join

Newsletter

Get home building tips, offers, and expert advice in your inbox

Signing you up...

This site is protected by reCAPTCHA and the Google Privacy Policy and Terms of Service apply.
See all newsletters
See all newsletters

Follow

  • twitter
  • facebook
  • instagram
  • pinterest

Join All Access

Become a member and get instant access to thousands of videos, how-tos, tool reviews, and design features.

Start Your Free Trial

Subscribe

FHB Magazine

Start your subscription today and save up to 70%

Subscribe

We hope you’ve enjoyed your free articles. To keep reading, become a member today.

Get complete site access to expert advice, how-to videos, Code Check, and more, plus the print magazine.

Start your FREE trial

Already a member? Log in