FHB Logo Facebook LinkedIn Email Pinterest Twitter Instagram Plus Icon Close Icon Navigation Search Icon Navigation Search Icon Arrow Down Icon Video Guide Icon Article Guide Icon Modal Close Icon Guide Search Icon Skip to content
Subscribe

In every issue you'll find...

  • Expert insights on techniques and principles
  • Unbiased tool reviews
  • Step-by-step details to master the job
  • Field-tested advice and know-how
Subscribe Now!
Subscribe
  • How-To
  • Design
  • Tools & Materials
  • Videos
  • Blogs
  • Forum
  • Magazine
  • Members
  • FHB House
  • Podcast
  • Join
  • Log In
Subscribe

Fine Homebuilding Project Guides

Plumbing

Guide Home
Chapter
  • Plumbing Basics
  • Bathrooms
  • Kitchens
  • Roughing In
  • Water Heaters, Washers, and More
  • Maintenance and Repair
How-To

Repairing Single-Handle Faucets

Plumber Steve Cory explains how to repair cartridge, ball, and disk faucets.

By Steve Cory

Single-handle faucets are often divided into three types: cartridge, ball, and disk (also called ceramic disk). The distinction between the three types has become blurred over the years, and in newer models the major replacement part for all three types may be called a “cartridge.”

MAIN TYPES
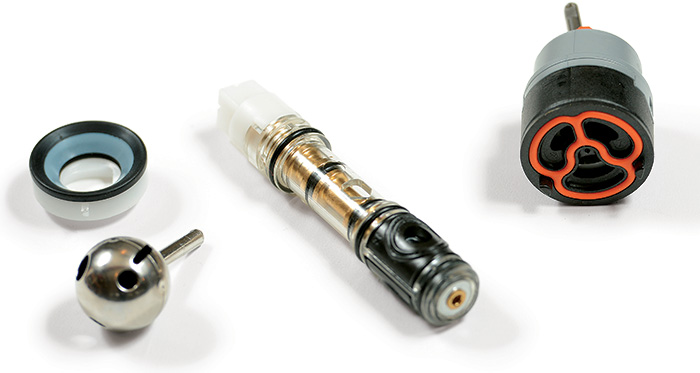
MAIN TYPES. From left to right, a ball with its cap, a cartridge, and a (ceramic) disk. All three types have small rubber and other parts that can be replaced, but it is common to simply replace the entire innards with a sealed part that may be called a cartridge.

To make repairs, shut off the water and follow the instructions on the next page for disassembling. Once you pull out the insides, you can determine which type of faucet you have, and you can look for exact replacement parts. If parts are difficult to find, consider installing a new faucet.


SIDE MOUNT
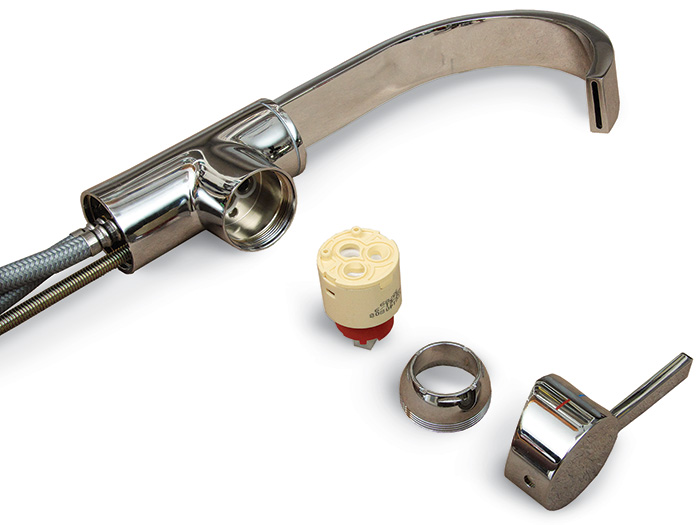
SIDE MOUNT. Valves mounted on the side, like this one, are growing in popularity. Many models use disc valves, like this one. For repair purposes, the valves are the same; only the orientation changes.


Disassembling a single-handle faucet

To get at a single-handle faucet valve, you usually need to remove the handle, then a retainer ring or clip of some sort.

Before you begin disassembly, shut off the water by turning off the stop valves under the sink. Open the hot and cold valves to ensure that the water is shut off.


REMOVE THE HANDLE
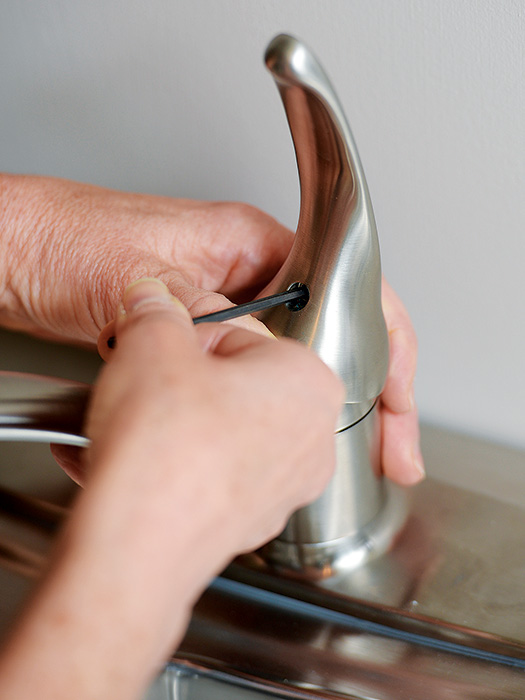
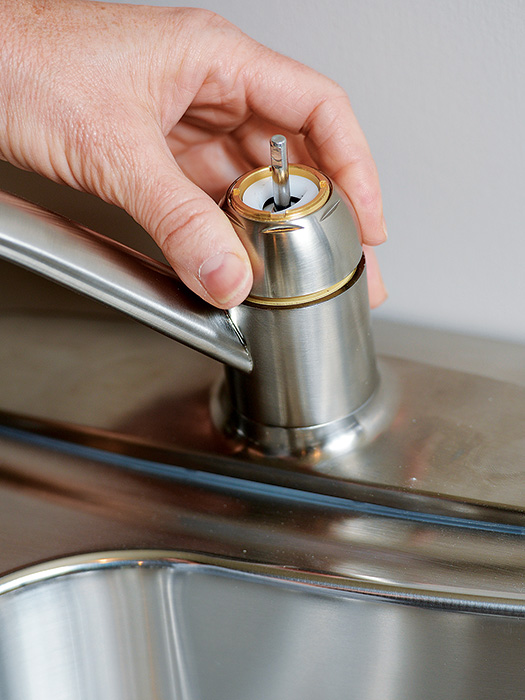
1. REMOVE THE HANDLE. If there is a plastic decorative cap, pry it off with a small flat screwdriver or a putty knife, then remove the screw that holds it down. On the type of handle shown here, raise the handle and use a small Allen (hex) wrench to back off the setscrew (do not remove it) far enough so you can pull the handle off.

REMOVE THE RETAINER
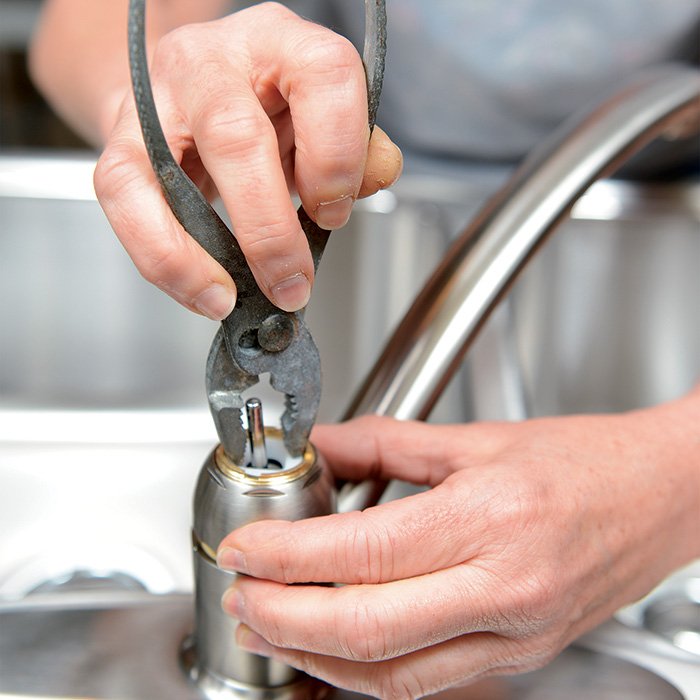
2. REMOVE THE RETAINER. Unscrew the retainer ring (also called a collar). If you cannot unscrew it by hand, wrap it with a cloth to protect it from scratches and use a pair of slip-joint pliers.
Repairing Single-Handle Faucets
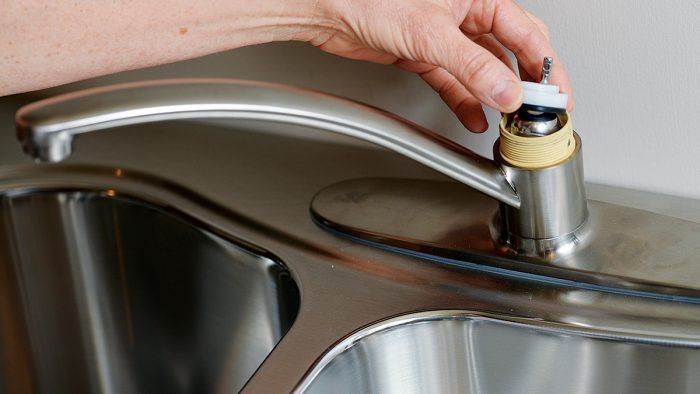
3. REMOVE THE VALVE. Now you can easily get at the disk, cartridge, or ball. In this example, there is a plastic cap with a rubber gasket fitted to it on top of a ball valve. In the case of a cartridge faucet, there may be a retaining clip that you must remove first.


Ball Faucets

If you have a ball faucet, a repair kit for your model will include springs and rubber seats, and perhaps a new ball as well.


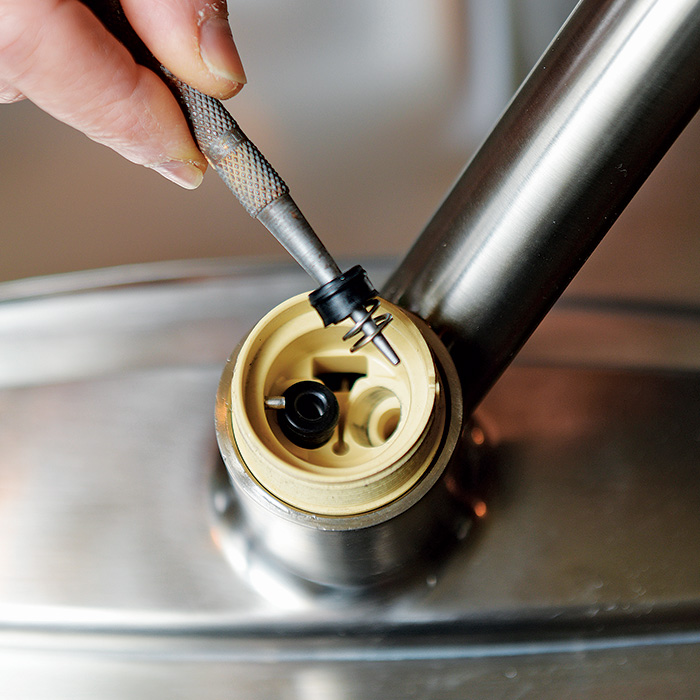
TIP: Pull the ball out gently and slowly, to ensure that the springs don’t fly out.

​

REMOVE THE SEATS AND SPRINGS
1. REMOVE THE SEATS AND SPRINGS. Use a nail set, awl, or small screwdriver to take out the rubber seats and the springs that are under them. Also remove any other rubber parts that appear worn. If the ball itself is scratched or pitted, replace it as well.

REPLACE THE PARTS
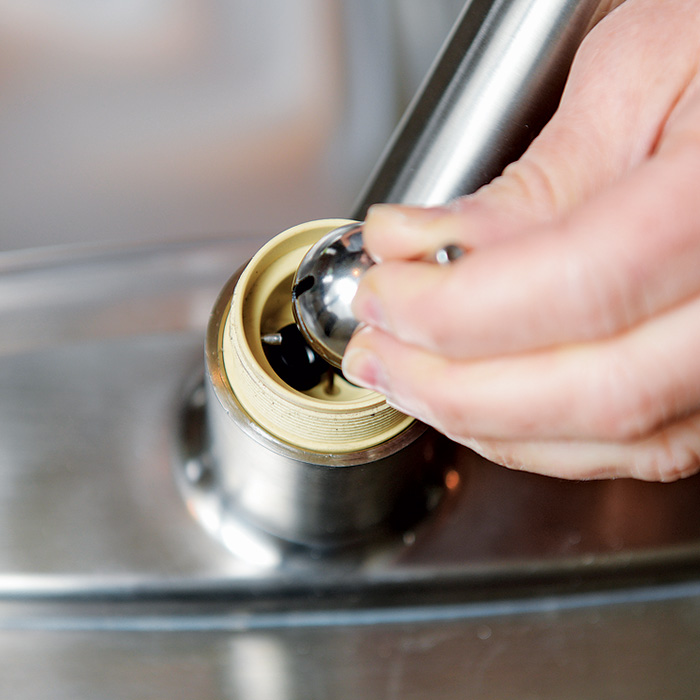
2. REPLACE THE PARTS. Carefully slip a spring into the opening, then press a seat over it and press until it seals tight. Or slip the seat onto the spring first, then push them into the opening as a single piece. Insert the ball so that its slot is aligned with the pin in the faucet body.

press down with the retainer
3. TIGHTEN THE CAP. Keeping the ball aligned correctly, add the cap, making sure it aligns with the notch in the faucet body (above). Taking care to keep the ball and the cap correctly positioned, press down with the retainer, then screw it on by hand.

Finish screwing using a pair of pliers
Finish screwing using a pair of pliers as shown.


TIP: If a ball-type faucet leaks at the base of the spout, remove the spout and replace the large O-ring that seals the spout at the bottom.

​

Disk or Cartridge Faucets

A ceramic disk cartridge rarely wears out, but the rubber O-rings and gaskets do. Still, you may find that a repair kit includes the cartridge, just to make installation easier.

CLEAN AND REPLACE RUBBER PARTS
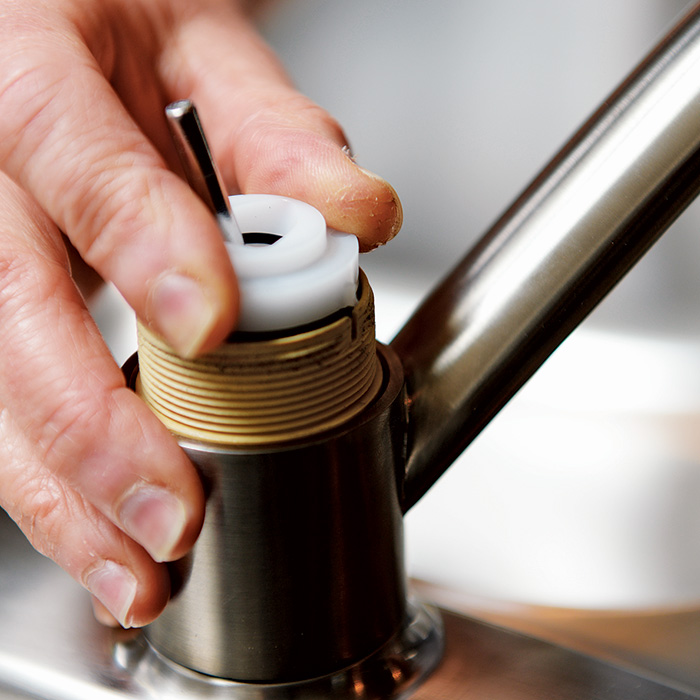
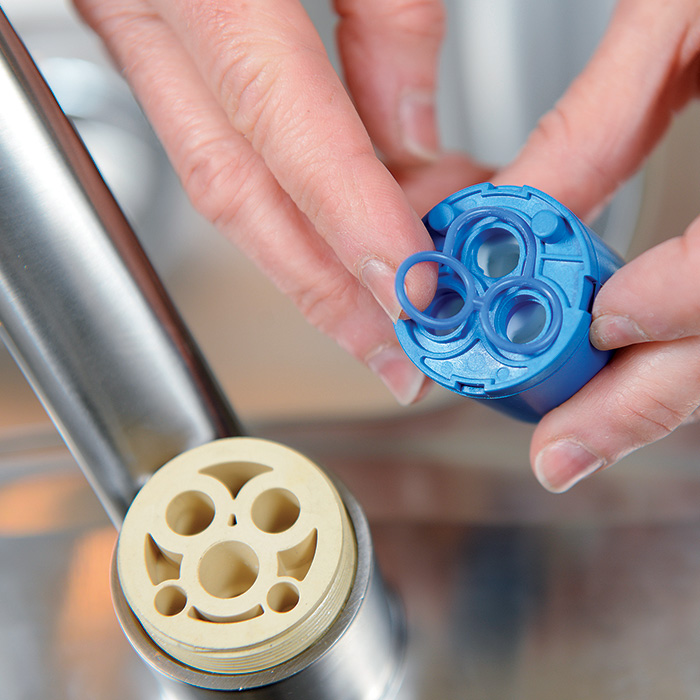
1. CLEAN AND REPLACE RUBBER PARTS. Remove the cartridge and pry out the rubber parts, which may be individual O-rings or a single gasket that goes around all the openings. Use a toothbrush or small brush and detergent to clean away scum and debris on the cartridge, then rinse clean. Apply plumber’s grease (which will come with the repair kit), then press the new rubber parts into place.

REASSEMBLE
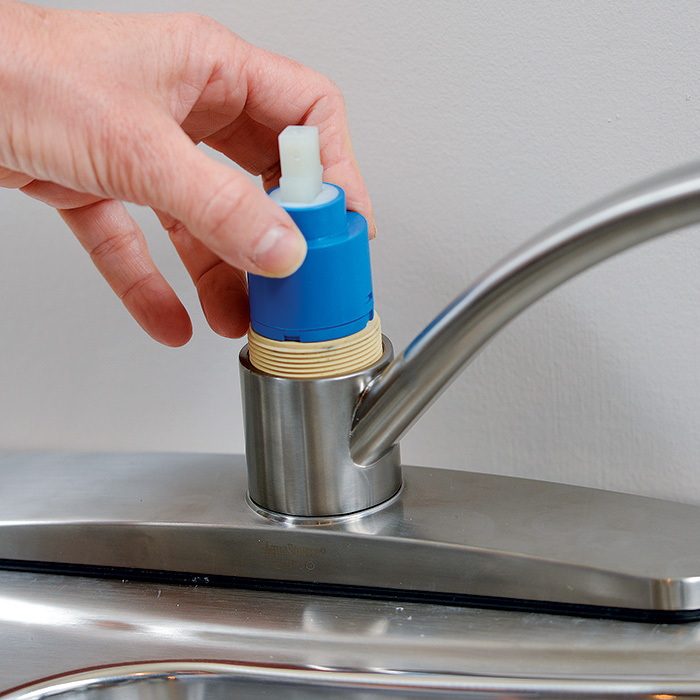
2. REASSEMBLE. Slide the cartridge back into the faucet body and reinstall any retaining clip. Hand-tighten the retainer ring (or collar). Replace the handle and fasten with a setscrew or hold-down screw. Restore water pressure and test for leaks.


Excerpted from Plumbing (The Taunton Press, 2016) by Steve Cory.

Sign up for eletters today and get the latest how-to from Fine Homebuilding, plus special offers.

Signing you up...

This site is protected by reCAPTCHA and the Google Privacy Policy and Terms of Service apply.
See all newsletters
See all newsletters
Previous: Tips for Faucet Repair Next: Troubleshooting a Toilet

Guide

Plumbing

Chapter

Maintenance and Repair

Log in or create an account to post a comment.

Sign up Log in

Become a member and get full access to FineHomebuilding.com

Plumbing

Plumbing

Trusted, comprehensive guidance from the pros for tackling any plumbing project

View Project Guide

View All Project Guides »

Become a member and get unlimited site access, including the Plumbing Project Guide.

Start Free Trial

Plumbing Basics
  • Plumbing Systems
  • Materials
  • Plumbing Tools
Bathrooms
  • Sinks
  • Showers & Tubs
  • Toilets
Kitchens
  • Kitchen Sinks
  • Water Filtration
  • Appliances
Roughing In
  • Layout
  • Installation
  • Copper Pipe
  • PEX Tubing
  • PVC Drainpipe
Water Heaters, Washers, and More
  • Water Heaters
  • Whole-House Filters
  • Sump Pumps
  • Washers
  • Sprinkler Systems
Maintenance and Repair
  • Sinks
  • Toilets
  • Showers & Tubs
  • Systems

Fine Homebuilding

Follow

  • twitter
  • facebook
  • instagram
  • pinterest

Newsletter

Get home building tips, offers, and expert advice in your inbox

Signing you up...

This site is protected by reCAPTCHA and the Google Privacy Policy and Terms of Service apply.
See all newsletters
See all newsletters

Membership & Magazine

  • Online Archive
  • Start Free Trial
  • Magazine Subscription
  • Magazine Renewal
  • Gift a Subscription
  • Customer Support
  • Privacy Preferences

Taunton Network

  • Green Building Advisor
  • Fine Woodworking
  • Fine Gardening
  • Threads
  • About
  • Contact
  • Advertise
  • Careers
  • Copyright
  • Terms of Use
  • Site Map
  • Do not sell my information
  • Privacy Policy
  • Accessibility
  • California Privacy Rights

© 2022 The Taunton Press, Inc. All rights reserved.

X
X
This is a dialog window which overlays the main content of the page. The modal window is a 'site map' of the most critical areas of the site. Pressing the Escape (ESC) button will close the modal and bring you back to where you were on the page.

Main Menu

  • How-To
  • Design
  • Tools & Materials
  • Video
  • Blogs
  • Forum
  • Reader Projects
  • Magazine
  • Members
  • FHB House

Podcasts

  • FHB Podcast
  • ProTalk

Webinars

  • Upcoming and On-Demand

Account

  • Log In
  • Join

Podcasts

  • FHB Podcast
  • ProTalk

Webinars

  • Upcoming and On-Demand

Popular Topics

  • Kitchens
  • Business
  • Bedrooms
  • Roofs
  • Architecture and Design
  • Green Building
  • Decks
  • Framing
  • Safety
  • Remodeling
  • Bathrooms
  • Windows
  • Tilework
  • Ceilings
  • HVAC

Magazine

  • Current Issue
  • Past Issues
  • Magazine Index
  • Subscribe
  • Online Archive
  • Author Guidelines

All Access

  • Member Home
  • Start Free Trial
  • Gift Membership

Shop the Store

  • Books
  • DVDs
  • Taunton Workshops

More

  • FHB Ambassadors
  • Reader Projects
  • Podcast
  • Customer Support

Account

  • Log In
  • Join

Newsletter

Get home building tips, offers, and expert advice in your inbox

Signing you up...

This site is protected by reCAPTCHA and the Google Privacy Policy and Terms of Service apply.
See all newsletters
See all newsletters

Follow

  • twitter
  • facebook
  • instagram
  • pinterest

Join All Access

Become a member and get instant access to thousands of videos, how-tos, tool reviews, and design features.

Start Your Free Trial

Subscribe

FHB Magazine

Start your subscription today and save up to 70%

Subscribe

We hope you’ve enjoyed your free articles. To keep reading, become a member today.

Get complete site access to expert advice, how-to videos, Code Check, and more, plus the print magazine.

Start your FREE trial

Already a member? Log in