FHB Logo Facebook LinkedIn Email Pinterest Twitter Instagram Plus Icon Close Icon Navigation Search Icon Navigation Search Icon Arrow Down Icon Video Guide Icon Article Guide Icon Modal Close Icon Guide Search Icon Skip to content
Subscribe

In every issue you'll find...

  • Expert insights on techniques and principles
  • Unbiased tool reviews
  • Step-by-step details to master the job
  • Field-tested advice and know-how
Subscribe Now!
Subscribe
  • How-To
  • Design
  • Tools & Materials
  • Videos
  • Blogs
  • Forum
  • Magazine
  • Members
  • FHB House
  • Podcast
  • Join
  • Log In
Subscribe

Fine Homebuilding Project Guides

Drywall

Guide Home
Chapter
  • Drywall Basics
  • Tools and Materials
  • Hanging Drywall
  • Taping and Sanding
  • Special Installations
  • Drywall Repairs
  • Plaster
How-To

Lime-Plaster Installation Over Drywall

This one-coat, environmentally and budget-conscious wall finish has a lot to offer.

By Matthew Millham Issue 278 - Oct/Nov 2018

For builders or homeowners who are concerned about the environmental and social impacts of the materials used in their homes, lime plaster has a lot to offer. New Frameworks Natural Design Build in Vermont uses it often, including as an interior finish in this deep-energy retrofit in Charlotte, Vt.

how to install lime plaster
Sign in or sign up for a FREE trial membership to read the companion article, A Hybrid Approach to Lime Plaster

There are four main binders for plaster: cement, gypsum, lime, and clay. In the natural-building community, lime and clay generally rise to the top as the most environmentally and socially responsible options.

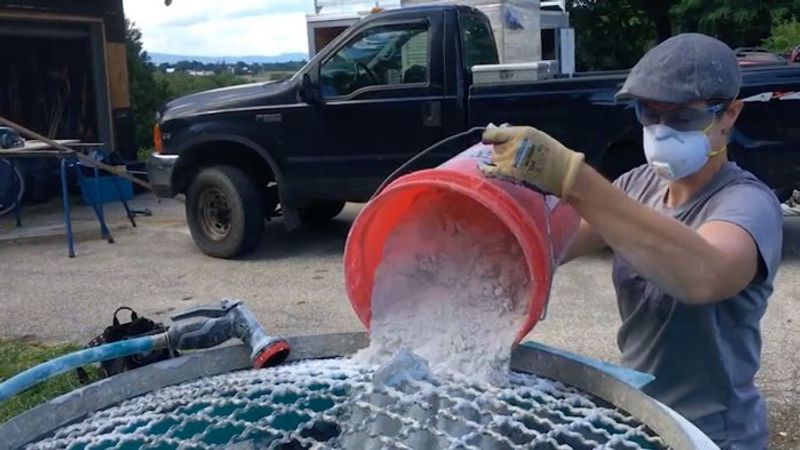
For this process, drywall is used in place of lath as a substrate because it is much less expensive and labor intensive to install, bringing the plaster finish into the realm of affordability for homeowners on a budget. To give the plaster something to grab onto, they prime the drywall with a mix of Elmer’s glue and handfuls of sand.

The plaster used in this process is simply a mix of Type-S mason’s lime, limestone sand, and water. It is, very nearly, liquefied rock that is troweled onto the walls. Even in the 1/4-in. thickness used in this house, it’s possible to sculpt outside corners to give a softer look to what will become rock-hard walls. As it cures, the plaster absorbs carbon dioxide from the air and turns back into limestone in the shape the plasterers put it in. While lime production does produce some greenhouse gasses, this is partially offset during the curing process.

The white lime mixed with the white sand produces a warm, bright plaster that is both beautiful and durable. Rather than use multiple coats, as is the case with some other plastering methods, this process requires just one coat, making it a less fussy, more affordable finish for the Earth-conscious builder or consumer who doesn’t want to break the bank.

For more on Lime Plaster:

  • A Hybrid Approach to Lime Plaster
  • A Short Guide to Lime-Plaster Trowels
  • Add Color to Lime-Plaster Walls
  • From Rock to Dust to Rock Again: An In-Depth Look at Hydrated Lime
  • Lime-Plaster Transformation: A Slideshow


Sign up for eletters today and get the latest how-to from Fine Homebuilding, plus special offers.

Signing you up...

This site is protected by reCAPTCHA and the Google Privacy Policy and Terms of Service apply.
See all newsletters
See all newsletters
Previous: A Hybrid Approach to Lime Plaster Next: Add Color to Lime-Plaster Walls

Guide

Drywall

Chapter

Plaster

View Comments

  1. user-286557 | Sep 17, 2018 02:42pm | #1

    Those un-taped joints are going to crack. Not, they may crack. They will crack.
    The social impact nonsense is for the crazies and whack jobs.

  2. User avater
    BGodfrey | Sep 17, 2018 05:00pm | #2

    It seems very likely that the previous poster is right about the joints, but unless he's actually used this process I cannot agree with his absolute position. I would very much like to see a followup article on how well this holds up.

    I think the reason our world is so angry and screwed up is that things like social impact are relegated to crazies. Being good should be a higher priority for everyone.

    Finally, my own question: do you leave it raw or prime and paint? If left raw, doesn't it lose a lot of crumbs and bits that fall into the carpet or onto the floor? I know the stucco on my house is always crumbling off a grain or two at a time.

  3. User avater
    BGodfrey | Sep 17, 2018 05:14pm | #3

    Turns out if you read the "For more on lime plaster" links at the end of the article, my questions are answered and more.

  4. suburbanguy | Aug 19, 2019 02:38pm | #4

    This is not a plaster finish in any sense of the traditional use of the word. This is best described as a mortar finish.

    Lathe is more labour intensive to install? The old wooden slats, yes, but not the more recent plasterboard lathe. I watched my parent's home being built in the '70's and that lathe went up very quickly. The fact that both a thick rough coat and a final finish coat of plaster were going to be applied over-top, meant that pieces didn't have to fit well and in fact the plaster would key better if there were spaces.

    A few buckets of mud applied to taped seams are more environmentally damaging than walls that are completely covered in this lime mixture? Does this company have any idea of the energy required to produce lime? Is this company aware that there is a shortage of sand in this world due to the vast quantity of construction that taken place over the last 2 decades? (One can't use desert sand in concrete) The rivers are not re-generating the sand fast enough to replace what is being removed.

    user-286557 is absolutely correct. It WILL crack. The scratch coat of traditional plaster included ingredients such as horse hair to prevent such an outcome.

    This is simply a company trying to build a business with fake environmentalism to "virtue signalling" purchasers.

  5. tdargan | Apr 09, 2021 08:33am | #5

    Lovely video and lovely walls. Well done.

  6. hanlond | Dec 30, 2021 02:30pm | #6

    Could this mixture be applied to osb or plywood, instead of drywall?

Log in or create an account to post a comment.

Sign up Log in

Become a member and get full access to FineHomebuilding.com

Drywall

Drywall

Trusted, comprehensive guidance for choosing, hanging, taping, sanding, and repairing drywall—the right way

View Project Guide

View All Project Guides »

Become a member and get unlimited site access, including the Drywall Project Guide.

Start Free Trial

Drywall Basics
  • Types and Uses of Drywall
  • Planning the Job
Tools and Materials
  • Hanging Tools
  • Taping Tools and Materials
  • Sanding and Finishing Tools and Materials
Hanging Drywall
  • Prep for Hanging
  • Measuring and Cutting Drywall
  • Guidelines for Hanging and Fastening Drywall
  • Hanging Ceilings
  • Hanging Walls
  • Hanging Airtight Drywall
  • Trim Accessories/Corner Beads
Taping and Sanding
  • Taping Basics
  • Taping Seams
  • Taping Inside and Outside Corners
  • Sanding
Special Installations
  • Tricky Transitions
  • Curved Surfaces
  • Other Special Installations
  • Decorating with Drywall
Drywall Repairs
  • Patching Holes, Cracks, and More
Plaster
  • Working with Lime Plaster
  • Plaster Repair
  • Classic Plaster Techniques

Fine Homebuilding

Follow

  • twitter
  • facebook
  • instagram
  • pinterest

Newsletter

Get home building tips, offers, and expert advice in your inbox

Signing you up...

This site is protected by reCAPTCHA and the Google Privacy Policy and Terms of Service apply.
See all newsletters
See all newsletters

Membership & Magazine

  • Online Archive
  • Start Free Trial
  • Magazine Subscription
  • Magazine Renewal
  • Gift a Subscription
  • Customer Support
  • Privacy Preferences

Taunton Network

  • Green Building Advisor
  • Fine Woodworking
  • Fine Gardening
  • Threads
  • About
  • Contact
  • Advertise
  • Careers
  • Copyright
  • Terms of Use
  • Site Map
  • Do not sell or share my information
  • Privacy Policy
  • Accessibility
  • California Privacy Rights

© 2023 The Taunton Press, Inc. All rights reserved.

X
X
This is a dialog window which overlays the main content of the page. The modal window is a 'site map' of the most critical areas of the site. Pressing the Escape (ESC) button will close the modal and bring you back to where you were on the page.

Main Menu

  • How-To
  • Design
  • Tools & Materials
  • Video
  • Blogs
  • Forum
  • Reader Projects
  • Magazine
  • Members
  • FHB House

Podcasts

  • FHB Podcast
  • ProTalk

Webinars

  • Upcoming and On-Demand

Account

  • Log In
  • Join

Podcasts

  • FHB Podcast
  • ProTalk

Webinars

  • Upcoming and On-Demand

Popular Topics

  • Kitchens
  • Business
  • Bedrooms
  • Roofs
  • Architecture and Design
  • Green Building
  • Decks
  • Framing
  • Safety
  • Remodeling
  • Bathrooms
  • Windows
  • Tilework
  • Ceilings
  • HVAC

Magazine

  • Current Issue
  • Past Issues
  • Magazine Index
  • Subscribe
  • Online Archive
  • Author Guidelines

All Access

  • Member Home
  • Start Free Trial
  • Gift Membership

Shop the Store

  • Books
  • DVDs
  • Taunton Workshops

More

  • FHB Ambassadors
  • Reader Projects
  • Podcast
  • Customer Support

Account

  • Log In
  • Join

Newsletter

Get home building tips, offers, and expert advice in your inbox

Signing you up...

This site is protected by reCAPTCHA and the Google Privacy Policy and Terms of Service apply.
See all newsletters
See all newsletters

Follow

  • twitter
  • facebook
  • instagram
  • pinterest

Join All Access

Become a member and get instant access to thousands of videos, how-tos, tool reviews, and design features.

Start Your Free Trial

Subscribe

FHB Magazine

Start your subscription today and save up to 70%

Subscribe

We hope you’ve enjoyed your free articles. To keep reading, become a member today.

Get complete site access to expert advice, how-to videos, Code Check, and more, plus the print magazine.

Start your FREE trial

Already a member? Log in