FHB Logo Facebook LinkedIn Email Pinterest Twitter Instagram Plus Icon Close Icon Navigation Search Icon Navigation Search Icon Arrow Down Icon Video Guide Icon Article Guide Icon Modal Close Icon Guide Search Icon Skip to content
Subscribe

In every issue you'll find...

  • Expert insights on techniques and principles
  • Unbiased tool reviews
  • Step-by-step details to master the job
  • Field-tested advice and know-how
Subscribe Now!
Subscribe
  • How-To
  • Design
  • Tools & Materials
  • Videos
  • Blogs
  • Forum
  • Magazine
  • Members
  • FHB House
  • Podcast
  • Join
  • Log In
Subscribe

Fine Homebuilding Project Guides

Painting

Guide Home
Chapter
  • Intro to Painting
  • Tools & Materials
  • Prep Work
  • Painting Walls, Ceilings, and Trim
  • Wallpaper
  • Windows and Doors
  • Spray Painting Interiors
  • Exterior Painting
How-To

Cutting in Trim and Corners

These tricky transition areas require not only the right technique but also the right brush.

By Jim Lacey Issue 220

One of the benchmarks of a good paint job is crisp, straight transitions of color where trim meets a wall or a wall meets a ceiling. I’ve found that cutting in these areas is as much about having the right tools as it is about having the right technique. It all starts with the right brush.

My favorite is a Corona 2-1/2-in. Excalibur angled sash brush. First, it works well with both oil- and water-based finishes. It’s also good for a wide variety of painting tasks besides cutting in, and its Chinex bristles are long-lasting and easy to clean (see “Building Skills”, FHB #210).

Most painters, pros and do-it-yourselfers alike, hate cleaning brushes; even some pros wrap their brushes in plastic wrap or aluminum foil for later use. Unless I’m in an extreme rush, though, I don’t do it. Clean bristles produce a much better finish, and it really doesn’t take long to clean a high-quality paintbrush.

Having a clean brush is so important that I wash my brushes both at lunchtime and at the end of the day. In hot or dry conditions, I may wash my brush three or four times a day. The problem with storing brushes in plastic wrap, foil, or even zip-top bags is that the paint near the top of the bristles dries in a few hours and becomes difficult to remove completely. Before long, the bristles don’t hold as much paint or flex as they should, which contributes to a rough finish and ragged lines where you’re cutting in.

Besides the brush, you need a paint pail. I like metal pails because they don’t flex unnervingly like plastic pails; however, the seams in metal pails make them more difficult to clean. If you find this a problem, look for a paint store that sells liners for metal pails. I use them whenever I’m changing colors several times a day.

I fill the pail about one-quarter full so that there’s plenty of room to tap off excess paint on the side. Generally, I find high-quality, well-mixed paint (I like Benjamin Moore) to be fine right out of the can, but in extremely hot or dry conditions, a paint additive such as Floetrol or Penetrol (www.flood.com) can reduce brush marks and even the transitions between brushed and rolled areas. Follow the additive directions carefully to avoid problems.

Step by Step: A kit for cutting in

paint brush and bucket

Cutting in nice, straight lines starts with the right brush and a high-quality paint pail. A good choice is an angled sash brush with Chinex bristles. This bristle works well with both oil and latex paint. Pails come in several sizes. Choose one that’s comfortable to hold and has enough room for tapping excess paint off the brush.

1. Wet the bristles. 1. Wet the bristles. Before painting, wet the bristles in the appropriate solvent (check the can), and then squeeze out the excess. This makes cleanup easier and prevents paint from creeping up the bristles.


Get a grip. 2. Get a grip. Hold the pail with four fingers on the bottom and your thumb wrapped around the handle. Keep only an inch or two of paint in the pail to keep your brush and workspace clean and to minimize spills.


Take a dip. 3. Take a dip. Dunk the brush into the pail so that paint covers about one-third of the bristles. You can adjust the paint depth by tipping the pail slightly to the side.


One tap. 4. One tap. Tap one side of the brush against the side of the pail, and then gently drag the bristle tips over the rim.

While painting, keep the pail in your left (or nondominant) hand for maximum productivity.


Apply the paint. 
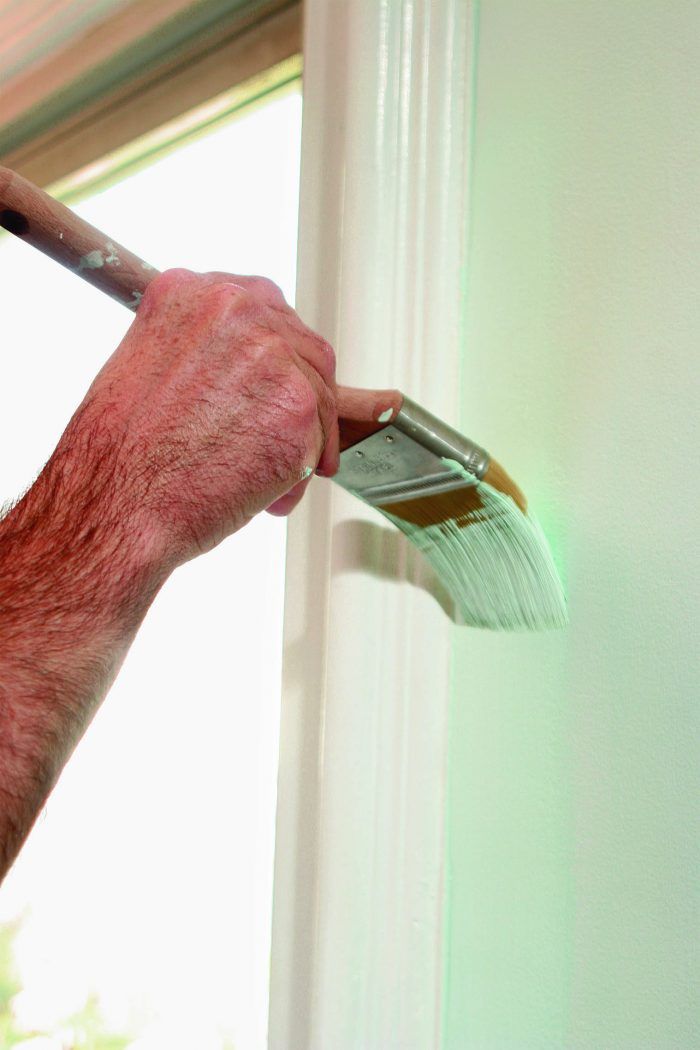
5. Apply the paint. Starting from 1/2 in. to 1/4 in. away from the trim or ceiling, use a single stroke to apply the paint. Looking slightly ahead of the bristles, pull the brush toward you; keep dragging until the paint stops covering.


Work it out. 6. Work it out. With the brush rotated 90°, take a second pass with the bristles just touching the trim or corner. The paint should level out, leaving a smooth line free of ridges.

Take a third pass only when necessary.

Photos: Rob Yagid

Sign up for eletters today and get the latest how-to from Fine Homebuilding, plus special offers.

Signing you up...

This site is protected by reCAPTCHA and the Google Privacy Policy and Terms of Service apply.
See all newsletters
See all newsletters
Previous: The Challenges of Painting Kitchens and Baths Next: Painting Trim the Right Way

Guide

Painting

Chapter

Painting Walls, Ceilings, and Trim

Log in or create an account to post a comment.

Sign up Log in

Become a member and get full access to FineHomebuilding.com

Painting

Painting

Everything you need to know to get the perfect finish, from choosing the right paint to applying the final coat

View Project Guide

View All Project Guides »

Become a member and get unlimited site access, including the Painting Project Guide.

Start Free Trial

Intro to Painting
  • Painting Basics
  • Painting Inspiration
Tools & Materials
  • Paint
  • Brushes and Rollers
  • Caulks and Sealants
  • Spray Equipment
  • Prep and Cleanup
Prep Work
  • Getting Ready For Painting and Finishing
Painting Walls, Ceilings, and Trim
  • Painting Interior Surfaces
Wallpaper
  • How to Prep and Install Wallpaper
  • Removing Wallpaper
  • Wallcovering Choices
Windows and Doors
  • Painting Windows and Doors
  • Video Series: Finishing an Exterior Door
Spray Painting Interiors
  • How To Spray Walls, Trim, Cabinets, and More
Exterior Painting
  • Exterior Paint Prep
  • Exterior Painting Techniques

Fine Homebuilding

Follow

  • twitter
  • facebook
  • instagram
  • pinterest

Newsletter

Get home building tips, offers, and expert advice in your inbox

Signing you up...

This site is protected by reCAPTCHA and the Google Privacy Policy and Terms of Service apply.
See all newsletters
See all newsletters

Membership & Magazine

  • Online Archive
  • Start Free Trial
  • Magazine Subscription
  • Magazine Renewal
  • Gift a Subscription
  • Customer Support
  • Privacy Preferences

Taunton Network

  • Green Building Advisor
  • Fine Woodworking
  • Fine Gardening
  • Threads
  • About
  • Contact
  • Advertise
  • Careers
  • Copyright
  • Terms of Use
  • Site Map
  • Do not sell or share my information
  • Privacy Policy
  • Accessibility
  • California Privacy Rights

© 2023 The Taunton Press, Inc. All rights reserved.

X
X
This is a dialog window which overlays the main content of the page. The modal window is a 'site map' of the most critical areas of the site. Pressing the Escape (ESC) button will close the modal and bring you back to where you were on the page.

Main Menu

  • How-To
  • Design
  • Tools & Materials
  • Video
  • Blogs
  • Forum
  • Reader Projects
  • Magazine
  • Members
  • FHB House

Podcasts

  • FHB Podcast
  • ProTalk

Webinars

  • Upcoming and On-Demand

Account

  • Log In
  • Join

Podcasts

  • FHB Podcast
  • ProTalk

Webinars

  • Upcoming and On-Demand

Popular Topics

  • Kitchens
  • Business
  • Bedrooms
  • Roofs
  • Architecture and Design
  • Green Building
  • Decks
  • Framing
  • Safety
  • Remodeling
  • Bathrooms
  • Windows
  • Tilework
  • Ceilings
  • HVAC

Magazine

  • Current Issue
  • Past Issues
  • Magazine Index
  • Subscribe
  • Online Archive
  • Author Guidelines

All Access

  • Member Home
  • Start Free Trial
  • Gift Membership

Shop the Store

  • Books
  • DVDs
  • Taunton Workshops

More

  • FHB Ambassadors
  • Reader Projects
  • Podcast
  • Customer Support

Account

  • Log In
  • Join

Newsletter

Get home building tips, offers, and expert advice in your inbox

Signing you up...

This site is protected by reCAPTCHA and the Google Privacy Policy and Terms of Service apply.
See all newsletters
See all newsletters

Follow

  • twitter
  • facebook
  • instagram
  • pinterest

Join All Access

Become a member and get instant access to thousands of videos, how-tos, tool reviews, and design features.

Start Your Free Trial

Subscribe

FHB Magazine

Start your subscription today and save up to 70%

Subscribe

We hope you’ve enjoyed your free articles. To keep reading, become a member today.

Get complete site access to expert advice, how-to videos, Code Check, and more, plus the print magazine.

Start your FREE trial

Already a member? Log in