FHB Logo Facebook LinkedIn Email Pinterest Twitter Instagram Plus Icon Close Icon Navigation Search Icon Navigation Search Icon Arrow Down Icon Video Guide Icon Article Guide Icon Modal Close Icon Guide Search Icon Skip to content
Subscribe

In every issue you'll find...

  • Expert insights on techniques and principles
  • Unbiased tool reviews
  • Step-by-step details to master the job
  • Field-tested advice and know-how
Subscribe Now!
Subscribe
  • How-To
  • Design
  • Tools & Materials
  • Videos
  • Blogs
  • Forum
  • Magazine
  • Members
  • FHB House
  • Podcast
  • Join
  • Log In
Subscribe

Fine Homebuilding Project Guides

Painting

Guide Home
Chapter
  • Intro to Painting
  • Tools & Materials
  • Prep Work
  • Painting Walls, Ceilings, and Trim
  • Wallpaper
  • Windows and Doors
  • Spray Painting Interiors
  • Exterior Painting
How-To

Painting Trim the Right Way

A pro painter shares 8 essential steps to get a smooth, blemish-free finish when painting molding.

By Tim Leahy Issue 245 - Aug/Sept 2014

Synopsis: Master craftsman Tim Leahy offers eight steps from prep to final coat in “Painting Trim the Right Way.” The real work that makes or breaks a paint job is how you prepare the surface. If you’re painting baseboard, window and door casings, crown molding, and other interior trim, and you don’t do a good job of sanding, cleaning, and priming, the final coats of paint won’t look pristine. At the very worst, a poor prep job can make the finish coats fail. With detailed suggestions and helpful tips, he suggests: clean the air, clean and protect the room, fill any holes, sand surfaces and often edges, apply primer, sand primer coats, caulk seams, and apply two topcoats. Watch the video extra for this article.


Most people who are new to painting see the job in terms of applying the finish coat, but that’s just the icing on the cake. The real work that makes or breaks a paint job is how you prepare the surface. If you’re painting interior trim and you don’t do a good job of sanding, cleaning, and priming, the final coats of paint won’t look pristine. At the very worst, a poor prep job can make the finish coats fail. I work in high-end restoration, where the end result is paramount. Over the years, I have developed the following procedures for a great paint job.

Clean the air

sanding trim for paint

Whether it’s your spouse, the construction manager, the homeowner, or any combination of the three, everyone needs to know when the painting stage of a job is set to begin. Other trades need to be out of the area, and the air needs to be right, especially for the last finish coats. The inside temperature should be between 55°F and 80°F, and the humidity level should be less than 50%. Humidity between 50% and 80% is less than ideal. When the humidity shoots over 85%, the paint won’t dry properly, which may cause blushing, sags, wrinkling, or film failure.

Air quality is very important, especially during the finish-coat stage, so we try to eliminate all airborne dust by using fans fitted with filters to draw in clean air and exhaust dusty air from the work area.

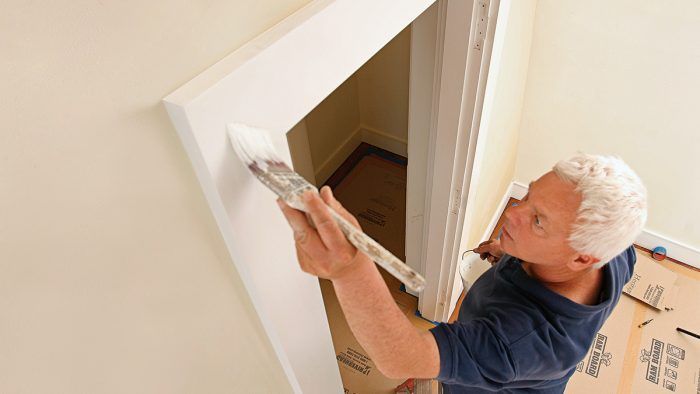
Clean and protect the room

A dirty floor and fresh paint don’t mix. The dirt gets airborne when kicked or when cords, hoses, or ladders are moved. Once everyone has left the area, the first thing we do is vacuum. Sawdust, dirt, and other debris on the floors and walls need to be cleaned off with a powerful vacuum that has non-marring attachments. Vacuums equipped with high-efficiency particulate absorption (HEPA) filters are the best, although they can be expensive.

Any hardware should be removed or protected. We remove hardware, tag it with tape, label it with a marker, and place it into plastic bags or clean cups. If there is a lot of hardware, I use a camera or a sketch pad to document the layout before taking everything apart.

If the area has finished floors, we use one of three levels of protection. If we happen to be priming in a room where the flooring hasn’t been finished, we tape down rosin paper, which helps keep the dust and dirt to a minimum. If the finish is in place, then we switch to a thicker, more protective paper product such as Ram Board, and sometimes even add a plastic layer to block moisture. The ultimate protection is paper first, followed by a layer of plastic and a layer of luan plywood.


For more photos and details, click the View PDF button below:

Sign up for eletters today and get the latest how-to from Fine Homebuilding, plus special offers.

Signing you up...

This site is protected by reCAPTCHA and the Google Privacy Policy and Terms of Service apply.
See all newsletters
See all newsletters
View PDF
Previous: Cutting in Trim and Corners Next: Master Carpenter: Painting Trim the Right Way

Guide

Painting

Chapter

Painting Walls, Ceilings, and Trim

Log in or create an account to post a comment.

Sign up Log in

Become a member and get full access to FineHomebuilding.com

Painting

Painting

Everything you need to know to get the perfect finish, from choosing the right paint to applying the final coat

View Project Guide

View All Project Guides »

Become a member and get unlimited site access, including the Painting Project Guide.

Start Free Trial

Intro to Painting
  • Painting Basics
  • Painting Inspiration
Tools & Materials
  • Paint
  • Brushes and Rollers
  • Caulks and Sealants
  • Spray Equipment
  • Prep and Cleanup
Prep Work
  • Getting Ready For Painting and Finishing
Painting Walls, Ceilings, and Trim
  • Painting Interior Surfaces
Wallpaper
  • How to Prep and Install Wallpaper
  • Removing Wallpaper
  • Wallcovering Choices
Windows and Doors
  • Painting Windows and Doors
  • Video Series: Finishing an Exterior Door
Spray Painting Interiors
  • How To Spray Walls, Trim, Cabinets, and More
Exterior Painting
  • Exterior Paint Prep
  • Exterior Painting Techniques

Fine Homebuilding

Follow

  • twitter
  • facebook
  • instagram
  • pinterest

Newsletter

Get home building tips, offers, and expert advice in your inbox

Signing you up...

This site is protected by reCAPTCHA and the Google Privacy Policy and Terms of Service apply.
See all newsletters
See all newsletters

Membership & Magazine

  • Online Archive
  • Start Free Trial
  • Magazine Subscription
  • Magazine Renewal
  • Gift a Subscription
  • Customer Support
  • Privacy Preferences

Taunton Network

  • Green Building Advisor
  • Fine Woodworking
  • Fine Gardening
  • Threads
  • About
  • Contact
  • Advertise
  • Careers
  • Copyright
  • Terms of Use
  • Site Map
  • Do not sell or share my information
  • Privacy Policy
  • Accessibility
  • California Privacy Rights

© 2023 The Taunton Press, Inc. All rights reserved.

X
X
This is a dialog window which overlays the main content of the page. The modal window is a 'site map' of the most critical areas of the site. Pressing the Escape (ESC) button will close the modal and bring you back to where you were on the page.

Main Menu

  • How-To
  • Design
  • Tools & Materials
  • Video
  • Blogs
  • Forum
  • Reader Projects
  • Magazine
  • Members
  • FHB House

Podcasts

  • FHB Podcast
  • ProTalk

Webinars

  • Upcoming and On-Demand

Account

  • Log In
  • Join

Podcasts

  • FHB Podcast
  • ProTalk

Webinars

  • Upcoming and On-Demand

Popular Topics

  • Kitchens
  • Business
  • Bedrooms
  • Roofs
  • Architecture and Design
  • Green Building
  • Decks
  • Framing
  • Safety
  • Remodeling
  • Bathrooms
  • Windows
  • Tilework
  • Ceilings
  • HVAC

Magazine

  • Current Issue
  • Past Issues
  • Magazine Index
  • Subscribe
  • Online Archive
  • Author Guidelines

All Access

  • Member Home
  • Start Free Trial
  • Gift Membership

Shop the Store

  • Books
  • DVDs
  • Taunton Workshops

More

  • FHB Ambassadors
  • Reader Projects
  • Podcast
  • Customer Support

Account

  • Log In
  • Join

Newsletter

Get home building tips, offers, and expert advice in your inbox

Signing you up...

This site is protected by reCAPTCHA and the Google Privacy Policy and Terms of Service apply.
See all newsletters
See all newsletters

Follow

  • twitter
  • facebook
  • instagram
  • pinterest

Join All Access

Become a member and get instant access to thousands of videos, how-tos, tool reviews, and design features.

Start Your Free Trial

Subscribe

FHB Magazine

Start your subscription today and save up to 70%

Subscribe

We hope you’ve enjoyed your free articles. To keep reading, become a member today.

Get complete site access to expert advice, how-to videos, Code Check, and more, plus the print magazine.

Start your FREE trial

Already a member? Log in