FHB Logo Facebook LinkedIn Email Pinterest Twitter X Instagram Tiktok YouTube Plus Icon Close Icon Navigation Search Icon Navigation Search Icon Arrow Down Icon Video Guide Icon Article Guide Icon Modal Close Icon Guide Search Icon Skip to content
Subscribe
Log In
  • How-To
  • Design
  • Tools & Materials
  • Restoration
  • Videos
  • Blogs
  • Forum
  • Magazine
  • Members
  • FHB House
  • Podcast
Log In

Fine Homebuilding Project Guides

Painting

Guide Home
  • Intro to Painting
  • Tools & Materials
  • Prep Work
  • Painting Walls, Ceilings, and Trim
  • Wallpaper
  • Windows and Doors
  • Spray Painting Interiors
  • Exterior Painting
Mastered in a Minute

How to Clean a Paint Brush

Follow these steps carefully to remove latex paint from a brush.

By Official Fine Homebuilding Post

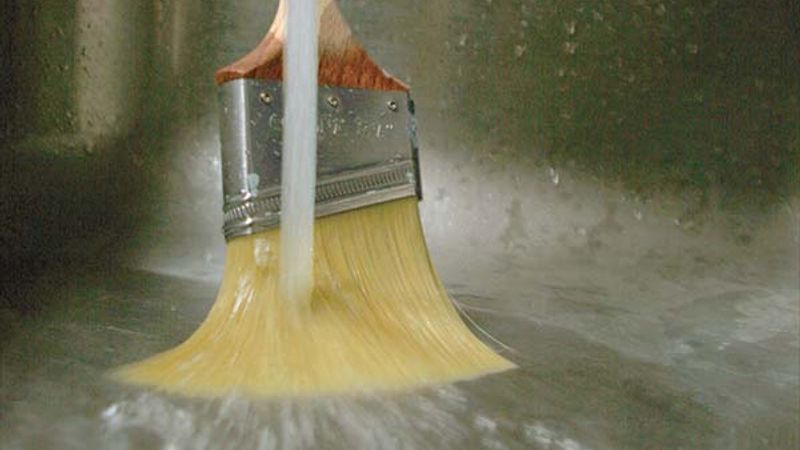
If you invest in a high-quality paint brush, it’s essential to know how to give it a proper cleaning to maintain the brush for optimal performance. To remove latex paint from a brush, start by rinsing out the brush under warm water, flaring out the bristles on the bottom on the sink to extract the paint. Once most of the paint has been washed away, comb out the bristles with a steel brush, moving from the ferrule towards the tip of the bristles to loosen any paint that’s hardened on the brush. After combing, rinse the brush again and repeat this process until the water runs out of the brush clear. Once clean, get rid of the excess water by tapping the brush on the toe of your shoe. Then give it a final brushing with the comb to restore its shape. Return the brush to its wrapper or case to protect it until its next use.

More Painting Tips

How to Clean a Paint Roller

Painting Solutions

Slide show: Tips and Techniques for Painting

Sign up for eletters today and get the latest how-to from Fine Homebuilding, plus special offers.

Signing you up...

This site is protected by reCAPTCHA and the Google Privacy Policy and Terms of Service apply.
See all newsletters
See all newsletters
Previous: How to Clean a Large Paint Roller Next: Cleaning Paintbrushes and Roller Covers

Guide

Painting

Chapter

Tools & Materials

View Comments

  1. genalorainne | May 14, 2015 02:23pm | #1

    Is it wrong if I use turpentine? It cleans it perfectly every time.

  2. user-1137422 | May 18, 2015 12:20pm | #2

    I would add a giant asterisk that says "only do this if you're on a public sewer system, not septic".

    Depending on weather, paint brushes should only be used for about an hour before cleaning.

  3. Architeuthus77 | May 18, 2015 12:29pm | #3

    Using a spinner gets more water out and the bristles dry nice and flexible.

  4. suburbangeorge | May 18, 2015 12:30pm | #4

    Only read the text. Did not watch the video as Adobe Flash Player messes up google chrome so I disabled it. The following is from an old time commercial painter that I met at a job years ago: First always paint from a pail rather than the can. Pour a few inches of paint into the pail and close the can. When finished pour remaining paint back into can and close can. Rub excess paint from pail and brush with newspapers or rags. With an inch or so of whatever is solvent for the paint(water or thinner)begin to clean the pail with the brush. Clean all over including any spills on the outside. Hold the brush head down in the pail with the handle between your palms and rub your hands back and forth to spin the brush and force the cleaner out of the bristles. Repeat with new solvent until the last cleaning leaves the solvent clear(or nearly so). Along the way use a wire brush on the bristles if necessary. Leaves you with a clean brush and a clean pail. Dry brush with newspaper or rags. If using thinner, it takes about a gallon of thinner to clean a brush. To conserve thinner, discard the first cleaning thinner then save second cleaning in marked can for the first cleaning next time and save the third for the second in another marked can etc. I have brushes that are decades old using this method.

  5. dejure | May 19, 2015 10:39am | #5

    Rather than a wire brush, even a brass one, use a hard bristle scrub brush. It's less damaging to the individual bristles.

    While we've all tapped a brush against our toes to knock out most the water, this is very hard on the ferrule holding the bristles. Over time, it will loosen the nails securing the ferrule.

    To make the brush easier to clean, wet it with the solvent you'd use to thin or clean the paint. If the bristles are wet before the brush is dipped, they'll soak up less paint.

    I have a couple rules for using my brushes: If I'm stopping for up to twenty minutes, I wrap the brush well in a grocery bag. Anything more than that and I wash it and store it in the original [or replacement] sleeve.

    ALWAYS keep and use the sleeves your brush came in. They shape the brush, as it dries.

  6. lnelvi | Jun 11, 2015 06:59pm | #6

Log in or create an account to post a comment.

Sign up Log in

Become a member and get full access to FineHomebuilding.com

Painting

Painting

Everything you need to know to get the perfect finish, from choosing the right paint to applying the final coat

View Project Guide

View All Project Guides »

Become a member and get unlimited site access, including the Painting Project Guide.

Start Free Trial

Intro to Painting
  • Painting Basics
  • Painting Inspiration
Tools & Materials
  • Paint
  • Brushes and Rollers
  • Caulks and Sealants
  • Spray Equipment
  • Prep and Cleanup
Prep Work
  • Getting Ready For Painting and Finishing
Painting Walls, Ceilings, and Trim
  • Painting Interior Surfaces
Wallpaper
  • How to Prep and Install Wallpaper
  • Removing Wallpaper
  • Wallcovering Choices
Windows and Doors
  • Painting Windows and Doors
  • Video Series: Finishing an Exterior Door
Spray Painting Interiors
  • How To Spray Walls, Trim, Cabinets, and More
Exterior Painting
  • Exterior Paint Prep
  • Exterior Painting Techniques

Fine Home Building

Newsletter Sign-up

  • Fine Homebuilding

    Home building tips, offers, and expert advice in your inbox.

  • Green Building Advisor

    Building science and energy efficiency advice, plus special offers, in your inbox.

  • Old House Journal

    Repair, renovation, and restoration tips, plus special offers, in your inbox.

Signing you up...

This site is protected by reCAPTCHA and the Google Privacy Policy and Terms of Service apply.
See all newsletters

Follow

  • Fine Homebuilding

    Dig into cutting-edge approaches and decades of proven solutions with total access to our experts and tradespeople.

    Start Free Trial Now
    • Facebook
    • Instagram
    • X
    • LinkedIn
  • GBA Prime

    Get instant access to the latest developments in green building, research, and reports from the field.

    Start Free Trial Now
    • Facebook
    • YouTube
  • Old House Journal

    Learn how to restore, repair, update, and decorate your home.

    Subscribe Now
    • Facebook
    • Instagram
    • X

Membership & Magazine

  • Online Archive
  • Start Free Trial
  • Magazine Subscription
  • Magazine Renewal
  • Gift a Subscription
  • Customer Support
  • Privacy Preferences
  • About
  • Contact
  • Advertise
  • Careers
  • Terms of Use
  • Site Map
  • Do not sell or share my information
  • Privacy Policy
  • Accessibility
  • California Privacy Rights

© 2025 Active Interest Media. All rights reserved.

Fine Homebuilding receives a commission for items purchased through links on this site, including Amazon Associates and other affiliate advertising programs.

X
X
This is a dialog window which overlays the main content of the page. The modal window is a 'site map' of the most critical areas of the site. Pressing the Escape (ESC) button will close the modal and bring you back to where you were on the page.

Main Menu

  • How-To
  • Design
  • Tools & Materials
  • Video
  • Blogs
  • Forum
  • Project Guides
  • Reader Projects
  • Magazine
  • Members
  • FHB House

Podcasts

  • FHB Podcast
  • ProTalk

Webinars

  • Upcoming and On-Demand

Podcasts

  • FHB Podcast
  • ProTalk

Webinars

  • Upcoming and On-Demand

Popular Topics

  • Kitchens
  • Business
  • Bedrooms
  • Roofs
  • Architecture and Design
  • Green Building
  • Decks
  • Framing
  • Safety
  • Remodeling
  • Bathrooms
  • Windows
  • Tilework
  • Ceilings
  • HVAC

Magazine

  • Current Issue
  • Past Issues
  • Magazine Index
  • Subscribe
  • Online Archive
  • Author Guidelines

All Access

  • Member Home
  • Start Free Trial
  • Gift Membership

Online Learning

  • Courses
  • Project Guides
  • Reader Projects
  • Podcast

More

  • FHB Ambassadors
  • FHB House
  • Customer Support

Account

  • Log In
  • Join

Newsletter

Get home building tips, offers, and expert advice in your inbox

Signing you up...

This site is protected by reCAPTCHA and the Google Privacy Policy and Terms of Service apply.
See all newsletters
See all newsletters

Follow

  • X
  • YouTube
  • instagram
  • facebook
  • pinterest
  • Tiktok

Join All Access

Become a member and get instant access to thousands of videos, how-tos, tool reviews, and design features.

Start Your Free Trial

Subscribe

FHB Magazine

Start your subscription today and save up to 70%

Subscribe

We hope you’ve enjoyed your free articles. To keep reading, become a member today.

Get complete site access to expert advice, how-to videos, Code Check, and more, plus the print magazine.

Start your FREE trial

Already a member? Log in