A retro-look claw-foot bathtub can be an elegant solution for a tub and shower combo in a traditional-style bathroom. They look great, as long as all the exposed plumbing (and there is a lot of that) is made of attractive materials—in this case, a gleaming chrome finish. If you are replacing an existing claw-foot tub, measure to see that the plumbing parts—the supply risers and the drain—will match. Otherwise, or if you are installing a claw-foot tub where there was none, you will need to move the plumbing under the floor.
TIP: If your tub is cast iron, have a helper or two on hand to move the tub around. When you turn it upside down, set one end on a thick book or block of wood, so you don’t trap your fingers. An acrylic tub is much lighter and easier to maneuver.
Claw-Foot Plumbing
If plumbing does not already exist in the floor, cut an access hole and run a drain and supply lines positioned so the tub’s plumbing can be inserted straight down into them. Here, we show supplies of PEX tubing and drop-ear elbows; you can screw the supply tubes directly into the elbows. Install the supply risers and the trap arm so they rise out of the floor, then install the subflooring and the finished floor around the pipes.
1. INSTALL THE LEGS AND CHECK FOR LEVEL. Turn the tub upside down and install the legs. Tighten the bolts and turn the tub right side up where it will go. If it wobbles or is seriously out of level, loosen a bolt or two and insert rubber shims to slightly lengthen one or more of the legs.
2. ADD THE WASTE-AND-OVERFLOW. If the waste-and-overflow assembly is not already cut to fit, temporarily attach the two parts to the waste and the overflow holes and mark for cutting the pieces.Assemble the parts as you would for a standard tub and tighten the nuts. At this point, the bottom of the assembly should be slightly above the floor; you will add the final part that goes into the floor later.
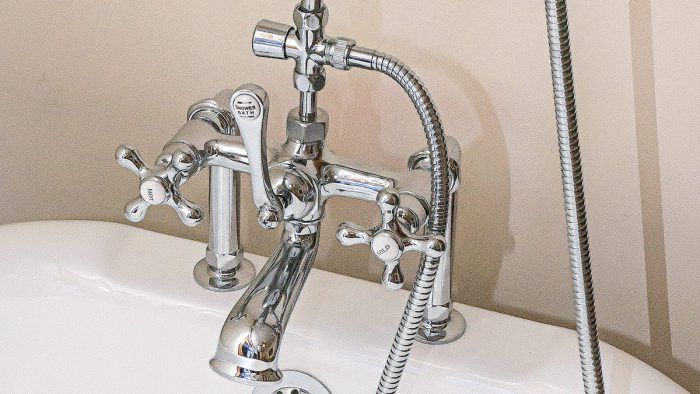
3. ASSEMBLE AND INSTALL THE FAUCET. A typical claw-foot’s faucet mounts on the tub’s deck and turns 90 degrees; it also has connections for both a shower and a hand-held shower wand, so it is somewhat complicated.Follow the manufacturer’s directions carefully to assemble the basic faucet (be vigilant about keeping track of all the little parts). Mount it into the tub’s holes.
4. PREPARE THE CURTAIN ROD. Assemble the curtain rod, the horizontal rod that attaches to the wall, and the vertical rod that attaches to the ceiling. Measure up from the tub’s floor to the ceiling and subtract the desired height of the curtain rod; 80 in. is standard.Cut the vertical rod to that length using a tube cutter. Then measure out from the back wall to the faucet’s plumbing hole and subtract the length of the fitting; cut the horizontal rod to that length.
5. ATTACH THE FITTINGS AND SHOWER ROD. Follow the manufacturer’s instructions to assemble the fittings needed for the shower wand (above). These usually join with rubber washers, so no plumber’s tape is needed.Measure from the top of the fitting to determine the height of the showerhead. Slip the showerhead’s rod through the fitting in the curtain rod and tighten a setscrew to hold it in place.
6. ATTACH THE CURTAIN ROD. Have a helper check with a level and eyeball the curtain rod to be sure it is parallel with a side wall; then drive screws to attach the vertical rod to the ceiling.Also attach the horizontal rod to the end wall. Unless you are fortunate enough to hit a stud or a joist, you will need to drill pilot holes, move the flange to the side, tap in plastic anchors, and then drive screws into the anchors.
7. ATTACH THE SHOWER ROD AND WAND ASSEMBLY. Mark the bottom of the shower rod and cut it so it can slip into the fitting.Slide the shower wand’s holder up onto the rod, slip the rod into the fitting, and tighten the nut. Screw on a showerhead.
8. FINISHING TOUCHES. Turn on the water supply and test for leaks. Hang two shower curtains. Here we have just cloth curtains, which will work fine, but you may prefer plastic liners as well, perhaps with the cloth curtains hanging outside the tub.
Excerpted from Plumbing (The Taunton Press, 2016) by Steve Cory.
Sign up for eletters today and get the latest how-to from Fine Homebuilding, plus special offers.
This is a dialog window which overlays the main content of the page. The modal window is a 'site map' of the most critical areas of the site. Pressing the Escape (ESC) button will close the modal and bring you back to where you were on the page.