When replacing a tub, you may be able to reuse the old faucet and perhaps just replace the visible parts: the handles, escutcheon, spout, and shower arm and head. But if you are installing a tub in a new location, or if your walls are opened up, you may choose to install a whole new shower faucet assembly. Here we show the most common type, with a single-handle control. The spout will have a lift-up diverter to direct water to the showerhead or down through the spout.
1. REMOVE THE FAUCET ASSEMBLY. Shut off water to the existing tub faucet. Cap the faucet outlet to avoid drips and tape over the drain trap. Using a tube cutter, remove the faucet assembly. (Don’t use a hacksaw—it can distort copper pipe.) Very likely, space will be tight; a small tube cutter (shown) comes in handy.
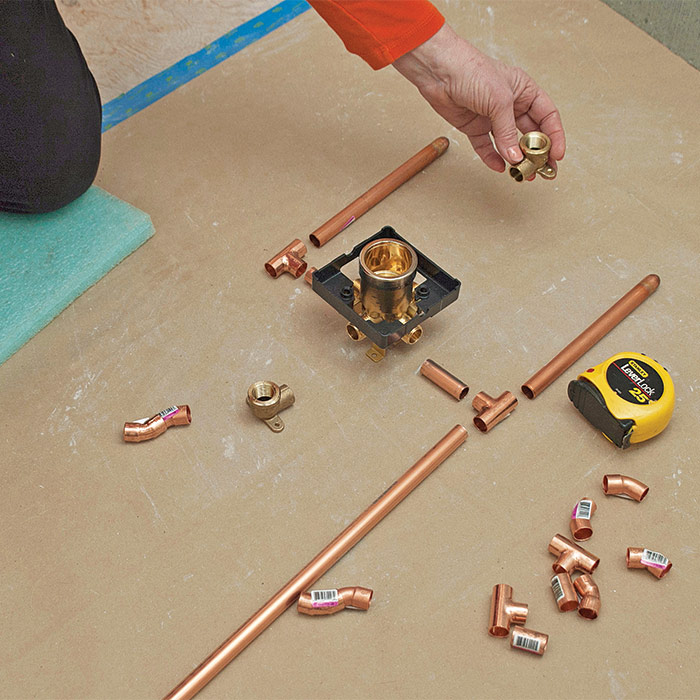
2. PLAN THE FAUCET ASSEMBLY. To avoid extra trips to the home center or hardware store, buy a range of pipe fittings. On a clean surface, work out the best arrangement for attaching supplies to the faucet.
What’s the Right Height?
Position the faucet where it is most convenient for your family. If someone likes to fiddle with the faucet handle with his or her foot while lying down in a bath, place it pretty low. If showers are far more common than baths, place it higher, so you don’t have to bend over to adjust the temperature. The spout should be about 6 in. above the top of the tub.
Ideally, a showerhead should be 4 in. to 6 in. higher than the tallest person who will use it. A showerhead’s fitting is commonly placed 7 ft. above the floor; the tub’s floor is a few inches above the room’s floor, and the showerhead itself will end up a few inches lower than the fitting, depending on the shower arm you choose.
3. INSTALL A FAUCET SUPPORT. Use the plaster guard attached to your faucet to establish the setback for wood blocking to support the faucet. Plan for the faucet to be about 6 in. above the tub. Drive screws to firmly install the blocking into adjacent wall studs. Mark for the location of the spout.
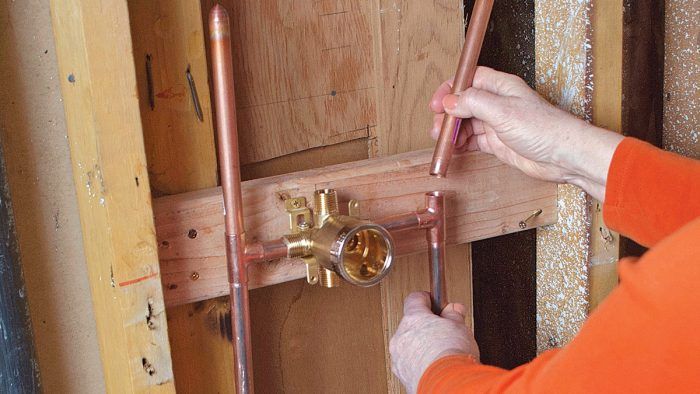
4. DRY-FIT THE FAUCET ASSEMBLY. Attach the faucet body to the support. Cut pipe and dry-fit your assembly. Be sure to keep the parts clean.
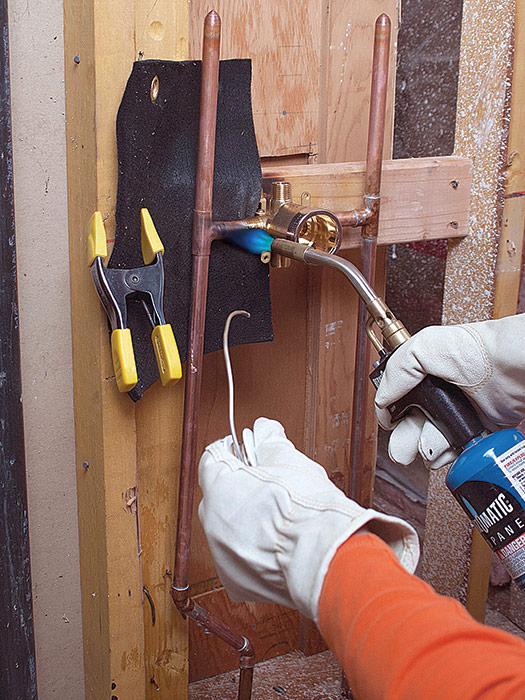
5. SWEAT THE FAUCET ASSEMBLY. Take apart and reassemble the pipe and fittings, methodically sanding or wire-brushing and applying flux to each of the pipe ends and the insides of the fittings. Spritz the framing with water to limit scorching. Clamp or wedge a fiber shield behind the joint you are sweating. Supply lines for this faucet slip into the threaded inlet ports of the faucet body. Then solder the pipe connections.
6. INSTALL A SPOUT SUPPORT. Fasten in place a 2x support for the faucet spout. You may need to attach an additional block. Check the manufacturer’s instructions for how far below the faucet body the spout should be to clear the faucet escutcheon. Cut the pipe and sweat on the drop-ear elbow before attaching it to the support. Sweat the pipe to the faucet body.
TIP: Consult the manufacturer’s literature to install the 2x support at the correct depth in the wall so the faucet’s escutcheon and handle can be neatly attached after the wall is finished. Take into account the total wall thickness, including the backerboard plus the tiles or the panels you will install. Also plan carefully so the faucet, spout, and showerhead will be centered on the tub’s width.
7. ADD A THREADED NIPPLE. To temporarily seal the spout, install a threaded nipple so it extends beyond the finished wall. Apply several windings of pipe tape to the threads and screw the nipple into the drop-ear elbow. Cap the nipple temporarily.
8. INSTALL THE FAUCET CARTRIDGE. Carefully line up the hot and cold chambers of the cartridge as you push it into the faucet housing.
9. ADD THE BONNET NUT. Slide the bonnet nut over the cartridge and thread it onto the faucet body. Hand-tighten it securely.
10. INSTALL A SHOWER DROP EAR. Fasten a 23 support at your chosen height. Cut the riser to length and sweat on the drop-ear elbow before attaching it to the support. Sweat the riser into the faucet body.
11. SECURE THE SHOWER OUTLET AND ARM. To safeguard the shower arm from damage, add a pipe clamp to the riser (top). Wrap the shower arm with pipe tape and hand-tighten the shower arm into the drop-ear elbow. To be able to safely turn the water on before installing the tub—handy if you don’t have stop valves on your tub faucet—add a temporary cap to the shower arm.
TIP: After securing the shower outlet and arm, check your installation for leaks. Restore water pressure and turn on the faucet. If a joint leaks, shut off and drain the water, dry out the pipes, and repeat the sweating process.
12. INSTALL THE FINISHING PIECES. Install backer board and tiles or solid panels. Shut off water and remove the temporary pipes. Attach the shower arm and showerhead, the faucet escutcheon and handle, and the spout.
Excerpted from Plumbing (The Taunton Press, 2016) by Steve Cory.
Sign up for eletters today and get the latest how-to from Fine Homebuilding, plus special offers.
This is a dialog window which overlays the main content of the page. The modal window is a 'site map' of the most critical areas of the site. Pressing the Escape (ESC) button will close the modal and bring you back to where you were on the page.