FHB Logo Facebook LinkedIn Email Pinterest Twitter Instagram Plus Icon Close Icon Navigation Search Icon Navigation Search Icon Arrow Down Icon Video Guide Icon Article Guide Icon Modal Close Icon Guide Search Icon Skip to content
Subscribe
Log In
  • How-To
  • Design
  • Tools & Materials
  • Videos
  • Blogs
  • Forum
  • Magazine
  • Members
  • FHB House
  • Podcast
Log In

Fine Homebuilding Project Guides

Plumbing

Guide Home
Chapter
  • Plumbing Basics
  • Bathrooms
  • Kitchens
  • Roughing In
  • Water Heaters, Washers, and More
  • Maintenance and Repair
How-To

Plumbing a Basement Bathroom

Cutting through the slab is grunt work of the highest order, but a relatively easy way to get an extra bath.

By Mike Guertin Issue 193

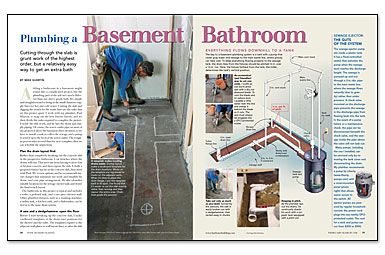
Synopsis: Adding a basement bathroom is just like adding a bath anywhere else in the house — except for cutting through the basement’s concrete-slab floor. Rhode Island contractor and Fine Homebuilding contributing editor Mike Guertin outlines his strategy for adding a basement bath, starting with planning the drain layout. This crucial step ensures that plumbing is located so that wastewater flows downhill to a tank; from there, it is pumped to the main waste line and out of the house. It’s also important to tie in vent lines for the basement fixtures.


Adding a bathroom in a basement might sound like a complicated project, but the plumbing part of the job isn’t much different than any above-grade bath. It’s simple and straightforward to bring in the small-diameter supply lines for hot and cold water. Cutting the slab and digging the trench for the waste lines are the tasks that set this project apart. I work with my plumber, Paul Murray, to map out the best fixture layout, and we then divide the tasks required to complete the project. I tackle the slab work, and he lays the drain and supply piping. Of course, the sewer-outlet pipe on most of my projects is above the basement-floor elevation, so we have to install a tank to collect the sewage and a pump to send it up to the level of the sewer outlet. The roughin process takes several days for us to complete; then we can schedule the inspections.

Plan the drain layout first

Rather than completely breaking out the concrete slab in the prospective bathroom, I cut trenches where the drains will run. This saves me from having to move lots of broken concrete and then repour the slab. I chalk a proposed fixture layout on the concrete slab, then meet with Paul. We review options, and he recommends layout changes that minimize my work and simplify his drain- and vent-pipe arrangement. He also identifies suitable locations for the sewage-ejector tank and draws the final trench layout.

The bathroom in this project is typical and includes a toilet, a pedestal sink, and a one-piece shower stall. Other plumbed fixtures, such as a washing machine, a utility sink, a kitchen sink, and a dishwasher, can be tied in to the same drain system.

A saw and a sledgehammer open the floor

Before I start breaking up the concrete slab, I make cardboard templates of the drain-riser positions for the shower and the toilet. The templates register to the adjacent wall plates or wall layout lines, so after the slab is removed and the trench is dug, Paul has a guide for installing the drains.

The largest drainpipe will be 3 in. dia., but the trenches need to be wide enough to be shoveled out. I usually make them 10 in. to 12 in. wide to leave extra working room for fittings. To cut the slab, I use an old worm-drive saw fitted with a $40 dry-cut diamond blade; it must be plugged into a GFCI-protected outlet. The blade cuts only 2 1⁄2 in. into the slab, which typically is 3 in. to 5 in. thick, but that’s deep enough to give me a good, clean fracture line. A gas-powered concrete saw would cut all the way through the slab, but the exhaust inside a poorly ventilated basement would be overwhelming and would migrate into the living space above.

basement plumbing magazine spreadFrom Fine Homebuilding #193

For more photos, drawings, and details, click the View PDF button below:


Sign up for eletters today and get the latest how-to from Fine Homebuilding, plus special offers.

Signing you up...

This site is protected by reCAPTCHA and the Google Privacy Policy and Terms of Service apply.
See all newsletters
See all newsletters
View PDF
Previous: 14 Tips for Bath Plumbing Next: Tapping into Drain and Supply Lines

Guide

Plumbing

Chapter

Roughing In

Log in or create an account to post a comment.

Sign up Log in

Become a member and get full access to FineHomebuilding.com

Plumbing

Plumbing

Trusted, comprehensive guidance from the pros for tackling any plumbing project

View Project Guide

View All Project Guides »

Become a member and get unlimited site access, including the Plumbing Project Guide.

Start Free Trial

Plumbing Basics
  • Plumbing Systems
  • Materials
  • Plumbing Tools
Bathrooms
  • Sinks
  • Showers & Tubs
  • Toilets
Kitchens
  • Kitchen Sinks
  • Water Filtration
  • Appliances
Roughing In
  • Layout
  • Installation
  • Copper Pipe
  • PEX Tubing
  • PVC Drainpipe
Water Heaters, Washers, and More
  • Water Heaters
  • Whole-House Filters
  • Sump Pumps
  • Washers
  • Sprinkler Systems
Maintenance and Repair
  • Sinks
  • Toilets
  • Showers & Tubs
  • Systems

Fine Homebuilding

Follow

  • twitter
  • facebook
  • instagram
  • pinterest

Newsletter

Get home building tips, offers, and expert advice in your inbox

Signing you up...

This site is protected by reCAPTCHA and the Google Privacy Policy and Terms of Service apply.
See all newsletters
See all newsletters

Membership & Magazine

  • Online Archive
  • Start Free Trial
  • Magazine Subscription
  • Magazine Renewal
  • Gift a Subscription
  • Customer Support
  • Privacy Preferences

Taunton Network

  • Green Building Advisor
  • Fine Woodworking
  • Fine Gardening
  • Threads
  • About
  • Contact
  • Advertise
  • Careers
  • Copyright
  • Terms of Use
  • Site Map
  • Do not sell or share my information
  • Privacy Policy
  • Accessibility
  • California Privacy Rights

© 2023 The Taunton Press, Inc. All rights reserved.

X
X
This is a dialog window which overlays the main content of the page. The modal window is a 'site map' of the most critical areas of the site. Pressing the Escape (ESC) button will close the modal and bring you back to where you were on the page.

Main Menu

  • How-To
  • Design
  • Tools & Materials
  • Video
  • Blogs
  • Forum
  • Reader Projects
  • Magazine
  • Members
  • FHB House

Podcasts

  • FHB Podcast
  • ProTalk

Webinars

  • Upcoming and On-Demand

Podcasts

  • FHB Podcast
  • ProTalk

Webinars

  • Upcoming and On-Demand

Popular Topics

  • Kitchens
  • Business
  • Bedrooms
  • Roofs
  • Architecture and Design
  • Green Building
  • Decks
  • Framing
  • Safety
  • Remodeling
  • Bathrooms
  • Windows
  • Tilework
  • Ceilings
  • HVAC

Magazine

  • Current Issue
  • Past Issues
  • Magazine Index
  • Subscribe
  • Online Archive
  • Author Guidelines

All Access

  • Member Home
  • Start Free Trial
  • Gift Membership

Shop the Store

  • Books
  • DVDs
  • Taunton Workshops

More

  • FHB Ambassadors
  • Reader Projects
  • Podcast
  • FHB House
  • Customer Support

Account

  • Log In
  • Join

Newsletter

Get home building tips, offers, and expert advice in your inbox

Signing you up...

This site is protected by reCAPTCHA and the Google Privacy Policy and Terms of Service apply.
See all newsletters
See all newsletters

Follow

  • twitter
  • facebook
  • instagram
  • pinterest

Join All Access

Become a member and get instant access to thousands of videos, how-tos, tool reviews, and design features.

Start Your Free Trial

Subscribe

FHB Magazine

Start your subscription today and save up to 70%

Subscribe

We hope you’ve enjoyed your free articles. To keep reading, become a member today.

Get complete site access to expert advice, how-to videos, Code Check, and more, plus the print magazine.

Start your FREE trial

Already a member? Log in