FHB Logo Facebook LinkedIn Email Pinterest Twitter X Instagram Tiktok YouTube Plus Icon Close Icon Navigation Search Icon Navigation Search Icon Arrow Down Icon Video Guide Icon Article Guide Icon Modal Close Icon Guide Search Icon Skip to content
Subscribe
Log In
  • How-To
  • Design
  • Tools & Materials
  • Restoration
  • Videos
  • Blogs
  • Forum
  • Magazine
  • Members
  • FHB House
  • Podcast
Log In

Fine Homebuilding Project Guides

Windows & Doors

Guide Home
  • Choosing Windows
  • Installing Windows In New Walls
  • Retrofitting Windows
  • Window Repairs
  • Door Basics
  • Interior Doors
  • Exterior Doors
Ask the Experts

Fix for Poorly Installed Window Flashing

When water is leaking in around newly installed windows, chances are that there are some missing or improper flashing details that need to be corrected.

By Mike Guertin Issue 289 - Feb/Mar 2020
  • X
  • facebook
  • linkedin
  • pinterest
  • email
  • add to favorites Log in or Sign up to save your favorite articles

We’re having a new home built and the windows just went in. Water is already leaking in around a lot of them, and I think I see why. The builder ran the housewrap inside on all four sides, then installed the windows and taped the flanges to the housewrap. We’re using Benjamin Obdyke’s HydroGap, which has a lot of tiny spacers to promote drainage behind the siding. I believe water is making it through the tiny gaps between the housewrap and flashing tape and following the housewrap into the house.

I cringe at the idea of pulling all the windows to flash them the right way—we don’t have the time or budget for it. I was thinking of two alternatives: either adding another layer of flashing using liquid flashing over the housewrap and tape, or cutting back the housewrap above each window a foot or so, flashing the flange to the sheathing, then tucking another 16 in. or so of housewrap under the cut and lapping it over the window flange. Are either of these ideas feasible?

—Kyle via email

Rhode Island builder and remodeler Mike Guertin (@mike_guertin) replies: You didn’t mention whether or not the window installers put flashing pans on the rough sills. My guess is they didn’t or you probably wouldn’t have noticed any water leaking in, since it would have just drained out. I’m also guessing that they applied sealant behind the windows’ bottom flanges, which will prevent any water that does leak in from draining back out. These deficiencies, along with the reverse-lapped head flashing you described, are probably code violations.

The IRC is pretty clear regarding window flashing, the goal of which is to keep water out of the walls. It offers a handful of options for achieving the required watertightness, the first being to install and flash the windows according to the window manufacturer’s instructions—code actually requires window manufacturers to provide them. Most window manufacturers, as well as water-resistive-barrier (WRB) and flashing-tape manufacturers, call for sill pans that drain to the exterior, as well as shingle-style flashing around the perimeter of openings and integrated with the WRB.

In the event that neither the window nor flashing company has instructions, the code prescribes that a draining sill pan be installed and that there be flashing or other protection around the sides and top of the window—all installed shingle style—to direct water to the surface of the exterior wall finish or to the WRB for subsequent drainage.

The code also acknowledges that there are lots of different ways to build, and it allows two other options as well: You can use a flashing design or method developed by a registered design professional, or you can use “other approved methods” of achieving the required watertightness.

Unless the installers can show you printed manufacturers’ instructions that verify the installation details they used are done according to the instructions or an approved alternative, I would have them remove the windows and follow the WRB manufacturer’s instructions to install the HydroGap and flash the windows according to the window manufacturer’s instructions. The installers were negligent, and it is up to them to correct the problem they created by not following the building code, at their own expense for both labor and materials. Yes, there will be a time delay, but there is no shortcut solution to remedy the problems the installers have created.

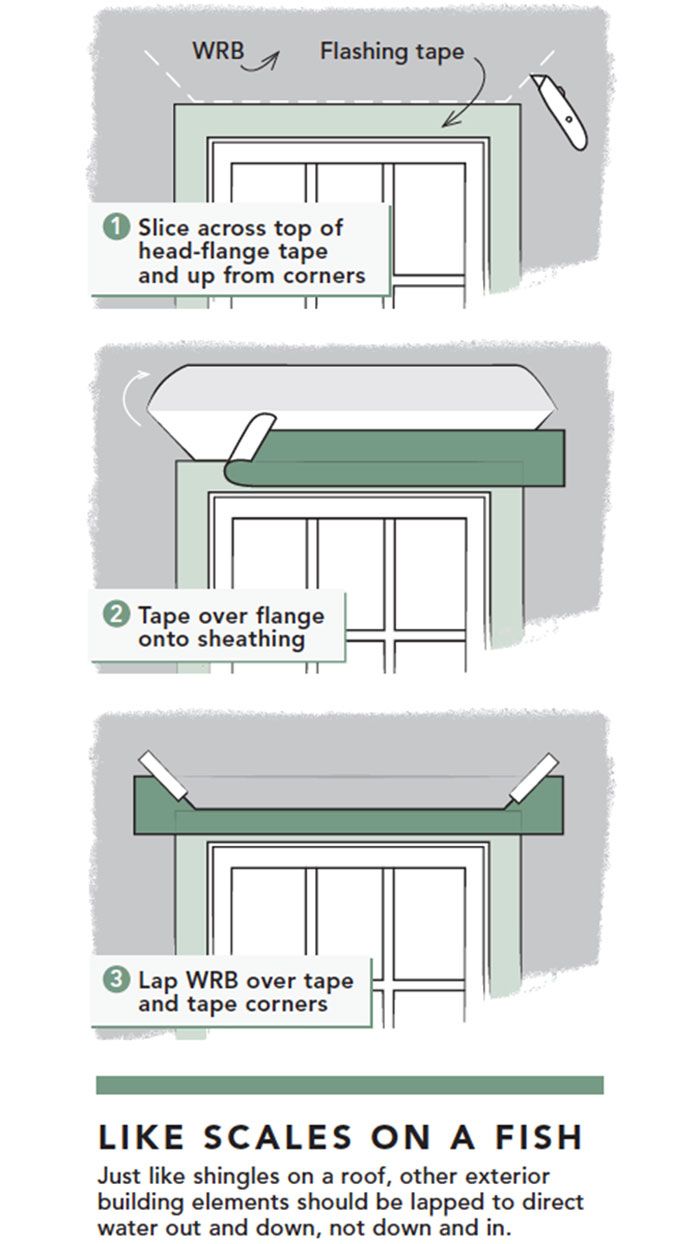
Now, if they did install a sill pan that is either sloped to the exterior or backdammed and there is no sealant between the bottom flange and the wall-face leg of the flashing pan, then the reverse-lapped head flashing can be remedied. Your second option is on the right track. Here’s my suggestion: Make a horizontal cut in the HydroGap across the top of the head-flange flashing tape. Then cut approximately 4-in. diagonal cuts in the WRB, radiating up from the ends of the horizontal cut. Lift the flap up and install a piece of self-adhering, self-sealing flashing tape that covers the original flashing tape and extends up 4 in. above the horizontal cut. Then fold the WRB flap down over the head flashing tape. This parallels HydroGap’s “method 2” installation guidelines.

If you have the installers make this repair, the labor and material expense is their responsibility—not yours—even if the project is being done on a “time and materials” basis. Paying them for repairing their negligent work just rewards them and encourages them to continue doing poor work without any consequences.

From Fine Homebuilding #289

More about flashing:

Shop Class: How to Install Nail-Fin Windows in 5 Common Wall Types – Builder Jake Bruton demonstrates trusted window-flashing details for walls with the following water-resistive barriers: Zip System sheathing, exterior rigid-foam insulation, housewrap, peel-and-stick membrane, and fluid-applied WRB.

Don’t Forget the Flashing – Easily overlooked and sometimes installed incorrectly, flashing keeps water out and rot at bay.

Waterproof Your Windows With Liquid Flashing – Learn how to install liquid-applied flashing to thoroughly seal a rough opening while also leaving a path for water to escape when it does get in.

Previous: Flashing for Old Windows Next: Window Replacement With a Side of Rot Repair

Guide

Windows & Doors

Chapter

Window Repairs

Sign up for eletters today and get the latest how-to from Fine Homebuilding, plus special offers.

Signing you up...

This site is protected by reCAPTCHA and the Google Privacy Policy and Terms of Service apply.
See all newsletters
See all newsletters

Log in or create an account to post a comment.

Sign up Log in

Become a member and get full access to FineHomebuilding.com

Windows & Doors

Windows & Doors

Trusted, comprehensive guidance from the pros for choosing, installing, replacing, and repairing windows and doors on any house

View Project Guide

View All Project Guides »

Become a member and get unlimited site access, including the Windows & Doors Project Guide.

Start Free Trial

Choosing Windows
  • Window Types
  • Design and Materials
  • Energy-Efficient Windows
Installing Windows In New Walls
  • Installation, Start to Finish
  • Head Flashing for Windows
  • Video Series: Nail-Fin Window over Zip System Sheathing
  • Video Series: Nail-Fin Window over Exterior Rigid-Foam Insulation
  • Video Series: Nail-Fin Window over Housewrap
  • Video Series: Nail-Fin Window over Peel-and-Stick Housewrap
  • Video Series: Nail-Fin Window over a Fluid-Applied WRB
  • Video Series: Weatherproof Window Installation
Retrofitting Windows
  • Removing the Old, Installing the New
  • Video Series: How to Replace a Window
  • Video Series: Install a Full-Frame Replacement Window in a Brick Wall
  • Video Series: Install an Insert Replacement Window in a Brick Wall
  • Video Series: Retrofit a Flanged Window
Window Repairs
  • Restoring Old Windows
  • Repairs and Upgrades
Door Basics
  • Tools & Jigs for Door Hanging
  • How to Install Doors
  • Hinges
  • Handles, Knobs, and Locksets
  • Fixing Door Problems
Interior Doors
  • Prehung Doors
  • Pocket Doors
  • Other Types of Doors
  • Custom-Built Doors
Exterior Doors
  • Door Choices and Design
  • Installing Entry Doors
  • Building Exterior Doors
  • Installing French Doors
  • Replacing a Door
  • Adding Weatherstripping and Sweeps

Fine Home Building

Newsletter Sign-up

  • Fine Homebuilding

    Home building tips, offers, and expert advice in your inbox.

  • Green Building Advisor

    Building science and energy efficiency advice, plus special offers, in your inbox.

  • Old House Journal

    Repair, renovation, and restoration tips, plus special offers, in your inbox.

Signing you up...

This site is protected by reCAPTCHA and the Google Privacy Policy and Terms of Service apply.
See all newsletters

Follow

  • Fine Homebuilding

    Dig into cutting-edge approaches and decades of proven solutions with total access to our experts and tradespeople.

    Start Free Trial Now
    • Facebook
    • Instagram
    • X
    • LinkedIn
  • GBA Prime

    Get instant access to the latest developments in green building, research, and reports from the field.

    Start Free Trial Now
    • Facebook
    • YouTube
  • Old House Journal

    Learn how to restore, repair, update, and decorate your home.

    Subscribe Now
    • Facebook
    • Instagram
    • X

Membership & Magazine

  • Online Archive
  • Start Free Trial
  • Magazine Subscription
  • Magazine Renewal
  • Gift a Subscription
  • Customer Support
  • Privacy Preferences
  • About
  • Contact
  • Advertise
  • Careers
  • Terms of Use
  • Site Map
  • Do not sell or share my information
  • Privacy Policy
  • Accessibility
  • California Privacy Rights

© 2025 Active Interest Media. All rights reserved.

Fine Homebuilding receives a commission for items purchased through links on this site, including Amazon Associates and other affiliate advertising programs.

  • Home Group
  • Antique Trader
  • Arts & Crafts Homes
  • Bank Note Reporter
  • Cabin Life
  • Cuisine at Home
  • Fine Gardening
  • Fine Woodworking
  • Green Building Advisor
  • Garden Gate
  • Horticulture
  • Keep Craft Alive
  • Log Home Living
  • Military Trader/Vehicles
  • Numismatic News
  • Numismaster
  • Old Cars Weekly
  • Old House Journal
  • Period Homes
  • Popular Woodworking
  • Script
  • ShopNotes
  • Sports Collectors Digest
  • Threads
  • Timber Home Living
  • Traditional Building
  • Woodsmith
  • World Coin News
  • Writer's Digest
Active Interest Media logo
X
X
This is a dialog window which overlays the main content of the page. The modal window is a 'site map' of the most critical areas of the site. Pressing the Escape (ESC) button will close the modal and bring you back to where you were on the page.

Main Menu

  • How-To
  • Design
  • Tools & Materials
  • Video
  • Blogs
  • Forum
  • Project Guides
  • Reader Projects
  • Magazine
  • Members
  • FHB House

Podcasts

  • FHB Podcast
  • ProTalk

Webinars

  • Upcoming and On-Demand

Podcasts

  • FHB Podcast
  • ProTalk

Webinars

  • Upcoming and On-Demand

Popular Topics

  • Kitchens
  • Business
  • Bedrooms
  • Roofs
  • Architecture and Design
  • Green Building
  • Decks
  • Framing
  • Safety
  • Remodeling
  • Bathrooms
  • Windows
  • Tilework
  • Ceilings
  • HVAC

Magazine

  • Current Issue
  • Past Issues
  • Magazine Index
  • Subscribe
  • Online Archive
  • Author Guidelines

All Access

  • Member Home
  • Start Free Trial
  • Gift Membership

Online Learning

  • Courses
  • Project Guides
  • Reader Projects
  • Podcast

More

  • FHB Ambassadors
  • FHB House
  • Customer Support

Account

  • Log In
  • Join

Newsletter

Get home building tips, offers, and expert advice in your inbox

Signing you up...

This site is protected by reCAPTCHA and the Google Privacy Policy and Terms of Service apply.
See all newsletters
See all newsletters

Follow

  • X
  • YouTube
  • instagram
  • facebook
  • pinterest
  • Tiktok

Join All Access

Become a member and get instant access to thousands of videos, how-tos, tool reviews, and design features.

Start Your Free Trial

Subscribe

FHB Magazine

Start your subscription today and save up to 70%

Subscribe

We hope you’ve enjoyed your free articles. To keep reading, become a member today.

Get complete site access to expert advice, how-to videos, Code Check, and more, plus the print magazine.

Start your FREE trial

Already a member? Log in

Privacy Policy Update

We use cookies, pixels, script and other tracking technologies to analyze and improve our service, to improve and personalize content, and for advertising to you. We also share information about your use of our site with third-party social media, advertising and analytics partners. You can view our Privacy Policy here and our Terms of Use here.

Cookies

Analytics

These cookies help us track site metrics to improve our sites and provide a better user experience.

Advertising/Social Media

These cookies are used to serve advertisements aligned with your interests.

Essential

These cookies are required to provide basic functions like page navigation and access to secure areas of the website.

Delete My Data

Delete all cookies and associated data