FHB Logo Facebook LinkedIn Email Pinterest Twitter Instagram Plus Icon Close Icon Navigation Search Icon Arrow Down Icon Video Guide Icon Article Guide Icon Modal Close Icon Guide Search Icon Skip to content
Main Menu
Subscribe

In every issue you'll find...

  • Expert insights on techniques and principles
  • Unbiased tool reviews
  • Step-by-step details to master the job
  • Field-tested advice and know-how
Subscribe Now!
Subscribe
  • How-To
  • Design
  • Tools & Materials
  • Videos
  • Blogs
  • Forum
  • Magazine
  • Members
  • FHB House
  • Podcast
  • Join
  • Log In
Main Menu Subscribe
How-To

How to Design and Assemble Rustic Oak Kitchen Island Brackets

In this video, learn how woodworker Peter Polcyn creates timber-frame brackets out of reclaimed rough-sawn white oak.

By Peter Polcyn

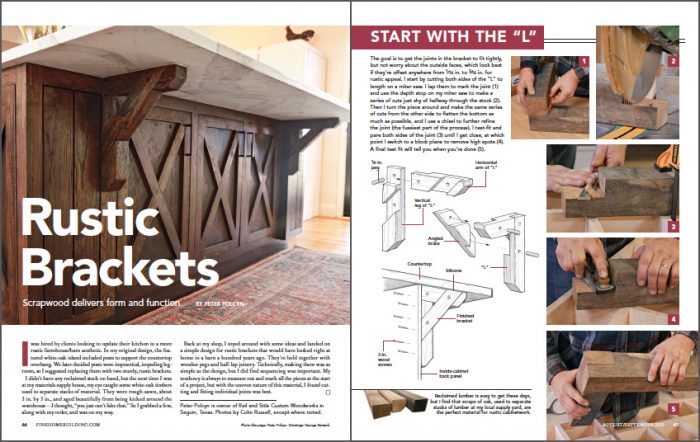
For this custom island, Peter Polcyn of Rail and Stile Custom Woodworks designed the brackets to look like they could have been right at home in a barn a hundred years ago. To get the look, he reclaimed lengths of 3×3 rough-sawn white oak used to separate stacks of material at his supply house.

To make the brackets, he works sequentially beginning with the L before integrating the brace. Peter doesn’t use glue or fasteners—just half-lap joints with pegs to lock the assembly together.

The L

Working from a single piece, he begins by cutting the 12-in. arm and 16-in. leg, then laps them to mark the joinery. He uses a small adjustable square to mark the depth of each lap joint halfway through each piece.

On a miter saw, he uses the trenching feature, setting the depth of cut just shy of halfway. Then he makes a series of cuts along the entire length of each joint, about 1/4 in. apart, leaving a series of 1/8-in. waste that he lathes away by sliding the piece along the fence.

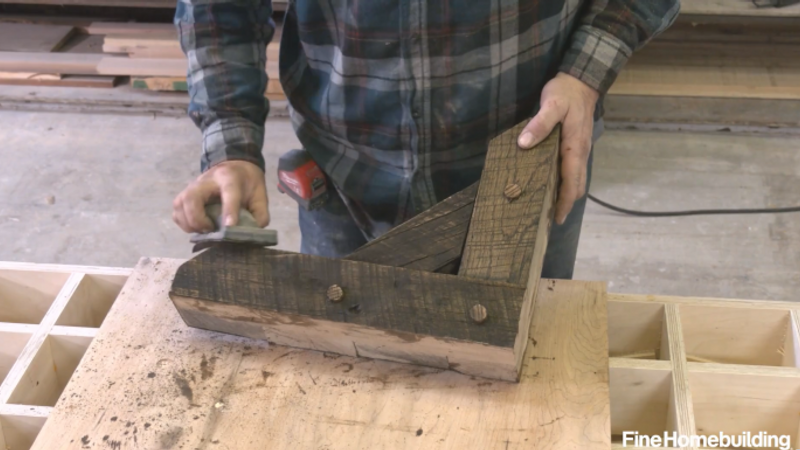
After checking the initial fit, he works to refine each joint. He starts with a hammer and chisel, but for the most part he works the chisel by hand to shave away unwanted material. Dialing in the joinery takes time. As the joints come together, he switches to a block plane to remove any remaining high spots and finesse the fit.

The brace

He uses a speed square to square up the L, and integrate the brace along the 45° edge, and then he marks the joinery. Next, he’s back to trenching on the miter saw.

On the angle cuts, instead of lathing away the waste on the miter saw, he uses his hammer to break away the remaining material. Then he’s back to chiseling, fitting, and more chiseling until he’s ready for the final pass with the block plane.

When he assembles the parts, the joinery is tight with no wiggle room. Even without pins, the bracket holds together as a solid unit.

Pegs and final details

He centers a peg over each joint using a 1/2-in. flat-bore bit starting with the L. After pounding in a common 1/2-in. dowel, he checks for square, then moves on to drill out the holes for the brace and install the remaining pins. Between the lap joints and pegs, the bracket locks togetherpermanently.

He runs the outside edges against a belt sander so they’ll fit flush against the island and countertop, and as a final detail, cuts a 45° on each end of the L.

Finishing

He then moves to a Restorer tool with a nylon brush wheel to clean away dirt. Like working with a wire brush, he can do this without compromising the character of the rough stock, which is the reason he chose it in the first place.

For finish, he brushes on a heavy coat of dark stain, then pads it out with a rag and hits the pegs and edges with a sanding block to bring out contrast. And that’s it, the rustic brackets are complete.

To install, six wood screws are driven from the inside to the cabinet and a couple beads of silicone are applied at the countertop.

For more on this project, read Peter’s related article:

Bracket LayoutRustic Oak Brackets – Learn how to use rough-sawn timbers and traditional joinery to fabricate sturdy, beautiful supports for a cantilevered kitchen island countertop.


Sign up for eletters today and get the latest how-to from Fine Homebuilding, plus special offers.

Sign Up

Get home building tips, offers, and expert advice in your inbox

×
X
X

New Feature

Fine Homebuilding Forums

Ask questions, offer advice, and share your work

View Comments

  1. milwaukee | Jul 09, 2020 06:05pm | #1

    great vid. But no 6 foot screws please. LOL

  2. User avater
    user-3422480 | Jul 13, 2020 02:26pm | #2

    I am amazed for sure. Woodworking has been a long tradition in my family, going back at least three generations. My father, grandfather, and great grandfather all have instructed me about safety. They can point to numerous friends and colleagues who did not adhere to proper simple safety procedures. All of which have wounds or missing digits to exemplify this lack of safety protocol. I enjoyed the video and have completed this project many times in much the same procedure with one big difference. I do not allow my shirt sleeves to be below my elbows for any reason, primarily when operating power tools. I would think that Fine Homebuilding would insist that all of its videos and procedures would put forth proper safety procedures.
    On the other hand, I am proud to say that many of my students (I teach carpentry to high school and community college students) view videos put out on the internet and then email or text me and tell me of the safety procedures they observed that was wrong. At least I know safety is on their mind or at least if evident when they watch the videos. However, I am concerned about the young people who may still be learning or do not have instructors who value safety, watching these videos, and think it is proper to wear long sleeves while working with power tools.
    My suggestion to you at Fine Homebuilding is to set a standard for safety and put that out to people who submit videos or even to your video presentations.

Log in or create an account to post a comment.

Sign up Log in

Become a member and get full access to FineHomebuilding.com

Up Next

Featured Story

Kerdi smoothing membrane

Moisture Management and the Schluter Shower System

Andrew Acker of Schluter-Systems talks about effective water management in this webinar.

Featured Video

Micro-Adjust Deck-Baluster Spacing for an Eye-Deceiving Layout

No math, no measuring—just a simple jig made from an elastic band is all you need to lay out a good-looking deck railing.

Related Stories

  • XPS Insulation With a Lower Climate Impact

  • Framing for Superinsulation

  • 2nd Annual Wall-Assembly Contest Finals

  • How to Insulate an Attic Floor

Discussion Forum

Recent Posts and Replies

  • |
  • |
  • |
  • |
  • |
  • |
View More Create Post

Highlights

  • Fine Homebuilding All Access
  • Fine Homebuilding Podcast
  • Tool Tech

    Plus, get an extra 20% off with code GIFT20

  • "I have learned so much thanks to the searchable articles on the FHB website. I can confidently say that I expect to be a life-long subscriber." - M.K.

    Get home building tips, offers, and expert advice in your inbox

    Sign Up See all newsletters

Video

View All
  • Ben Bogie stands on a job site in front of a stick frame

    Framing for Superinsulation

  • Wall assembly student contest

    2nd Annual Wall-Assembly Contest Finals

  • Podcast 339: PRO TALK With Sandra Hyde of the ICC

    Podcast 339: PRO TALK With Sandra Hyde of the ICC

  • View of home under construction with hip roof

    Widow's Walk: An Inside Look at an Uncommon Roof Feature

View All

Kitchens

View All
  • First Day at the Virtual IBSx: Stuff You Won't Want To Miss

  • All for Fun With Family

  • 1970s Revamp

  • Opening Up a Family Kitchen 16x9

    Opening Up a Family Kitchen

View All

BOOKS, DVDs, & MERCH

Shop the Store
  • Code Check Building 4th Edition

    Buy Now
  • 2020 Fine Homebuilding Archive

    Buy Now
  • Fine Homebuilding Magazine Slipcase

    Buy Now
  • Musings of an Energy Nerd

    Buy Now
  • Shop the Store

Fine Homebuilding Magazine

  • Issue 298 - April/May 2021

    • Butt Boards for Smooth Ceilings
    • Help Installing Gutters
    • Safety Bucket
  • Issue 297 - Feb/Mar 2021

    • Foundations for Success
    • Staircase Renovation
    • Ditch the Hose
  • Issue 296 - Dec 2020/Jan 2021

    • Insulating Glass Keeps Getting Better
    • Simple Way to Make Old Walls Straight and Plumb
    • Making Sense of Minisplits
  • Issue 295 - Kitchens & Baths

    • Condo Kitchen Reimagined
    • Row-House Remodel
    • Rise of the IAQ Monitor
  • Issue 294 - Oct/Nov 2020

    • Schoolhouse Reimagined
    • Tool Test: Folding Sawhorses
    • A Better Way to Build Tall Walls

Fine Homebuilding

Follow

Newsletter

Get home building tips, offers, and expert advice in your inbox

Sign Up See all newsletters

Membership & Magazine

  • Online Archive
  • Start Free Trial
  • Magazine Subscription
  • Magazine Renewal
  • Gift a Subscription
  • Customer Support
  • Manage Preferences

Taunton Network

  • Green Building Advisor
  • Fine Woodworking
  • Fine Gardening
  • Threads
  • About
  • Contact
  • Advertise
  • Privacy Policy
  • Careers
  • Copyright
  • Terms of Use
  • Accessibility
  • California Privacy Rights

© 2021 The Taunton Press, Inc. All rights reserved.

    Main Menu

  • How-To
  • Design
  • Tools & Materials
  • Video
  • Blogs
  • Forum
  • Reader Projects
  • Magazine
  • Members
  • FHB House
  • Podcasts

  • FHB Podcast
  • ProTalk
  • Account

  • Log In
  • Join

    Podcasts

  • FHB Podcast
  • ProTalk
  • Popular Topics

  • Kitchens
  • Business
  • Bedrooms
  • Roofs
  • Architecture and Design
  • Green Building
  • Decks
  • Framing
  • Safety
  • Remodeling
  • Bathrooms
  • Windows
  • Tilework
  • Ceilings
  • HVAC

    Magazine

  • Current Issue
  • Past Issues
  • Magazine Index
  • Subscribe
  • Online Archive
  • Author Guidelines

    All Access

  • Member Home
  • Start Free Trial
  • Gift Membership

    Shop the Store

  • Books
  • DVDs
  • Taunton Workshops

    More

  • FHB Ambassadors
  • Reader Projects
  • Podcast
  • Customer Support

    Account

  • Log In
  • Join

Newsletter

Get home building tips, offers, and expert advice in your inbox

Sign Up See all newsletters

Follow

Join All Access

Become a member and get instant access to thousands of videos, how-tos, tool reviews, and design features.

Start Your Free Trial

Subscribe

FHB Magazine

Start your subscription today and save up to 52%

Subscribe

We hope you’ve enjoyed your free articles. To keep reading, become a member today.

Get complete site access to expert advice, how-to videos, Code Check, and more, plus the print magazine.

Start your FREE trial

Already a member? Log in