Code Requirements for Fireplace Clearances
Avoid DIY disasters by following code-required clearances to combustibles, rules for hearth extensions, and trim-projection limits for elements above and beside the firebox opening.
Synopsis: There are two general categories of clearances around fireplaces—from the opening of the firebox to the interior space surrounding it, and from the exterior of the fireplace box to the interior framing—as well as additional rules for the hearth extension. Code expert Glenn Mathewson walks through the code requirements and describes how the easy availability of consumer building materials and rise in DIY projects have led to ignorance of fire-safety provisions.
There was a time when fireplaces made sense. We aren’t physically adapted to live in cold environments, so to avoid freezing to death in harsh winters, humans developed all kinds of skills, from stealing animal fur to harnessing fire. At some point, we began building rather than just finding shelter, and put fireplaces in those shelters to keep ourselves warm.
In the colonial period and for decades after, most Americans heated their homes by burning wood in masonry fireplaces. We’ve developed numerous technologies since then, any one of which renders the masonry fireplace obsolete. Yet such fireplaces persist, partly for nostalgic and partly for practical reasons having nothing to do with providing heat; they’re abundant in the stock of existing homes from times long past. New masonry fireplaces are not common in any urban environment (clean-air objectives in cities typically prohibit traditional fireplaces and limit their use), and the EPA strongly discourages them. But because so many fireplaces exist, and because some people are too nostalgic to build a home without one, we can’t forget how to remodel or trim around them safely.
Historical building codes
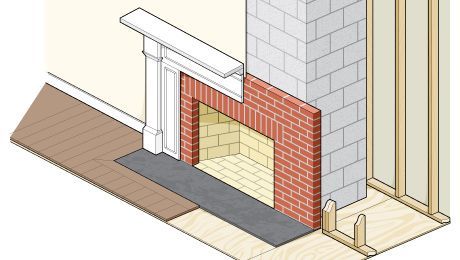
There are two general categories of clearances around fireplaces—from the opening of the firebox to the interior space surrounding it, and from the exterior of the fireplace box to the interior framing—as well as additional rules for the hearth extension. A century ago, building codes already recognized that fireplaces were not only warm centerpieces, they were also architectural. Ornate wood finishes and mantles just outside the opening of the fireplace were prone to charring and igniting. The earliest codes referred to an 8-in. or 12-in. clearance to wood finish depending on whether the fireplace face was brick or tile. Code writers back then simply fit the rules to the standard finish sizes of the day.
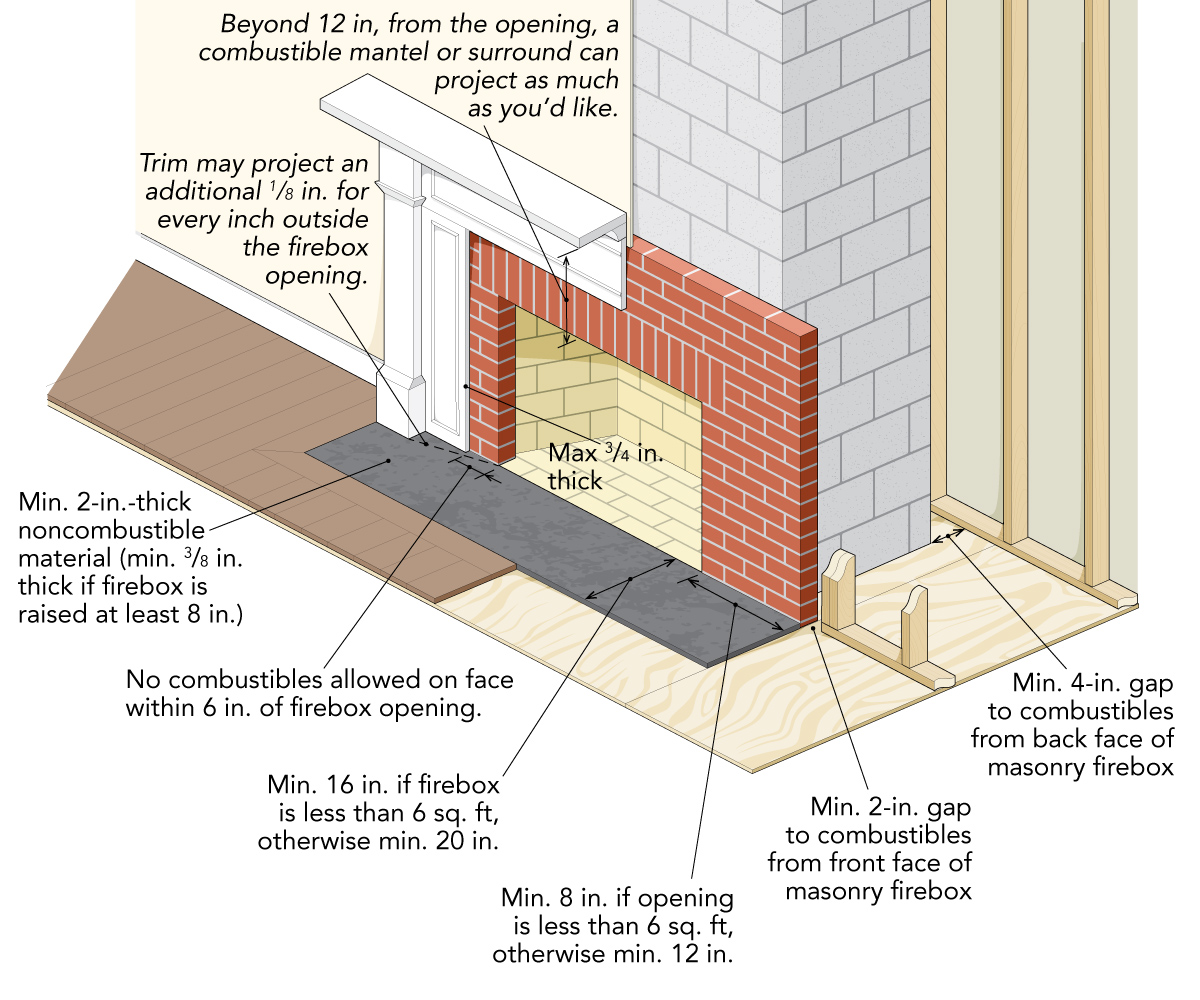
Still, the rather unscientific dimension of 12 in. stuck, and since the 1940s that has been the minimum distance from a fireplace opening to a projecting combustible mantel above it. It was also recognized that a mantel looks better with some trim below it, so an additional allowance was provided. Combustible trim on the face of the fireplace could be installed as close as 6 in. to the opening, but its projection is limited to 1⁄8 in. for every inch above the opening. This means that you can have 3⁄4-in.-thick trim beginning 6 in. from the fireplace opening, and it can taper or step outward to 11⁄2 in. at 12 in. above the opening, which is where the mantel typically sits.
Why materials matter
This allowance is unchanged today in section R1001.11 of the International Residential Code. What has changed is the easy availability of consumer building materials, rampant reckless DIY guidance across the internet and television, and widespread ignorance of these age-old fire-safety provisions, which results in increased fire risk. It’s important to note that while these dimensions were driven from traditional mantels, they apply to trim around the sides of the opening as well. If you want trim or a mantel closer to the firebox, there is a solution: Use approved noncombustible materials instead.
The clearances to wood studs, beams, joists, and other combustible framing and finishes from the exterior of the fireplace box are another consideration that builders of new homes typically get right, but that DIYers don’t. These clearances aren’t related to the radiant heat coming out of the opening, but to the conductive heat moving through the masonry box. The wood framing must be held back at least 2 in. from the sides and front of the fireplace and 4 in. from the back. This space can only be filled in order to meet fireblocking requirements. A 2-in. gap between your wall finish and fireplace isn’t going to look very good, so an exception to this rule allows finish materials such as gypsum board, flooring, and wood siding to contact the masonry; they can butt into the fireplace’s sidewalls so long as the masonry firebox is at least 12 in. thick between the point of contact and the inside face of the firebox. This thickness provides sufficient mass to disperse the heat and insulate the exterior surface that’s contacting combustibles.
The hearth is the noncombustible surface the fire burns on top of; the hearth extension takes the place of the flooring in the room just beyond the firebox. The extension protects the floor from sparks and embers cast out of the fire, but it doesn’t just cover the floor—it is the floor. And it must be supported by noncombustible materials. Framing similar to a stairwell leaves an opening for the noncombustible extension. A brick arch or concrete slab cantilever is formed from the hearth to the front edge of the hearth extension, which wraps around the sides of the opening as well. How far the extension projects beyond the fireplace opening depends on the size of the opening. If the opening is less than 6 sq. ft., the extension needs to extend at least 16 in. in front of and at least 8 in. beyond either side of the fireplace opening. For openings 6 sq. ft. or larger, the hearth-extension dimensions bump up to minimums of 20 in. in front of and 12 in. beyond the sides. The extension must be of concrete or masonry and at least 2 in. thick in most cases. The hearth extension’s thickness can be reduced if the firebox opening is raised at least 8 in. above the top of the hearth extension, to 3⁄8 in. of brick, concrete, stone, tile, or other approved noncombustible material.
Be wary of DIY suggestions
Among the bad DIY fireplace makeover advice you’ll find online are hearth-extension “updates” that involve wood, either as a base for other finishes or as part of the exposed finish of the extension. I cannot stress enough that modifications to the finish of the hearth extension can utilize only noncombustible brick, concrete, stone, tile, or other approved noncombustible materials. In the case that a gas fireplace or factory-built wood burning unit is installed that allows different finishes, remember that the existing hearth extension is not just built over a wood floor, or at least it shouldn’t be. Don’t break it apart before investigating its supporting design.
Factory-built fireplaces are a whole other ball of wax. Those tested in accordance with UL 127 can have reduced clearances to combustibles when permitted in the manufacturer’s installation instructions. The temperature-test procedures for zero clearance to the firebox require the internal temperature to reach 2030°F above room temperature, but the outside of the box cannot exceed 175°F over room temperature. Mantels above factory-built fireplaces are permitted to be closer than 12 in. to the opening provided they are tested in this manner and the fireplace installation instructions permit it.
Though building codes are generally considered restrictive, the use of referenced test standards is quite the opposite. A test standard levels the playing field for all materials, technologies, and creative ideas by creating a uniform protocol to evaluate different items for identical minimum performance. It’s a strange form of freedom within regulation if you open up your perspective.
Glenn Mathewson is a consultant and educator with BuildingCodeCollege.com.
From Fine Homebuilding #313
RELATED STORIES