FHB Logo Facebook LinkedIn Email Pinterest Twitter Instagram Plus Icon Close Icon Navigation Search Icon Navigation Search Icon Arrow Down Icon Video Guide Icon Article Guide Icon Modal Close Icon Guide Search Icon Skip to content
Subscribe

In every issue you'll find...

  • Expert insights on techniques and principles
  • Unbiased tool reviews
  • Step-by-step details to master the job
  • Field-tested advice and know-how
Subscribe Now!
Subscribe
  • How-To
  • Design
  • Tools & Materials
  • Videos
  • Blogs
  • Forum
  • Magazine
  • Members
  • FHB House
  • Podcast
  • Join
  • Log In
Subscribe

Fine Homebuilding Project Guides

Plumbing

Guide Home
Chapter
  • Plumbing Basics
  • Bathrooms
  • Kitchens
  • Roughing In
  • Water Heaters, Washers, and More
  • Maintenance and Repair
How-To

Installing a Farmhouse Sink

The process of installing this popular style of sink is different from but not much more complicated than that of a simple drop-in sink.
By Steve Cory

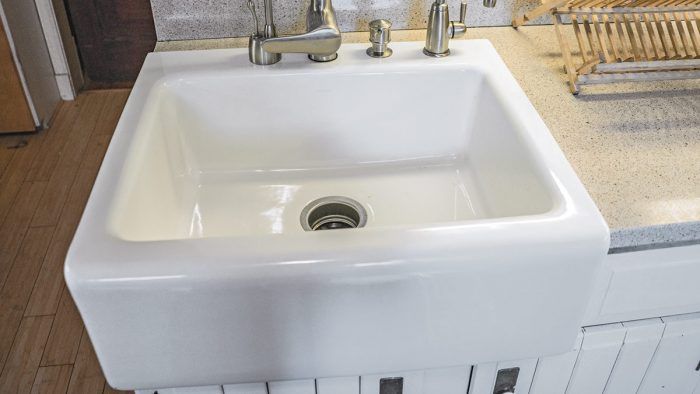
Also called an apron sink, a farmhouse sink is typically made of glazed ceramic and has one large basin and a front apron that forms a decorative vertical face. Because farmhouse sinks usually have thick walls and deep basins, they can take up more cabinet space than drop-in sinks, so take that into consideration when planning your new kitchen.

This article illustrates the installation of a self-rimming farmhouse sink, which is a do-it-yourself-friendly project because it rests on top of the countertop on three sides. Alternatively, installing undermount models or ones without flanges can be more complicated because of how they are supported and how they interface with the cabinetry, so that style isn’t covered here.

Plumbing a farmhouse sink is not much different from a standard sink. However, the cabinet opening must be prepared with care. It’s important that the countertop be level at all points, so the sink can rest firmly. This sink will be installed at the end of a countertop, so there is a panel on one side. The top of the panel is level with the top of the countertop.

PREP THE OPENING
1. PREP THE OPENING. A farmhouse sink rests in a cabinet opening rather than a hole in the countertop. The sink’s front may be flush with the faces of the abutting cabinets, or it may protrude an inch or two toward the person standing at the sink. Be certain you understand just how deep the opening needs to be. Because it will house a self-rimming sink, the cuts do not need to be perfect—they just need to be covered by the sink’s rim.


2. CUTTING A STONE TOP. It is possible to cut a granite or quartz countertop for a self-rimming sink. Use a grinder equipped with a diamond blade and cut slowly.


INSTALL PLUMBING BEFORE SETTING THE SINK
3. INSTALL PLUMBING BEFORE SETTING THE SINK. Install the faucet and garbage disposal as you would for a standard sink. We’ve filled all four of this sink’s holes with a faucet, hot-water dispenser, soap dispenser, and filtered drinking water faucet.


SET THE SINK
4. SET THE SINK. Working with a helper, set the sink in place and check underneath to be sure all your plumbing will line up. Then remove it, run a bead of clear or color-matched silicone caulk around the perimeter of the countertop, and set the sink on the caulk. Check that it is aligned correctly, with its back parallel to the wall, and wait at least a couple of hours for the caulk to harden before hooking up the plumbing underneath.


FINISH UP
5. FINISH UP. Hook up the drain and supply lines under the sink. Open the supply lines and run the water through the faucet and any appliances, watching carefully for any leaks below. If drips do appear, you usually need only tighten connections. You may choose to apply a bead of silicone caulk around the rim, for a more finished look.

Excerpted from Plumbing (The Taunton Press, 2016) by Steve Cory.

Sign up for eletters today and get the latest how-to from Fine Homebuilding, plus special offers.

Signing you up...

This site is protected by reCAPTCHA and the Google Privacy Policy and Terms of Service apply.
See all newsletters
See all newsletters
Previous: Installing a Drop-In Sink Next: Installing a Cast-Iron Kitchen Sink: Faucets and Drain

Guide

Plumbing

Chapter

Kitchens

Log in or create an account to post a comment.

Sign up Log in

Become a member and get full access to FineHomebuilding.com

Plumbing

Plumbing

Trusted, comprehensive guidance from the pros for tackling any plumbing project

View Project Guide

View All Project Guides »

Become a member and get unlimited site access, including the Plumbing Project Guide.

Start Free Trial

Plumbing Basics
  • Plumbing Systems
  • Materials
  • Plumbing Tools
Bathrooms
  • Sinks
  • Showers & Tubs
  • Toilets
Kitchens
  • Kitchen Sinks
  • Water Filtration
  • Appliances
Roughing In
  • Layout
  • Installation
  • Copper Pipe
  • PEX Tubing
  • PVC Drainpipe
Water Heaters, Washers, and More
  • Water Heaters
  • Whole-House Filters
  • Sump Pumps
  • Washers
  • Sprinkler Systems
Maintenance and Repair
  • Sinks
  • Toilets
  • Showers & Tubs
  • Systems

Fine Homebuilding

Follow

  • twitter
  • facebook
  • instagram
  • pinterest

Newsletter

Get home building tips, offers, and expert advice in your inbox

Signing you up...

This site is protected by reCAPTCHA and the Google Privacy Policy and Terms of Service apply.
See all newsletters
See all newsletters

Membership & Magazine

  • Online Archive
  • Start Free Trial
  • Magazine Subscription
  • Magazine Renewal
  • Gift a Subscription
  • Customer Support
  • Privacy Preferences

Taunton Network

  • Green Building Advisor
  • Fine Woodworking
  • Fine Gardening
  • Threads
  • About
  • Contact
  • Advertise
  • Careers
  • Copyright
  • Terms of Use
  • Site Map
  • Do not sell my information
  • Privacy Policy
  • Accessibility
  • California Privacy Rights

© 2022 The Taunton Press, Inc. All rights reserved.

X
X
This is a dialog window which overlays the main content of the page. The modal window is a 'site map' of the most critical areas of the site. Pressing the Escape (ESC) button will close the modal and bring you back to where you were on the page.

Main Menu

  • How-To
  • Design
  • Tools & Materials
  • Video
  • Blogs
  • Forum
  • Reader Projects
  • Magazine
  • Members
  • FHB House

Podcasts

  • FHB Podcast
  • ProTalk

Webinars

  • Upcoming and On-Demand

Account

  • Log In
  • Join

Podcasts

  • FHB Podcast
  • ProTalk

Webinars

  • Upcoming and On-Demand

Popular Topics

  • Kitchens
  • Business
  • Bedrooms
  • Roofs
  • Architecture and Design
  • Green Building
  • Decks
  • Framing
  • Safety
  • Remodeling
  • Bathrooms
  • Windows
  • Tilework
  • Ceilings
  • HVAC

Magazine

  • Current Issue
  • Past Issues
  • Magazine Index
  • Subscribe
  • Online Archive
  • Author Guidelines

All Access

  • Member Home
  • Start Free Trial
  • Gift Membership

Shop the Store

  • Books
  • DVDs
  • Taunton Workshops

More

  • FHB Ambassadors
  • Reader Projects
  • Podcast
  • Customer Support

Account

  • Log In
  • Join

Newsletter

Get home building tips, offers, and expert advice in your inbox

Signing you up...

This site is protected by reCAPTCHA and the Google Privacy Policy and Terms of Service apply.
See all newsletters
See all newsletters

Follow

  • twitter
  • facebook
  • instagram
  • pinterest

Join All Access

Become a member and get instant access to thousands of videos, how-tos, tool reviews, and design features.

Start Your Free Trial

Subscribe

FHB Magazine

Start your subscription today and save up to 70%

Subscribe

We hope you’ve enjoyed your free articles. To keep reading, become a member today.

Get complete site access to expert advice, how-to videos, Code Check, and more, plus the print magazine.

Start your FREE trial

Already a member? Log in