FHB Logo Facebook LinkedIn Email Pinterest Twitter Instagram Plus Icon Close Icon Navigation Search Icon Navigation Search Icon Arrow Down Icon Video Guide Icon Article Guide Icon Modal Close Icon Guide Search Icon Skip to content
Subscribe

In every issue you'll find...

  • Expert insights on techniques and principles
  • Unbiased tool reviews
  • Step-by-step details to master the job
  • Field-tested advice and know-how
Subscribe Now!
Subscribe
  • How-To
  • Design
  • Tools & Materials
  • Videos
  • Blogs
  • Forum
  • Magazine
  • Members
  • FHB House
  • Podcast
  • Join
  • Log In
Subscribe

Fine Homebuilding Project Guides

Tiling

Guide Home
Chapter
  • Selecting Tile
  • Tools & Techniques
  • Installation Materials
  • Preparation
  • Tiling Floors
  • Tiling Walls & Backsplashes
  • Tiling Showers
  • Grouting, Sealing & Caulking
  • Maintenance & Repair
How-To

Mitered Joints Make a Tiled Shower Niche Shine

All you need for tight-fitting miters in tile is an angle grinder and a steady hand.

By Joshua Oduin Issue 279 – Kitchens & Baths 2018

After ten years of building tiled shower niches many different ways, I’ve developed some techniques that ensure the niche blends with the surrounding wall tile and acts as an accent to bring the bathroom together, not an eyesore that mars the wall. The approach can be adapted to any tile style by varying the techniques for finishing the edges. Subway tile, for example, can usually be purchased with factory bullnose edging that aligns nicely with the exterior of the box. For porcelain and marble, on the other hand, I create my own edging elements, as shown here.

If you’re mitering the joints between the wall tiles and niche tiles, as I am here, the wall tiles must protrude into the niche box by the thickness of the tile and thinset, and be mitered before you install them. It’s better that the wall tiles protrude into the opening too much than too little, since you can always put more thinset on the niche tiles to move them inward.

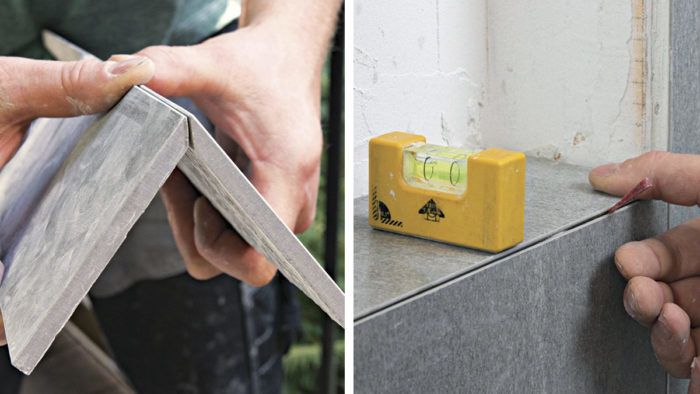
It might seem counterintuitive, but I’ve found it easier to grind these miters by hand than cut them with a tile saw. Tile-saw blades tend to deflect, especially on today’s dense porcelain tiles, and this often causes chipping along the cut edges. Instead, use an angle grinder (I prefer a cordless model) equipped with a diamond cutting blade. The key is using the factory edge as your guide, working your way up to a blunt edge as you form the miter—but stopping just short of it to avoid a brittle knife edge. If the thin line formed by the blunt edge is consistent, you’ll have a consistent miter.

smoothing tile for shower niche

miter for outside edge of tile

The other trick is grinding the miter a little steeper than 45° to be sure the all-important outside edge will come together cleanly.

use a polishing pad for perfect miter

After I get the miter close with the diamond blade, I switch to a 200-grit polishing pad, which offers more control as I sneak up on the perfect miter.

sand cut surfaces for tiled shower niche

The last step is to hit all the cut surfaces and sharp corners with a 60-grit diamond hand pad before installation.

tile sanding

pieces come together for a tiled shower niche

leveling a tiled shower niche

For more on this process, and to learn about Joshua Oduin’s approach to integrating this tiled shower niche into the bathroom design, read the entire feature article:

How to Build a Better Shower Niche – A tile and stone pro offers detailed instructions for designing and installing a beautiful, custom niche with any type of tile.

Sign up for eletters today and get the latest how-to from Fine Homebuilding, plus special offers.

Signing you up...

This site is protected by reCAPTCHA and the Google Privacy Policy and Terms of Service apply.
See all newsletters
See all newsletters
Previous: How to Build a Better Shower Niche Next: Installing a Shower Niche

Guide

Tiling

Chapter

Tiling Showers

View Comments

  1. user-7629907 | Jan 27, 2020 03:21am | #1

    Outstanding

Log in or create an account to post a comment.

Sign up Log in

Become a member and get full access to FineHomebuilding.com

Tiling

Tiling

Trusted, comprehensive guidance from the pros for a great-looking tile job in any room of the house

View Project Guide

View All Project Guides »

Become a member and get unlimited site access, including the Tiling Project Guide.

Start Free Trial

Selecting Tile
  • The Basics
  • Tile Options
Tools & Techniques
  • Job-Preparation Tools
  • Cutting Tiles
  • Setting & Grouting Tools
Installation Materials
  • Membranes & Substrates
  • Adhesives & Mortars
  • Grout
  • Sealers & Caulk
  • Spacers, Hardware & Trim
Preparation
  • The Prep Job
  • Repairs & Surface Prep
  • Installing Backerboard
Tiling Floors
  • Layout & Installation
  • Setting Specialty Tiles
Tiling Walls & Backsplashes
  • Preparation
  • Backsplashes
  • Walls
Tiling Showers
  • Tile Shower Basics
  • Waterproofing
  • Shower Pans
  • Shower Drains
  • Shower Niches
  • Video Series: Tile a Shower
  • Video Series: Tile a Barrier-Free Bathroom
Grouting, Sealing & Caulking
  • Grouting
  • Caulking
  • Sealing
Maintenance & Repair
  • Maintenance
  • Tile Repair
  • Grout Repair

Fine Homebuilding

Follow

  • twitter
  • facebook
  • instagram
  • pinterest

Newsletter

Get home building tips, offers, and expert advice in your inbox

Signing you up...

This site is protected by reCAPTCHA and the Google Privacy Policy and Terms of Service apply.
See all newsletters
See all newsletters

Membership & Magazine

  • Online Archive
  • Start Free Trial
  • Magazine Subscription
  • Magazine Renewal
  • Gift a Subscription
  • Customer Support
  • Privacy Preferences

Taunton Network

  • Green Building Advisor
  • Fine Woodworking
  • Fine Gardening
  • Threads
  • About
  • Contact
  • Advertise
  • Careers
  • Copyright
  • Terms of Use
  • Site Map
  • Do not sell or share my information
  • Privacy Policy
  • Accessibility
  • California Privacy Rights

© 2023 The Taunton Press, Inc. All rights reserved.

X
X
This is a dialog window which overlays the main content of the page. The modal window is a 'site map' of the most critical areas of the site. Pressing the Escape (ESC) button will close the modal and bring you back to where you were on the page.

Main Menu

  • How-To
  • Design
  • Tools & Materials
  • Video
  • Blogs
  • Forum
  • Reader Projects
  • Magazine
  • Members
  • FHB House

Podcasts

  • FHB Podcast
  • ProTalk

Webinars

  • Upcoming and On-Demand

Account

  • Log In
  • Join

Podcasts

  • FHB Podcast
  • ProTalk

Webinars

  • Upcoming and On-Demand

Popular Topics

  • Kitchens
  • Business
  • Bedrooms
  • Roofs
  • Architecture and Design
  • Green Building
  • Decks
  • Framing
  • Safety
  • Remodeling
  • Bathrooms
  • Windows
  • Tilework
  • Ceilings
  • HVAC

Magazine

  • Current Issue
  • Past Issues
  • Magazine Index
  • Subscribe
  • Online Archive
  • Author Guidelines

All Access

  • Member Home
  • Start Free Trial
  • Gift Membership

Shop the Store

  • Books
  • DVDs
  • Taunton Workshops

More

  • FHB Ambassadors
  • Reader Projects
  • Podcast
  • Customer Support

Account

  • Log In
  • Join

Newsletter

Get home building tips, offers, and expert advice in your inbox

Signing you up...

This site is protected by reCAPTCHA and the Google Privacy Policy and Terms of Service apply.
See all newsletters
See all newsletters

Follow

  • twitter
  • facebook
  • instagram
  • pinterest

Join All Access

Become a member and get instant access to thousands of videos, how-tos, tool reviews, and design features.

Start Your Free Trial

Subscribe

FHB Magazine

Start your subscription today and save up to 70%

Subscribe

We hope you’ve enjoyed your free articles. To keep reading, become a member today.

Get complete site access to expert advice, how-to videos, Code Check, and more, plus the print magazine.

Start your FREE trial

Already a member? Log in