FHB Logo Facebook LinkedIn Email Pinterest Twitter Instagram Plus Icon Close Icon Navigation Search Icon Navigation Search Icon Arrow Down Icon Video Guide Icon Article Guide Icon Modal Close Icon Guide Search Icon Skip to content
Subscribe

In every issue you'll find...

  • Expert insights on techniques and principles
  • Unbiased tool reviews
  • Step-by-step details to master the job
  • Field-tested advice and know-how
Subscribe Now!
Subscribe
  • How-To
  • Design
  • Tools & Materials
  • Videos
  • Blogs
  • Forum
  • Magazine
  • Members
  • FHB House
  • Podcast
  • Join
  • Log In
Subscribe

Fine Homebuilding Project Guides

Tiling

Guide Home
Chapter
  • Selecting Tile
  • Tools & Techniques
  • Installation Materials
  • Preparation
  • Tiling Floors
  • Tiling Walls & Backsplashes
  • Tiling Showers
  • Grouting, Sealing & Caulking
  • Maintenance & Repair
How-To

Sealing Terra-Cotta Pavers

Apply one of the many finishing systems available for sealing pavers and Saltillos.

By Robin Nicholas, Michael Schweit

Terra-cotta pavers look great when treated with a top finish. Applied in addition to a sealer, a top finish enhances durability, ease of cleaning, and gives the tiles a great, sophisticated look. There are myriad finishing systems made for sealing pavers and Saltillos, each offering a slightly different look and finish.

As always, we prefer to use water-based finishes because they have a lower toxicity, have less odor, and are easier to clean up than solvent-based products. Just make sure that the finish you select is compatible with the tile sealer you used by checking with the manufacturer; the wrong product can ruin the look of an entire job.

Most terra-cotta finishing systems consist of two or three products 1. The first is a sealer that’s applied to the tile before grouting.

In addition to preventing the grout from staining the tile, this sealer makes it easier to clean the grout from the tile faces during wipe down. The second product is a top-coat finish that, depending on the particular product, gives the tile either a natural, matte, or glossy finish. The top coat is usually applied in several applications. Some finishing systems include a third product: a wax-type finish that is easy to reapply to make tile look fresh again, after long usage has dulled the finish. Some manufacturers will combine the second and third steps in a single product, for ease of use.

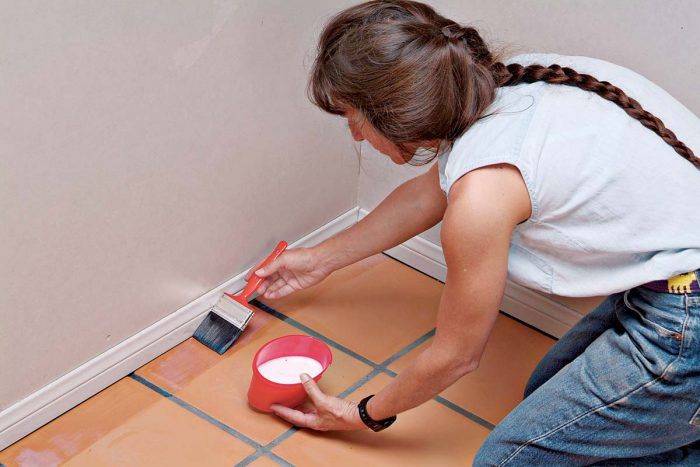
The application of any terra-cotta finishing product is quite straightforward. If you’re finishing a small area, use a plastic bucket and a brush, sponge, or clean rag as an applicator. Brush the sealer on evenly, beginning with the perimeter of a manageable area, probably about 4 sq. ft., coating the tile face and grout joints 2. Let it dry according to the directions and apply a second or third coat as necessary. For larger floors, apply the sealer with a paint roller with a 1/4-in. nap mounted on a pole handle (this will save your back). Pour the liquid into a 5-gal. pail fitted with a bucket grid 3, dip the roller into the bucket and roll it a few times across the grid, to remove excess liquid. This prevents the sealer from going on too thick. Roll the sealer onto the floor, making sure the tile faces and grout joints are fully covered 4. If some puddling occurs, use the roller to spread the finish to adjacent areas. You may also use a pad-type applicator instead of a roller 5. Let the sealer dry according to the directions, then apply the second and (if used) third finishing products, brushing or rolling each on in a perpendicular direction to the previous coat 6.

Most Saltillo finishing systems consist of two or three products. 1.  Most Saltillo finishing systems consist of two or three products.
Wipe the sealer on evenly, coating the tile face and grout joints with a damp paintbrush. 2.  Wipe the sealer on evenly, coating the tile face and grout joints with a damp paintbrush.
For large floors, apply the sealer with a paint roller with a 1⁄4-in. nap, mounted on a pole handle. 3.  For large floors, apply the sealer with a paint roller with a 1⁄4-in. nap, mounted on a pole handle.
Roll the sealer onto the floor, making sure tile faces and grout joints are fully covered. 4.  Roll the sealer onto the floor, making sure tile faces and grout joints are fully covered.
You may use a pad-type applicator in lieu of a brush or roller to apply floor-finishing products. 5.  You may use a pad-type applicator in lieu of a brush or roller to apply floor-finishing products.
Apply subsequent coats of floor-finishing products at right angles to previous coats. 6.  Apply subsequent coats of floor-finishing products at right angles to previous coats.

Tiling Complete, 2nd EditionExcerpted from Tiling Complete, 2nd Edition by Robin Nicholas and Michael Schweit.

Available in the Taunton Store and at Amazon.com.

Sign up for eletters today and get the latest how-to from Fine Homebuilding, plus special offers.

Signing you up...

This site is protected by reCAPTCHA and the Google Privacy Policy and Terms of Service apply.
See all newsletters
See all newsletters
Previous: Sealing Tile and Grout Next: Sealing Natural Stone

Guide

Tiling

Chapter

Grouting, Sealing & Caulking

Log in or create an account to post a comment.

Sign up Log in

Become a member and get full access to FineHomebuilding.com

Tiling

Tiling

Trusted, comprehensive guidance from the pros for a great-looking tile job in any room of the house

View Project Guide

View All Project Guides »

Become a member and get unlimited site access, including the Tiling Project Guide.

Start Free Trial

Selecting Tile
  • The Basics
  • Tile Options
Tools & Techniques
  • Job-Preparation Tools
  • Cutting Tiles
  • Setting & Grouting Tools
Installation Materials
  • Membranes & Substrates
  • Adhesives & Mortars
  • Grout
  • Sealers & Caulk
  • Spacers, Hardware & Trim
Preparation
  • The Prep Job
  • Repairs & Surface Prep
  • Installing Backerboard
Tiling Floors
  • Layout & Installation
  • Setting Specialty Tiles
Tiling Walls & Backsplashes
  • Preparation
  • Backsplashes
  • Walls
Tiling Showers
  • Tile Shower Basics
  • Waterproofing
  • Shower Pans
  • Shower Drains
  • Shower Niches
  • Video Series: Tile a Shower
  • Video Series: Tile a Barrier-Free Bathroom
Grouting, Sealing & Caulking
  • Grouting
  • Caulking
  • Sealing
Maintenance & Repair
  • Maintenance
  • Tile Repair
  • Grout Repair

Fine Homebuilding

Follow

  • twitter
  • facebook
  • instagram
  • pinterest

Newsletter

Get home building tips, offers, and expert advice in your inbox

Signing you up...

This site is protected by reCAPTCHA and the Google Privacy Policy and Terms of Service apply.
See all newsletters
See all newsletters

Membership & Magazine

  • Online Archive
  • Start Free Trial
  • Magazine Subscription
  • Magazine Renewal
  • Gift a Subscription
  • Customer Support
  • Privacy Preferences

Taunton Network

  • Green Building Advisor
  • Fine Woodworking
  • Fine Gardening
  • Threads
  • About
  • Contact
  • Advertise
  • Careers
  • Copyright
  • Terms of Use
  • Site Map
  • Do not sell my information
  • Privacy Policy
  • Accessibility
  • California Privacy Rights

© 2022 The Taunton Press, Inc. All rights reserved.

X
X
This is a dialog window which overlays the main content of the page. The modal window is a 'site map' of the most critical areas of the site. Pressing the Escape (ESC) button will close the modal and bring you back to where you were on the page.

Main Menu

  • How-To
  • Design
  • Tools & Materials
  • Video
  • Blogs
  • Forum
  • Reader Projects
  • Magazine
  • Members
  • FHB House

Podcasts

  • FHB Podcast
  • ProTalk

Webinars

  • Upcoming and On-Demand

Account

  • Log In
  • Join

Podcasts

  • FHB Podcast
  • ProTalk

Webinars

  • Upcoming and On-Demand

Popular Topics

  • Kitchens
  • Business
  • Bedrooms
  • Roofs
  • Architecture and Design
  • Green Building
  • Decks
  • Framing
  • Safety
  • Remodeling
  • Bathrooms
  • Windows
  • Tilework
  • Ceilings
  • HVAC

Magazine

  • Current Issue
  • Past Issues
  • Magazine Index
  • Subscribe
  • Online Archive
  • Author Guidelines

All Access

  • Member Home
  • Start Free Trial
  • Gift Membership

Shop the Store

  • Books
  • DVDs
  • Taunton Workshops

More

  • FHB Ambassadors
  • Reader Projects
  • Podcast
  • Customer Support

Account

  • Log In
  • Join

Newsletter

Get home building tips, offers, and expert advice in your inbox

Signing you up...

This site is protected by reCAPTCHA and the Google Privacy Policy and Terms of Service apply.
See all newsletters
See all newsletters

Follow

  • twitter
  • facebook
  • instagram
  • pinterest

Join All Access

Become a member and get instant access to thousands of videos, how-tos, tool reviews, and design features.

Start Your Free Trial

Subscribe

FHB Magazine

Start your subscription today and save up to 70%

Subscribe

We hope you’ve enjoyed your free articles. To keep reading, become a member today.

Get complete site access to expert advice, how-to videos, Code Check, and more, plus the print magazine.

Start your FREE trial

Already a member? Log in