FHB Logo Facebook LinkedIn Email Pinterest Twitter X Instagram Tiktok YouTube Plus Icon Close Icon Navigation Search Icon Navigation Search Icon Arrow Down Icon Video Guide Icon Article Guide Icon Modal Close Icon Guide Search Icon Skip to content
Subscribe
Log In
  • How-To
  • Design
  • Tools & Materials
  • Restoration
  • Videos
  • Blogs
  • Forum
  • Magazine
  • Members
  • FHB House
  • Podcast
Log In

Fine Homebuilding Project Guides

Tiling

Guide Home
  • Selecting Tile
  • Tools & Techniques
  • Installation Materials
  • Preparation
  • Tiling Floors
  • Tiling Walls & Backsplashes
  • Tiling Showers
  • Grouting, Sealing & Caulking
  • Maintenance & Repair
How-To

Tiling a Backsplash with a Decorative Border

Follow these guidelines to set a row of decorative tile within the field tiles.

By Robin Nicholas, Michael Schweit
  • X
  • facebook
  • linkedin
  • pinterest
  • email
  • add to favorites Log in or Sign up to save your favorite articles

To prepare for an efficient installation, make sure you have all of your materials at hand 1. If you had to repair the wall to prep it for tile, spread the thinset carefully to avoid stripping off the fiberglass mesh tape 2. Take care to comb the thinset thoroughly in one direction for better tile adhesion 3.

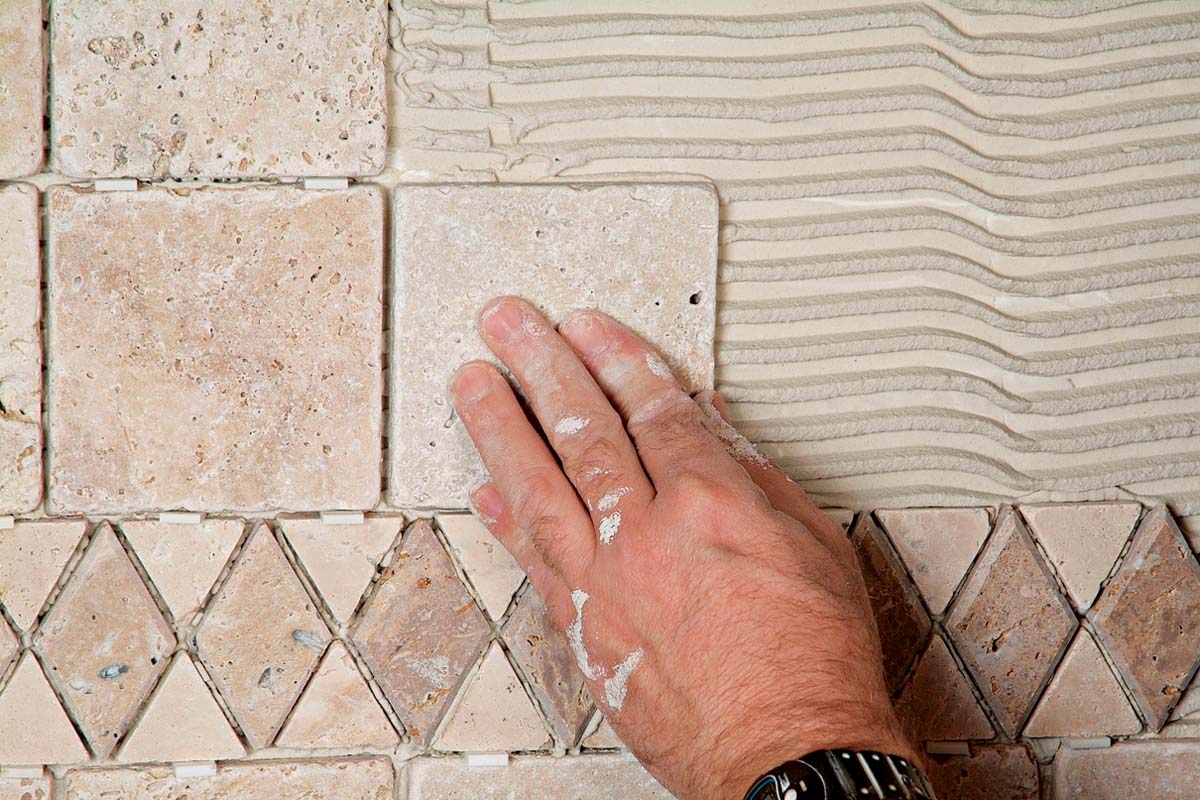
Press the first row of tile in place, aligning the grout joints with the countertop tiles, if necessary. Level the row, adjusting individual tile height with wedges 4. If your design includes decorative border tiles, set them in place carefully 5, using wedges to adjust the tiles for even spacing and to create a properly sized grout joint between the border and the row of tiles below it 6. Continue setting the remaining rows of field tiles above the border, pressing them firmly into the thinset 7.

Cut and set tiles around electrical outlets and switches as necessary, leaving enough clearance for mounting screws and to allow for the metal ears of the switch or receptacle to rest on the tile. Cut the tiles for the backsplash’s top row as needed and set them in place.

Because tumbled stone tiles like the ones used in this example often don’t have available edge trim, you need to make your own trim tiles for the finished edges of the splash. After cutting edge tiles to size, round over and rough up the outside edge of each, using a pair of tile nippers 8. The idea is to make the cut edge look similar to a bullnose edge 9. The decorative border adds an interesting focal point in the finished backsplash 10.

Having all backsplash tiling materials close by makes for an easier installation.
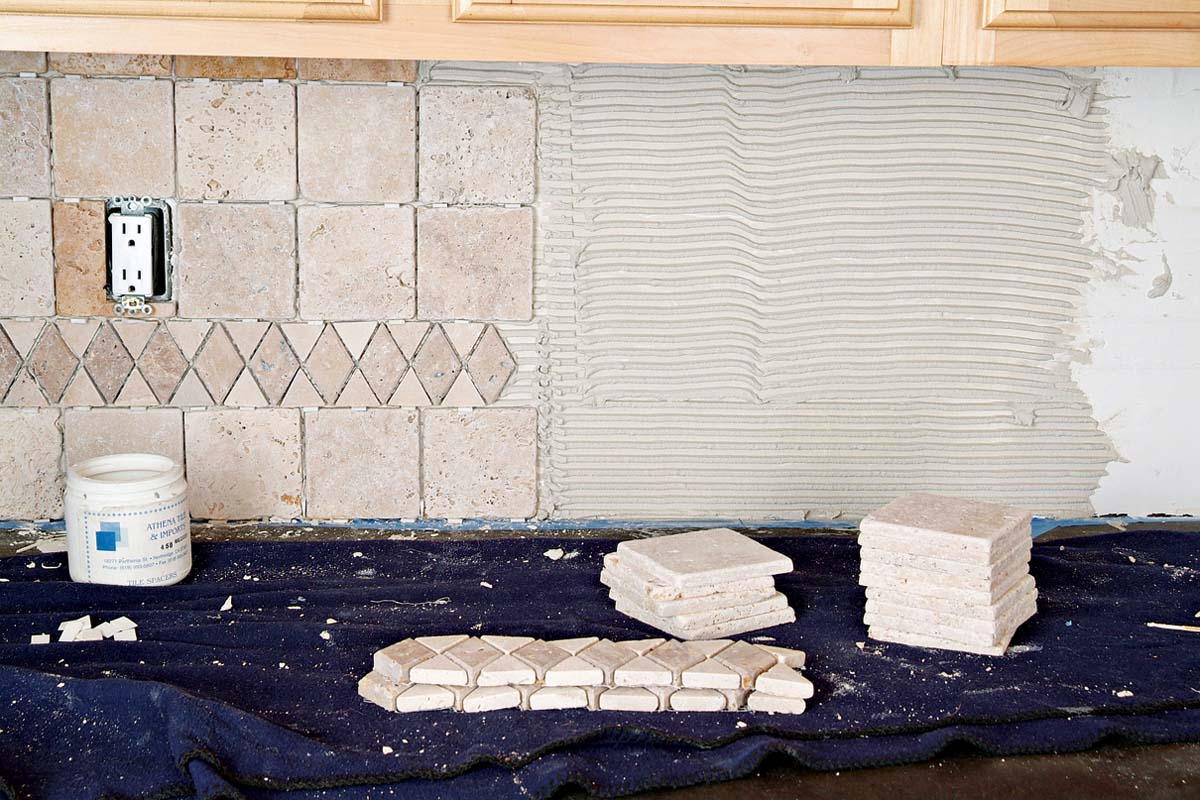
1.  Having all backsplash tiling materials close by makes for an easier installation.
Apply thinset carefully over any repaired and taped area of a wall.
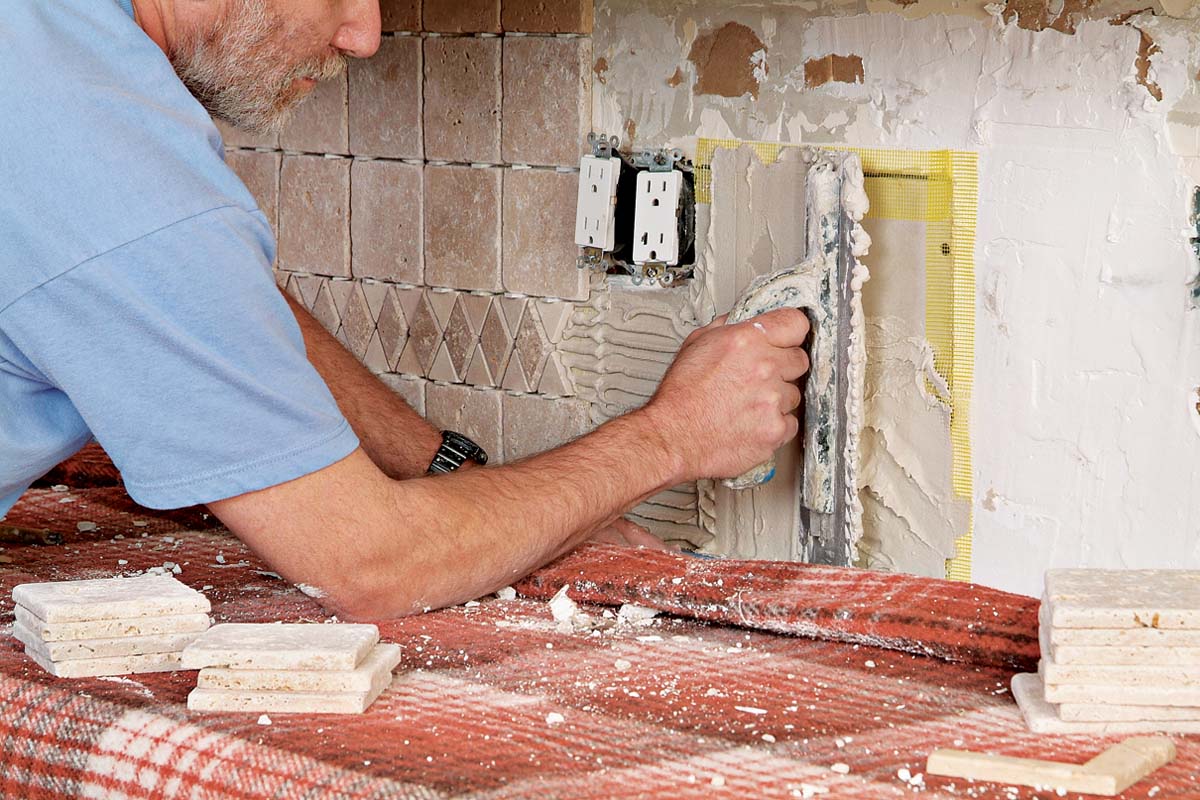
2.  Apply thinset carefully over any repaired and taped area of a wall.
Comb thinset on the wall in one direction, for best adhesion.
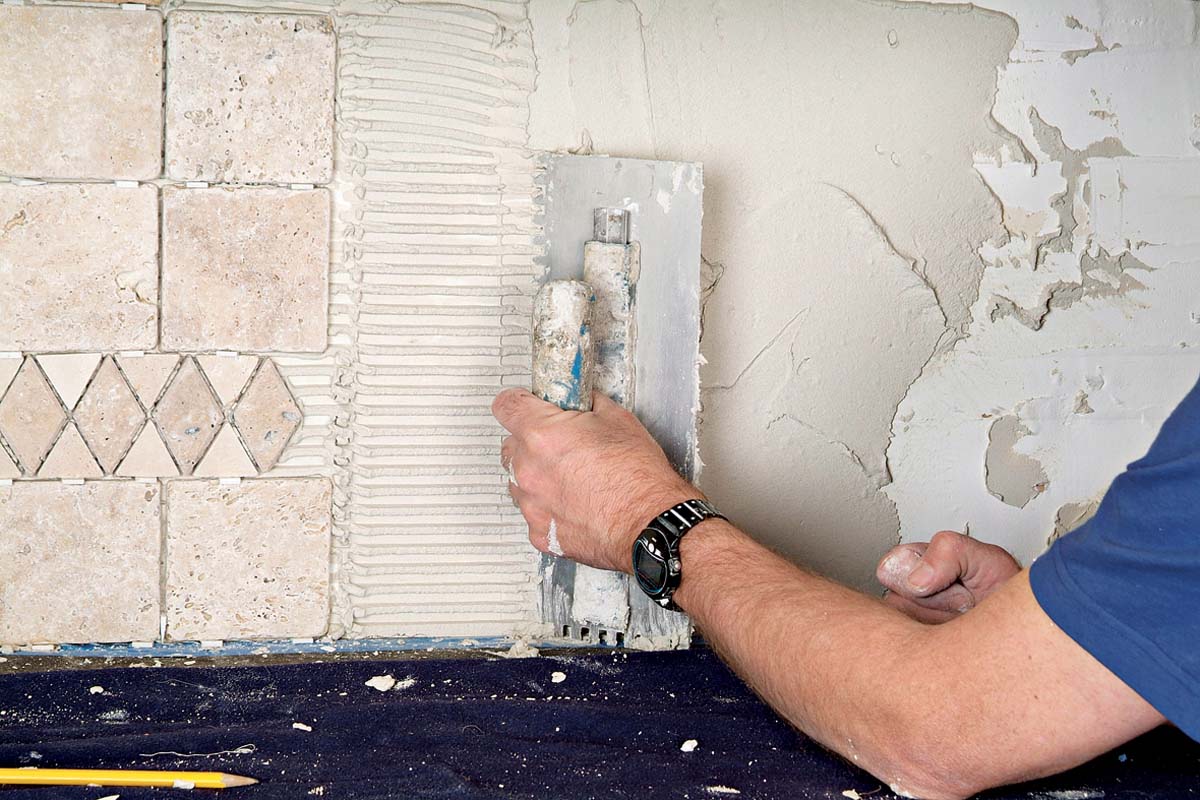
3.  Comb thinset on the wall in one direction, for best adhesion.
After setting the first row of tiles, use a level to check for straightness. Add wedges to adjust tile height as necessary.
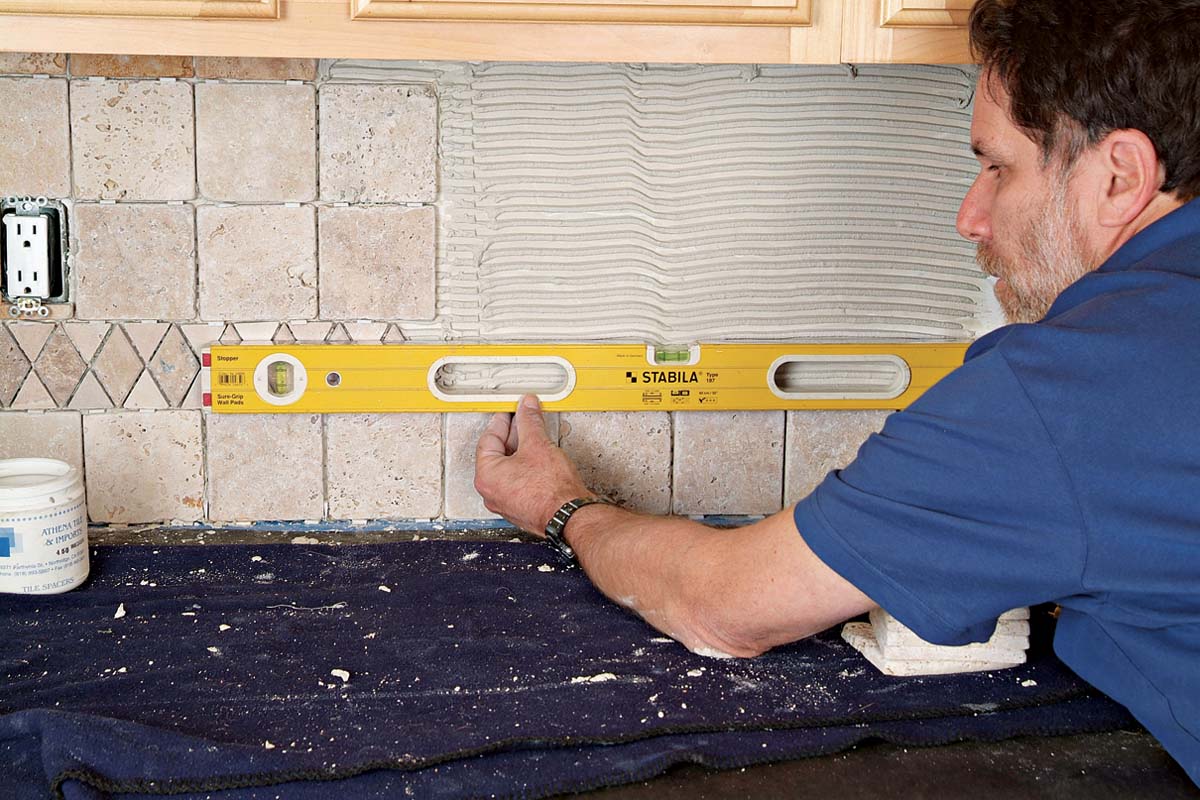
4.  After setting the first row of tiles, use a level to check for straightness. Add wedges to adjust tile height as necessary.
A decorative strip of tiles is set above the first row of tile, and below the level of electrical boxes.
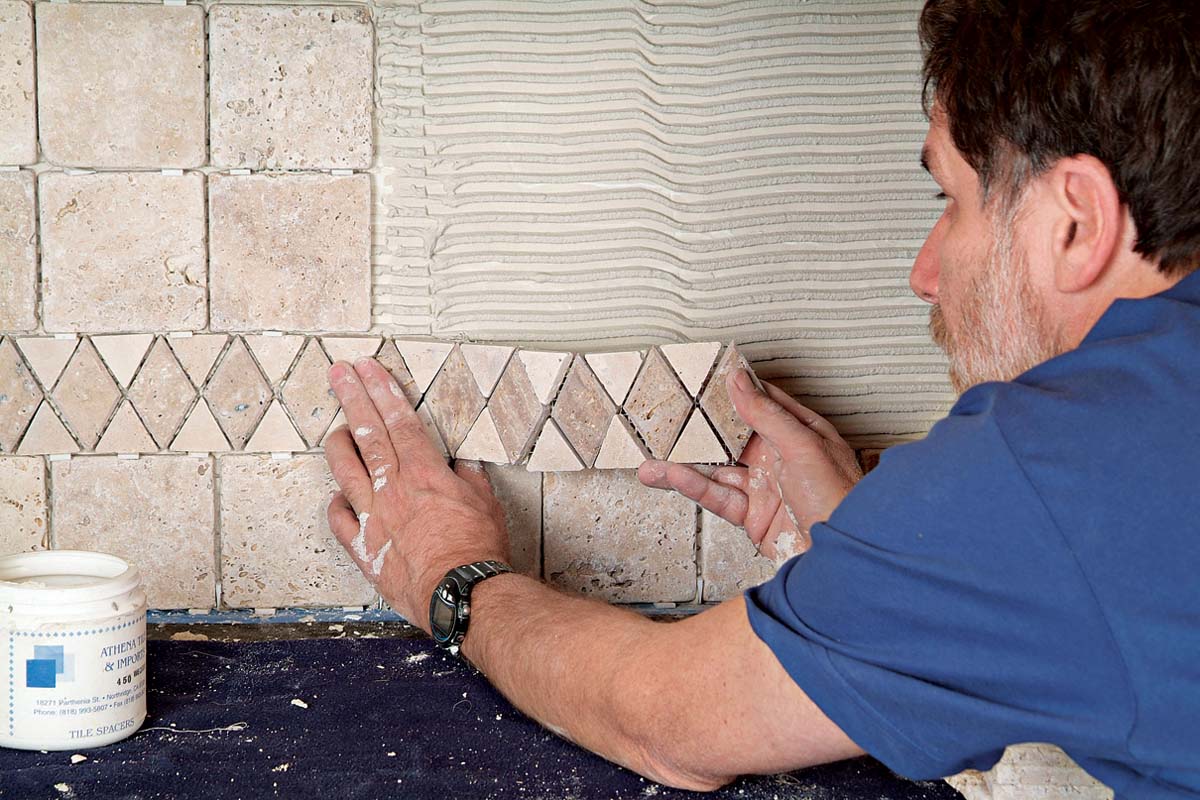
5.  A decorative strip of tiles is set above the first row of tile, and below the level of electrical boxes.
Insert wedges to help maintain an even grout joint.
6.  Insert wedges to help maintain an even grout joint.
Press each tile firmly into the wet thinset on the wall.
7.  Press each tile firmly into the wet thinset on the wall.
Use a pair of tile nippers to shape and rough up the otherwise sharp cut edge of a tumbled tile.
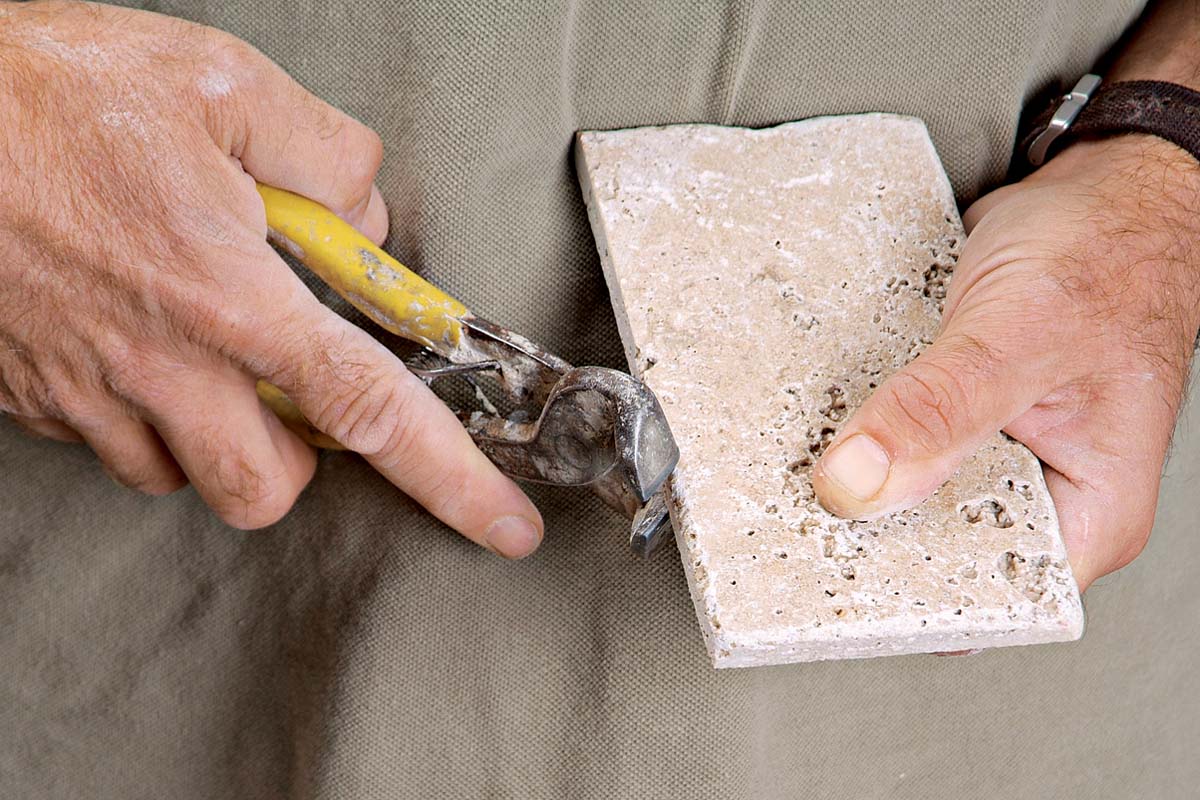
8.  Use a pair of tile nippers to shape and rough up the otherwise sharp cut edge of a tumbled tile.
Round the edge of tumbled stone field tiles to make a nice clean finished edge.
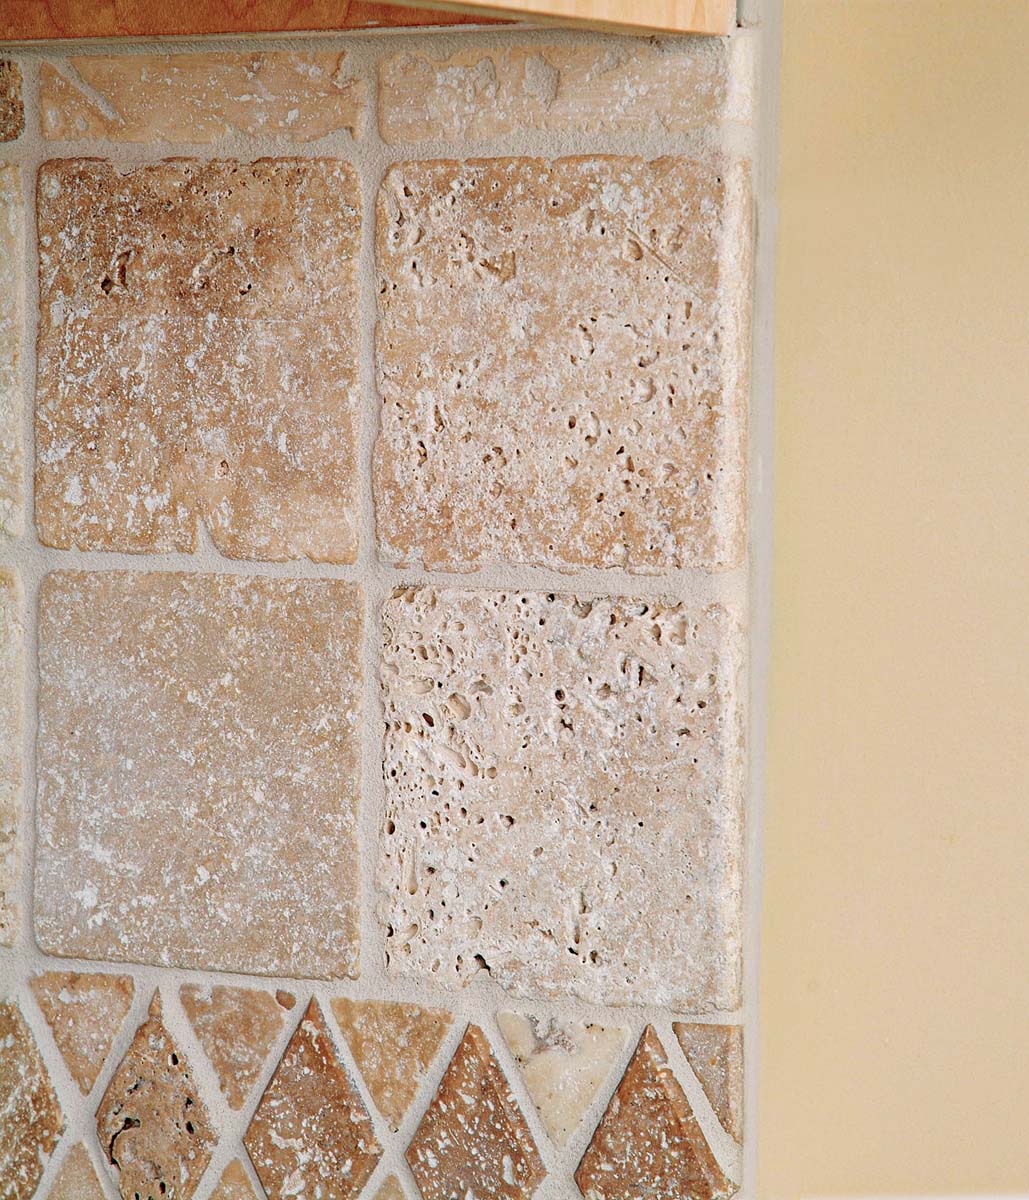
9.  Round the edge of tumbled stone field tiles to make a nice clean finished edge.
The finished installation with geometric stone border tiles.
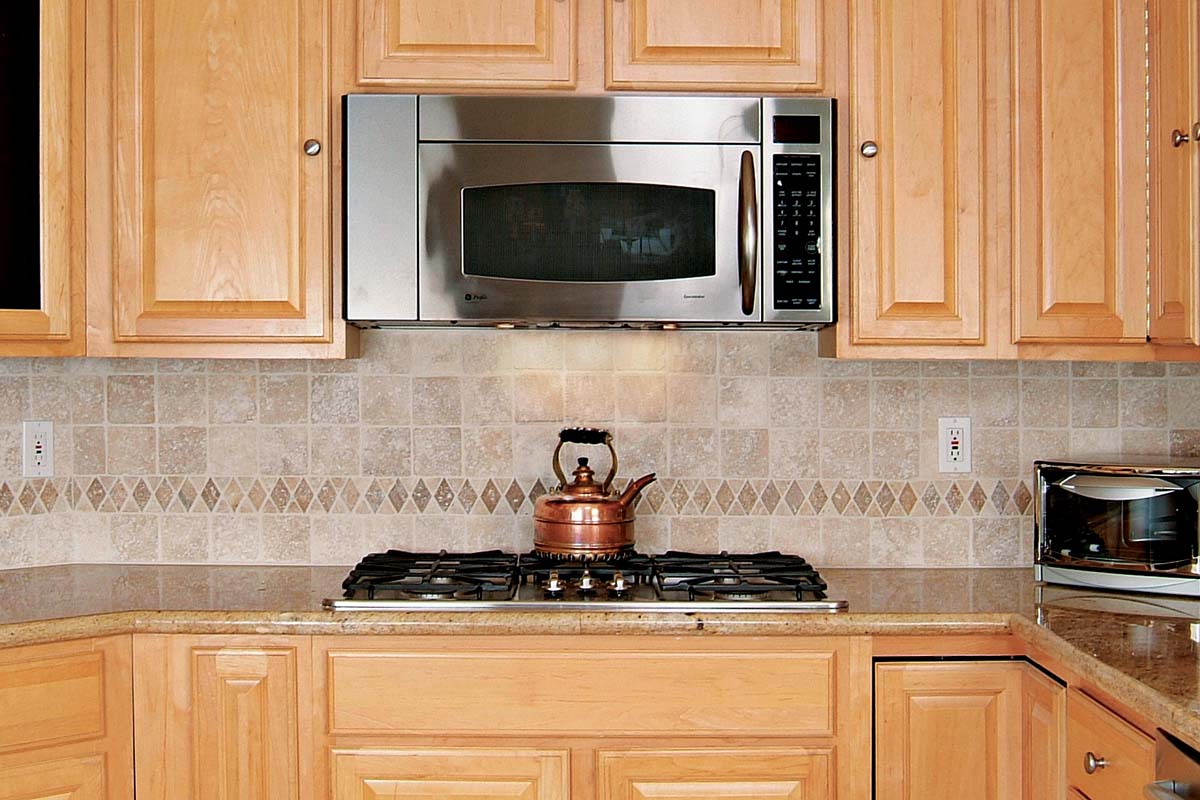
10.  The finished installation with geometric stone border tiles.
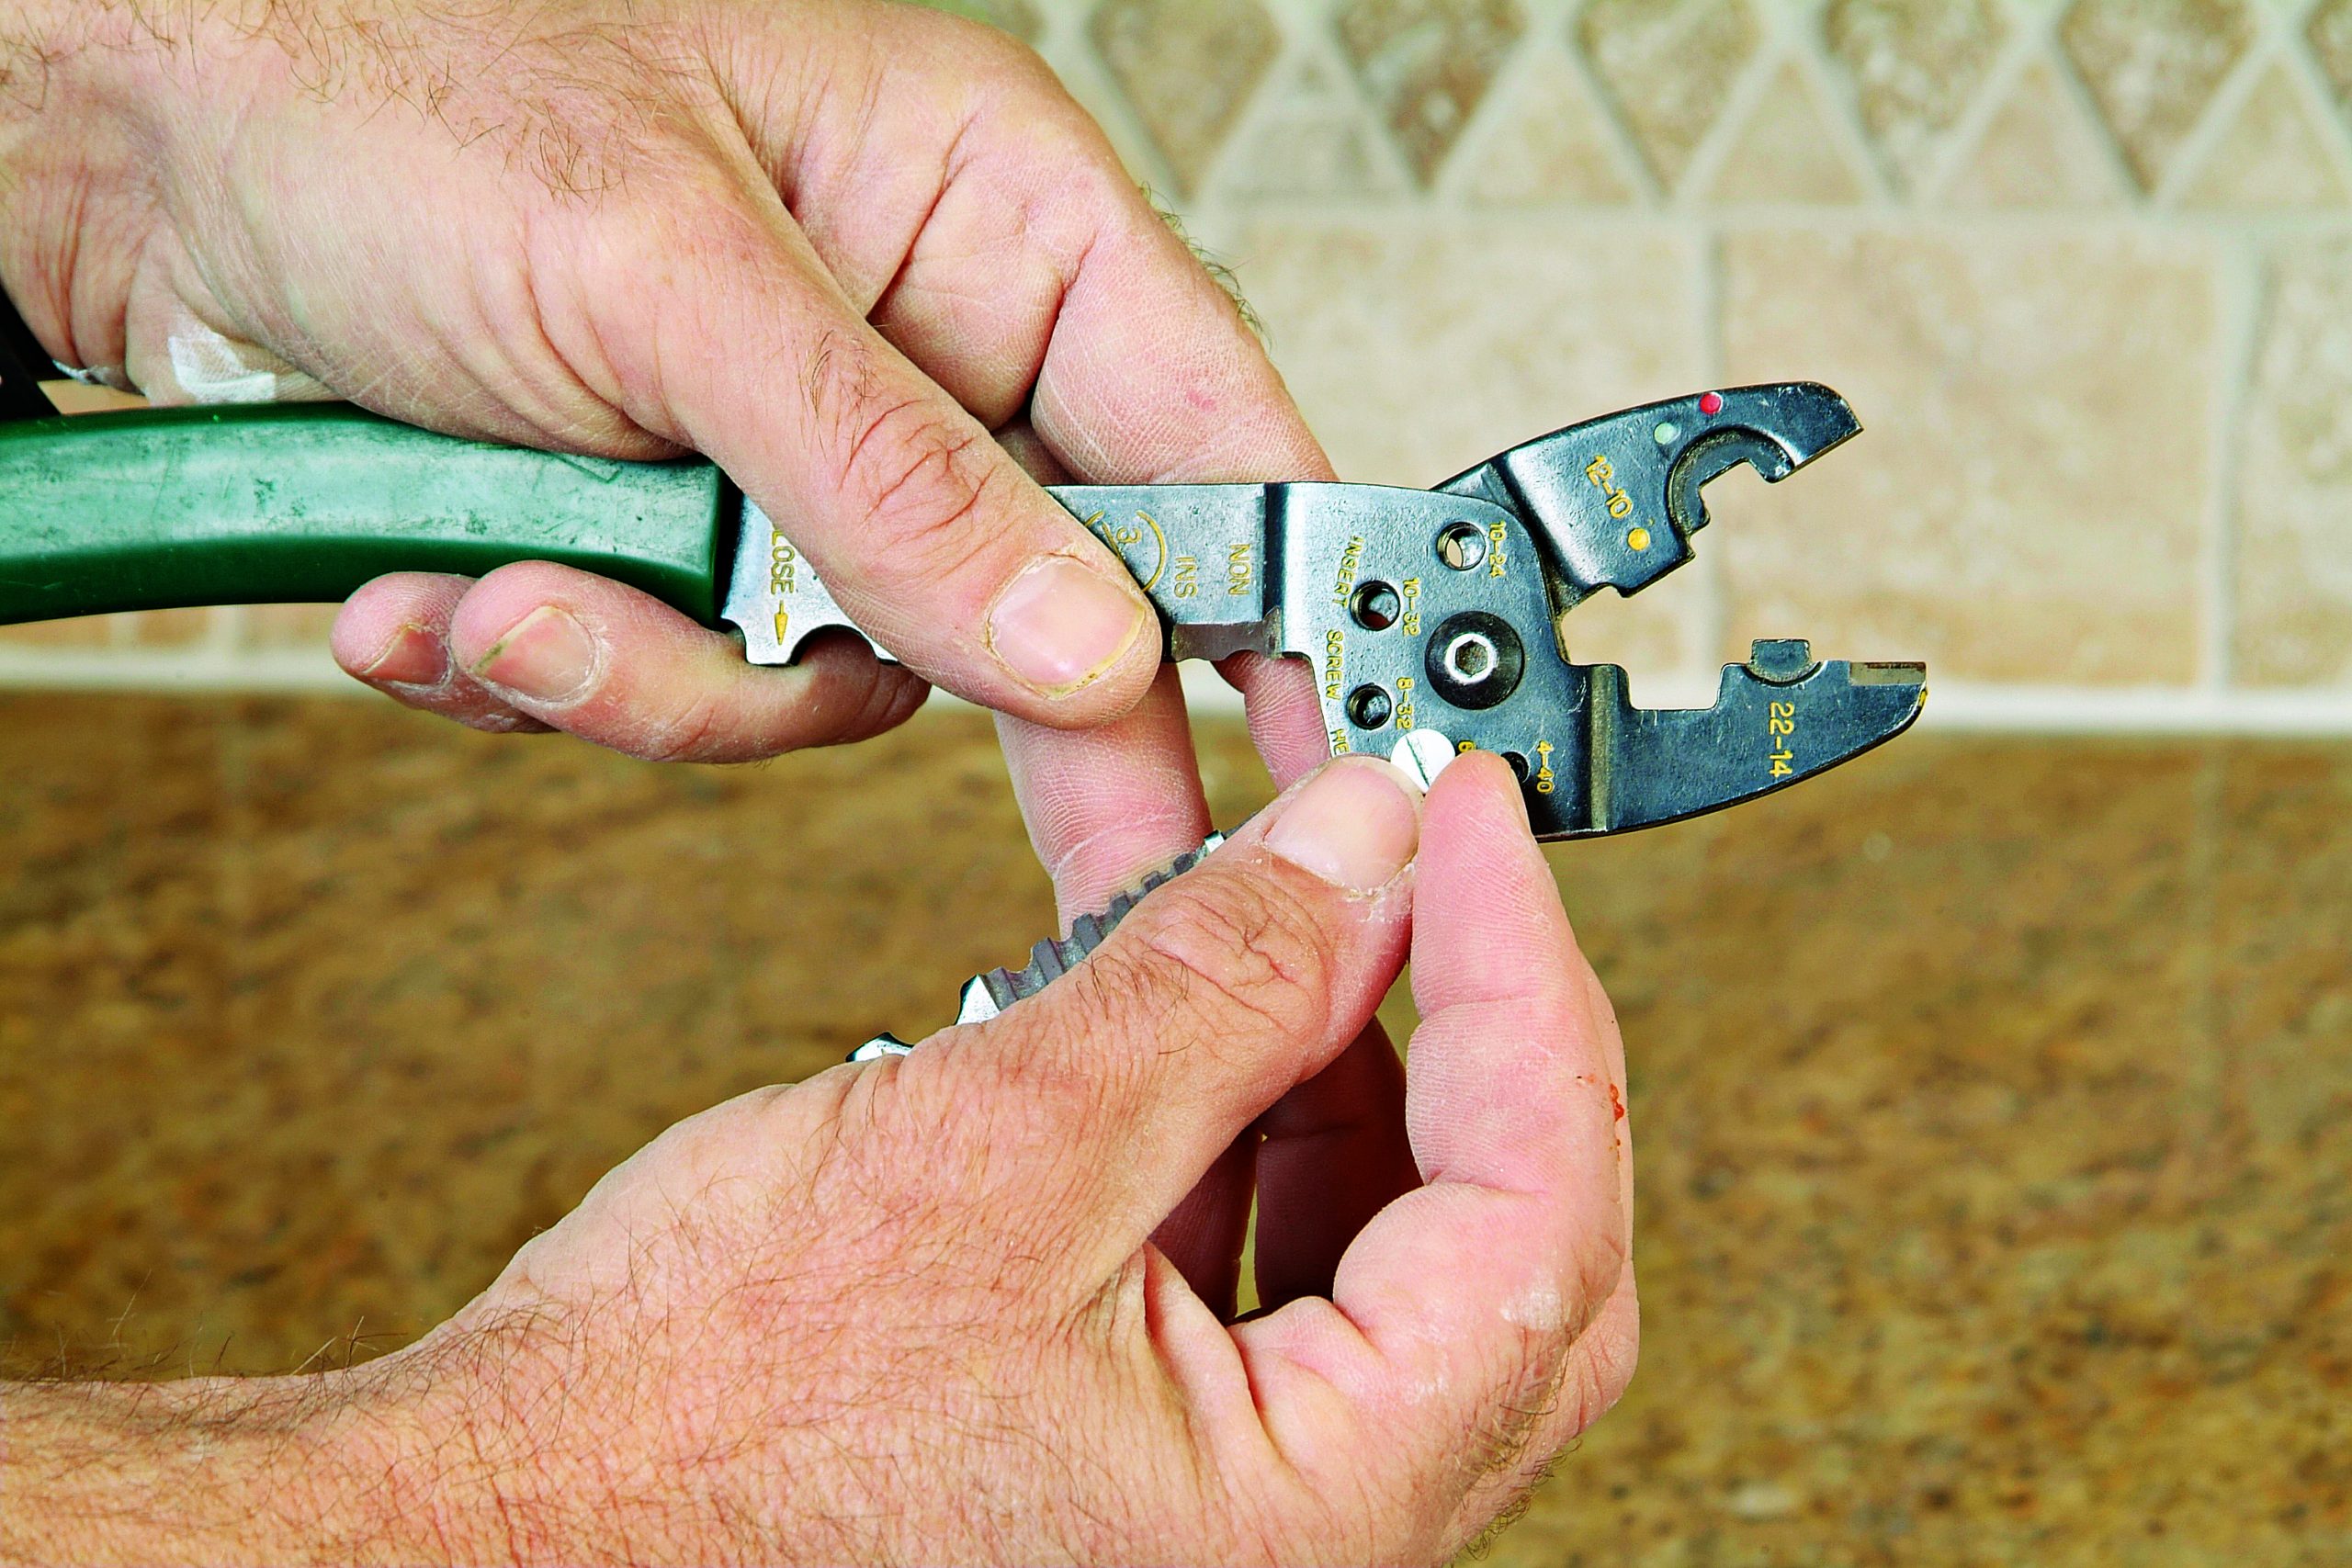
 

Cutting It Short

If you plan to use Decora-type electrical fixtures, cut about two and a half threads of each screw off with an electrician’s multicrimp and strip tool. This leaves the screws long enough to grab the electrical fixture but not strike the tile surface.

Decora-type electrical fixtures


Tiling Complete, 2nd EditionExcerpted from Tiling Complete, 2nd Edition by Robin Nicholas and Michael Schweit.

Available in the Taunton Store and at Amazon.com.


Previous: How to Tile a Backsplash: Installing a Tile Mosaic Next: Tiling a Backsplash with Decorative Tile Inserts

Guide

Tiling

Chapter

Tiling Walls & Backsplashes

Sign up for eletters today and get the latest how-to from Fine Homebuilding, plus special offers.

Signing you up...

This site is protected by reCAPTCHA and the Google Privacy Policy and Terms of Service apply.
See all newsletters
See all newsletters

Log in or create an account to post a comment.

Sign up Log in

Become a member and get full access to FineHomebuilding.com

Tiling

Tiling

Trusted, comprehensive guidance from the pros for a great-looking tile job in any room of the house

View Project Guide

View All Project Guides »

Become a member and get unlimited site access, including the Tiling Project Guide.

Start Free Trial

Selecting Tile
  • The Basics
  • Tile Options
Tools & Techniques
  • Job-Preparation Tools
  • Cutting Tiles
  • Setting & Grouting Tools
Installation Materials
  • Membranes & Substrates
  • Adhesives & Mortars
  • Grout
  • Sealers & Caulk
  • Spacers, Hardware & Trim
Preparation
  • The Prep Job
  • Repairs & Surface Prep
  • Installing Backerboard
Tiling Floors
  • Layout & Installation
  • Setting Specialty Tiles
Tiling Walls & Backsplashes
  • Preparation
  • Backsplashes
  • Walls
Tiling Showers
  • Tile Shower Basics
  • Waterproofing
  • Shower Pans
  • Shower Drains
  • Shower Niches
  • Video Series: Tile a Shower
  • Video Series: Tile a Barrier-Free Bathroom
Grouting, Sealing & Caulking
  • Grouting
  • Caulking
  • Sealing
Maintenance & Repair
  • Maintenance
  • Tile Repair
  • Grout Repair

Fine Home Building

Newsletter Sign-up

  • Fine Homebuilding

    Home building tips, offers, and expert advice in your inbox.

  • Green Building Advisor

    Building science and energy efficiency advice, plus special offers, in your inbox.

  • Old House Journal

    Repair, renovation, and restoration tips, plus special offers, in your inbox.

Signing you up...

This site is protected by reCAPTCHA and the Google Privacy Policy and Terms of Service apply.
See all newsletters

Follow

  • Fine Homebuilding

    Dig into cutting-edge approaches and decades of proven solutions with total access to our experts and tradespeople.

    Start Free Trial Now
    • Facebook
    • Instagram
    • X
    • LinkedIn
  • GBA Prime

    Get instant access to the latest developments in green building, research, and reports from the field.

    Start Free Trial Now
    • Facebook
    • YouTube
  • Old House Journal

    Learn how to restore, repair, update, and decorate your home.

    Subscribe Now
    • Facebook
    • Instagram
    • X

Membership & Magazine

  • Online Archive
  • Start Free Trial
  • Magazine Subscription
  • Magazine Renewal
  • Gift a Subscription
  • Customer Support
  • Privacy Preferences
  • About
  • Contact
  • Advertise
  • Careers
  • Terms of Use
  • Site Map
  • Do not sell or share my information
  • Privacy Policy
  • Accessibility
  • California Privacy Rights

© 2025 Active Interest Media. All rights reserved.

Fine Homebuilding receives a commission for items purchased through links on this site, including Amazon Associates and other affiliate advertising programs.

  • Home Group
  • Antique Trader
  • Arts & Crafts Homes
  • Bank Note Reporter
  • Cabin Life
  • Cuisine at Home
  • Fine Gardening
  • Fine Woodworking
  • Green Building Advisor
  • Garden Gate
  • Horticulture
  • Keep Craft Alive
  • Log Home Living
  • Military Trader/Vehicles
  • Numismatic News
  • Numismaster
  • Old Cars Weekly
  • Old House Journal
  • Period Homes
  • Popular Woodworking
  • Script
  • ShopNotes
  • Sports Collectors Digest
  • Threads
  • Timber Home Living
  • Traditional Building
  • Woodsmith
  • World Coin News
  • Writer's Digest
Active Interest Media logo
X
X
This is a dialog window which overlays the main content of the page. The modal window is a 'site map' of the most critical areas of the site. Pressing the Escape (ESC) button will close the modal and bring you back to where you were on the page.

Main Menu

  • How-To
  • Design
  • Tools & Materials
  • Video
  • Blogs
  • Forum
  • Project Guides
  • Reader Projects
  • Magazine
  • Members
  • FHB House

Podcasts

  • FHB Podcast
  • ProTalk

Webinars

  • Upcoming and On-Demand

Podcasts

  • FHB Podcast
  • ProTalk

Webinars

  • Upcoming and On-Demand

Popular Topics

  • Kitchens
  • Business
  • Bedrooms
  • Roofs
  • Architecture and Design
  • Green Building
  • Decks
  • Framing
  • Safety
  • Remodeling
  • Bathrooms
  • Windows
  • Tilework
  • Ceilings
  • HVAC

Magazine

  • Current Issue
  • Past Issues
  • Magazine Index
  • Subscribe
  • Online Archive
  • Author Guidelines

All Access

  • Member Home
  • Start Free Trial
  • Gift Membership

Online Learning

  • Courses
  • Project Guides
  • Reader Projects
  • Podcast

More

  • FHB Ambassadors
  • FHB House
  • Customer Support

Account

  • Log In
  • Join

Newsletter

Get home building tips, offers, and expert advice in your inbox

Signing you up...

This site is protected by reCAPTCHA and the Google Privacy Policy and Terms of Service apply.
See all newsletters
See all newsletters

Follow

  • X
  • YouTube
  • instagram
  • facebook
  • pinterest
  • Tiktok

Join All Access

Become a member and get instant access to thousands of videos, how-tos, tool reviews, and design features.

Start Your Free Trial

Subscribe

FHB Magazine

Start your subscription today and save up to 70%

Subscribe

We hope you’ve enjoyed your free articles. To keep reading, become a member today.

Get complete site access to expert advice, how-to videos, Code Check, and more, plus the print magazine.

Start your FREE trial

Already a member? Log in

Privacy Policy Update

We use cookies, pixels, script and other tracking technologies to analyze and improve our service, to improve and personalize content, and for advertising to you. We also share information about your use of our site with third-party social media, advertising and analytics partners. You can view our Privacy Policy here and our Terms of Use here.

Cookies

Analytics

These cookies help us track site metrics to improve our sites and provide a better user experience.

Advertising/Social Media

These cookies are used to serve advertisements aligned with your interests.

Essential

These cookies are required to provide basic functions like page navigation and access to secure areas of the website.

Delete My Data

Delete all cookies and associated data