FHB Logo Facebook LinkedIn Email Pinterest Twitter Instagram Plus Icon Close Icon Navigation Search Icon Navigation Search Icon Arrow Down Icon Video Guide Icon Article Guide Icon Modal Close Icon Guide Search Icon Skip to content
Subscribe

In every issue you'll find...

  • Expert insights on techniques and principles
  • Unbiased tool reviews
  • Step-by-step details to master the job
  • Field-tested advice and know-how
Subscribe Now!
Subscribe
  • How-To
  • Design
  • Tools & Materials
  • Videos
  • Blogs
  • Forum
  • Magazine
  • Members
  • FHB House
  • Podcast
  • Join
  • Log In
Subscribe

Fine Homebuilding Project Guides

Tiling

Guide Home
Chapter
  • Selecting Tile
  • Tools & Techniques
  • Installation Materials
  • Preparation
  • Tiling Floors
  • Tiling Walls & Backsplashes
  • Tiling Showers
  • Grouting, Sealing & Caulking
  • Maintenance & Repair
How-To

Tiling a Glass Mosaic Backsplash

Be sure to prep the wall with an antifracture membrane before spreading the thinset and setting the glass tile.

By Robin Nicholas, Michael Schweit

Glass tile backsplashes require a slightly different procedure than is used for setting other kinds of tile. First, it’s essential to install an antifracture membrane underneath the glass tile because glass expands and contracts more than stone or ceramic tile. Without the membrane, a glass tile installation can fail, leaving you with cracked tiles that need replacing.

Learn more about Antifracture Membranes

Spread the thinset on with a 3/16-in. V-notched trowel on an area that can be set in 15 minutes (about 2 sq. ft. to 4 sq. ft.). Apply the thinset with the flat side of the trowel, to key it in 1. Then comb the thinset with the notched side of the trowel, working in one direction and striving for an even surface 2. It’s very important to apply a thin layer of the thinset that’s just enough to bond the tile to the wall. A too-thick layer causes shrinkage that can actually crack tiles as the thinset dries. Now go over the thinset with the flat side of the trowel, to flatten out the ridges and create a smooth, even surface 3. Any ridges from the notched trowel, debris, or patterns left in the thinset may show through the glass tile.

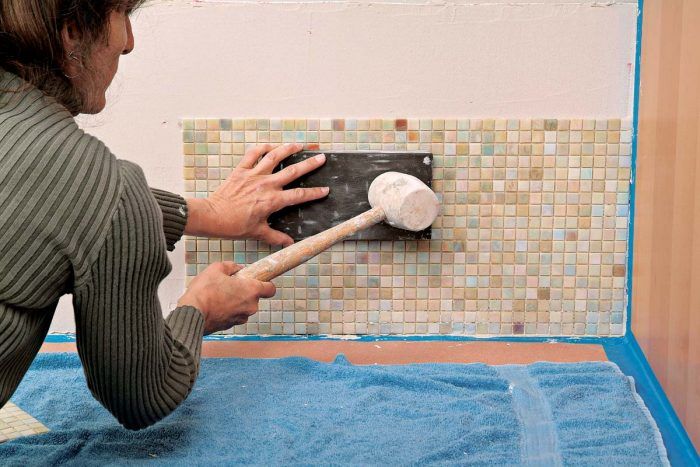
Carefully press the mesh-backed sheets of tile into the thinset 4. After several sheets are in place, use a beater block and mallet to embed the tile into the thinset and smooth out the tile surface 5. You can easily cut any sheet of tile into smaller pieces to fill in areas that are less than a full sheet. Use a sharp razor knife as the netting can be tough to cut 6.

Glass tiles do not generally come with trim shapes, although a few manufacturers are starting to make them. For a finished look to your glass backsplash, lay full tiles right up to the ends of the splash. Later, apply a fine line of grout along the edge to finish it off cleanly 7.

Spread thinset over the wall that’s been prepared with an antifracture membrane. 
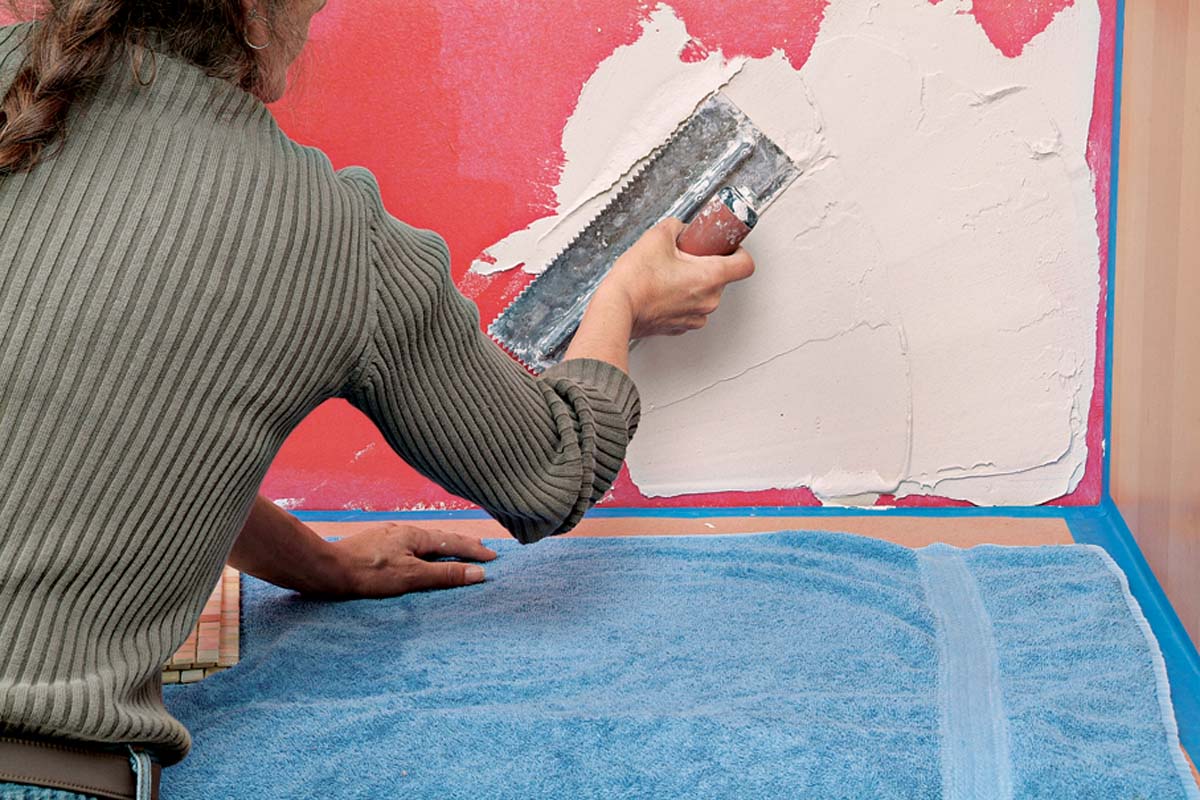
1.  Spread thinset over the wall that’s been prepared with an antifracture membrane.
Comb the thinset to even it out, gauging its depth with a V-notched trowel. Keep your trowel lines straight and parallel. 
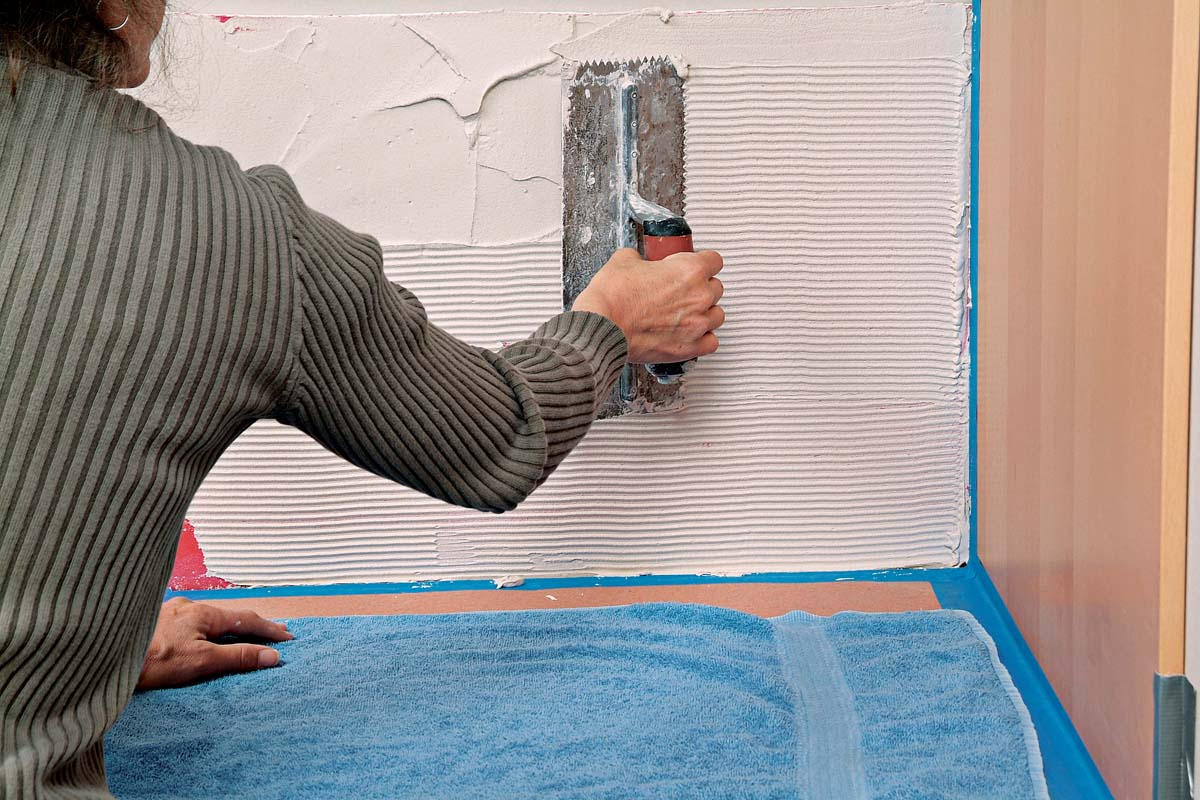
2.  Comb the thinset to even it out, gauging its depth with a V-notched trowel. Keep your trowel lines straight and parallel.
To prevent trowel ridges from showing through the glass tile, smooth ridges out with the flat side of your trowel. 
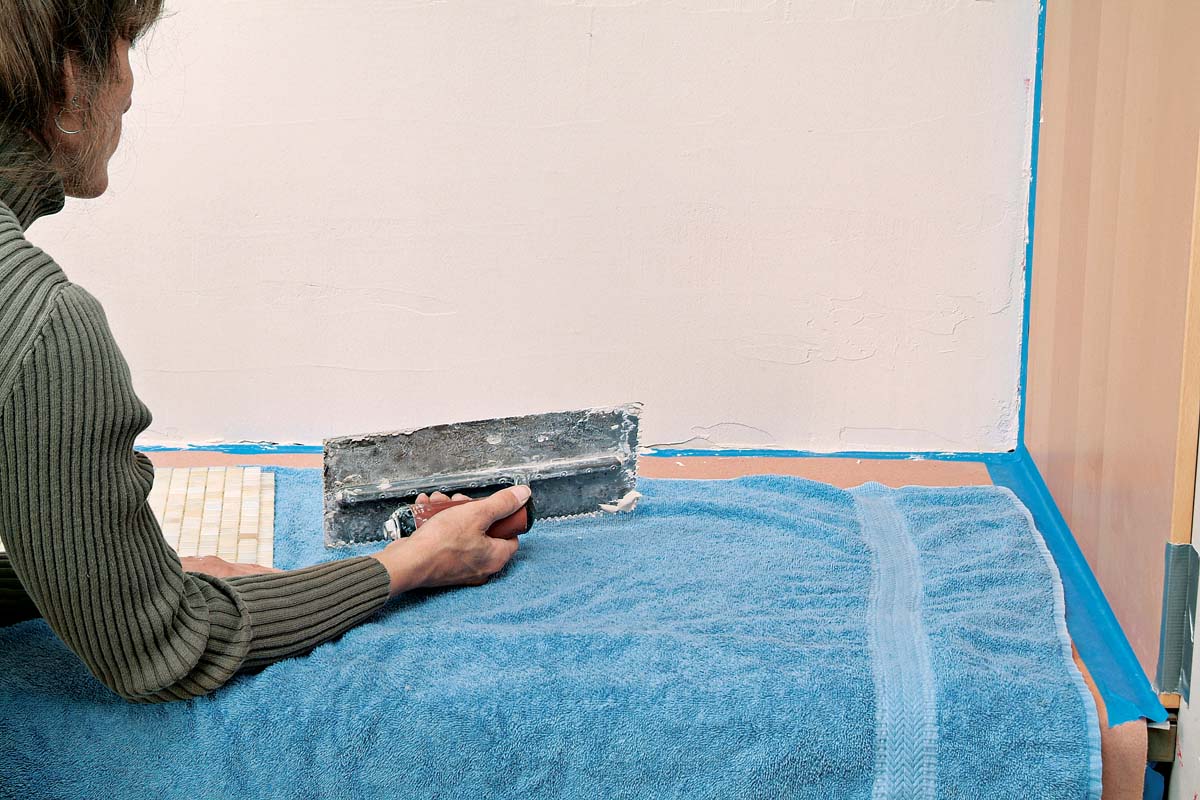
3.  To prevent trowel ridges from showing through the glass tile, smooth ridges out with the flat side of your trowel.
Apply sheets of the glass mosaic tile to the thinset, carefully pressing them in place. 
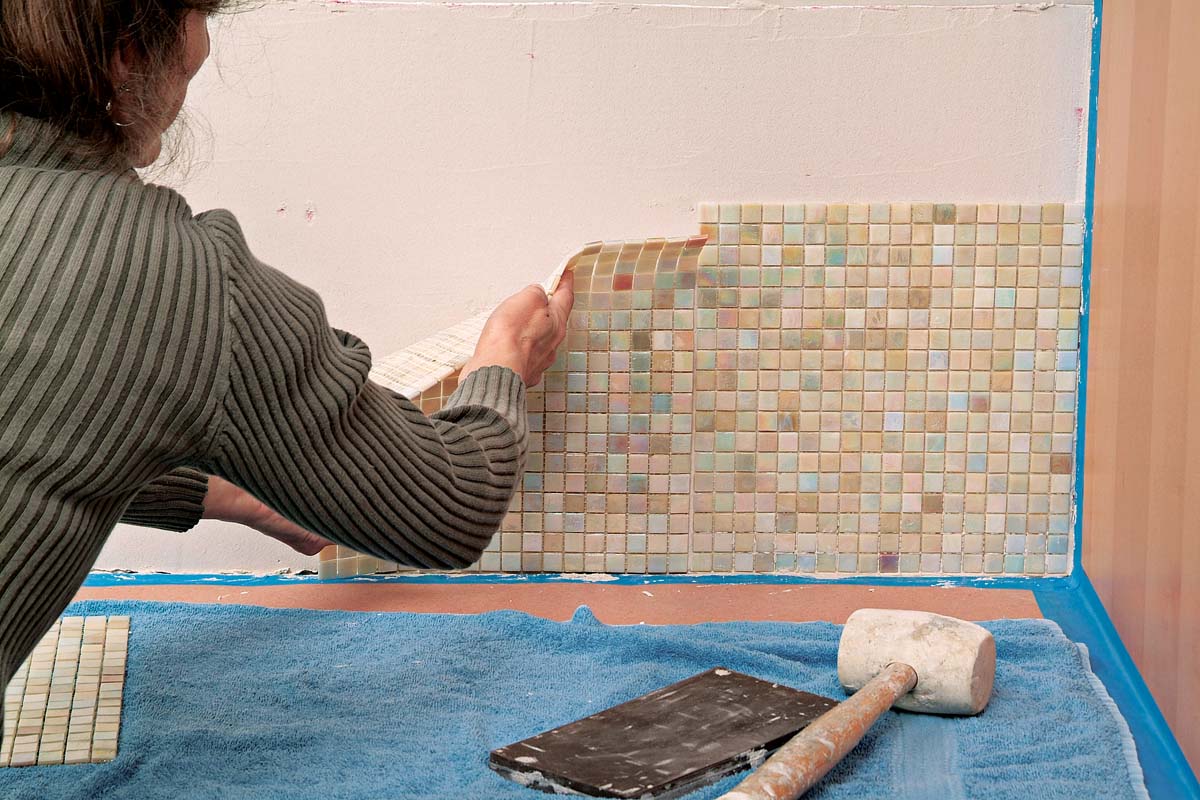
4.  Apply sheets of the glass mosaic tile to the thinset, carefully pressing them in place.
Strike your beater block gently and evenly to embed the mosaic tiles in place. 5.  Strike your beater block gently and evenly to embed the mosaic tiles in place.
When you need a strip of mosaic tiles smaller than a full sheet, use a razor knife to cut through the net backing. 
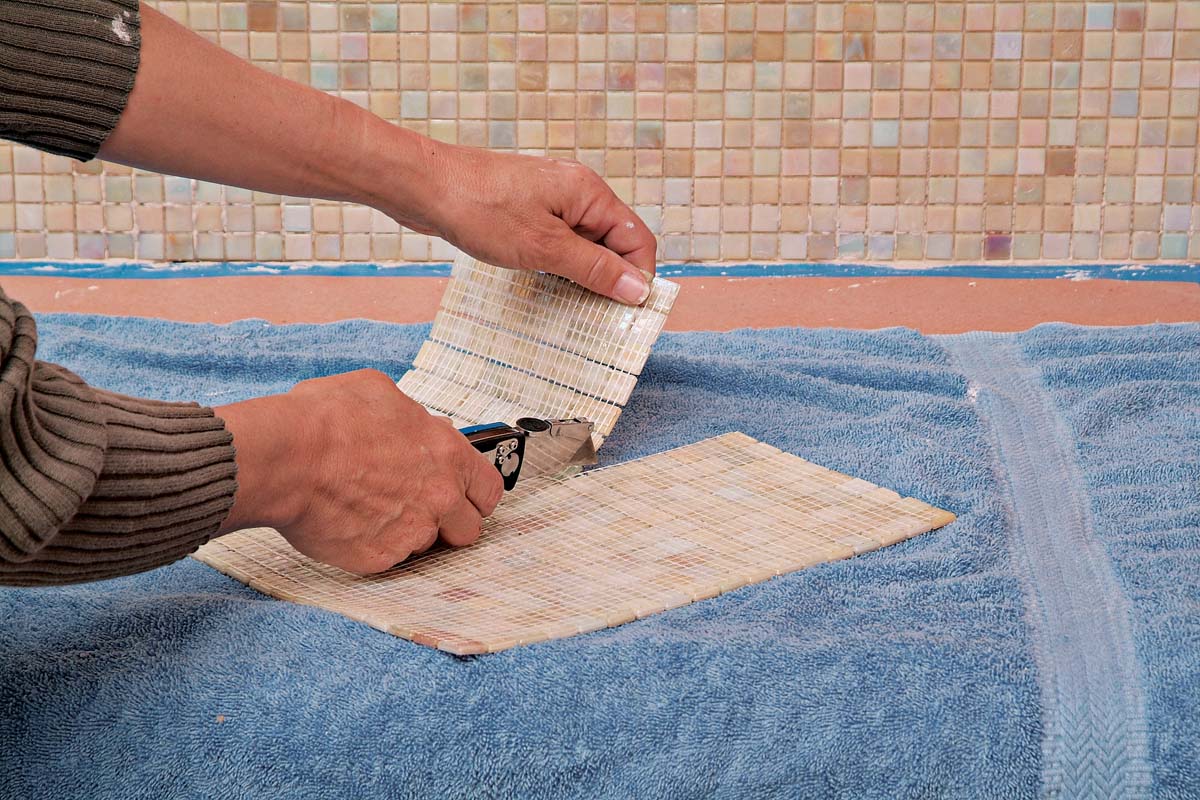
6.  When you need a strip of mosaic tiles smaller than a full sheet, use a razor knife to cut through the net backing.
Grouting the edge of a glass mosaic tile backsplash provides a clean finished edge. 
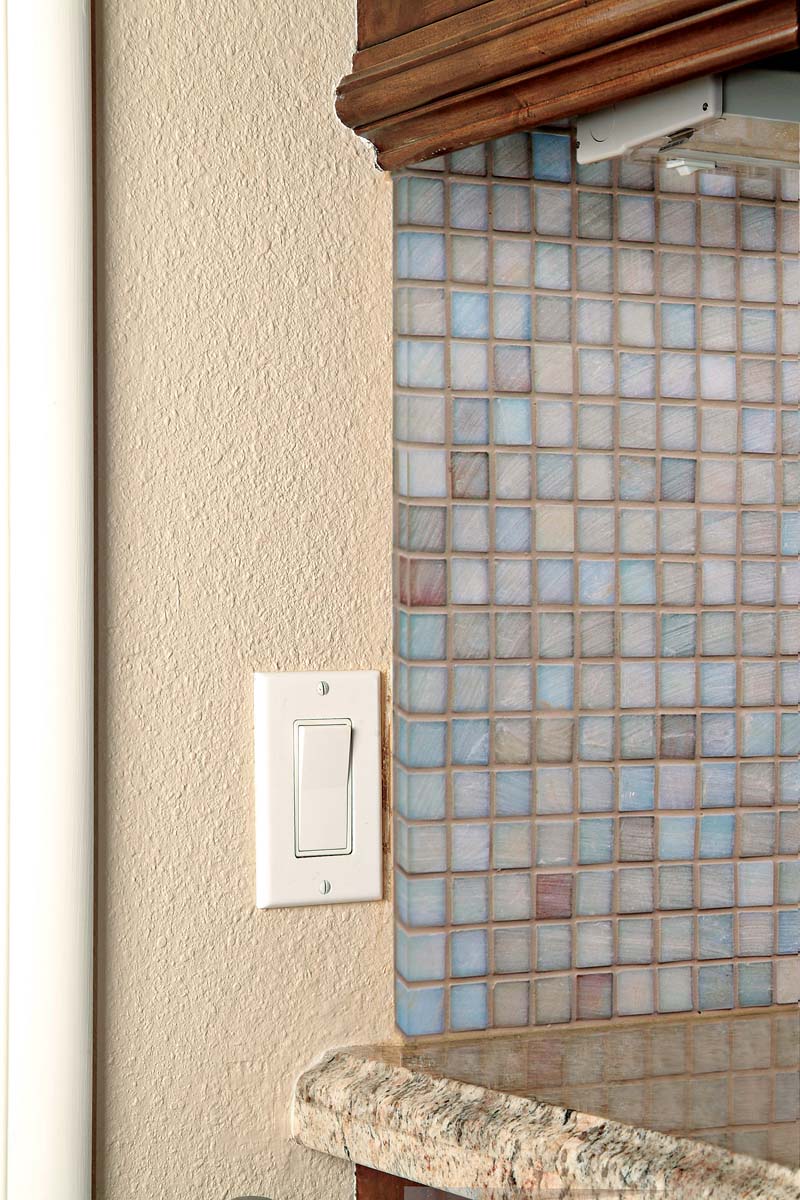
7.  Grouting the edge of a glass mosaic tile backsplash provides a clean finished edge.

Tiling Complete, 2nd EditionExcerpted from Tiling Complete, 2nd Edition by Robin Nicholas and Michael Schweit.

Available in the Taunton Store and at Amazon.com.

Sign up for eletters today and get the latest how-to from Fine Homebuilding, plus special offers.

Signing you up...

This site is protected by reCAPTCHA and the Google Privacy Policy and Terms of Service apply.
See all newsletters
See all newsletters
Previous: Tiling a Backsplash with Decorative Tile Inserts Next: Tile Backsplash Layout

Guide

Tiling

Chapter

Tiling Walls & Backsplashes

Log in or create an account to post a comment.

Sign up Log in

Become a member and get full access to FineHomebuilding.com

Tiling

Tiling

Trusted, comprehensive guidance from the pros for a great-looking tile job in any room of the house

View Project Guide

View All Project Guides »

Become a member and get unlimited site access, including the Tiling Project Guide.

Start Free Trial

Selecting Tile
  • The Basics
  • Tile Options
Tools & Techniques
  • Job-Preparation Tools
  • Cutting Tiles
  • Setting & Grouting Tools
Installation Materials
  • Membranes & Substrates
  • Adhesives & Mortars
  • Grout
  • Sealers & Caulk
  • Spacers, Hardware & Trim
Preparation
  • The Prep Job
  • Repairs & Surface Prep
  • Installing Backerboard
Tiling Floors
  • Layout & Installation
  • Setting Specialty Tiles
Tiling Walls & Backsplashes
  • Preparation
  • Backsplashes
  • Walls
Tiling Showers
  • Tile Shower Basics
  • Waterproofing
  • Shower Pans
  • Shower Drains
  • Shower Niches
  • Video Series: Tile a Shower
  • Video Series: Tile a Barrier-Free Bathroom
Grouting, Sealing & Caulking
  • Grouting
  • Caulking
  • Sealing
Maintenance & Repair
  • Maintenance
  • Tile Repair
  • Grout Repair

Fine Homebuilding

Follow

  • twitter
  • facebook
  • instagram
  • pinterest

Newsletter

Get home building tips, offers, and expert advice in your inbox

Signing you up...

This site is protected by reCAPTCHA and the Google Privacy Policy and Terms of Service apply.
See all newsletters
See all newsletters

Membership & Magazine

  • Online Archive
  • Start Free Trial
  • Magazine Subscription
  • Magazine Renewal
  • Gift a Subscription
  • Customer Support
  • Privacy Preferences

Taunton Network

  • Green Building Advisor
  • Fine Woodworking
  • Fine Gardening
  • Threads
  • About
  • Contact
  • Advertise
  • Careers
  • Copyright
  • Terms of Use
  • Site Map
  • Do not sell my information
  • Privacy Policy
  • Accessibility
  • California Privacy Rights

© 2022 The Taunton Press, Inc. All rights reserved.

X
X
This is a dialog window which overlays the main content of the page. The modal window is a 'site map' of the most critical areas of the site. Pressing the Escape (ESC) button will close the modal and bring you back to where you were on the page.

Main Menu

  • How-To
  • Design
  • Tools & Materials
  • Video
  • Blogs
  • Forum
  • Reader Projects
  • Magazine
  • Members
  • FHB House

Podcasts

  • FHB Podcast
  • ProTalk

Webinars

  • Upcoming and On-Demand

Account

  • Log In
  • Join

Podcasts

  • FHB Podcast
  • ProTalk

Webinars

  • Upcoming and On-Demand

Popular Topics

  • Kitchens
  • Business
  • Bedrooms
  • Roofs
  • Architecture and Design
  • Green Building
  • Decks
  • Framing
  • Safety
  • Remodeling
  • Bathrooms
  • Windows
  • Tilework
  • Ceilings
  • HVAC

Magazine

  • Current Issue
  • Past Issues
  • Magazine Index
  • Subscribe
  • Online Archive
  • Author Guidelines

All Access

  • Member Home
  • Start Free Trial
  • Gift Membership

Shop the Store

  • Books
  • DVDs
  • Taunton Workshops

More

  • FHB Ambassadors
  • Reader Projects
  • Podcast
  • Customer Support

Account

  • Log In
  • Join

Newsletter

Get home building tips, offers, and expert advice in your inbox

Signing you up...

This site is protected by reCAPTCHA and the Google Privacy Policy and Terms of Service apply.
See all newsletters
See all newsletters

Follow

  • twitter
  • facebook
  • instagram
  • pinterest

Join All Access

Become a member and get instant access to thousands of videos, how-tos, tool reviews, and design features.

Start Your Free Trial

Subscribe

FHB Magazine

Start your subscription today and save up to 70%

Subscribe

We hope you’ve enjoyed your free articles. To keep reading, become a member today.

Get complete site access to expert advice, how-to videos, Code Check, and more, plus the print magazine.

Start your FREE trial

Already a member? Log in