FHB Logo Facebook LinkedIn Email Pinterest Twitter X Instagram Tiktok YouTube Plus Icon Close Icon Navigation Search Icon Navigation Search Icon Arrow Down Icon Video Guide Icon Article Guide Icon Modal Close Icon Guide Search Icon Skip to content
Subscribe
Log In
  • How-To
  • Design
  • Tools & Materials
  • Restoration
  • Videos
  • Blogs
  • Forum
  • Magazine
  • Members
  • FHB House
  • Podcast
Log In

Fine Homebuilding Project Guides

Tiling

Guide Home
  • Selecting Tile
  • Tools & Techniques
  • Installation Materials
  • Preparation
  • Tiling Floors
  • Tiling Walls & Backsplashes
  • Tiling Showers
  • Grouting, Sealing & Caulking
  • Maintenance & Repair

Tiling Wainscoting

Tiling the lower half of a wall both protects the wall and offers an opportunity to add color and texture.

By Robin Nicholas, Michael Schweit
  • X
  • facebook
  • linkedin
  • pinterest
  • email
  • add to favorites Log in or Sign up to save your favorite articles

In the 1950s, and even earlier, a tiled wainscoting was almost as commonplace as your toilet or vanity. And for good reason, because wainscoting can serve practical purposes as well as aesthetic ones. A tiled wainscoting can offer protection for your walls or pedestal sink, add color or architectural elements, and even make an area seem larger by the expanse of tile. Tile walls are resistant to water and moisture so those areas will never need to be painted. Wainscoting lends lots of visual drama and ambiance to a bath or powder room, or to any wall you choose.

Before laying out the installation, you’ll want to check the wall for any dramatically bowed areas and fill or flatten them as needed. The smoother the wall, the better the tile work will look, especially under overhead lighting.

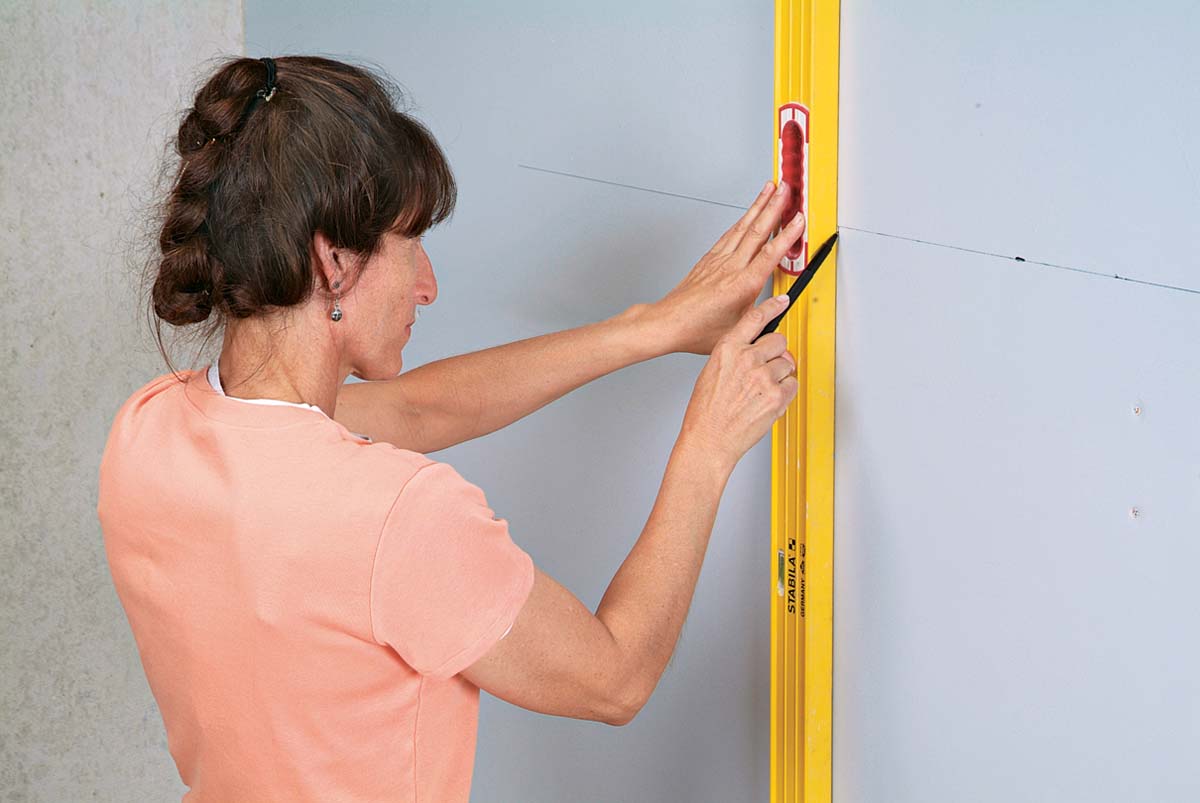
First, check your job site for outlets, switches, and windowsills to determine the height of the wainscoting that will work best. You might even wish to incorporate the backsplash into the wainscoting for a continuous line around the room. After you’ve determined this height, make a mark on the wall at that measurement 1. You’ll then use a level to draw a line all around the room 2. This line will indicate the top of your tiled wainscoting.

Lay your tiles on a flat surface to lay out your design. Using the height of the wainscoting, measure from the top of your layout and make a mark on the field tile to represent the floor or bottom of the wainscoting 3. Measure the distance from the top of the layout to the grout joint above this mark 4. You’ll use that measurement to set your first row of tile.

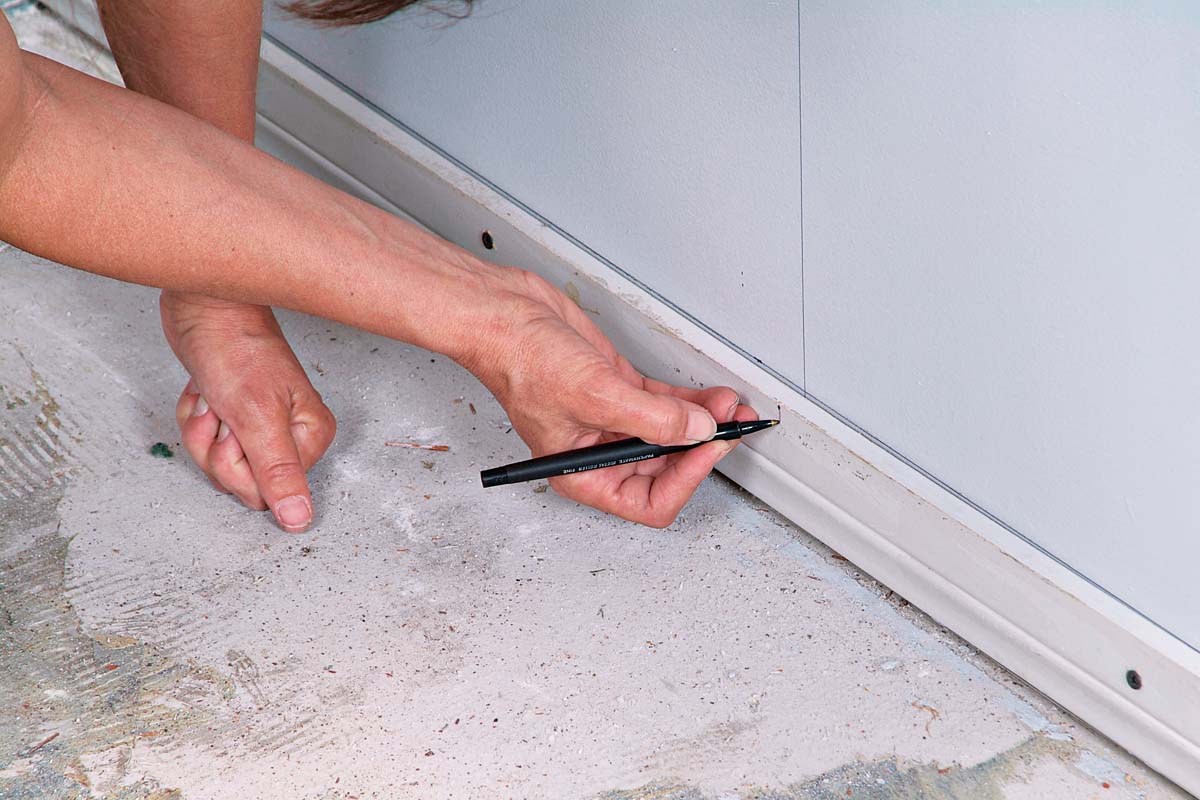
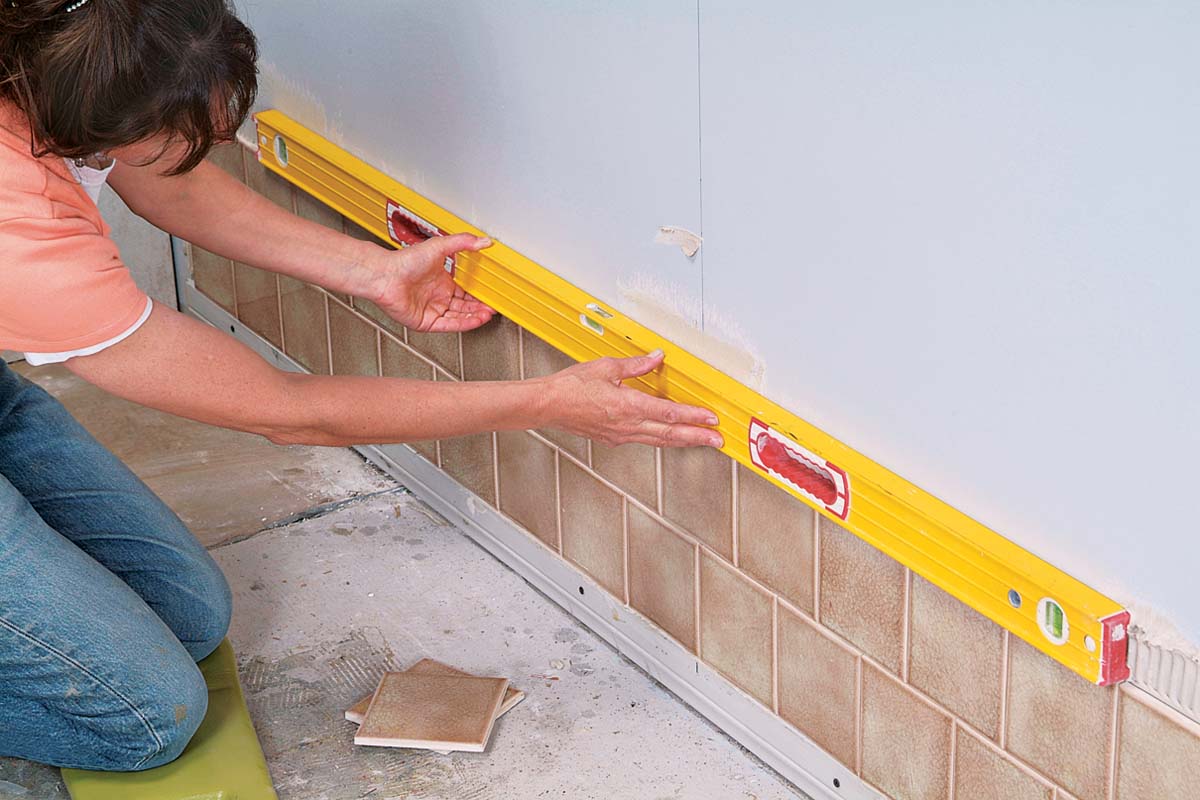
Return to the wall and measure down from the top line to make a mark at the bottom measurement 5. Use a level and draw a line at this height 6. Finally, find the halfway point on the wall and draw a vertical plumb line from the top line down to the floor 7.

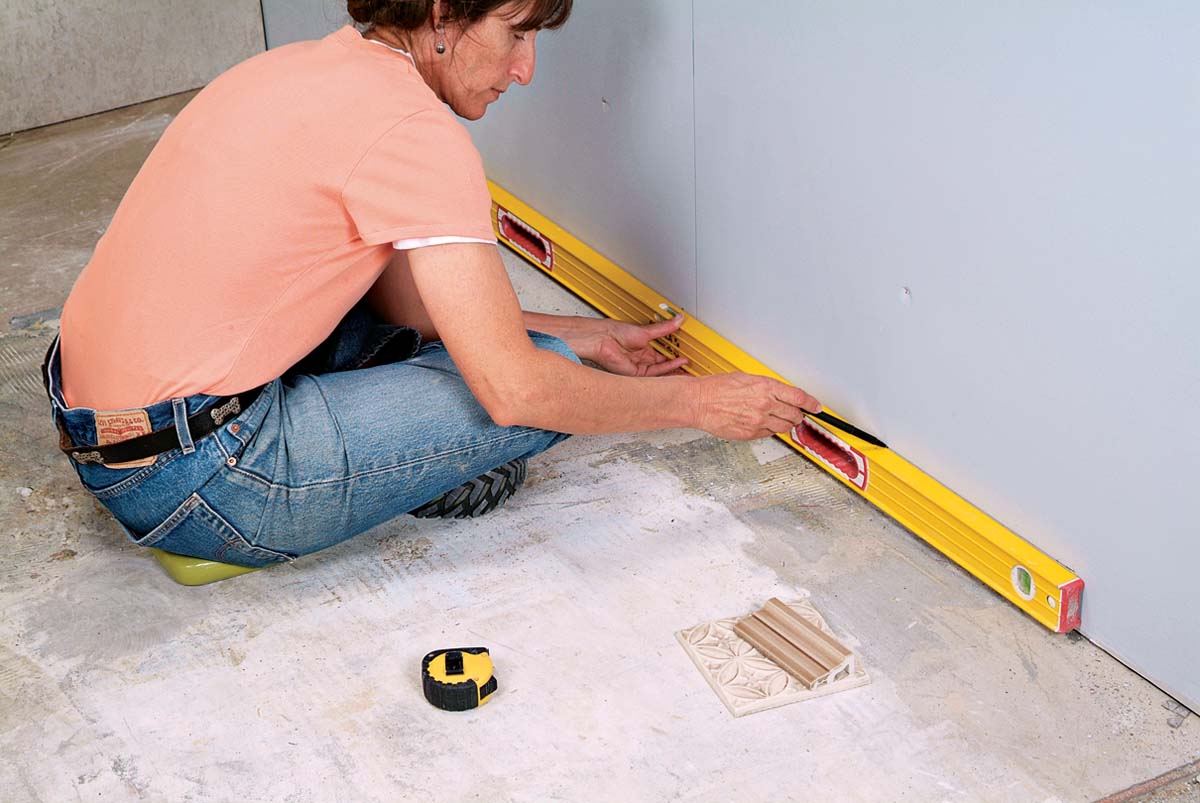
Next, you’ll need a ledger board to hold up the tile. Screw any unwarped piece of wood or molding into the wall at the studs, keeping the top of the ledger board even with the bottom line 8. Then make a mark on the ledger board at the vertical reference line 9. This line will serve as an additional guide after you spread thinset.

Spread and comb thinset over a small manageable area above the ledger board 10. You’ll begin setting tile, using the vertical line as a reference 11. After setting a couple of rows, check the tiled rows for level 12. Adjust with wedges as necessary. Continue tiling the wall with field tile, checking with the level every few rows 13.

Comb the remaining area with thinset or back-butter individual decorative tiles, setting them in place 14. Back-butter tile crown or top pieces as necessary 15. Level the final row and use wedges to adjust 16.

Leave the ledger board in place for 24 hours after you complete the wall. The next day, carefully remove the board. Measure and cut the bottom row of tiles to fit 17. If the floor is out of level, these cuts will vary. Also, there’s no need for perfection if a floor tile will cover the edge. If you’re setting to a finished floor, take the extra care and leave space for a caulk joint. Allow the tile to set 24 hours and then grout. The finished wainscoting is shown in photo 18.

Make a mark on the wall at the top measurement you’ve chosen for your wainscoting.
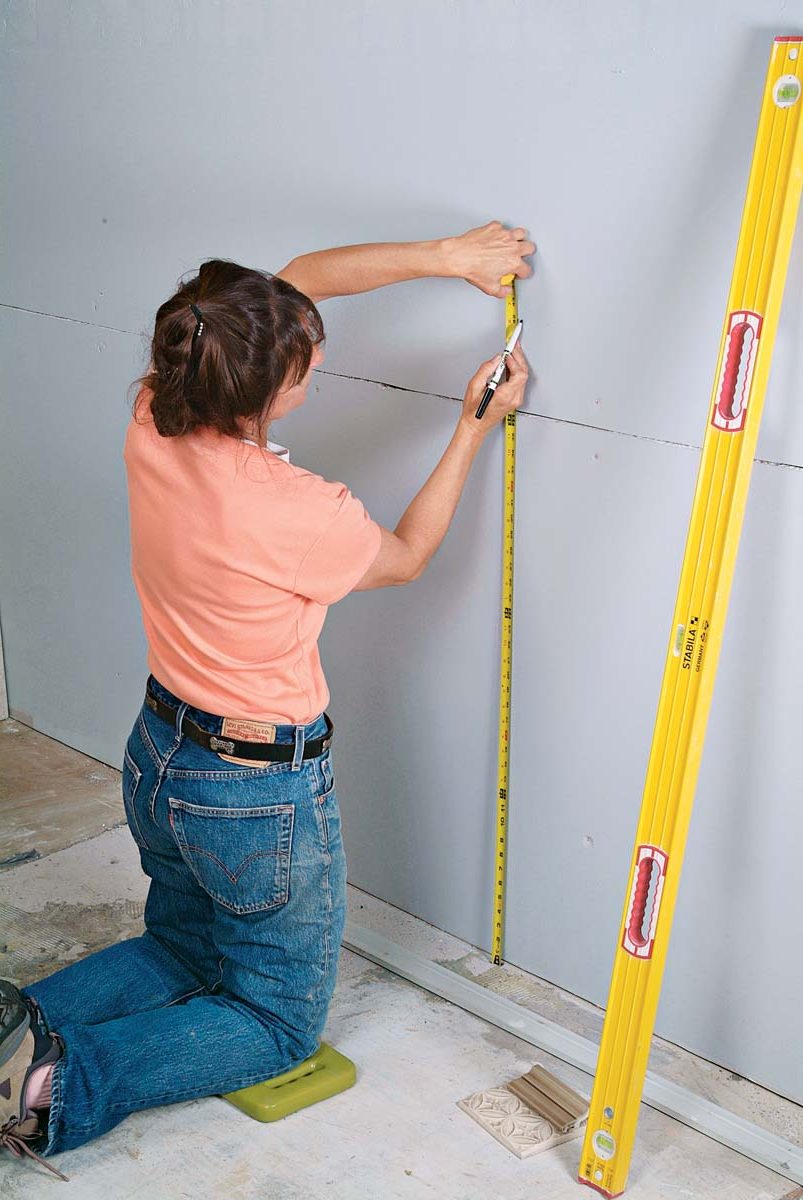
 1. Make a mark on the wall at the top measurement you’ve chosen for your wainscoting.
Use a level to make your mark into a continuous line for the new wainscoting.
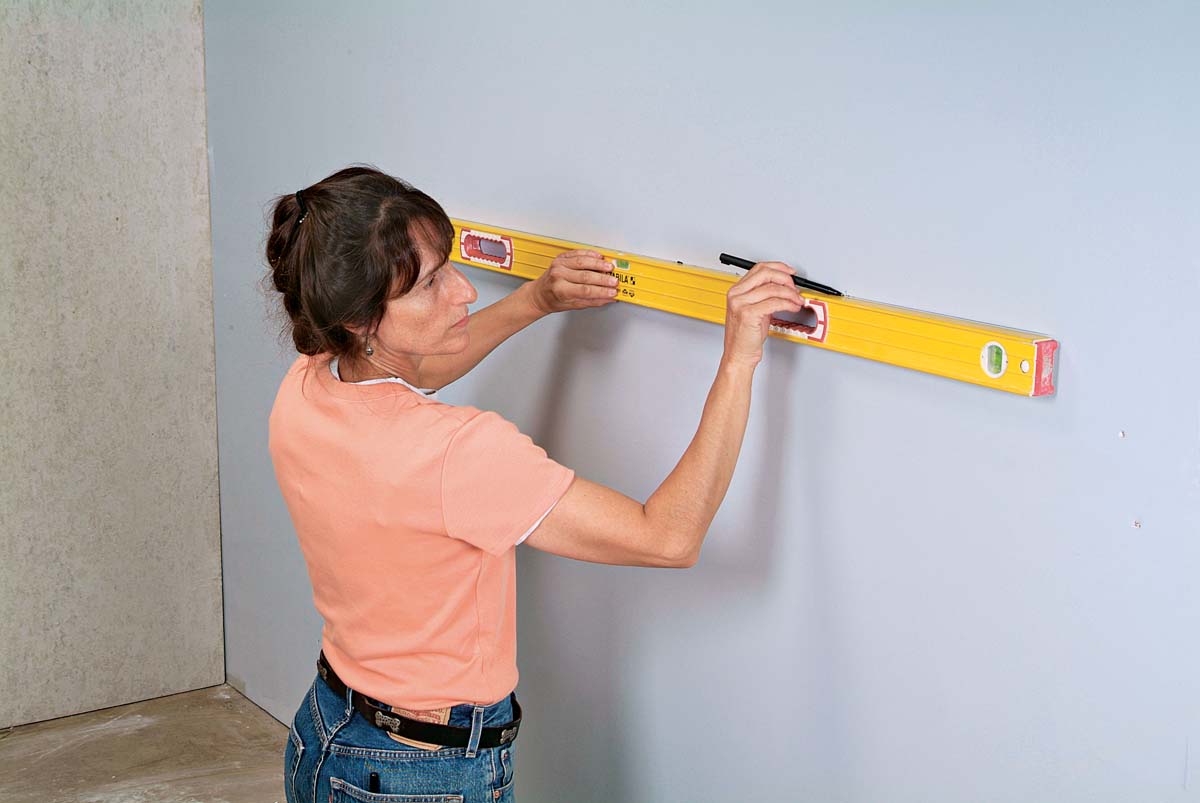
 2.  Use a level to make your mark into a continuous line for the new wainscoting.
Lay out your pattern and measure from the top trim tile down. Mark the tile that will be at the floor.
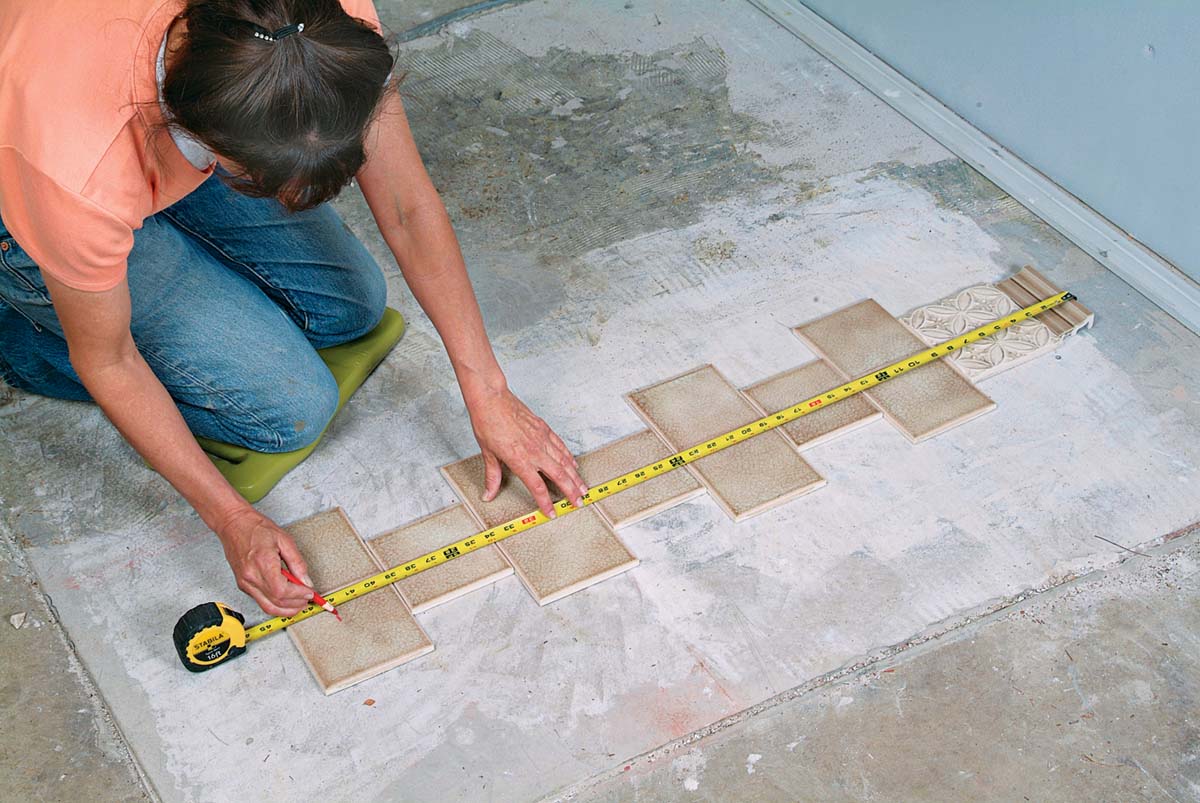
3.  Lay out your pattern and measure from the top trim tile down. Mark the tile that will be at the floor.
Note the measurement for the first grout joint above your bottom tile. This is where the ledger board will go.
4.  Note the measurement for the first grout joint above your bottom tile. This is where the ledger board will go.
Measure down from the top mark of your wainscoting to the grout joint above the bottom cut tile.
5.  Measure down from the top mark of your wainscoting to the grout joint above the bottom cut tile.
Make a level line across the wall at the grout joint to locate the ledger board.
6.  Make a level line across the wall at the grout joint to locate the ledger board.
From the top horizontal line, draw a line down the center of the wall to use as a reference.
7.  From the top horizontal line, draw a line down the center of the wall to use as a reference.
Screw a ledger board into the wall studs at the bottom horizontal line.
8.  Screw a ledger board into the wall studs at the bottom horizontal line.
Continue the vertical reference line down onto the ledger board so that you can see it even if the wall is obscured by thinset.
9.  Continue the vertical reference line down onto the ledger board so that you can see it even if the wall is obscured by thinset.
Spread a manageable area with thinset above the ledger board.
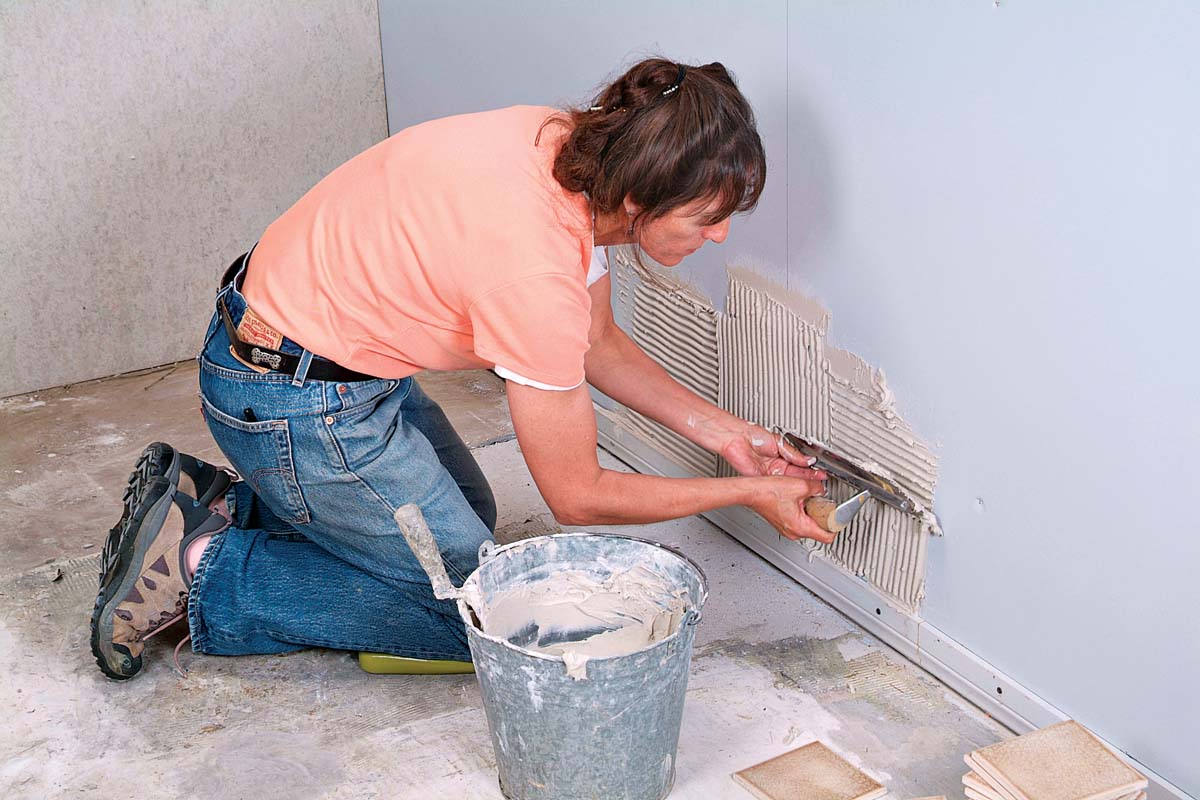
10.  Spread a manageable area with thinset above the ledger board.
Begin setting field tiles, using the vertical line as a reference.
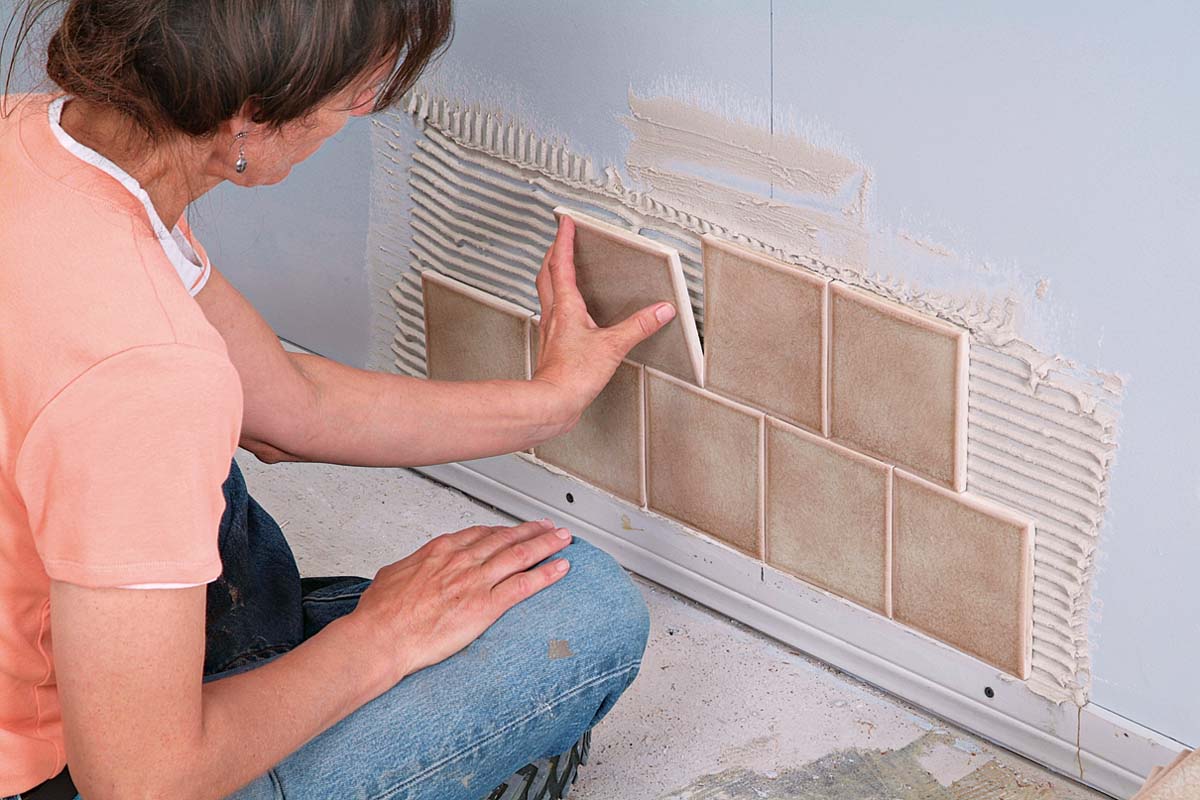
11.  Begin setting field tiles, using the vertical line as a reference.
After you’ve set a couple of rows, check them with a level and adjust with spacers if necessary.
12.  After you’ve set a couple of rows, check them with a level and adjust with spacers if necessary.
Continue tiling up the wall, checking every few rows with a level, and adjusting with spacers.
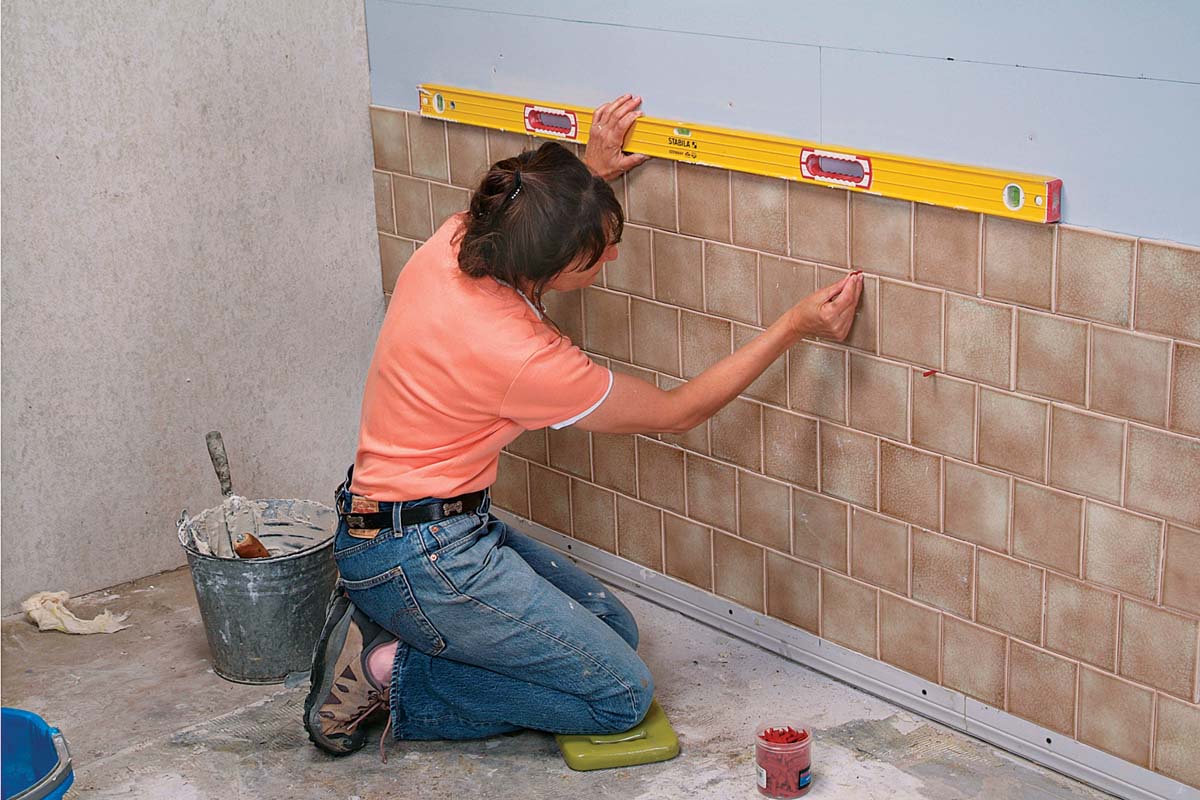
13.  Continue tiling up the wall, checking every few rows with a level, and adjusting with spacers.
Back-butter decorative tiles and set in place.
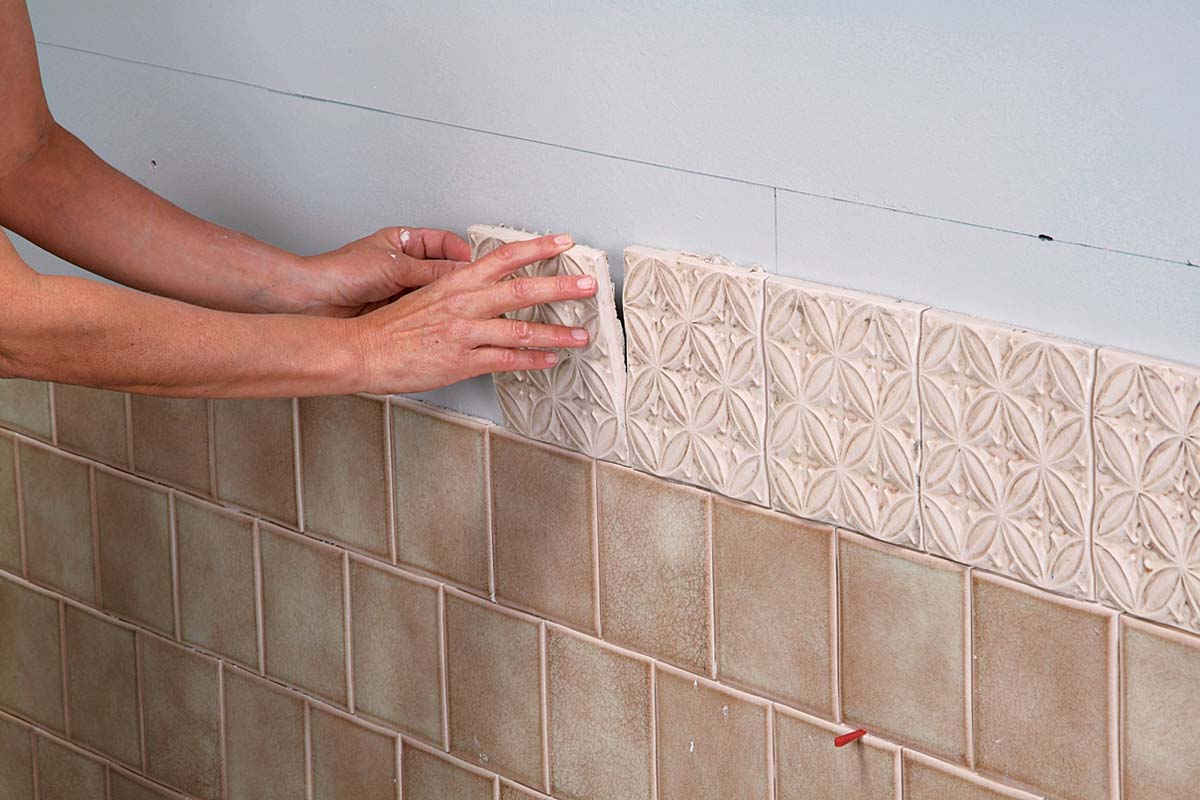
14.  Back-butter decorative tiles and set in place.
Back-butter the tile crown pieces and carefully squish into place.
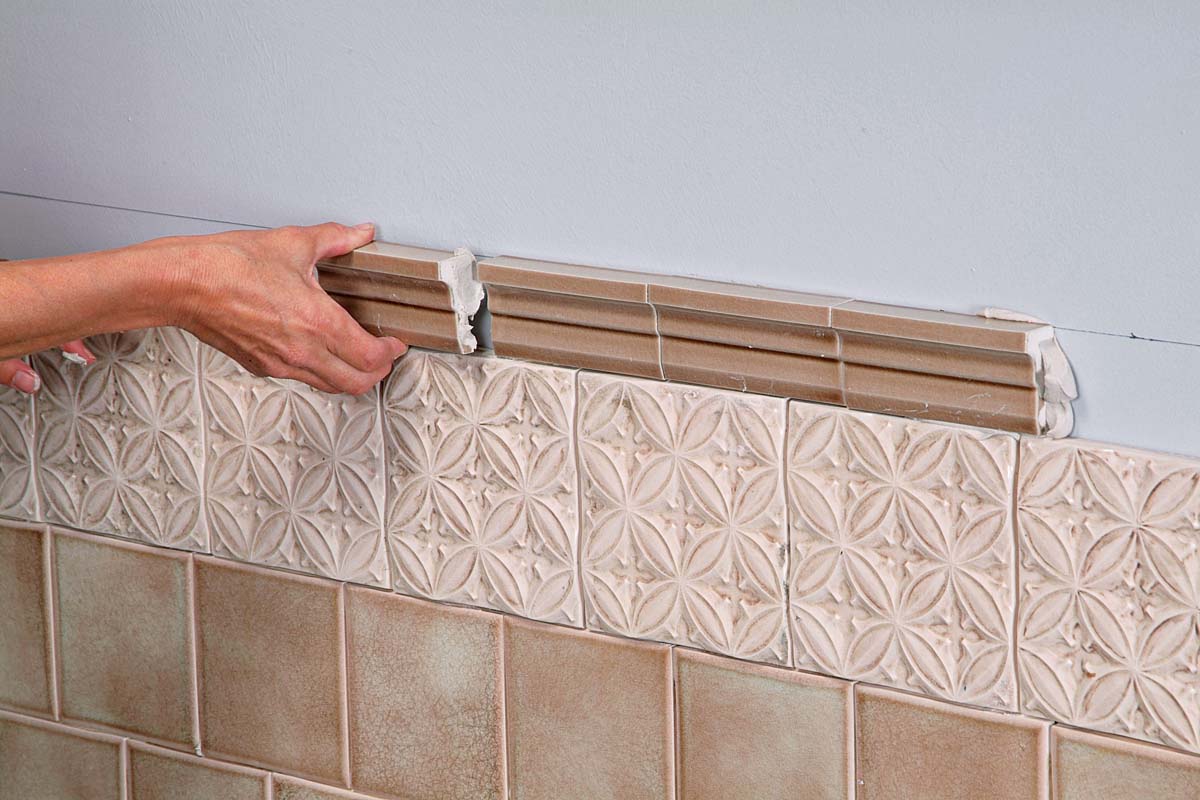
15.  Back-butter the tile crown pieces and carefully squish into place.
Level the final row of tile and adjust with spacers.
16.  Level the final row of tile and adjust with spacers.
The next day, remove the ledger board, cut your bottom row of tiles, and back-butter and set them, adjusting with spacers.
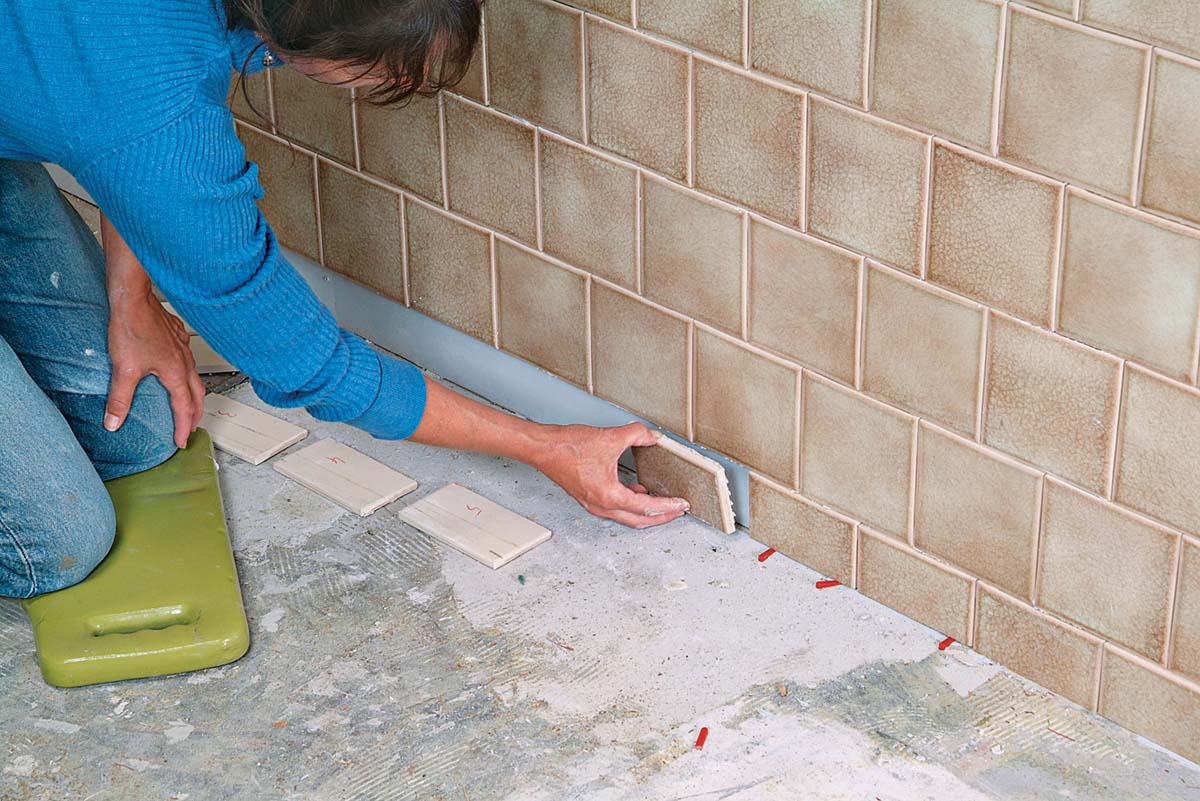
17.  The next day, remove the ledger board, cut your bottom row of tiles, and back-butter and set them, adjusting with spacers.
Tiled wainscoting with decorative relief tile and crown piece.
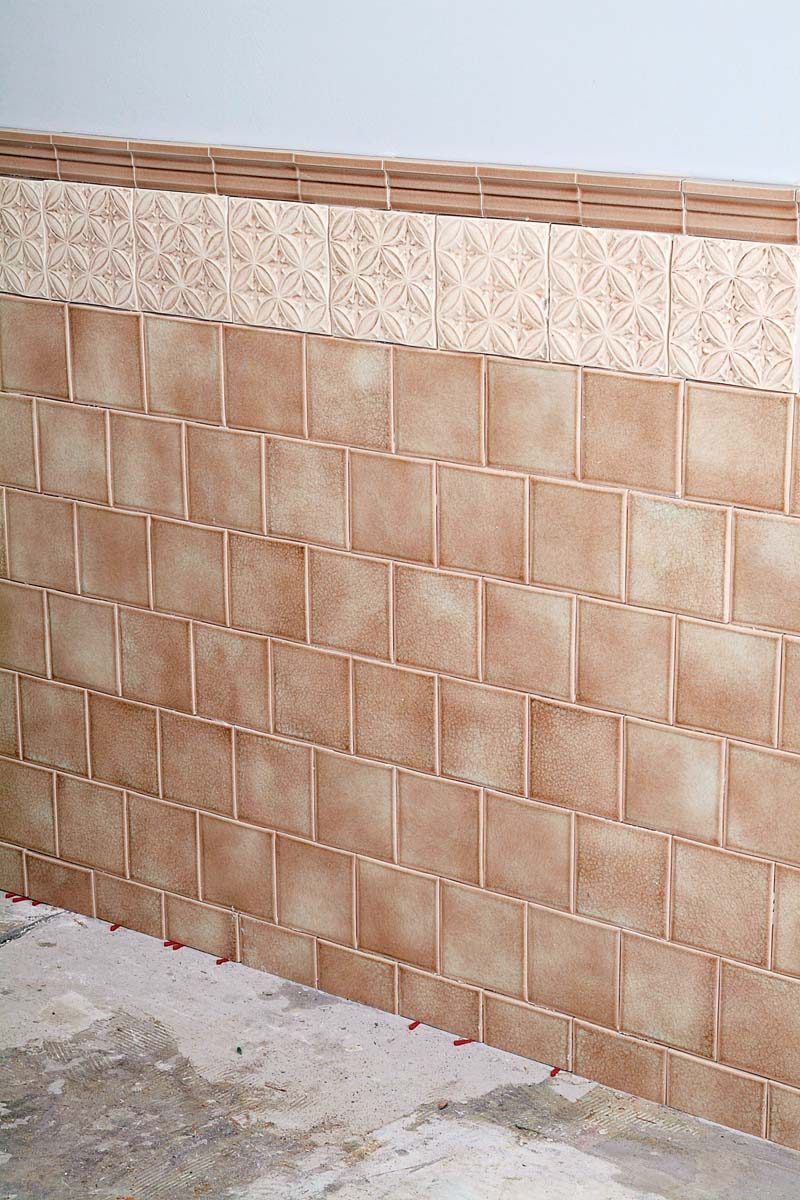
18.  Tiled wainscoting with decorative relief tile and crown piece.

Tiling Complete, 2nd EditionExcerpted from Tiling Complete, 2nd Edition by Robin Nicholas and Michael Schweit.

Available in the Taunton Store and at Amazon.com.

Previous: Pro Tips for Tiling Walls

Guide

Tiling

Chapter

Tiling Walls & Backsplashes

Sign up for eletters today and get the latest how-to from Fine Homebuilding, plus special offers.

Signing you up...

This site is protected by reCAPTCHA and the Google Privacy Policy and Terms of Service apply.
See all newsletters
See all newsletters

Log in or create an account to post a comment.

Sign up Log in

Become a member and get full access to FineHomebuilding.com

Tiling

Tiling

Trusted, comprehensive guidance from the pros for a great-looking tile job in any room of the house

View Project Guide

View All Project Guides »

Become a member and get unlimited site access, including the Tiling Project Guide.

Start Free Trial

Selecting Tile
  • The Basics
  • Tile Options
Tools & Techniques
  • Job-Preparation Tools
  • Cutting Tiles
  • Setting & Grouting Tools
Installation Materials
  • Membranes & Substrates
  • Adhesives & Mortars
  • Grout
  • Sealers & Caulk
  • Spacers, Hardware & Trim
Preparation
  • The Prep Job
  • Repairs & Surface Prep
  • Installing Backerboard
Tiling Floors
  • Layout & Installation
  • Setting Specialty Tiles
Tiling Walls & Backsplashes
  • Preparation
  • Backsplashes
  • Walls
Tiling Showers
  • Tile Shower Basics
  • Waterproofing
  • Shower Pans
  • Shower Drains
  • Shower Niches
  • Video Series: Tile a Shower
  • Video Series: Tile a Barrier-Free Bathroom
Grouting, Sealing & Caulking
  • Grouting
  • Caulking
  • Sealing
Maintenance & Repair
  • Maintenance
  • Tile Repair
  • Grout Repair

Fine Home Building

Newsletter Sign-up

  • Fine Homebuilding

    Home building tips, offers, and expert advice in your inbox.

  • Green Building Advisor

    Building science and energy efficiency advice, plus special offers, in your inbox.

  • Old House Journal

    Repair, renovation, and restoration tips, plus special offers, in your inbox.

Signing you up...

This site is protected by reCAPTCHA and the Google Privacy Policy and Terms of Service apply.
See all newsletters

Follow

  • Fine Homebuilding

    Dig into cutting-edge approaches and decades of proven solutions with total access to our experts and tradespeople.

    Start Free Trial Now
    • Facebook
    • Instagram
    • X
    • LinkedIn
  • GBA Prime

    Get instant access to the latest developments in green building, research, and reports from the field.

    Start Free Trial Now
    • Facebook
    • YouTube
  • Old House Journal

    Learn how to restore, repair, update, and decorate your home.

    Subscribe Now
    • Facebook
    • Instagram
    • X

Membership & Magazine

  • Online Archive
  • Start Free Trial
  • Magazine Subscription
  • Magazine Renewal
  • Gift a Subscription
  • Customer Support
  • Privacy Preferences
  • About
  • Contact
  • Advertise
  • Careers
  • Terms of Use
  • Site Map
  • Do not sell or share my information
  • Privacy Policy
  • Accessibility
  • California Privacy Rights

© 2025 Active Interest Media. All rights reserved.

Fine Homebuilding receives a commission for items purchased through links on this site, including Amazon Associates and other affiliate advertising programs.

  • Home Group
  • Antique Trader
  • Arts & Crafts Homes
  • Bank Note Reporter
  • Cabin Life
  • Cuisine at Home
  • Fine Gardening
  • Fine Woodworking
  • Green Building Advisor
  • Garden Gate
  • Horticulture
  • Keep Craft Alive
  • Log Home Living
  • Military Trader/Vehicles
  • Numismatic News
  • Numismaster
  • Old Cars Weekly
  • Old House Journal
  • Period Homes
  • Popular Woodworking
  • Script
  • ShopNotes
  • Sports Collectors Digest
  • Threads
  • Timber Home Living
  • Traditional Building
  • Woodsmith
  • World Coin News
  • Writer's Digest
Active Interest Media logo
X
X
This is a dialog window which overlays the main content of the page. The modal window is a 'site map' of the most critical areas of the site. Pressing the Escape (ESC) button will close the modal and bring you back to where you were on the page.

Main Menu

  • How-To
  • Design
  • Tools & Materials
  • Video
  • Blogs
  • Forum
  • Project Guides
  • Reader Projects
  • Magazine
  • Members
  • FHB House

Podcasts

  • FHB Podcast
  • ProTalk

Webinars

  • Upcoming and On-Demand

Podcasts

  • FHB Podcast
  • ProTalk

Webinars

  • Upcoming and On-Demand

Popular Topics

  • Kitchens
  • Business
  • Bedrooms
  • Roofs
  • Architecture and Design
  • Green Building
  • Decks
  • Framing
  • Safety
  • Remodeling
  • Bathrooms
  • Windows
  • Tilework
  • Ceilings
  • HVAC

Magazine

  • Current Issue
  • Past Issues
  • Magazine Index
  • Subscribe
  • Online Archive
  • Author Guidelines

All Access

  • Member Home
  • Start Free Trial
  • Gift Membership

Online Learning

  • Courses
  • Project Guides
  • Reader Projects
  • Podcast

More

  • FHB Ambassadors
  • FHB House
  • Customer Support

Account

  • Log In
  • Join

Newsletter

Get home building tips, offers, and expert advice in your inbox

Signing you up...

This site is protected by reCAPTCHA and the Google Privacy Policy and Terms of Service apply.
See all newsletters
See all newsletters

Follow

  • X
  • YouTube
  • instagram
  • facebook
  • pinterest
  • Tiktok

Join All Access

Become a member and get instant access to thousands of videos, how-tos, tool reviews, and design features.

Start Your Free Trial

Subscribe

FHB Magazine

Start your subscription today and save up to 70%

Subscribe

You have 1 free article remaining.

Get complete site access, including thousands of videos, how-to tips, tool reviews, and design features.

Start your FREE trial

Already a member? Log in

We hope you’ve enjoyed your free articles. To keep reading, become a member today.

Get complete site access to expert advice, how-to videos, Code Check, and more, plus the print magazine.

Start your FREE trial

Already a member? Log in

Privacy Policy Update

We use cookies, pixels, script and other tracking technologies to analyze and improve our service, to improve and personalize content, and for advertising to you. We also share information about your use of our site with third-party social media, advertising and analytics partners. You can view our Privacy Policy here and our Terms of Use here.

Cookies

Analytics

These cookies help us track site metrics to improve our sites and provide a better user experience.

Advertising/Social Media

These cookies are used to serve advertisements aligned with your interests.

Essential

These cookies are required to provide basic functions like page navigation and access to secure areas of the website.

Delete My Data

Delete all cookies and associated data