FHB Logo Facebook LinkedIn Email Pinterest Twitter X Instagram Tiktok YouTube Plus Icon Close Icon Navigation Search Icon Navigation Search Icon Arrow Down Icon Video Guide Icon Article Guide Icon Modal Close Icon Guide Search Icon Skip to content
Subscribe
Log In
  • How-To
  • Design
  • Tools & Materials
  • Restoration
  • Videos
  • Blogs
  • Forum
  • Magazine
  • Members
  • FHB House
  • Podcast
Log In

Fine Homebuilding Project Guides

Drywall

Guide Home
  • Drywall Basics
  • Tools and Materials
  • Hanging Drywall
  • Taping and Sanding
  • Special Installations
  • Drywall Repairs
  • Plaster
How-To

Install and Finish Drywall Series: 6 Steps to a Level-5 Finish

High-gloss paint and harsh lighting will show every imperfection in your walls unless you take this additional step to eliminate surface differences.

By Myron R. Ferguson
  • X
  • facebook
  • linkedin
  • pinterest
  • email
  • add to favorites Log in or Sign up to save your favorite articles
6 Steps to a Level-5 Finish
Video Player is loading.
Current Time 0:00
/
Duration 5:14
Loaded: 0%
0:00
Stream Type LIVE
Remaining Time -5:14
 
1x
    • Chapters
    • descriptions off, selected
    • captions settings, opens captions settings dialog
    • captions off, selected
    • en (Main), selected

    This is a modal window.

    Beginning of dialog window. Escape will cancel and close the window.

    Text
    Background
    Window
    Font Size
    Text Edge Style
    Font Family

    End of dialog window.

    This is a modal window. This modal can be closed by pressing the Escape key or activating the close button.

    This is a modal window. This modal can be closed by pressing the Escape key or activating the close button.

    Jump to all the videos in this series

    Getting the smoothest-possible drywall finish is not as difficult as you might think. Use the tools and techniques that Myron Ferguson demonstrates in this video, and you will be well on your way.
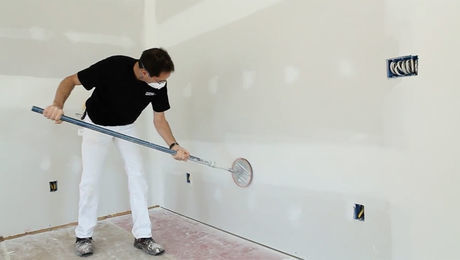
    1. Sand

    The first thing to do is to take a pole sander and sand the surface. Normally, you’d be done after sanding it for a typical finish. But you’d be left with a lot of areas that have compound on them, and other areas that don’t have any compound.

    2. Remove dust

    Take a brush and get all the dust and compound chunks out of the outlets. You don’t want to pick them up with your taping knife when applying the level-5 finish.

    Differences are visible between areas of the same wall surface. Some very smooth areas blend into the paper, but in other areas the paper is kind of roughed up. Sanding has raised the nap of the paper just a little bit; you can see the dust clinging to the nap. The porosity of these areas is different, and that creates slight differences in the look after the wall has been primed. That’s the reason for a level-5 finish: to eliminate all the differences.

    Mix all-purpose lightweight compound and water in a bucket.

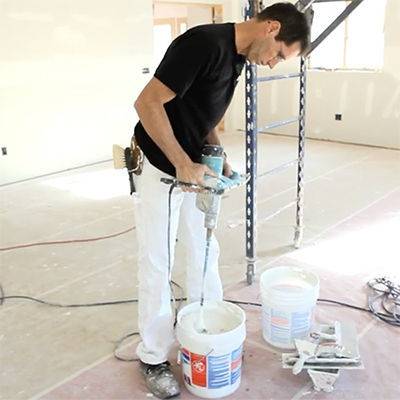
    3. Thin all-purpose compound with water

    Mix all-purpose lightweight compound and water in a bucket. The consistency should not be too thin. When you dip the roller in, you don’t want the compound to drip right off before you get it to the wall surface. The compound should cling to the roller so that you can get it to the wall without creating a big mess. After mixing, stick your knife in there to make sure the consistency is good. As you work with the mix, it’ll get a little thicker, so you’ll have to re-mix it.

    Use a roller with a thick nap – ½ inch to ¾ inch. The mix should cling to the roller.

    4. Roll on compound over the entire wall

    Roll up the wall; if you roll down, the compound will drip on the floor. Move the roller in one long pass up the wall. Just slide it; the roller will turn very slowly. You don’t have to go right into the corner with this thin layer of compound, because the corner is already covered with compound. But do go over the seams to blend them in.

    Apply the compound rather heavily. If the application is too thin, it’ll dry too quickly before you get to remove it.

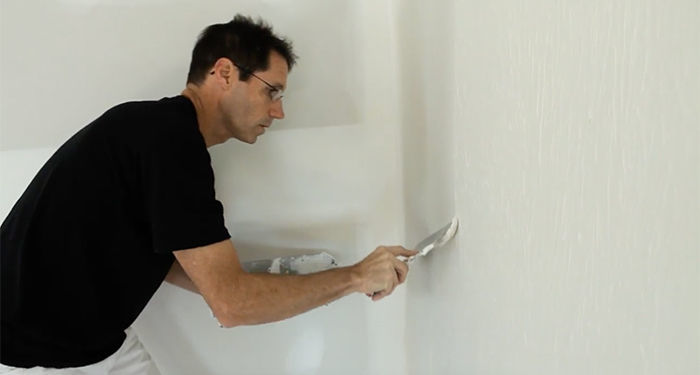
    5. Remove compound from the wall

    After you’ve rolled 4 feet wide, start removing the compound right away using the knife. It will have already started to dry along the edge, so remove a little compound from another area and apply it to that dry edge. Then start removing as much compound as you can. A level-5 finish is just a thin film; it’s not comparable to a plaster finish or a veneer plaster finish. You’re just trying to equalize the wall surfaces. You’re not trying to put another thick layer of compound on the wall.

    After you've rolled 4 feet wide, start removing the compound right away using the knife.

    This finishing process doesn’t have to be a one-man operation. If you have a helper rolling it on ahead of you, you could really accomplish a level-5 finish very quickly.

    The compound that you remove goes right back into the bucket. As you work, the mixture will dry out a little bit.

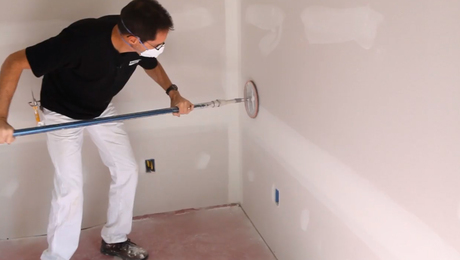
    6. Give a quick final sanding

    The wall will dry quickly. In about an hour, go over it lightly with a pole sander equipped with 220-grit sandpaper. It’ll take about a minute. Then the wall is ready for priming and painting.


    Videos in the Series

    • Series Introduction: Install and Finish Drywall

      In this video series, a drywall expert shares his no-nonsense tips for making the job go smoother, and for getting a perfect finish every time.

    • Install and Finish Drywall: 7 Tips for an Accurate Takeoff

      Ordering the proper materials is really important because your main goal is to reduce the lineal footage of seams that you're going to have to tape later.

    • Install and Finish Drywall: 7 Fixes Before Delivery

      Prep your framing so that drywall sits flat and is easy to fasten securely.

    • Install and Finish Drywall: 9 Secrets to an Effortless Install

      These straightforward steps will make any drywall-hanging job easier.

    • Install and Finish Drywall: 9 Rules for Hanging a Vaulted Ceiling

      Cover cathedral ceilings faster and easier by following a few basic rules.

    • Install and Finish Drywall Series: 7 Tips for the Best Basic Finish

      Pro drywall installer Myron Ferguson shares techniques that will help you get smoother seams with almost no sanding.

    • Install and Finish Drywall Series: 6 Steps to a Level-5 Finish

      High-gloss paint and harsh lighting will show every imperfection in your walls unless you take this additional step to eliminate surface differences.

    Previous: Flawless Drywall Finish Next: Finishing Drywall With Seamless Results

    Guide

    Drywall

    Chapter

    Taping and Sanding

    Sign up for eletters today and get the latest how-to from Fine Homebuilding, plus special offers.

    Signing you up...

    This site is protected by reCAPTCHA and the Google Privacy Policy and Terms of Service apply.
    See all newsletters
    See all newsletters

    View Comments

    1. stevefoley | Nov 13, 2016 06:17pm | #1

      how

    2. user-6813612 | Sep 23, 2019 09:09am | #2

      Nice video series from a very conscientious professional. As a homeowner I have renovated three homes and hanging drywall is the hardest job as I am a perfectionist and spend way too much time trying to make it look nice. I wish I had learned these tips 15 years ago. Great video series.

    Log in or create an account to post a comment.

    Sign up Log in

    Become a member and get full access to FineHomebuilding.com

    Drywall

    Drywall

    Trusted, comprehensive guidance for choosing, hanging, taping, sanding, and repairing drywall—the right way

    View Project Guide

    View All Project Guides »

    Become a member and get unlimited site access, including the Drywall Project Guide.

    Start Free Trial

    Drywall Basics
    • Types and Uses of Drywall
    • Planning the Job
    Tools and Materials
    • Hanging Tools
    • Taping Tools and Materials
    • Sanding and Finishing Tools and Materials
    Hanging Drywall
    • Prep for Hanging
    • Measuring and Cutting Drywall
    • Guidelines for Hanging and Fastening Drywall
    • Hanging Ceilings
    • Hanging Walls
    • Hanging Airtight Drywall
    • Trim Accessories/Corner Beads
    Taping and Sanding
    • Taping Basics
    • Taping Seams
    • Taping Inside and Outside Corners
    • Sanding
    Special Installations
    • Tricky Transitions
    • Curved Surfaces
    • Other Special Installations
    • Decorating with Drywall
    Drywall Repairs
    • Patching Holes, Cracks, and More
    Plaster
    • Working with Lime Plaster
    • Plaster Repair
    • Classic Plaster Techniques

    Fine Home Building

    Newsletter Sign-up

    • Fine Homebuilding

      Home building tips, offers, and expert advice in your inbox.

    • Green Building Advisor

      Building science and energy efficiency advice, plus special offers, in your inbox.

    • Old House Journal

      Repair, renovation, and restoration tips, plus special offers, in your inbox.

    Signing you up...

    This site is protected by reCAPTCHA and the Google Privacy Policy and Terms of Service apply.
    See all newsletters

    Follow

    • Fine Homebuilding

      Dig into cutting-edge approaches and decades of proven solutions with total access to our experts and tradespeople.

      Start Free Trial Now
      • Facebook
      • Instagram
      • X
      • LinkedIn
    • GBA Prime

      Get instant access to the latest developments in green building, research, and reports from the field.

      Start Free Trial Now
      • Facebook
      • YouTube
    • Old House Journal

      Learn how to restore, repair, update, and decorate your home.

      Subscribe Now
      • Facebook
      • Instagram
      • X

    Membership & Magazine

    • Online Archive
    • Start Free Trial
    • Magazine Subscription
    • Magazine Renewal
    • Gift a Subscription
    • Customer Support
    • Privacy Preferences
    • About
    • Contact
    • Advertise
    • Careers
    • Terms of Use
    • Site Map
    • Do not sell or share my information
    • Privacy Policy
    • Accessibility
    • California Privacy Rights

    © 2025 Active Interest Media. All rights reserved.

    Fine Homebuilding receives a commission for items purchased through links on this site, including Amazon Associates and other affiliate advertising programs.

    • Home Group
    • Antique Trader
    • Arts & Crafts Homes
    • Bank Note Reporter
    • Cabin Life
    • Cuisine at Home
    • Fine Gardening
    • Fine Woodworking
    • Green Building Advisor
    • Garden Gate
    • Horticulture
    • Keep Craft Alive
    • Log Home Living
    • Military Trader/Vehicles
    • Numismatic News
    • Numismaster
    • Old Cars Weekly
    • Old House Journal
    • Period Homes
    • Popular Woodworking
    • Script
    • ShopNotes
    • Sports Collectors Digest
    • Threads
    • Timber Home Living
    • Traditional Building
    • Woodsmith
    • World Coin News
    • Writer's Digest
    Active Interest Media logo
    X
    X
    This is a dialog window which overlays the main content of the page. The modal window is a 'site map' of the most critical areas of the site. Pressing the Escape (ESC) button will close the modal and bring you back to where you were on the page.

    Main Menu

    • How-To
    • Design
    • Tools & Materials
    • Video
    • Blogs
    • Forum
    • Project Guides
    • Reader Projects
    • Magazine
    • Members
    • FHB House

    Podcasts

    • FHB Podcast
    • ProTalk

    Webinars

    • Upcoming and On-Demand

    Podcasts

    • FHB Podcast
    • ProTalk

    Webinars

    • Upcoming and On-Demand

    Popular Topics

    • Kitchens
    • Business
    • Bedrooms
    • Roofs
    • Architecture and Design
    • Green Building
    • Decks
    • Framing
    • Safety
    • Remodeling
    • Bathrooms
    • Windows
    • Tilework
    • Ceilings
    • HVAC

    Magazine

    • Current Issue
    • Past Issues
    • Magazine Index
    • Subscribe
    • Online Archive
    • Author Guidelines

    All Access

    • Member Home
    • Start Free Trial
    • Gift Membership

    Online Learning

    • Courses
    • Project Guides
    • Reader Projects
    • Podcast

    More

    • FHB Ambassadors
    • FHB House
    • Customer Support

    Account

    • Log In
    • Join

    Newsletter

    Get home building tips, offers, and expert advice in your inbox

    Signing you up...

    This site is protected by reCAPTCHA and the Google Privacy Policy and Terms of Service apply.
    See all newsletters
    See all newsletters

    Follow

    • X
    • YouTube
    • instagram
    • facebook
    • pinterest
    • Tiktok

    Join All Access

    Become a member and get instant access to thousands of videos, how-tos, tool reviews, and design features.

    Start Your Free Trial

    Subscribe

    FHB Magazine

    Start your subscription today and save up to 70%

    Subscribe

    This is your last free article.

    Don't miss another expert tip or technique from building pros. Start your free trial today.

    Start your FREE trial

    Already a member? Log in

    We hope you’ve enjoyed your free articles. To keep reading, become a member today.

    Get complete site access to expert advice, how-to videos, Code Check, and more, plus the print magazine.

    Start your FREE trial

    Already a member? Log in

    Privacy Policy Update

    We use cookies, pixels, script and other tracking technologies to analyze and improve our service, to improve and personalize content, and for advertising to you. We also share information about your use of our site with third-party social media, advertising and analytics partners. You can view our Privacy Policy here and our Terms of Use here.

    Cookies

    Analytics

    These cookies help us track site metrics to improve our sites and provide a better user experience.

    Advertising/Social Media

    These cookies are used to serve advertisements aligned with your interests.

    Essential

    These cookies are required to provide basic functions like page navigation and access to secure areas of the website.

    Delete My Data

    Delete all cookies and associated data