FHB Logo Facebook LinkedIn Email Pinterest Twitter Instagram Plus Icon Close Icon Navigation Search Icon Arrow Down Icon Video Guide Icon Article Guide Icon Modal Close Icon Guide Search Icon Skip to content
Main Menu
Subscribe

In every issue you'll find...

  • Expert insights on techniques and principles
  • Unbiased tool reviews
  • Step-by-step details to master the job
  • Field-tested advice and know-how
Subscribe Now!
Subscribe
  • How-To
  • Design
  • Tools & Materials
  • Videos
  • Blogs
  • Forum
  • Magazine
  • Members
  • FHB House
  • Podcast
  • Join
  • Log In
Main Menu Subscribe

Fine Homebuilding Project Guides

Framing

Guide Home
Chapter
  • Introduction to Framing
  • Framing Tools, Techniques, and Materials
  • Framing Floors
  • Framing Walls
  • Framing Stairs
  • Framing Roofs
  • Efficient Framing Methods
  • Timber Framing
Building Skills

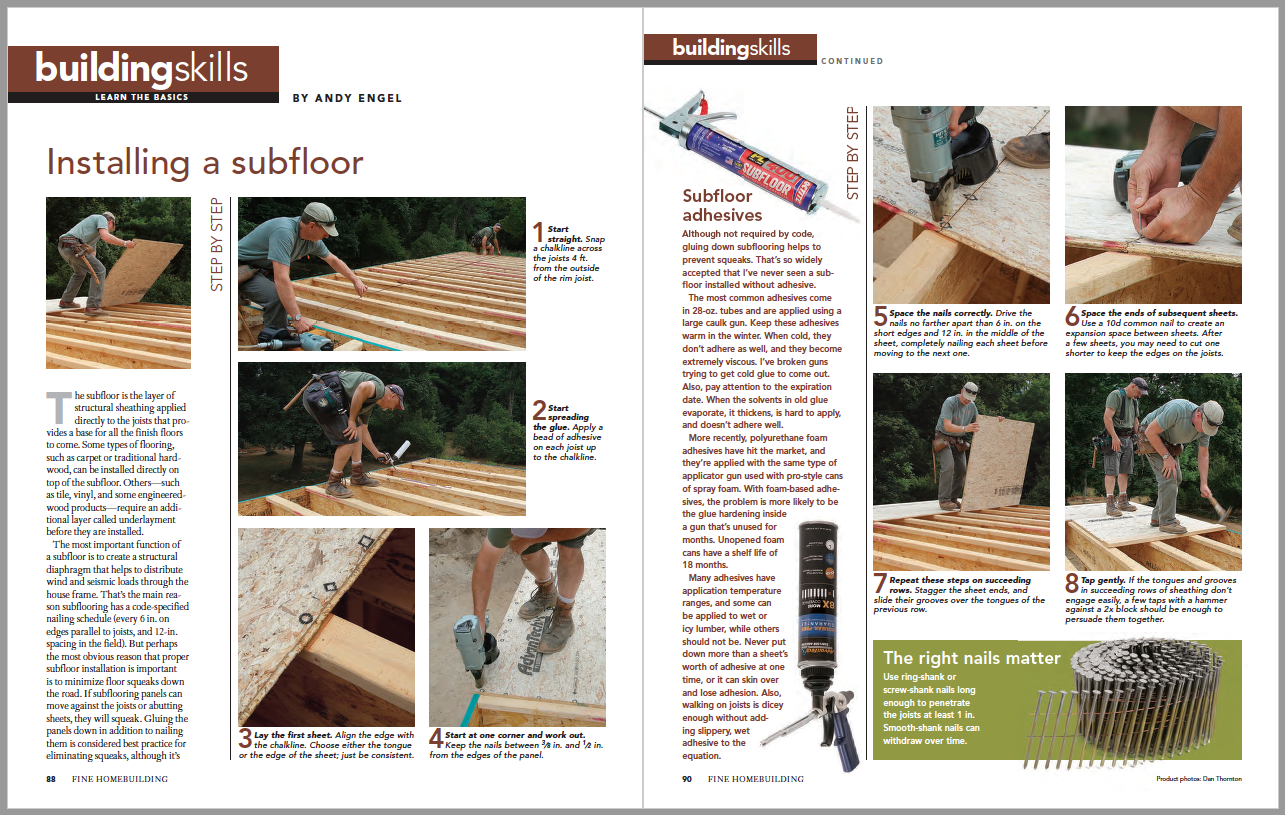
Installing a Subfloor

If subflooring panels can move against the joists or abutting sheets, they will squeak.

By Andy Engel Issue 264 – Dec 2016/Jan 2017
Article Image

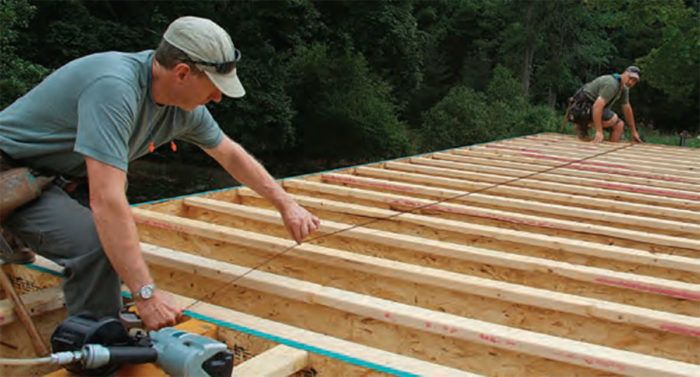
The subfloor is the layer of structural sheathing applied directly to the joists that provides a base for all the finish floors to come. Some types of flooring, such as carpet or traditional hardwood, can be installed directly on top of the subfloor. Others—such as tile, vinyl, and some engineered wood products require an additional layer called underlayment before they are installed.

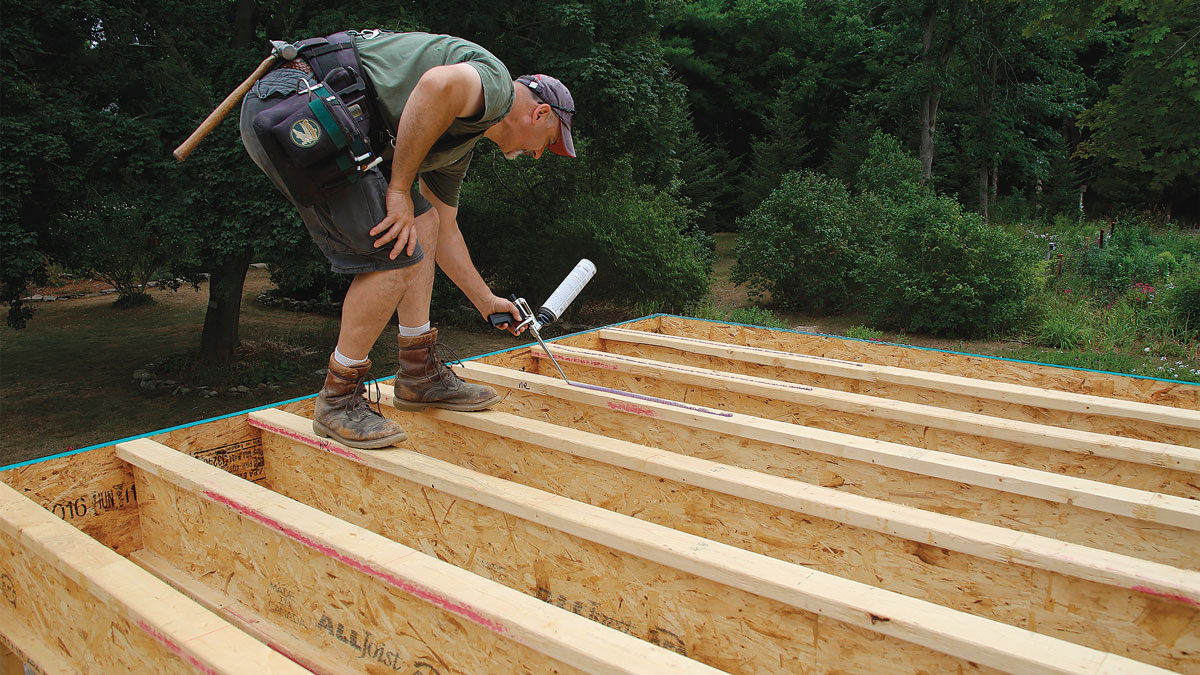
The most important function of a subfloor is to create a structural diaphragm that helps to distribute wind and seismic loads through the house frame. That’s the main reason subflooring has a code-specified nailing schedule (every 6 in. on edges parallel to joists, and 12-in. spacing in the field). But perhaps the most obvious reason that proper subfloor installation is important is to minimize floor squeaks down the road. If subflooring panels can move against the joists or abutting sheets, they will squeak. Gluing the panels down in addition to nailing them is considered best practice for eliminating squeaks, although it’s not included in the structural calculations, nor is it required by code. Some engineered floor specifications, however, may require the use of adhesive. Whenever working with engineered floor systems, be sure to follow the manufacturer’s instructions to the letter.

Start straight. Snap a chalkline across the joists 4 ft. from the outside of the rim joist.

New materials solve old problems

Most subflooring used these days is either 3⁄4-in. plywood or 3/4-in. OSB, one long edge of which has a tongue and the other long edge a matching groove. Tongue-and groove subflooring was pretty new to the market when I started framing in the 1980s. Prior to that, the standard was regular old 5/8-in. or 3/4-in. CDX plywood. To support the edges of the sheets so that they didn’t sag between the joists, carpenters installed blocking where the long edges of the sheets would meet. This required extra material for the blocking as well as a fair amount of extra work.

The introduction of tongue-and-groove subflooring eliminated the need for the extra work of installing the blocking because the sheets support each other when their edges interlock. Getting the sheets to go together could sometimes be challenging, however, particularly if they’d been exposed to much moisture prior to installation. The solution with the commodity sheets I saw in years past was to beat them together with a sledgehammer, using a length of 2x to cushion the blows.

Even after subflooring has been installed, extended exposure to the elements often can lead to trouble. Plywood subflooring can delaminate, and OSB is famous for its edges swelling (sometimes to the point where the joints must be sanded down prior to the finish flooring being installed). The market responded to these problems with premium grades of subflooring, such as the Huber AdvanTech used here. The company promises that AdvanTech can be exposed to the weather for 500 days with no edge swelling severe enough to require sanding, and says that carpenters should never need to use more than a few taps with a block and a framing hammer to drive the sheets home.

From Fine Homebuilding #264

For more photos and information on subfloor adhesives, click the View PDF button below. 

Sign up for eletters today and get the latest how-to from Fine Homebuilding, plus special offers.

Sign Up
View PDF
X
X
Previous: Installing T&G Floor Sheathing Next: Fast, Accurate Floor Sheathing

Guide

Framing

Chapter

Framing Floors

Log in or create an account to post a comment.

Sign up Log in

Become a member and get full access to FineHomebuilding.com

Framing

Framing

Trusted, in-depth guidance from the pros for framing a durable, code-compliant house

View Project Guide

View All Project Guides »

Become a member and get unlimited site access, including the Framing Project Guide.

Start Free Trial

Introduction to Framing
  • House Framing Concepts, Tips, and More
Framing Tools, Techniques, and Materials
  • Tools
  • Techniques
  • Framing Lumber
  • Steel
Framing Floors
  • Floor Framing
  • Engineered Floors
  • Floor Sheathing
Framing Walls
  • Wall Framing Basics
  • Layout
  • Wall Assembly
  • Raising and Straightening Walls
  • Framing Rough Openings
  • Blocking
Framing Stairs
  • Stair Layout
  • Building Stairs
Framing Roofs
  • Roof-Framing Basics
  • Roof Design
  • Laying Out and Cutting Rafters
  • Framing Valleys
  • Working with Trusses
  • Dormers
  • Special Situations
Efficient Framing Methods
  • Advanced Framing
  • Double-Stud Walls
Timber Framing
  • Timber-Frame Construction
  • Timber-Frame Design

Fine Homebuilding

Follow

Newsletter

Get home building tips, offers, and expert advice in your inbox

Sign Up See all newsletters

Membership & Magazine

  • Online Archive
  • Start Free Trial
  • Magazine Subscription
  • Magazine Renewal
  • Gift a Subscription
  • Customer Support
  • Manage Preferences

Taunton Network

  • Green Building Advisor
  • Fine Woodworking
  • Fine Gardening
  • Threads
  • About
  • Contact
  • Advertise
  • Privacy Policy
  • Careers
  • Copyright
  • Terms of Use
  • Accessibility
  • CA Privacy Rights

© 2021 The Taunton Press, Inc. All rights reserved.

    Main Menu

  • How-To
  • Design
  • Tools & Materials
  • Video
  • Blogs
  • Forum
  • Reader Projects
  • Magazine
  • Members
  • FHB House
  • Podcasts

  • FHB Podcast
  • ProTalk
  • Account

  • Log In
  • Join

    Podcasts

  • FHB Podcast
  • ProTalk
  • Popular Topics

  • Kitchens
  • Business
  • Bedrooms
  • Roofs
  • Architecture and Design
  • Green Building
  • Decks
  • Framing
  • Safety
  • Remodeling
  • Bathrooms
  • Windows
  • Tilework
  • Ceilings
  • HVAC

    Magazine

  • Current Issue
  • Past Issues
  • Magazine Index
  • Subscribe
  • Online Archive
  • Author Guidelines

    All Access

  • Member Home
  • Start Free Trial
  • Gift Membership

    Shop the Store

  • Books
  • DVDs
  • Taunton Workshops

    More

  • FHB Ambassadors
  • Reader Projects
  • Podcast
  • Customer Support

    Account

  • Log In
  • Join

Newsletter

Get home building tips, offers, and expert advice in your inbox

Sign Up See all newsletters

Follow

Join All Access

Become a member and get instant access to thousands of videos, how-tos, tool reviews, and design features.

Start Your Free Trial

Subscribe

FHB Magazine

Start your subscription today and save up to 52%

Subscribe

We hope you’ve enjoyed your free articles. To keep reading, become a member today.

Get complete site access to expert advice, how-to videos, Code Check, and more, plus the print magazine.

Start your FREE trial

Already a member? Log in