FHB Logo Facebook LinkedIn Email Pinterest Twitter Instagram Plus Icon Close Icon Navigation Search Icon Navigation Search Icon Arrow Down Icon Video Guide Icon Article Guide Icon Modal Close Icon Guide Search Icon Skip to content
Subscribe

In every issue you'll find...

  • Expert insights on techniques and principles
  • Unbiased tool reviews
  • Step-by-step details to master the job
  • Field-tested advice and know-how
Subscribe Now!
Subscribe
  • How-To
  • Design
  • Tools & Materials
  • Videos
  • Blogs
  • Forum
  • Magazine
  • Members
  • FHB House
  • Podcast
  • Join
  • Log In
Subscribe

Fine Homebuilding Project Guides

Framing

Guide Home
Chapter
  • Introduction to Framing
  • Framing Tools, Techniques, and Materials
  • Framing Floors
  • Framing Walls
  • Framing Stairs
  • Framing Roofs
  • Efficient Framing Methods
  • Timber Framing
How-To

Can You Fix a Squeaky Subfloor With Extra Blocking?

Builder William Wiehe offers a solution for spanning an unsupported tongue-and-groove subfloor joint that runs perpendicular to the joists and squeaks along its entire length.

By William Wiehe Issue 246 - Oct/Nov 2014

Q:

I’m ripping up wall-to-wall carpeting and replacing it with hardwood flooring. The 3/4-in. tongue-and-groove plywood subfloor was laid in construction adhesive and fastened with nails, but there is one joint that runs perpendicular to the joists and squeaks along its entire length. I can access the framing from the basement below, so I’m thinking the best bet is to screw some 2×4 blocking to the underside of the subfloor to support the joint. Will this do the trick?

Jimmie M., via the Fine Homebuilding forum

A:

William “Sonny” Wiehe of Vice Versa Builders, in Fairfax, VA, replies: It sounds like your squeaks—either wood rubbing against wood, or wood rubbing against a nail shaft—can indeed be solved by adding 2×4 blocking. But keep in mind that the devil is in the installation details.

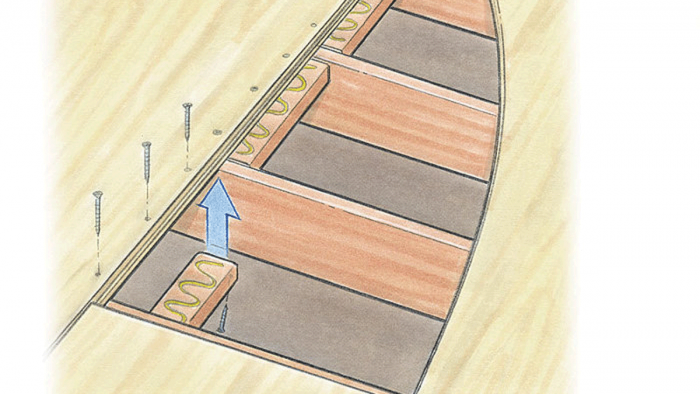
Many builders don’t know that for glued-floor systems, APA-The Engineered Wood Association recommends adhesive not only along the top edges of the floor joists but also along the entire length of the tongue-and-groove joint. The idea here is to develop continuity in the floor-diaphragm structure and reduce wood-to-wood squeaks. In a retrofit like yours, gluing the joints isn’t possible, so your aim is to create glued gussets to help reinforce these areas. To do this, install the 2×4 blocks on the flat, which provides a wide gluing surface.

Your goal is really to “clamp” the blocking to the subfloor and let the layer of construction adhesive (I recommend SF-450 adhesive, made by OSI) do the rest of the work. I advise against your idea of driving the screws through the blocking and into the subfloor from below, however.

As a general rule, when joining materials of dissimilar thickness, it’s not a good idea to screw through the thicker material (2×4 blocking) to attach it to the thinner material (3/4-in. subfloor). First, this approach will mean your screw tips have only 3/4 in. of wood to bite into before they poke up through your subfloor. Second, you don’t want the screw to get hung up in the 2×4 material you’re driving it through rather than the subfloor that you’re trying to anchor it to. When this happens, you get what’s called screw jacking, which actually forces the materials apart instead of pulling them together. Screw jacking is part of the reason why many wood screws (particularly decking and framing screws) have a smooth shaft below the head. It’s also why drilling clearance holes through the material being fastened is usually smart.

Instead, cut the blocking so that it’s a pressure fit between the floor joists, then go upstairs and drive 2-1/8-in. screws through the subfloor into the blocking, pulling it tight. I’ve been happy with McFeely’s line of ProMax deck screws. Back downstairs, tie the ends of those snugged-up blocks into the joists with pocket screws.

While you’re at it, pull any nails you see in the subfloor, and replace them with screws. Screws don’t squeak because they really can’t rub against anything. Driving screws near nails will probably reduce the likelihood of nail squeaks, but why leave that risk in place if you have an opportunity to remove it entirely?

From Fine Homebuilding #246

Sign up for eletters today and get the latest how-to from Fine Homebuilding, plus special offers.

Signing you up...

This site is protected by reCAPTCHA and the Google Privacy Policy and Terms of Service apply.
See all newsletters
See all newsletters
Previous: Squeak-Free Floors: 3 Tips for Strong Subfloors Next: Replace Damaged Board Floor Sheathing

Guide

Framing

Chapter

Framing Floors

View Comments

  1. user-7077131 | May 28, 2020 01:39pm | #1

    About a month before I read this article, I did exactly what is described but substituted 2x6s for even more surface area and added construction adhesive not only between the subfloor and the flat side of the 2x6, but also on the 2x6 edges that contact the floor joists. For the area that has the most foot traffic, I added 3 additional blocks between between each 4 foot span, Overkill for sure, but the resulting floor now feels like walking on concrete. Putting the blocking under the joints of the 4x8 per the article resulted in the most effective reduction of the squeaks, but not all of them until the additional blocking was added. It's nice to be retired.

Log in or create an account to post a comment.

Sign up Log in

Become a member and get full access to FineHomebuilding.com

Framing

Framing

Trusted, in-depth guidance from the pros for framing a durable, code-compliant house

View Project Guide

View All Project Guides »

Become a member and get unlimited site access, including the Framing Project Guide.

Start Free Trial

Introduction to Framing
  • House Framing Concepts, Tips, and More
Framing Tools, Techniques, and Materials
  • Tools
  • Techniques
  • Framing Lumber
  • Steel
Framing Floors
  • Floor Framing
  • Engineered Floors
  • Floor Sheathing
Framing Walls
  • Wall Framing Basics
  • Layout
  • Wall Assembly
  • Raising and Straightening Walls
  • Framing Rough Openings
  • Blocking
Framing Stairs
  • Stair Layout
  • Building Stairs
Framing Roofs
  • Roof-Framing Basics
  • Roof Design
  • Laying Out and Cutting Rafters
  • Framing Valleys
  • Working with Trusses
  • Dormers
  • Special Situations
Efficient Framing Methods
  • Advanced Framing
  • Double-Stud Walls
Timber Framing
  • Timber-Frame Construction
  • Timber-Frame Design

Fine Homebuilding

Follow

  • twitter
  • facebook
  • instagram
  • pinterest

Newsletter

Get home building tips, offers, and expert advice in your inbox

Signing you up...

This site is protected by reCAPTCHA and the Google Privacy Policy and Terms of Service apply.
See all newsletters
See all newsletters

Membership & Magazine

  • Online Archive
  • Start Free Trial
  • Magazine Subscription
  • Magazine Renewal
  • Gift a Subscription
  • Customer Support
  • Privacy Preferences

Taunton Network

  • Green Building Advisor
  • Fine Woodworking
  • Fine Gardening
  • Threads
  • About
  • Contact
  • Advertise
  • Careers
  • Copyright
  • Terms of Use
  • Site Map
  • Do not sell my information
  • Privacy Policy
  • Accessibility
  • California Privacy Rights

© 2022 The Taunton Press, Inc. All rights reserved.

X
X
This is a dialog window which overlays the main content of the page. The modal window is a 'site map' of the most critical areas of the site. Pressing the Escape (ESC) button will close the modal and bring you back to where you were on the page.

Main Menu

  • How-To
  • Design
  • Tools & Materials
  • Video
  • Blogs
  • Forum
  • Reader Projects
  • Magazine
  • Members
  • FHB House

Podcasts

  • FHB Podcast
  • ProTalk

Webinars

  • Upcoming and On-Demand

Account

  • Log In
  • Join

Podcasts

  • FHB Podcast
  • ProTalk

Webinars

  • Upcoming and On-Demand

Popular Topics

  • Kitchens
  • Business
  • Bedrooms
  • Roofs
  • Architecture and Design
  • Green Building
  • Decks
  • Framing
  • Safety
  • Remodeling
  • Bathrooms
  • Windows
  • Tilework
  • Ceilings
  • HVAC

Magazine

  • Current Issue
  • Past Issues
  • Magazine Index
  • Subscribe
  • Online Archive
  • Author Guidelines

All Access

  • Member Home
  • Start Free Trial
  • Gift Membership

Shop the Store

  • Books
  • DVDs
  • Taunton Workshops

More

  • FHB Ambassadors
  • Reader Projects
  • Podcast
  • Customer Support

Account

  • Log In
  • Join

Newsletter

Get home building tips, offers, and expert advice in your inbox

Signing you up...

This site is protected by reCAPTCHA and the Google Privacy Policy and Terms of Service apply.
See all newsletters
See all newsletters

Follow

  • twitter
  • facebook
  • instagram
  • pinterest

Join All Access

Become a member and get instant access to thousands of videos, how-tos, tool reviews, and design features.

Start Your Free Trial

Subscribe

FHB Magazine

Start your subscription today and save up to 70%

Subscribe

We hope you’ve enjoyed your free articles. To keep reading, become a member today.

Get complete site access to expert advice, how-to videos, Code Check, and more, plus the print magazine.

Start your FREE trial

Already a member? Log in