FHB Logo Facebook LinkedIn Email Pinterest Twitter Instagram Plus Icon Close Icon Navigation Search Icon Navigation Search Icon Arrow Down Icon Video Guide Icon Article Guide Icon Modal Close Icon Guide Search Icon Skip to content
Subscribe

In every issue you'll find...

  • Expert insights on techniques and principles
  • Unbiased tool reviews
  • Step-by-step details to master the job
  • Field-tested advice and know-how
Subscribe Now!
Subscribe
  • How-To
  • Design
  • Tools & Materials
  • Videos
  • Blogs
  • Forum
  • Magazine
  • Members
  • FHB House
  • Podcast
  • Join
  • Log In
Subscribe

Fine Homebuilding Project Guides

Roofing

Guide Home
Chapter
  • Tools and Materials
  • Roof Replacement and Reroofing
  • Roof Ventilation
  • Waterproofing
  • Installing Asphalt Shingles
  • Installing Other Types of Roofs
  • Roof Maintenance and Repair
Building Skills

How to Bend Copper Chimney Flashing

Roofing contractor Dyami Plotke demonstrates how to make complex cuts and bends to create durable, beautiful flashings for making watertight connections between roofs and chimneys.

By Official Fine Homebuilding Post

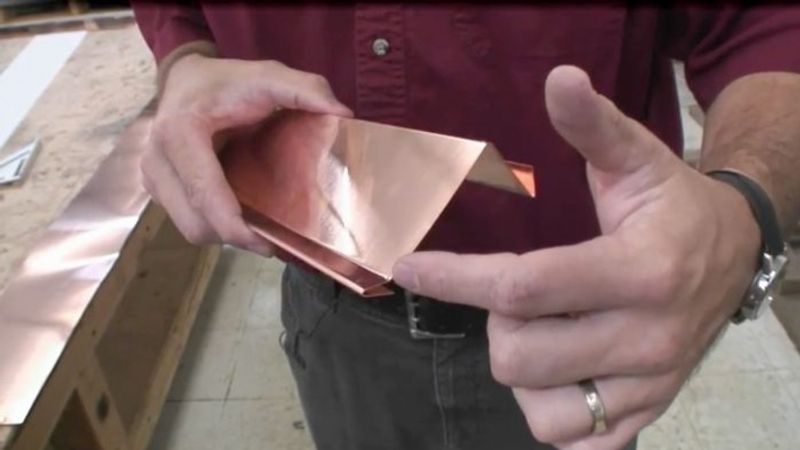
Roofing project manager Dyami Plotke demonstrates how to fabricate complex pieces of flashing and describes the various pieces needed to make a chimney-to-roof connection watertight.

Note: The portable job-site brakes work almost identically to the heavy-duty brake in this video, so the techniques shown here will still apply


Dyami is demonstrating how to bend a section of cut-in-reglet flashing, because it is one of the more complicated chimney-flashing components. If you’re comfortable with the skills needed to fabricate this piece of flashing, you will be able to tackle any basic flashing component.

The elements of the cut-in-reglet flashing include:

  • A strength hem along the bottom which gives a straight, clean line
  • A vertical face which will cover the step flashing previously installed on the roof
  • A horizontal leg that returns into the chimney (in a reglet cut with a grinder)
  • A return lap which, in conjunction with wedges driven in afterwards, locks the flashing into the chimney

The trick to fabricating a piece of flashing with multiple bends is to plan your bends in an order that prevents damage to bends already completed. In this case, Dyami starts with the return lap at the top of the flashing and works consecutively through the adjacent bends until he completes the strength hem at the bottom.

It’s a good idea to make a test piece out of a short scrap of metal before you attempt to create an actual piece of flashing.

More tips for successful flashing fabrication:

  • For long pieces, have a second person on hand to help load the brake without bending the metal
  • Mark the flashing with an awl; the depression made by an awl is visible on both sides of the metal, which is helpful when you have to flip the piece multiple times for consecutive bends
  • Use the width of the lip of the jaw on the brake as a reference for strength hems or return laps; this minimizes the number of measurements you need to make during layout
  • Don’t over-bend flashing at the transition between a roof and a vertical surface (like a chimney or wall); this will ensure that the flashing stays tight to the surfaces rather than wanting to pull away
  • Copper is soft enough that bends usually can be easily adjusted by hand; aluminum flashing requires more precise work on the brake, as it is stiffer and harder to re-bend
  • It is usually easier and more economical to buy any needed step flashing rather than fabricating it yourself

Also read Dyami’s related article Bending Copper Chimney Flashing

Sign up for eletters today and get the latest how-to from Fine Homebuilding, plus special offers.

Signing you up...

This site is protected by reCAPTCHA and the Google Privacy Policy and Terms of Service apply.
See all newsletters
See all newsletters
Previous: Bending Copper Chimney Flashing Next: Vent Flashing Done Right

Guide

Roofing

Chapter

Waterproofing

View Comments

  1. user-1045145 | Nov 19, 2012 12:38pm | #1

    This is a nice demonstration of the sequence of bending flashing. However, the installation as explained will leak at the corners. By simply cutting the top and bottom flashing at the corners and bending the vertical leg around the corner will leave a hole right at the bottom of each corner. Even if the step flashing is cut in a similar way with a vertical leg bent around the corner, there is still a hole at the bottom of each corner. These holes can be caulked as the flashing is installed, or the top and bottom flashing need a corner return soldered as part of each end of the top and bottom flashing. Easier shown than explained. If the video actually showed a corner with the flashing cuts, this would be evident.

  2. [email protected] | Oct 18, 2020 08:39am | #2

    The demonstrator did a good job however the presentation would have been more thorough with a pre-drawn diagram that shows each component. I agree with user 1045145 that a hole would have been left and step flashing to base/top flashings. The demonstrator could have easily mocked up a chimney on a slope in that beautiful shop and actually applied each flashing to show each piece in place and the importance of position.

Log in or create an account to post a comment.

Sign up Log in

Become a member and get full access to FineHomebuilding.com

Roofing

Roofing

A complete resource that includes the best materials and the right techniques to build a sturdy, leak-free, attractive roof on any house

View Project Guide

View All Project Guides »

Become a member and get unlimited site access, including the Roofing Project Guide.

Start Free Trial

Tools and Materials
  • Roof Coverings
  • Roofing Materials
  • Power Tools
  • Handy Helpers
  • Staging and Ladders
  • Safety Equipment
Roof Replacement and Reroofing
  • Preparing the Old Roof
  • Sheathing
  • Installing the New Roof
Roof Ventilation
  • Venting Basics
  • Installation
Waterproofing
  • Underlayment
  • Drip Edge
  • Flashing Adjoining Walls
  • Dormer and Skylight Flashing
  • Chimney Flashing
  • Vent Flashing
  • Gutters
Installing Asphalt Shingles
  • Calculating Shingles
  • Layout
  • Installation
  • Valleys
Installing Other Types of Roofs
  • Cedar Shingles
  • Metal
  • Low-Slope Roofs
  • Slate and Tile
Roof Maintenance and Repair
  • Assessing the Problem
  • Repairing Asphalt-Shingle Roofs
  • Other Roofing Repairs

Fine Homebuilding

Follow

  • twitter
  • facebook
  • instagram
  • pinterest

Newsletter

Get home building tips, offers, and expert advice in your inbox

Signing you up...

This site is protected by reCAPTCHA and the Google Privacy Policy and Terms of Service apply.
See all newsletters
See all newsletters

Membership & Magazine

  • Online Archive
  • Start Free Trial
  • Magazine Subscription
  • Magazine Renewal
  • Gift a Subscription
  • Customer Support
  • Privacy Preferences

Taunton Network

  • Green Building Advisor
  • Fine Woodworking
  • Fine Gardening
  • Threads
  • About
  • Contact
  • Advertise
  • Careers
  • Copyright
  • Terms of Use
  • Site Map
  • Do not sell or share my information
  • Privacy Policy
  • Accessibility
  • California Privacy Rights

© 2023 The Taunton Press, Inc. All rights reserved.

X
X
This is a dialog window which overlays the main content of the page. The modal window is a 'site map' of the most critical areas of the site. Pressing the Escape (ESC) button will close the modal and bring you back to where you were on the page.

Main Menu

  • How-To
  • Design
  • Tools & Materials
  • Video
  • Blogs
  • Forum
  • Reader Projects
  • Magazine
  • Members
  • FHB House

Podcasts

  • FHB Podcast
  • ProTalk

Webinars

  • Upcoming and On-Demand

Account

  • Log In
  • Join

Podcasts

  • FHB Podcast
  • ProTalk

Webinars

  • Upcoming and On-Demand

Popular Topics

  • Kitchens
  • Business
  • Bedrooms
  • Roofs
  • Architecture and Design
  • Green Building
  • Decks
  • Framing
  • Safety
  • Remodeling
  • Bathrooms
  • Windows
  • Tilework
  • Ceilings
  • HVAC

Magazine

  • Current Issue
  • Past Issues
  • Magazine Index
  • Subscribe
  • Online Archive
  • Author Guidelines

All Access

  • Member Home
  • Start Free Trial
  • Gift Membership

Shop the Store

  • Books
  • DVDs
  • Taunton Workshops

More

  • FHB Ambassadors
  • Reader Projects
  • Podcast
  • Customer Support

Account

  • Log In
  • Join

Newsletter

Get home building tips, offers, and expert advice in your inbox

Signing you up...

This site is protected by reCAPTCHA and the Google Privacy Policy and Terms of Service apply.
See all newsletters
See all newsletters

Follow

  • twitter
  • facebook
  • instagram
  • pinterest

Join All Access

Become a member and get instant access to thousands of videos, how-tos, tool reviews, and design features.

Start Your Free Trial

Subscribe

FHB Magazine

Start your subscription today and save up to 70%

Subscribe

We hope you’ve enjoyed your free articles. To keep reading, become a member today.

Get complete site access to expert advice, how-to videos, Code Check, and more, plus the print magazine.

Start your FREE trial

Already a member? Log in