FHB Logo Facebook LinkedIn Email Pinterest Twitter Instagram Tiktok YouTube Plus Icon Close Icon Navigation Search Icon Navigation Search Icon Arrow Down Icon Video Guide Icon Article Guide Icon Modal Close Icon Guide Search Icon Skip to content
Subscribe
Log In
  • How-To
  • Design
  • Tools & Materials
  • Videos
  • Blogs
  • Forum
  • Magazine
  • Members
  • FHB House
  • Podcast
Log In

Fine Homebuilding Project Guides

Roofing

Guide Home
  • Tools and Materials
  • Roof Replacement and Reroofing
  • Roof Ventilation
  • Waterproofing
  • Installing Asphalt Shingles
  • Installing Other Types of Roofs
  • Roof Maintenance and Repair
How-To

Retrofit Intake Vents

Bring in fresh air through venting drip edge.

By Mike Guertin Issue 278 - Oct/Nov 2018

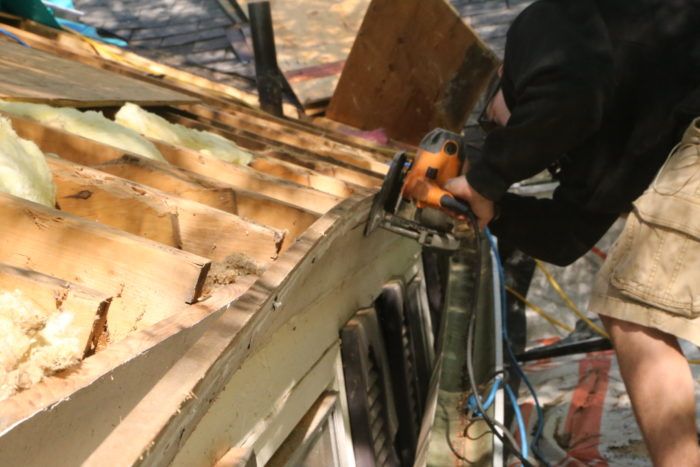
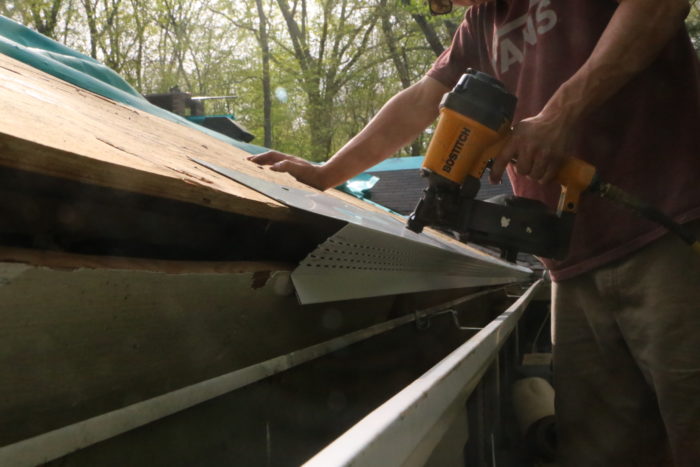
This house has a very narrow overhang—6 in.—and square-cut rafters, leaving only 1-1/2 in. of “soffit” area between the fascia and frieze boards. This leaves little room for soffit-style intake vents. So instead, we ripped a 1-3/4-in. strip off the top of the fascia, leaving an open space between the sheathing and the fascia. Then we installed venting drip edge. The sloped return leg on the extended nose of the drip edge is louvered for air to enter the attic. And this puts the intake air right under the roof sheathing so it enters the vent baffle without obstruction.

Retrofit Intake Vents

After that, we removed the roof sheathing, fabricated custom vent baffles for each rafter bay, and took care of any incidental air-sealing of vent pipes and drywall transitions we could reach. For more on that, check out “Roof Vent Retrofit From the Outside In” in FHB #278.

Photos by Mike Guertin.

Sign up for eletters today and get the latest how-to from Fine Homebuilding, plus special offers.

Signing you up...

This site is protected by reCAPTCHA and the Google Privacy Policy and Terms of Service apply.
See all newsletters
See all newsletters
Previous: Roof Vent Retrofit from the Outside In Next: Venting a Tricky Old Roof

Guide

Roofing

Chapter

Roof Ventilation

View Comments

  1. crowntrim | Sep 14, 2018 11:15am | #1

    I love that. I am battling a lack of ventilation in my roof. But I don’t think I would install gutters underneath this style of ventilation.

    1. p_vilefort | Nov 28, 2022 01:56pm | #4

      According to the Building Science Corp. it is impossible to have too much eave venting, in other words use continuous venting.
      There is a new material using an old idea for venting. The material is available in sheets and is called Coroplast; think corrugated paper made from plastic. I think there is a company that also packages it in narrow strips to about 1/4 or 1/2 thick with the corrugations in the vertical direction. It is usually installed between the soffit boards or covering and the frieze board for the entire perimeter of the house. Some folks also add black nylon screen to help prevent insects from getting into the corrugations. I have also seen it at the bottom of the gap between the siding and the rain screen, where there is a deliberate gap to promote drying. Naturally you would also have it at the top of the wall venting into the rafter space. The space between the rain screen and the cladding is a minimum of 3/8 inch.

  2. user-7140895 | Oct 01, 2018 03:02pm | #2

    Right, my house has ventilated drip edging installed, and during heavy snow periods, the gutter can fill with ice and water can back up into the wall. This photo seems to imply a larger gap.

    1. p_vilefort | Nov 28, 2022 01:43pm | #3

      If you are going to have gutters change to a half round or quarter round. When installed correctly there is a much larger gap between the back of the gutter and the edge of the roof. Half round is what was used back in the 1920's. I grew up in a house in the Northeast that was built in the 1920s and at some point the front gutter was replaced with aluminum. One winter it collapsed due to snow and ice accumulation. The gutter on the back of the house was the original half round iron gutter and it survived just fine. It is now 2022 and it is still on the back of the house. It used a very hefty half round support that was attached to the soffit boards with brass screws. Back then the soffit trim boards were 1 inch thick with 2 inch thick structural supports behind that were nailed to the roof rafter outlooks. The underside was finished with red cedar beaded ceiling about 3/8 inch thick. Over the years my father had to replace a number of supports and he always used hot dipped galvanized supports. Those never rusted. They were all eventually replaced but not the gutter.

Log in or create an account to post a comment.

Sign up Log in

Become a member and get full access to FineHomebuilding.com

Roofing

Roofing

A complete resource that includes the best materials and the right techniques to build a sturdy, leak-free, attractive roof on any house

View Project Guide

View All Project Guides »

Become a member and get unlimited site access, including the Roofing Project Guide.

Start Free Trial

Tools and Materials
  • Roof Coverings
  • Roofing Materials
  • Power Tools
  • Handy Helpers
  • Staging and Ladders
  • Safety Equipment
Roof Replacement and Reroofing
  • Preparing the Old Roof
  • Sheathing
  • Installing the New Roof
Roof Ventilation
  • Venting Basics
  • Installation
Waterproofing
  • Underlayment
  • Drip Edge
  • Flashing Adjoining Walls
  • Dormer and Skylight Flashing
  • Chimney Flashing
  • Vent Flashing
  • Gutters
Installing Asphalt Shingles
  • Calculating Shingles
  • Layout
  • Installation
  • Valleys
Installing Other Types of Roofs
  • Cedar Shingles
  • Metal
  • Low-Slope Roofs
  • Slate and Tile
Roof Maintenance and Repair
  • Assessing the Problem
  • Repairing Asphalt-Shingle Roofs
  • Other Roofing Repairs

Fine Homebuilding

Follow

  • YouTube
  • instagram
  • facebook
  • pinterest
  • Tiktok
  • twitter

Newsletter

Get home building tips, offers, and expert advice in your inbox

Signing you up...

This site is protected by reCAPTCHA and the Google Privacy Policy and Terms of Service apply.
See all newsletters
See all newsletters

Membership & Magazine

  • Online Archive
  • Start Free Trial
  • Magazine Subscription
  • Magazine Renewal
  • Gift a Subscription
  • Customer Support
  • Privacy Preferences

Taunton Network

  • Green Building Advisor
  • Fine Woodworking
  • Fine Gardening
  • Threads
  • About
  • Contact
  • Advertise
  • Careers
  • Copyright
  • Terms of Use
  • Site Map
  • Do not sell or share my information
  • Privacy Policy
  • Accessibility
  • California Privacy Rights

© 2023 The Taunton Press, Inc. All rights reserved.

X
X
This is a dialog window which overlays the main content of the page. The modal window is a 'site map' of the most critical areas of the site. Pressing the Escape (ESC) button will close the modal and bring you back to where you were on the page.

Main Menu

  • How-To
  • Design
  • Tools & Materials
  • Video
  • Blogs
  • Forum
  • Project Guides
  • Reader Projects
  • Magazine
  • Members
  • FHB House

Podcasts

  • FHB Podcast
  • ProTalk

Webinars

  • Upcoming and On-Demand

Podcasts

  • FHB Podcast
  • ProTalk

Webinars

  • Upcoming and On-Demand

Popular Topics

  • Kitchens
  • Business
  • Bedrooms
  • Roofs
  • Architecture and Design
  • Green Building
  • Decks
  • Framing
  • Safety
  • Remodeling
  • Bathrooms
  • Windows
  • Tilework
  • Ceilings
  • HVAC

Magazine

  • Current Issue
  • Past Issues
  • Magazine Index
  • Subscribe
  • Online Archive
  • Author Guidelines

All Access

  • Member Home
  • Start Free Trial
  • Gift Membership

Shop the Store

  • Books
  • DVDs
  • Taunton Workshops

More

  • FHB Ambassadors
  • Reader Projects
  • Podcast
  • FHB House
  • Customer Support

Account

  • Log In
  • Join

Newsletter

Get home building tips, offers, and expert advice in your inbox

Signing you up...

This site is protected by reCAPTCHA and the Google Privacy Policy and Terms of Service apply.
See all newsletters
See all newsletters

Follow

  • YouTube
  • instagram
  • facebook
  • pinterest
  • Tiktok
  • twitter

Join All Access

Become a member and get instant access to thousands of videos, how-tos, tool reviews, and design features.

Start Your Free Trial

Subscribe

FHB Magazine

Start your subscription today and save up to set_percent%

Subscribe

We hope you’ve enjoyed your free articles. To keep reading, become a member today.

Get complete site access to expert advice, how-to videos, Code Check, and more, plus the print magazine.

Start your FREE trial

Already a member? Log in