FHB Logo Facebook LinkedIn Email Pinterest Twitter X Instagram Tiktok YouTube Plus Icon Close Icon Navigation Search Icon Navigation Search Icon Arrow Down Icon Video Guide Icon Article Guide Icon Modal Close Icon Guide Search Icon Skip to content
Subscribe
Log In
  • How-To
  • Design
  • Tools & Materials
  • Restoration
  • Videos
  • Blogs
  • Forum
  • Magazine
  • Members
  • FHB House
  • Podcast
Log In

Fine Homebuilding Project Guides

Tiling

Guide Home
  • Selecting Tile
  • Tools & Techniques
  • Installation Materials
  • Preparation
  • Tiling Floors
  • Tiling Walls & Backsplashes
  • Tiling Showers
  • Grouting, Sealing & Caulking
  • Maintenance & Repair
Tools & Materials

Installing Floor Trim

Learn how to finish off a tile floor installation with tile base, edge trim, and transitional trim strips.

By Robin Nicholas, Michael Schweit
  • X
  • facebook
  • linkedin
  • pinterest
  • email
  • add to favorites Log in or Sign up to save your favorite articles

Setting Tile Base

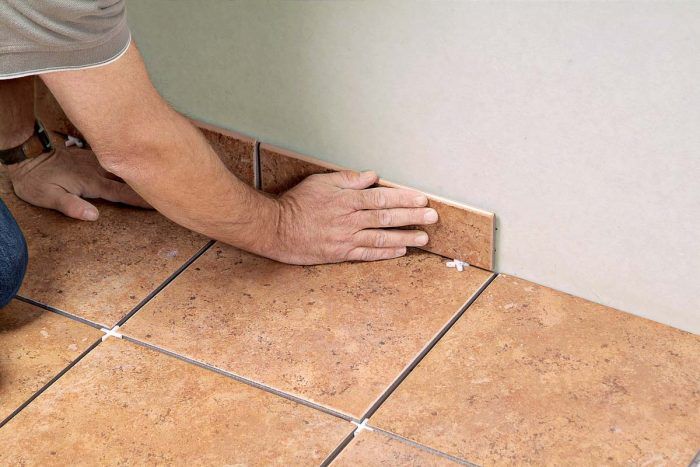
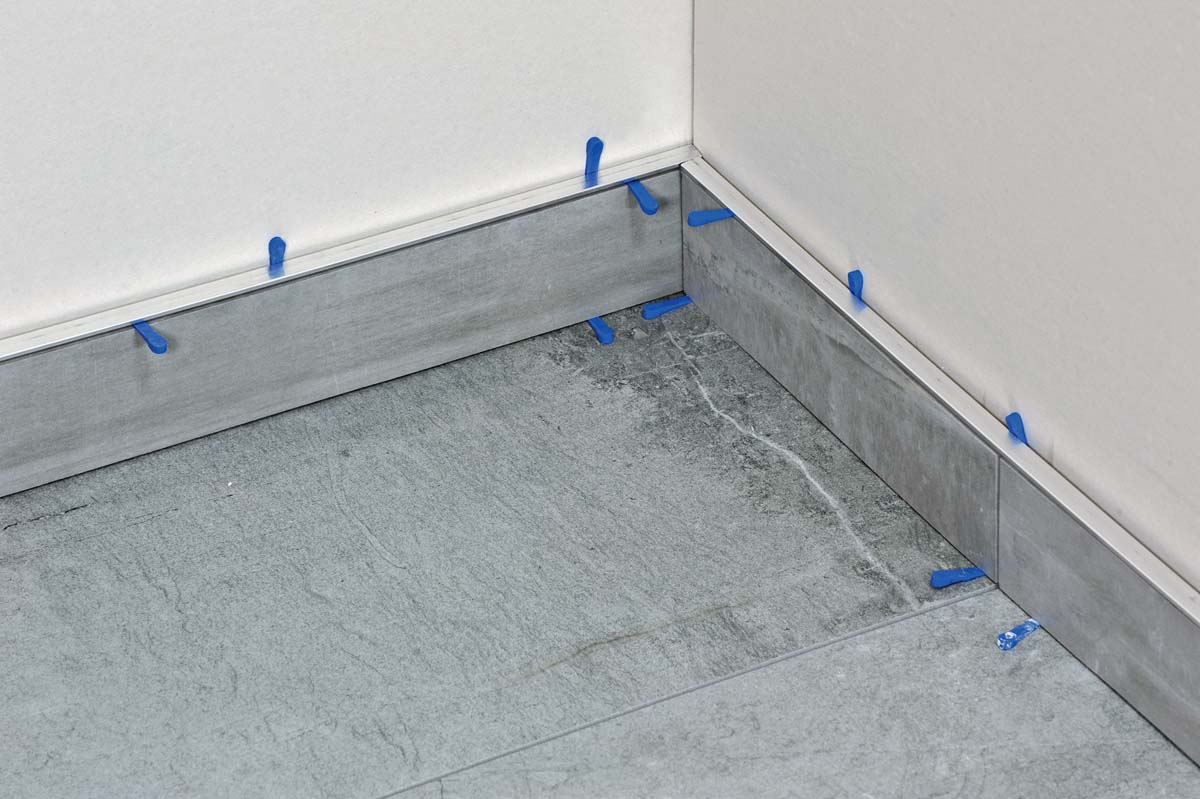
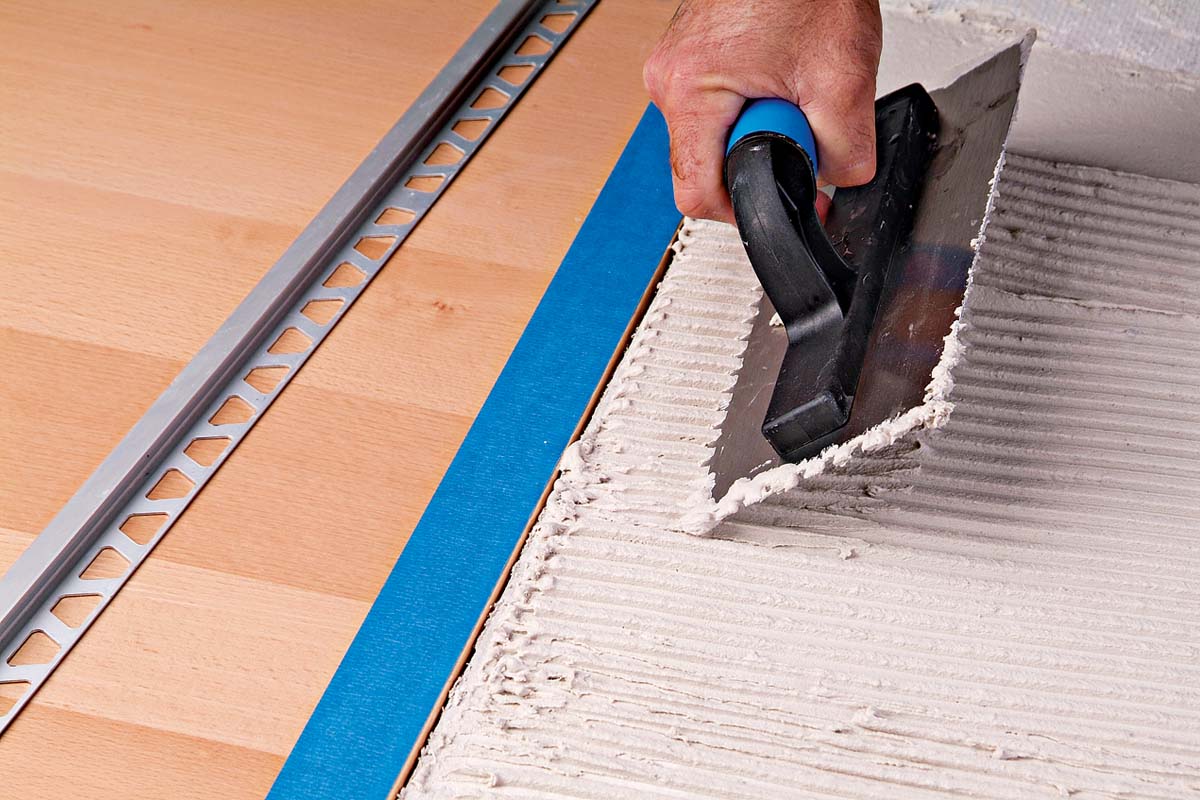
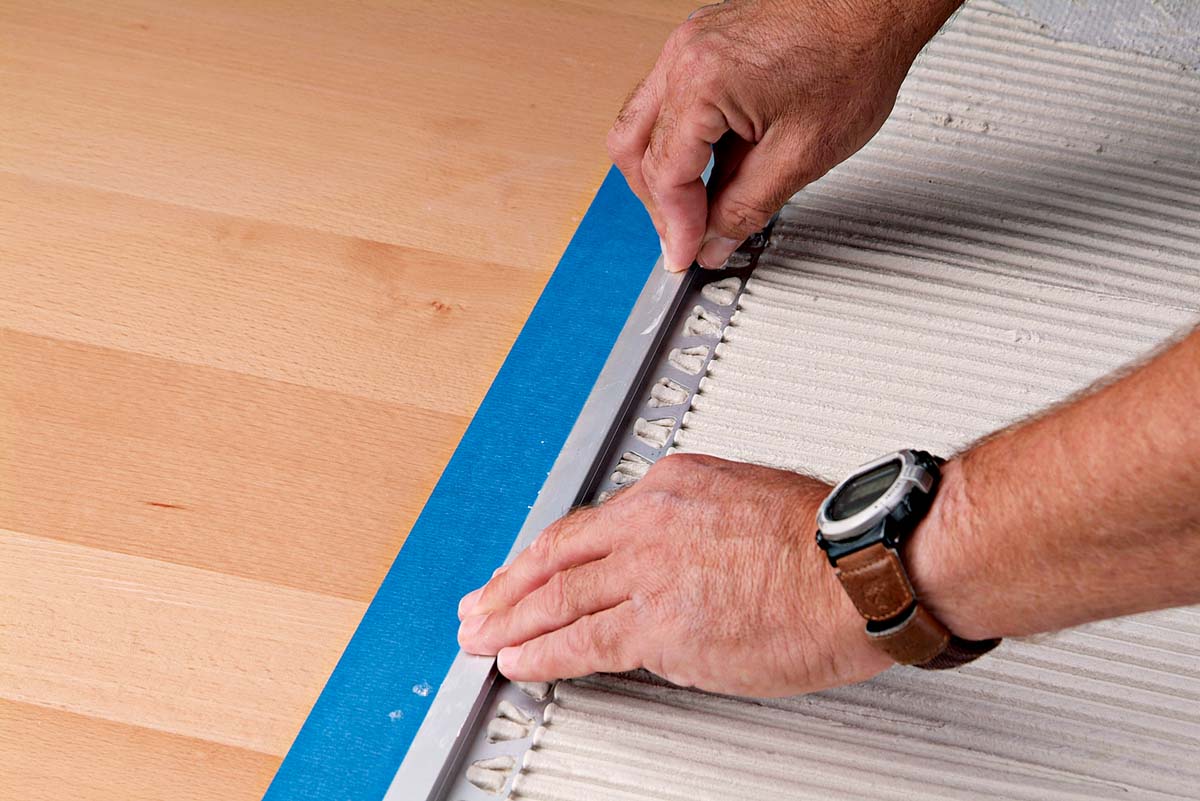
A baseboard installed around the perimeter of a floor protects the walls from dents and scuffs due to brooms, vacuum cleaners, and other everyday wear 1. Tile base goes on after the floor is completely set but before it is grouted. If the base tiles are the same size as the field tiles, align the grout joints. Otherwise, find the center point of each wall and lay out the base tiles symmetrically, to yield the biggest cut pieces on either end. Backbutter each base piece and press it onto the wall surface 2, 3. Use a spacer or wedge to raise the base off the floor, to leave room for a caulk joint. Remember to fill this joint with caulk, not grout, as walls and floors can flex and move at different rates, causing grout to crack.

If you’re installing a wood base, you’ll want to nail it in place after the floor and grout are completely set. It’s best to stain or paint the wood before you set it in place to avoid drips or stains on your new tile floor. The nail holes will be easy to touch up.

Tile base adds a nice finish to a tile floor and protects the bottom edge of the wall.
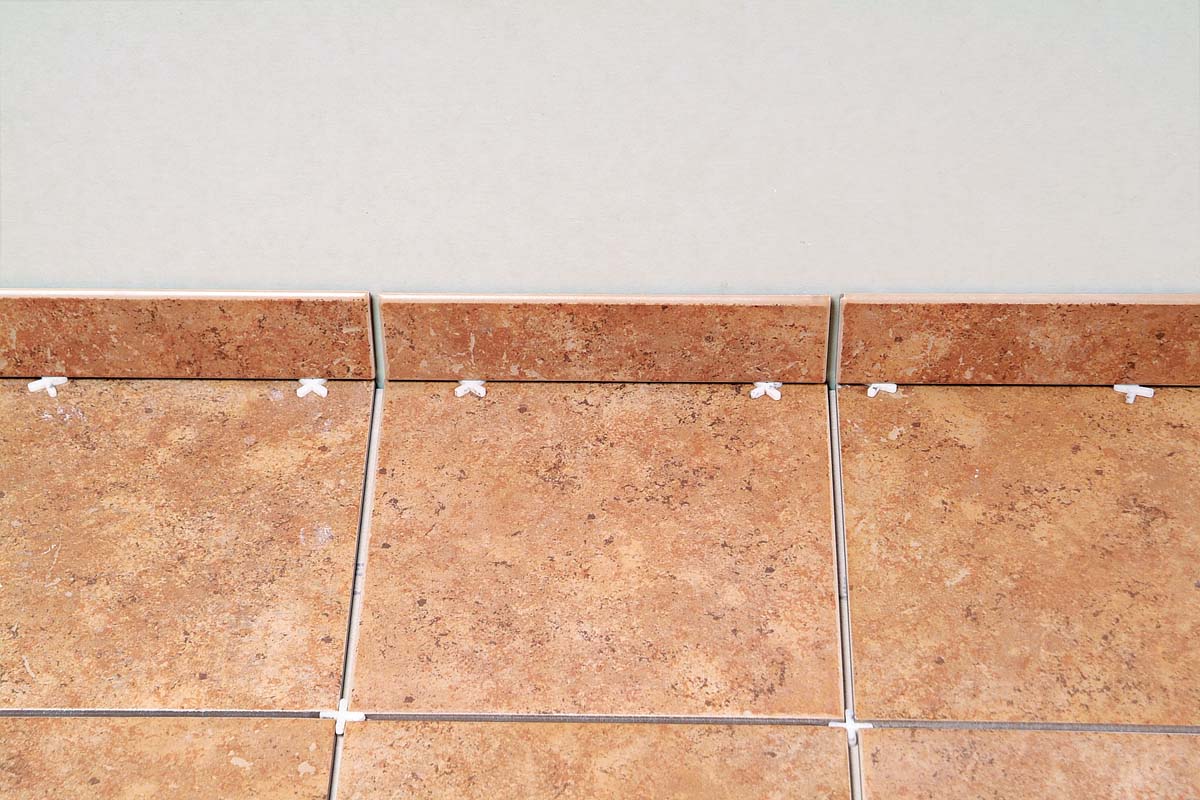
1.  Tile base adds a nice finish to a tile floor and protects the bottom edge of the wall.
Back-butter each base tile with modified thinset.
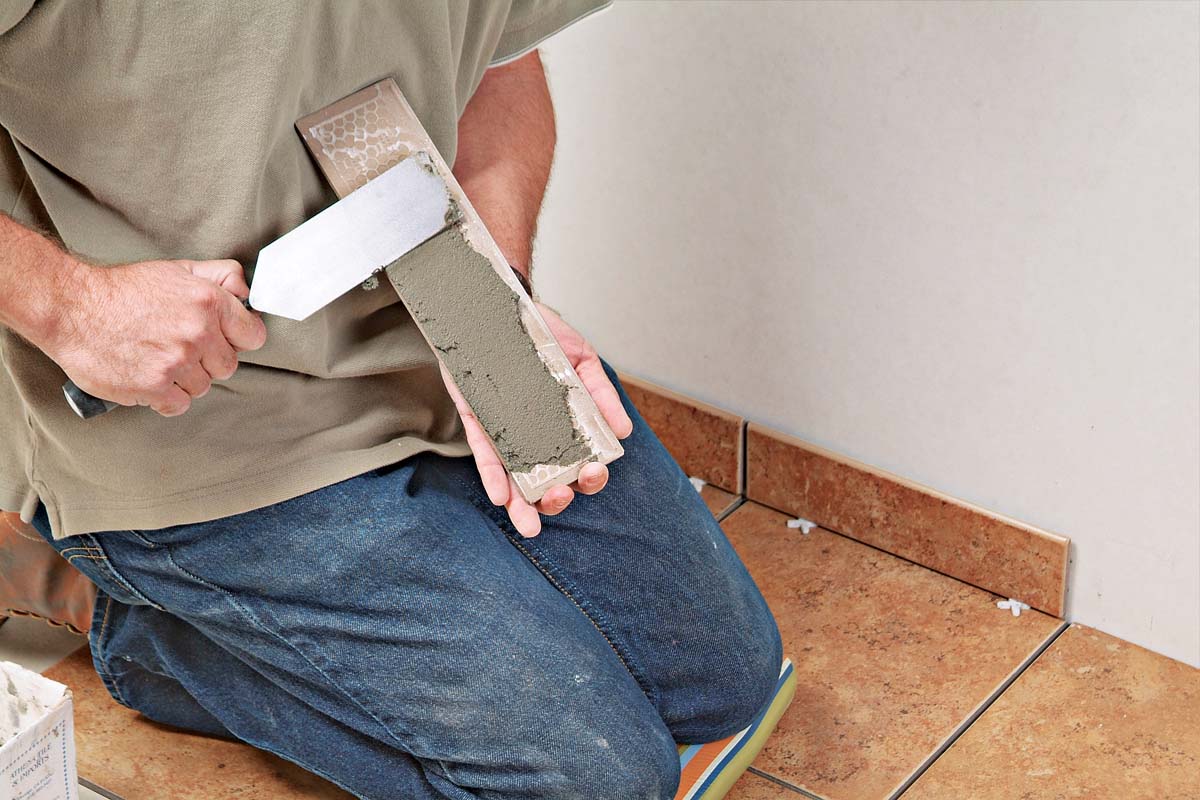
2.  Back-butter each base tile with modified thinset.
Press the tile base onto the wall, using spacers to keep the tops even to one another and to allow a caulk joint below.
3.  Press the tile base onto the wall, using spacers to keep the tops even to one another and to allow a caulk joint below.


TRADE SECRET: If your chosen tile does not come with a surface bullnose that can be used as base trim, you can always cut a field tile to the desired height and set it with the cut edge down.

Installing Edging

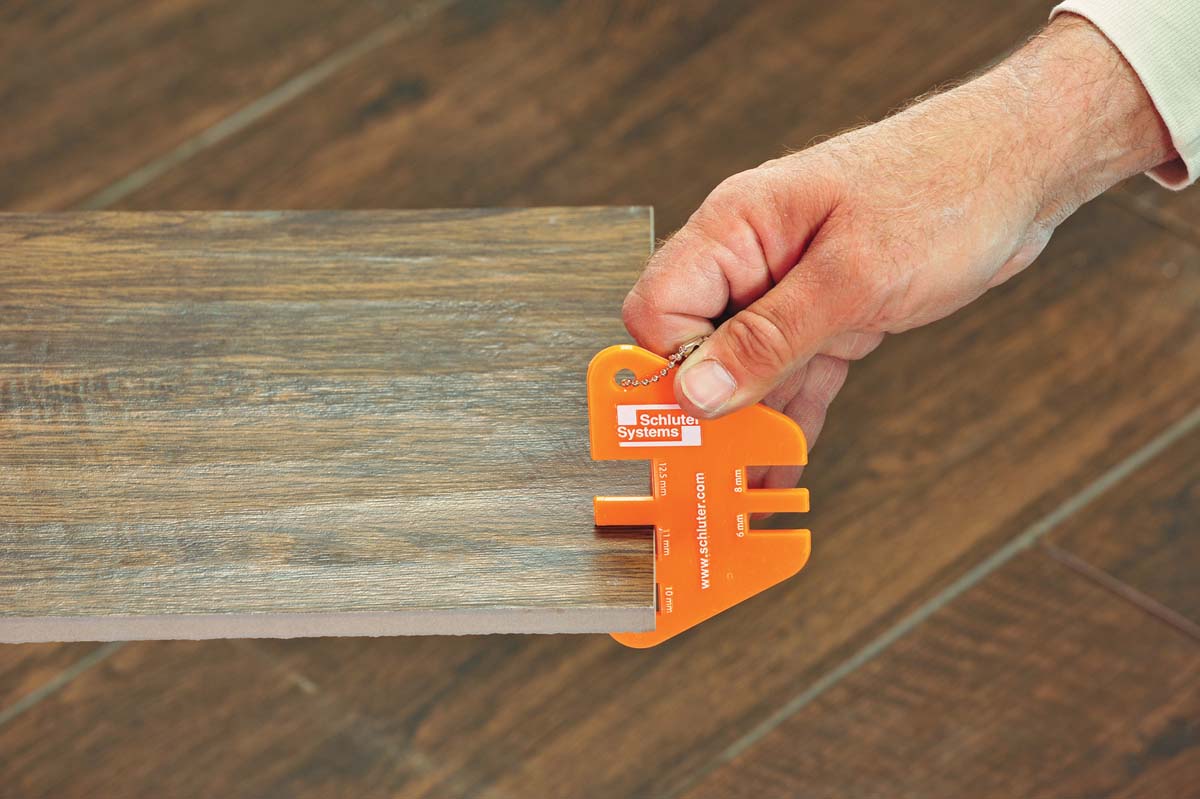
You’ll need to measure the thickness of your tile to help you select the appropriate-size edge trim. Another option is to take your tile to the store with you so that you can hold the trim piece in place to find the right size. Ideally, you want the tile and the trim piece to be as close as possible in size. Some companies offer a gauge tool that measures the thickness of the tile and is marked with the size of the matching trim you need.

Measure and cut your edge trim piece to the length you need 1. A new hacksaw blade will help to prevent skittering, but, in any case, take your time because the metal surface cannot be repaired. You can also use a tile saw to cut some softer metals or plastic edging. A tile rubbing stone can be used to smooth burrs 2.

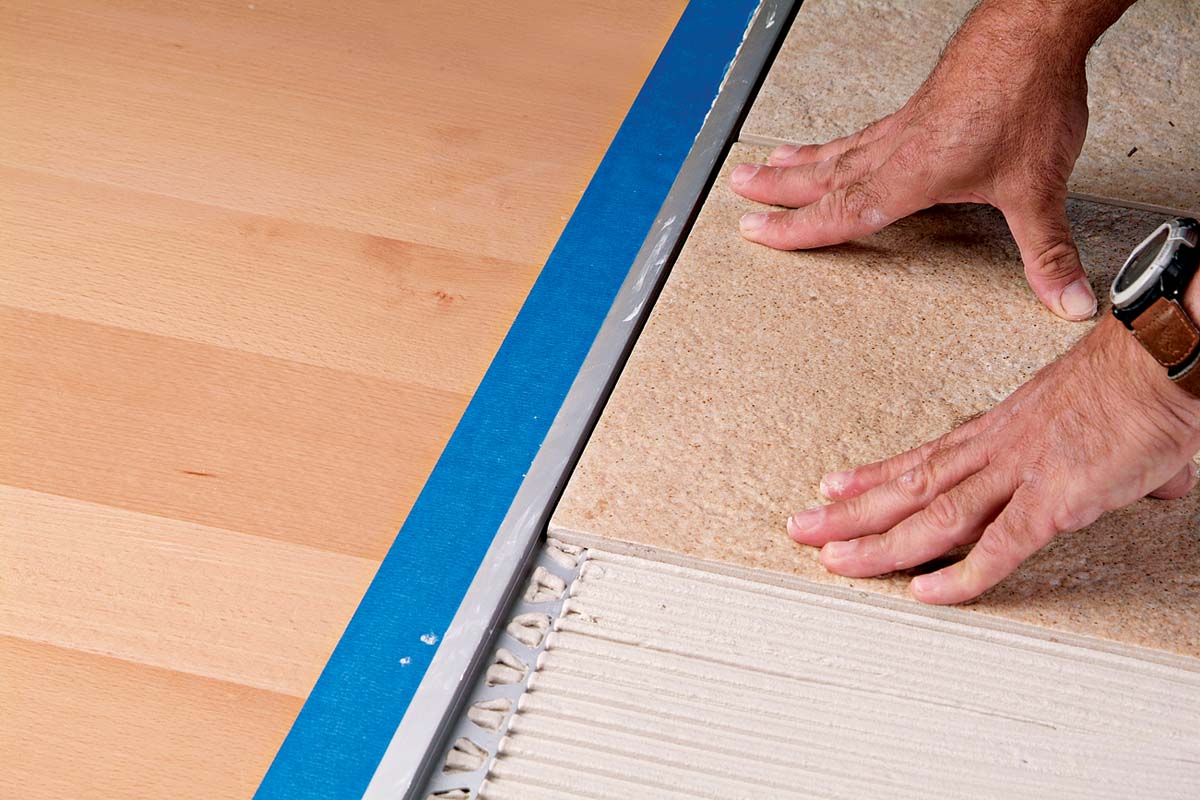
Apply thinset and set the tile base. Slide the edge trim piece behind the tile while the thinset is workable 3. Use wedges or spacers to keep the grout line consistent between the tile and the trim. Wedges are also handy to adjust the trim against an irregular adjacent surface and to match the face of the tile 4.

After the thinset has cured, use a sponge or small scrub brush to clean the joints. Don’t use a razor knife as one slip could mar your beautiful trim and replacing it at this stage is very difficult. Grout as usual.

Your tile store may have a gauge to measure the thickness of your tile to match it with the appropriate-size edge trim.
Some lines of trim have inside or outside corners. Install these first and measure accordingly.


Measure, and then use a hacksaw to cut the trim to length.
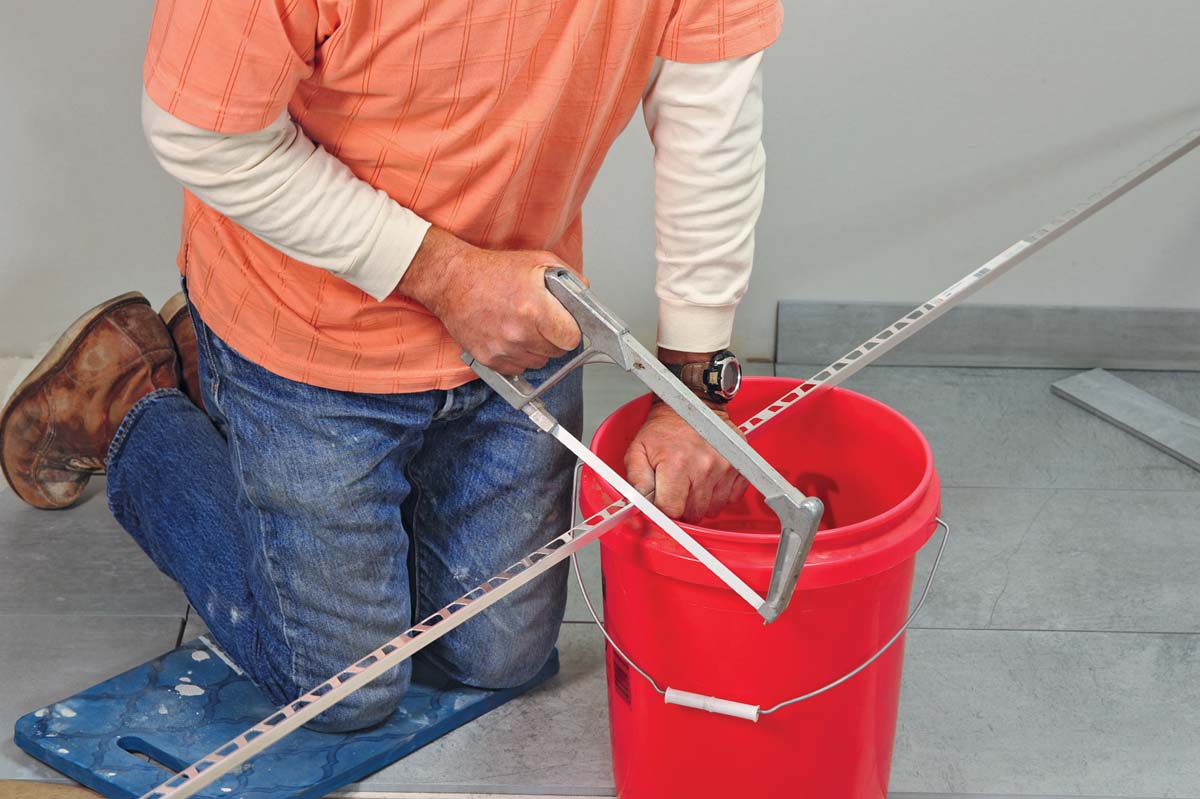
1.  Measure, and then use a hacksaw to cut the trim to length.
Use a rubbing stone to remove and smooth any burrs.
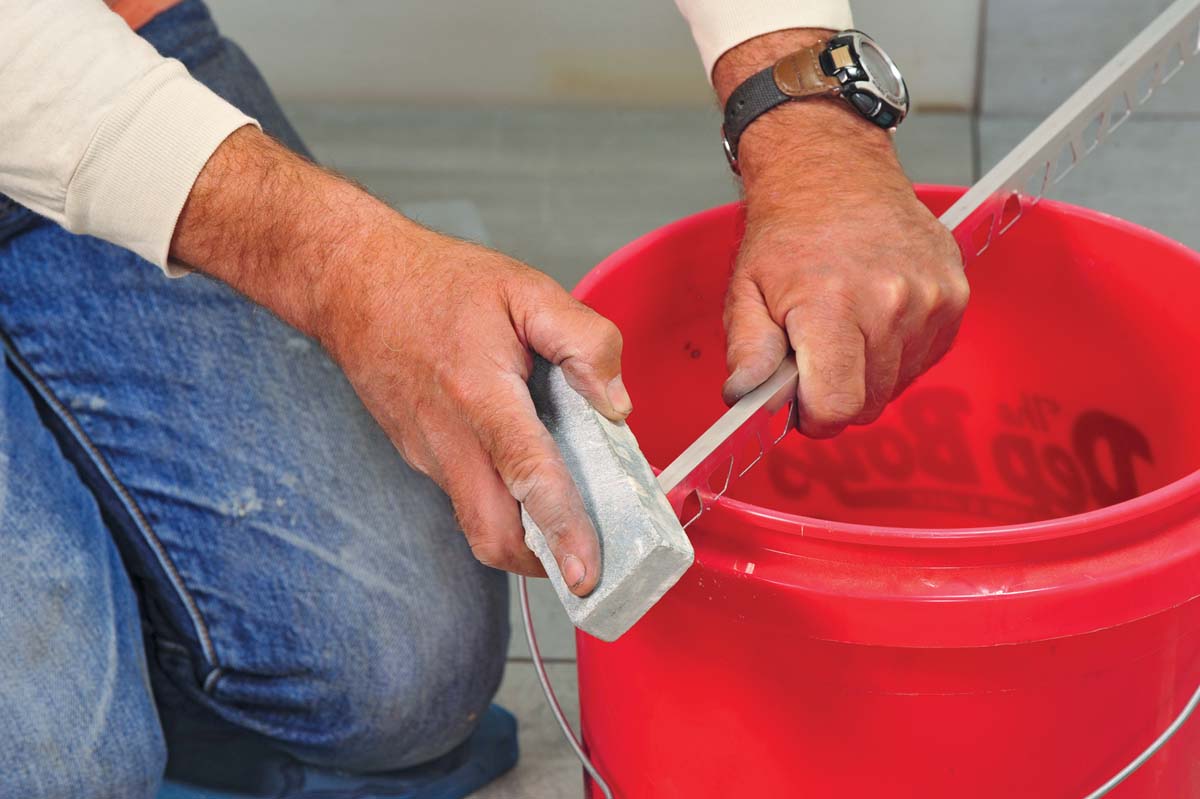
2.  Use a rubbing stone to remove and smooth any burrs.
Insert the trim piece behind the tile base while the thinset is still workable.
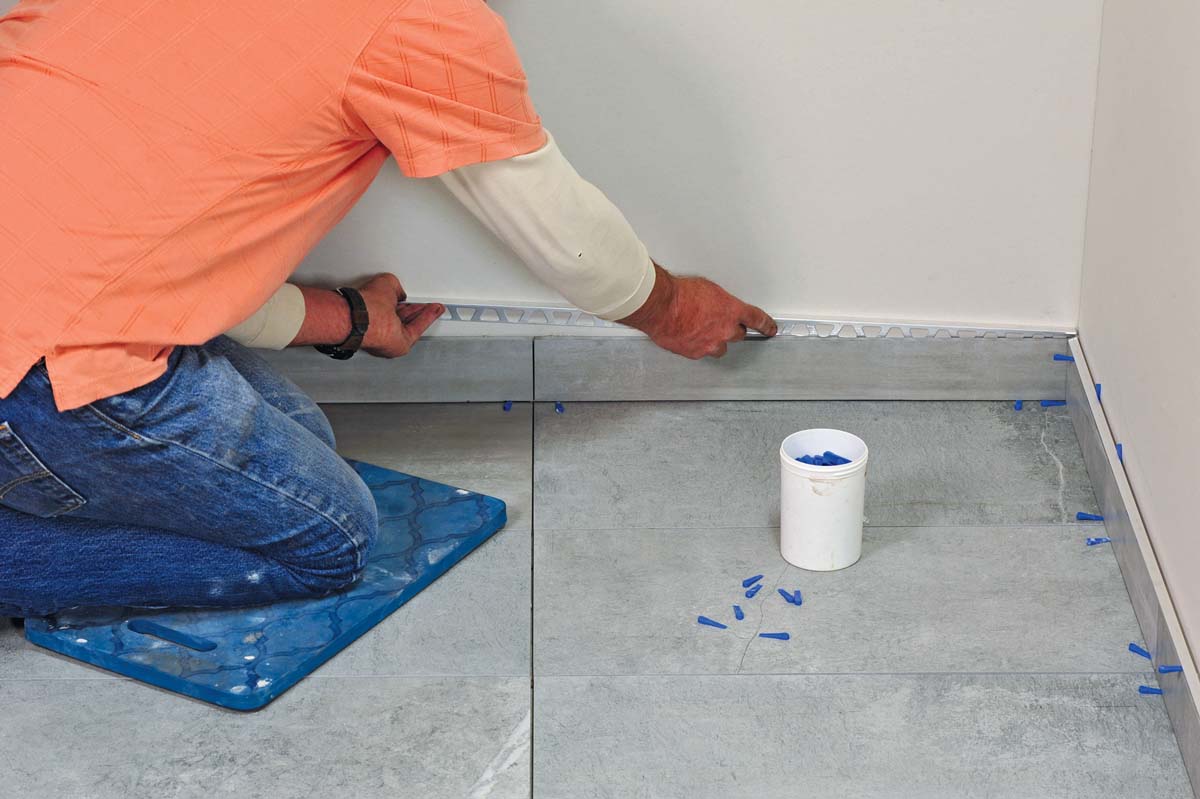
3.  Insert the trim piece behind the tile base while the thinset is still workable.
Wedges can be a great tool to help you adjust the trim.
4.  Wedges can be a great tool to help you adjust the trim.

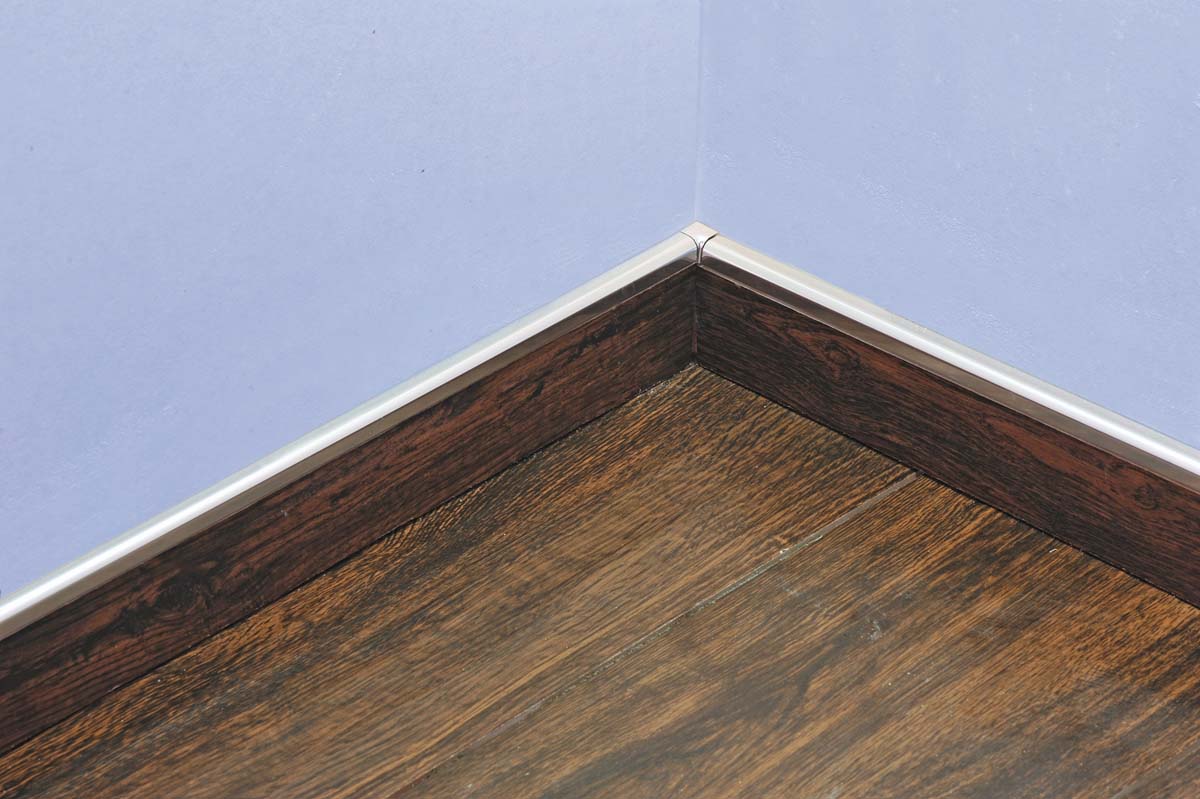
Trimming Floor Transitions

Often, a new tile floor butts up against an existing floor at a doorway or hall. If the tile is higher than the adjacent floor, you can sometimes use surface bullnose or quarter-round trim to finish off the edge. A more versatile solution is to install a metal trim strip. Schluter brand trim comes in different profiles and colors to suit transitions between tile and wood, carpet, and other kinds of flooring.

Installing this trim is much like setting tile. Start by laying down a strip of masking tape to protect the finished floor adjacent to the tile 1. Spread the thinset onto your substrate, in preparation for setting the last row of tile. Cut the trim strip to length and press its perforated edge firmly into the thinset 2. Align the strip with the edge of the finished flooring. Mark and cut the tiles to fit against the trim strip, leaving room for a caulk joint. Place these tiles into the thinset as you would normally set any floor tile 3. Before the thinset firms up, adjust the profile so that the grout joint is parallel and consistent with the floor tile. Let this dry for 24 hours and then grout the tile floor, leaving the joint between the metal trim strip and the tile open. Caulking this joint allows for movement between the two different floor materials.

To install a trim strip between tile and an adjacent floor, comb thinset for the last row of tile.
1.  To install a trim strip between tile and an adjacent floor, comb thinset for the last row of tile.
Press the perforated edge of the trim firmly into the thinset.
2.  Press the perforated edge of the trim firmly into the thinset.
Set tiles along the edge of the trim strip, leaving room for a caulk joint.
3.  Set tiles along the edge of the trim strip, leaving room for a caulk joint.

Tiling Complete, 2nd EditionExcerpted from Tiling Complete, 2nd Edition by Robin Nicholas and Michael Schweit.

Available in the Taunton Store and at Amazon.com.

Previous: Installing Electric Radiant Heat under a Tile Bathroom Floor Next: Setting Terra Cotta Pavers

Guide

Tiling

Chapter

Tiling Floors

Sign up for eletters today and get the latest how-to from Fine Homebuilding, plus special offers.

Signing you up...

This site is protected by reCAPTCHA and the Google Privacy Policy and Terms of Service apply.
See all newsletters
See all newsletters

Log in or create an account to post a comment.

Sign up Log in

Become a member and get full access to FineHomebuilding.com

Tiling

Tiling

Trusted, comprehensive guidance from the pros for a great-looking tile job in any room of the house

View Project Guide

View All Project Guides »

Become a member and get unlimited site access, including the Tiling Project Guide.

Start Free Trial

Selecting Tile
  • The Basics
  • Tile Options
Tools & Techniques
  • Job-Preparation Tools
  • Cutting Tiles
  • Setting & Grouting Tools
Installation Materials
  • Membranes & Substrates
  • Adhesives & Mortars
  • Grout
  • Sealers & Caulk
  • Spacers, Hardware & Trim
Preparation
  • The Prep Job
  • Repairs & Surface Prep
  • Installing Backerboard
Tiling Floors
  • Layout & Installation
  • Setting Specialty Tiles
Tiling Walls & Backsplashes
  • Preparation
  • Backsplashes
  • Walls
Tiling Showers
  • Tile Shower Basics
  • Waterproofing
  • Shower Pans
  • Shower Drains
  • Shower Niches
  • Video Series: Tile a Shower
  • Video Series: Tile a Barrier-Free Bathroom
Grouting, Sealing & Caulking
  • Grouting
  • Caulking
  • Sealing
Maintenance & Repair
  • Maintenance
  • Tile Repair
  • Grout Repair

Fine Home Building

Newsletter Sign-up

  • Fine Homebuilding

    Home building tips, offers, and expert advice in your inbox.

  • Green Building Advisor

    Building science and energy efficiency advice, plus special offers, in your inbox.

  • Old House Journal

    Repair, renovation, and restoration tips, plus special offers, in your inbox.

Signing you up...

This site is protected by reCAPTCHA and the Google Privacy Policy and Terms of Service apply.
See all newsletters

Follow

  • Fine Homebuilding

    Dig into cutting-edge approaches and decades of proven solutions with total access to our experts and tradespeople.

    Start Free Trial Now
    • Facebook
    • Instagram
    • X
    • LinkedIn
  • GBA Prime

    Get instant access to the latest developments in green building, research, and reports from the field.

    Start Free Trial Now
    • Facebook
    • YouTube
  • Old House Journal

    Learn how to restore, repair, update, and decorate your home.

    Subscribe Now
    • Facebook
    • Instagram
    • X

Membership & Magazine

  • Online Archive
  • Start Free Trial
  • Magazine Subscription
  • Magazine Renewal
  • Gift a Subscription
  • Customer Support
  • Privacy Preferences
  • About
  • Contact
  • Advertise
  • Careers
  • Terms of Use
  • Site Map
  • Do not sell or share my information
  • Privacy Policy
  • Accessibility
  • California Privacy Rights

© 2025 Active Interest Media. All rights reserved.

Fine Homebuilding receives a commission for items purchased through links on this site, including Amazon Associates and other affiliate advertising programs.

  • Home Group
  • Antique Trader
  • Arts & Crafts Homes
  • Bank Note Reporter
  • Cabin Life
  • Cuisine at Home
  • Fine Gardening
  • Fine Woodworking
  • Green Building Advisor
  • Garden Gate
  • Horticulture
  • Keep Craft Alive
  • Log Home Living
  • Military Trader/Vehicles
  • Numismatic News
  • Numismaster
  • Old Cars Weekly
  • Old House Journal
  • Period Homes
  • Popular Woodworking
  • Script
  • ShopNotes
  • Sports Collectors Digest
  • Threads
  • Timber Home Living
  • Traditional Building
  • Woodsmith
  • World Coin News
  • Writer's Digest
Active Interest Media logo
X
X
This is a dialog window which overlays the main content of the page. The modal window is a 'site map' of the most critical areas of the site. Pressing the Escape (ESC) button will close the modal and bring you back to where you were on the page.

Main Menu

  • How-To
  • Design
  • Tools & Materials
  • Video
  • Blogs
  • Forum
  • Project Guides
  • Reader Projects
  • Magazine
  • Members
  • FHB House

Podcasts

  • FHB Podcast
  • ProTalk

Webinars

  • Upcoming and On-Demand

Podcasts

  • FHB Podcast
  • ProTalk

Webinars

  • Upcoming and On-Demand

Popular Topics

  • Kitchens
  • Business
  • Bedrooms
  • Roofs
  • Architecture and Design
  • Green Building
  • Decks
  • Framing
  • Safety
  • Remodeling
  • Bathrooms
  • Windows
  • Tilework
  • Ceilings
  • HVAC

Magazine

  • Current Issue
  • Past Issues
  • Magazine Index
  • Subscribe
  • Online Archive
  • Author Guidelines

All Access

  • Member Home
  • Start Free Trial
  • Gift Membership

Online Learning

  • Courses
  • Project Guides
  • Reader Projects
  • Podcast

More

  • FHB Ambassadors
  • FHB House
  • Customer Support

Account

  • Log In
  • Join

Newsletter

Get home building tips, offers, and expert advice in your inbox

Signing you up...

This site is protected by reCAPTCHA and the Google Privacy Policy and Terms of Service apply.
See all newsletters
See all newsletters

Follow

  • X
  • YouTube
  • instagram
  • facebook
  • pinterest
  • Tiktok

Join All Access

Become a member and get instant access to thousands of videos, how-tos, tool reviews, and design features.

Start Your Free Trial

Subscribe

FHB Magazine

Start your subscription today and save up to 70%

Subscribe

You have 1 free article remaining.

Get complete site access, including thousands of videos, how-to tips, tool reviews, and design features.

Start your FREE trial

Already a member? Log in

We hope you’ve enjoyed your free articles. To keep reading, become a member today.

Get complete site access to expert advice, how-to videos, Code Check, and more, plus the print magazine.

Start your FREE trial

Already a member? Log in

Privacy Policy Update

We use cookies, pixels, script and other tracking technologies to analyze and improve our service, to improve and personalize content, and for advertising to you. We also share information about your use of our site with third-party social media, advertising and analytics partners. You can view our Privacy Policy here and our Terms of Use here.

Cookies

Analytics

These cookies help us track site metrics to improve our sites and provide a better user experience.

Advertising/Social Media

These cookies are used to serve advertisements aligned with your interests.

Essential

These cookies are required to provide basic functions like page navigation and access to secure areas of the website.

Delete My Data

Delete all cookies and associated data