FHB Logo Facebook LinkedIn Email Pinterest Twitter Instagram Plus Icon Close Icon Navigation Search Icon Navigation Search Icon Arrow Down Icon Video Guide Icon Article Guide Icon Modal Close Icon Guide Search Icon Skip to content
Subscribe

In every issue you'll find...

  • Expert insights on techniques and principles
  • Unbiased tool reviews
  • Step-by-step details to master the job
  • Field-tested advice and know-how
Subscribe Now!
Subscribe
  • How-To
  • Design
  • Tools & Materials
  • Videos
  • Blogs
  • Forum
  • Magazine
  • Members
  • FHB House
  • Podcast
  • Join
  • Log In
Subscribe

Fine Homebuilding Project Guides

Tiling

Guide Home
Chapter
  • Selecting Tile
  • Tools & Techniques
  • Installation Materials
  • Preparation
  • Tiling Floors
  • Tiling Walls & Backsplashes
  • Tiling Showers
  • Grouting, Sealing & Caulking
  • Maintenance & Repair
How-To

Large-Format Tiles

Learn how to set supersized tiles, which can be more challenging to install than smaller tiles.

By Robin Nicholas, Michael Schweit

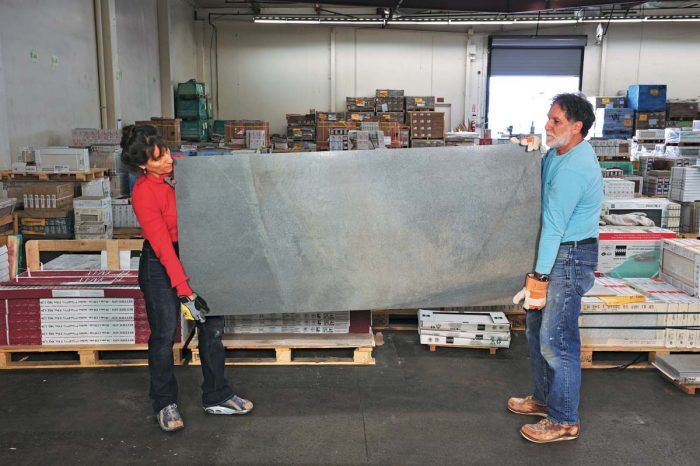
In years past, the trend was toward smaller and smaller tiles including mosaics. Recently, the move has been in the other direction—toward supersizing the size of tiles, with no real limit in sight. In general, any tile over 15 in. x 15 in. is considered a large-format tile (LF); however, wood-look plank tiles that are narrower on one side and over 15 in. on the other are also considered to be large-format tiles. For our local tile business, installing 12-in. x 24-in. tiles has become a large part of our work. And now, there are even tiles that are over 4 ft. x 8 ft. as well as ceramic and porcelain tile panels that are even larger. With all of these larger tiles, there is less grout to clean, resulting in a cleaner, more expansive look. 

Installing large-format tiles

Working with LF tiles presents some challenges that smaller tiles do not. Because tile does not bend, it’s imperative that your substrate be as flat as possible. We’ve all experienced floors where this issue was not addressed and tripped lightly over “lippage.” The American National Standards Institute (ANSI) specification for installing large-format ceramic tile recommends that the substrate have no more than 1/8 in. in 10-ft. variance, with no more than 1/16-in. variation in 24 in. With any job that requires leveling, we strongly suggest hiring a licensed professional for areas over 100 sq. ft.

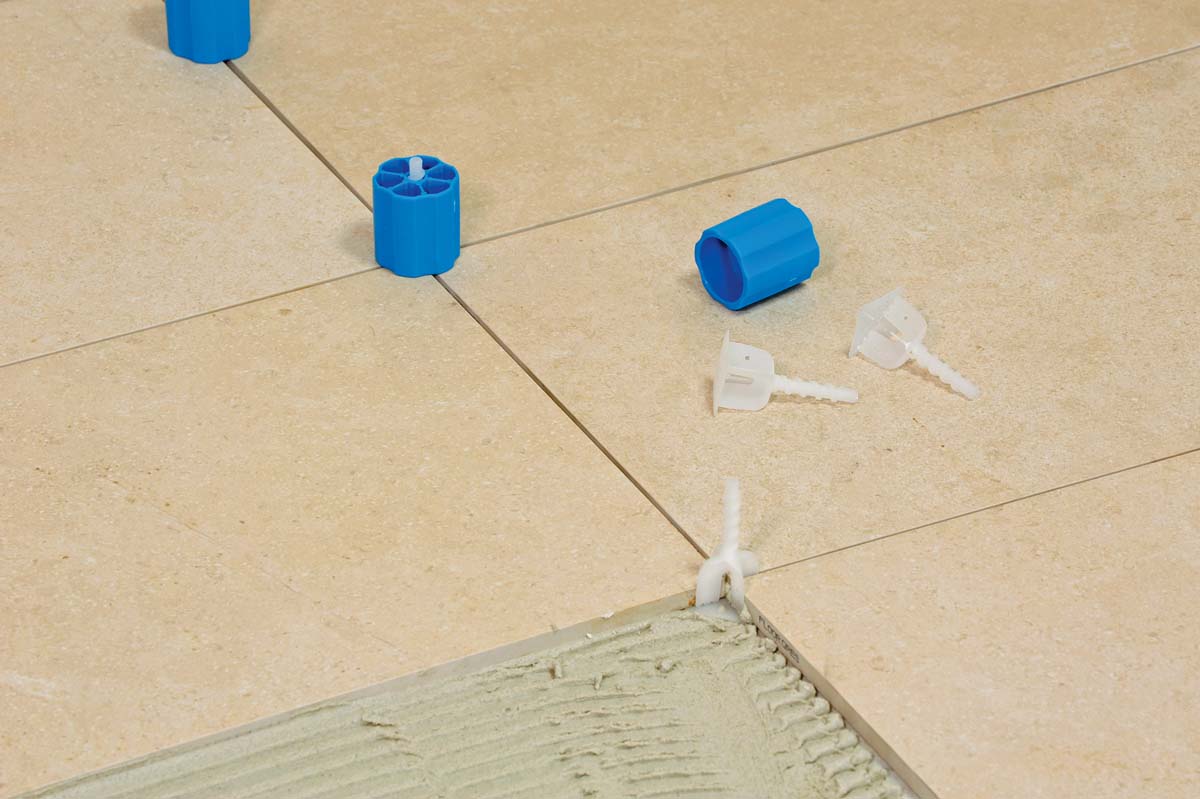
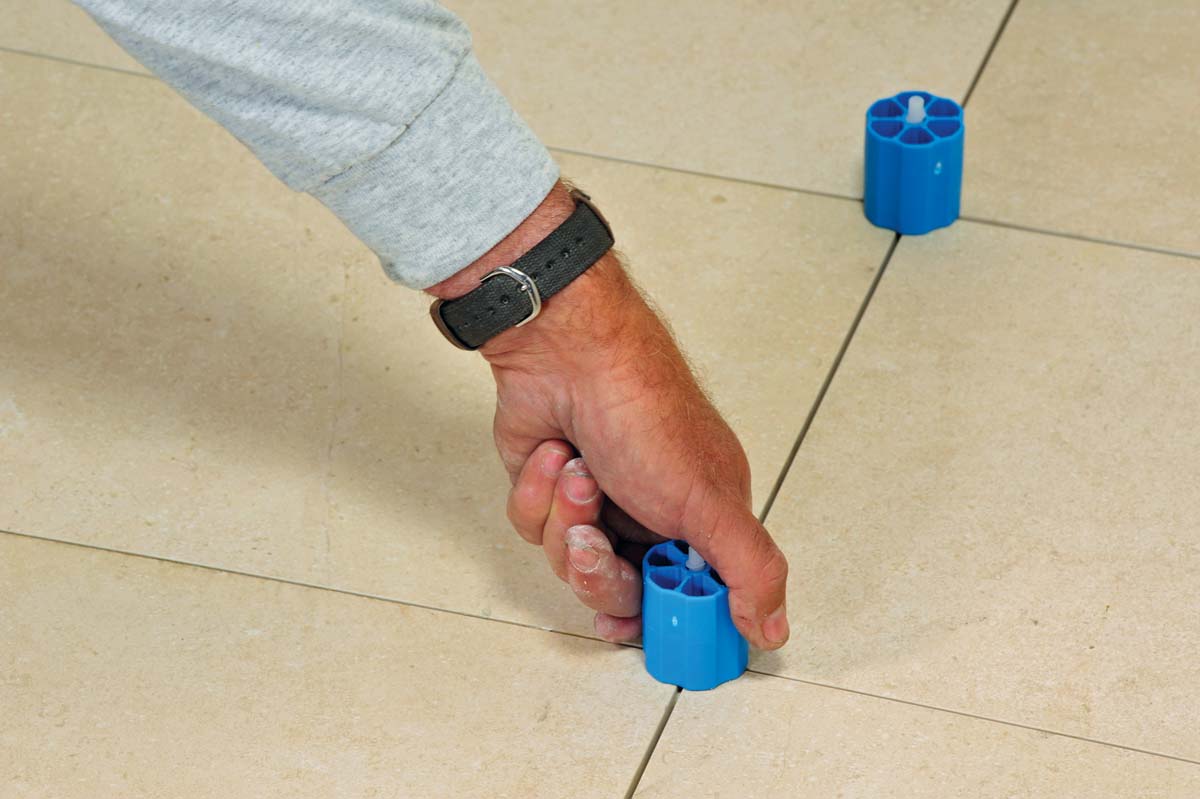
Even with a properly flattened substrate, warped LF tiles can lead to lippage, which is where leveling clips come in. When you use the clips, adjacent tiles are lifted or lowered to make an even plane. You’ll need to use more thinset than usual (1/16 in. to 1/8 in. more) to allow room for the clips, tile, and thinset to work together.

Spread large-format thinset with a bigger notched trowel than usual to allow for the leveling clips under the tile. Back-butter the tile and set it in the thinset bed. For the twist-type clips, insert the leveler at the corner. Back-butter and lay your next tile and, when the clip is covered (three tiles for T-shape levelers and four tiles for X-shape levelers), twist on the cap and tighten securely. For the wedge-type clip, place the clips at the corners and insert the wedge into the clip after you’ve laid clips for the adjacent tiles.

Use a mallet to beat the tiles in after you’ve tightened the clips. Periodically check that the tiles have not slipped out of alignment. Also use your mallet to tap the edges if you need to adjust the tile into alignment or to keep it within the chalk line. Continue tiling, adding clips and/or spacers as you go.

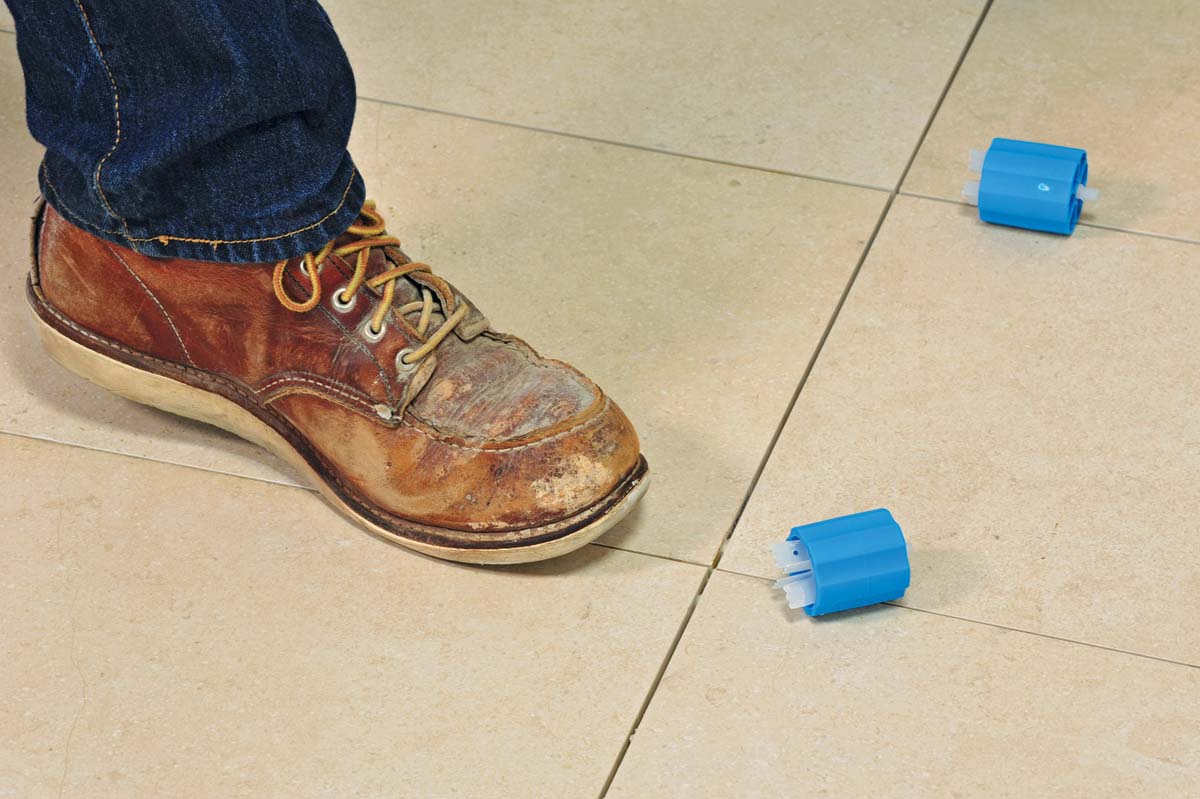
The following day, or at least 24 hours later (to allow the thinset to cure), kick out the clips or use a mallet. All clips are designed to break off cleanly when broken in the direction of the grout joint. If a clip does not break off cleanly (a rare occurrence), use your utility knife and a sharp new blade to carefully carve the clip below the surface of the tile. You may also pull gently, wriggling carefully with long-nose or other pliers to extricate it from the joint.

TRADE SECRET: Before you install 12-in. x 24-in. wood plank, or any LF tile in a staggered or brick pattern, check with the manufacturer about the amount of overlap. Most manufacturers recommend a 33% overlap rather than 50% overlap. If you choose to install with a 50% overlap, just be aware that you may experience some shadowing or lippage from tile to tile.


TRADE SECRET: Large-format (LF) tiles are any tiles over 15 in. on any side. If you consider working with this size, look for tiles that are “rectified,” which means they have been mechanically processed to ensure that they are uniform in length and width. They give a “clean and lean” look with a more uniform tile size and sharp, narrow grout joints.
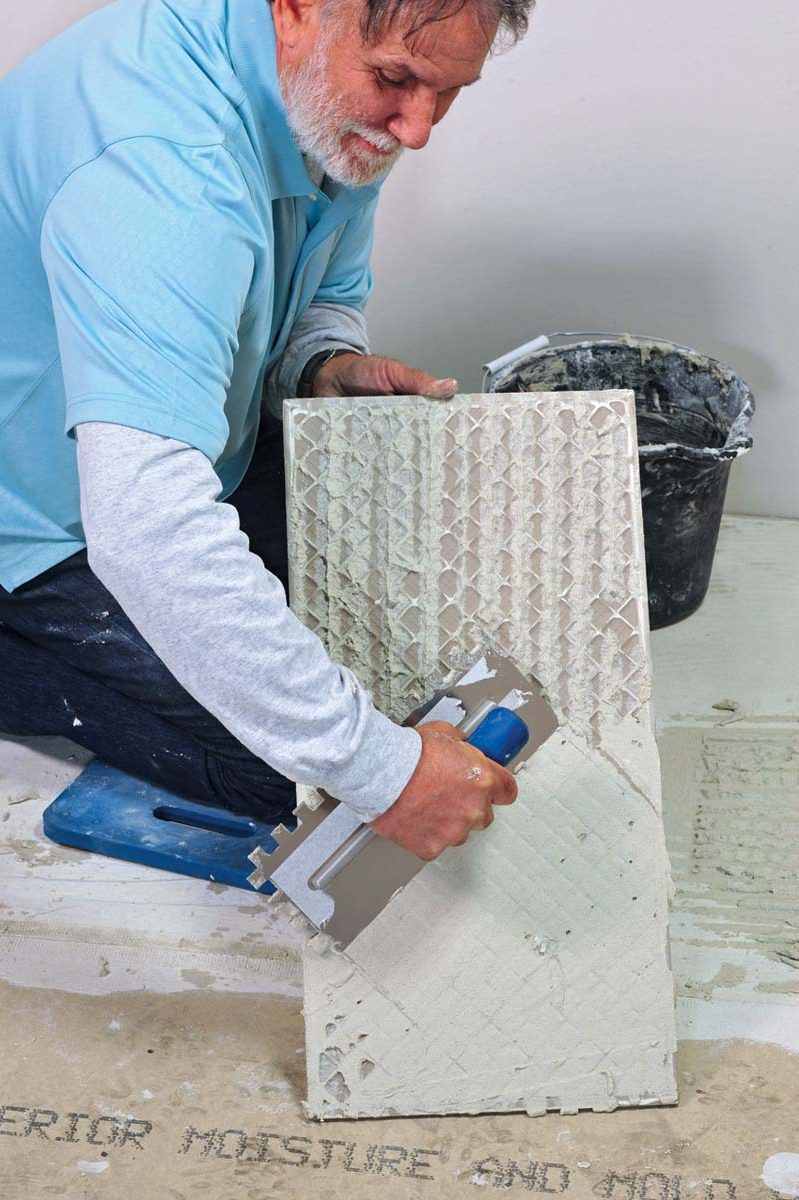
Insert the leveling stem at the intersection of two tiles and set the next two tiles.
Screw on the leveling cap and tighten until the faces are even.
Use a mallet or your foot to kick out the clips.


Back-Buttering Large-Format Tiles

Back-buttering is applying thinset to the underside of a tile to ensure complete coverage between the thinset on the substrate and the tile.

With larger tiles, you must always back-butter the underside of each tile. Tiles need to be supported by enough thinset, especially larger tiles, which are prone to warpage. Larger tiles also become unwieldy to beat and embed properly into a bed of thinset unless they are first back-buttered. In addition, back-buttering provides extra insurance against cracks in your tile.

showing the bottom of a tile off setting up tile

Tiling Complete, 2nd EditionExcerpted from Tiling Complete, 2nd Edition by Robin Nicholas and Michael Schweit.

Available in the Taunton Store and at Amazon.com.

Sign up for eletters today and get the latest how-to from Fine Homebuilding, plus special offers.

Signing you up...

This site is protected by reCAPTCHA and the Google Privacy Policy and Terms of Service apply.
See all newsletters
See all newsletters
Previous: Setting Polished Stone Next: How To Install Wood-Look Tile Flooring

Guide

Tiling

Chapter

Tiling Floors

Log in or create an account to post a comment.

Sign up Log in

Become a member and get full access to FineHomebuilding.com

Tiling

Tiling

Trusted, comprehensive guidance from the pros for a great-looking tile job in any room of the house

View Project Guide

View All Project Guides »

Become a member and get unlimited site access, including the Tiling Project Guide.

Start Free Trial

Selecting Tile
  • The Basics
  • Tile Options
Tools & Techniques
  • Job-Preparation Tools
  • Cutting Tiles
  • Setting & Grouting Tools
Installation Materials
  • Membranes & Substrates
  • Adhesives & Mortars
  • Grout
  • Sealers & Caulk
  • Spacers, Hardware & Trim
Preparation
  • The Prep Job
  • Repairs & Surface Prep
  • Installing Backerboard
Tiling Floors
  • Layout & Installation
  • Setting Specialty Tiles
Tiling Walls & Backsplashes
  • Preparation
  • Backsplashes
  • Walls
Tiling Showers
  • Tile Shower Basics
  • Waterproofing
  • Shower Pans
  • Shower Drains
  • Shower Niches
  • Video Series: Tile a Shower
  • Video Series: Tile a Barrier-Free Bathroom
Grouting, Sealing & Caulking
  • Grouting
  • Caulking
  • Sealing
Maintenance & Repair
  • Maintenance
  • Tile Repair
  • Grout Repair

Fine Homebuilding

Follow

  • twitter
  • facebook
  • instagram
  • pinterest

Newsletter

Get home building tips, offers, and expert advice in your inbox

Signing you up...

This site is protected by reCAPTCHA and the Google Privacy Policy and Terms of Service apply.
See all newsletters
See all newsletters

Membership & Magazine

  • Online Archive
  • Start Free Trial
  • Magazine Subscription
  • Magazine Renewal
  • Gift a Subscription
  • Customer Support
  • Privacy Preferences

Taunton Network

  • Green Building Advisor
  • Fine Woodworking
  • Fine Gardening
  • Threads
  • About
  • Contact
  • Advertise
  • Careers
  • Copyright
  • Terms of Use
  • Site Map
  • Do not sell my information
  • Privacy Policy
  • Accessibility
  • California Privacy Rights

© 2022 The Taunton Press, Inc. All rights reserved.

X
X
This is a dialog window which overlays the main content of the page. The modal window is a 'site map' of the most critical areas of the site. Pressing the Escape (ESC) button will close the modal and bring you back to where you were on the page.

Main Menu

  • How-To
  • Design
  • Tools & Materials
  • Video
  • Blogs
  • Forum
  • Reader Projects
  • Magazine
  • Members
  • FHB House

Podcasts

  • FHB Podcast
  • ProTalk

Webinars

  • Upcoming and On-Demand

Account

  • Log In
  • Join

Podcasts

  • FHB Podcast
  • ProTalk

Webinars

  • Upcoming and On-Demand

Popular Topics

  • Kitchens
  • Business
  • Bedrooms
  • Roofs
  • Architecture and Design
  • Green Building
  • Decks
  • Framing
  • Safety
  • Remodeling
  • Bathrooms
  • Windows
  • Tilework
  • Ceilings
  • HVAC

Magazine

  • Current Issue
  • Past Issues
  • Magazine Index
  • Subscribe
  • Online Archive
  • Author Guidelines

All Access

  • Member Home
  • Start Free Trial
  • Gift Membership

Shop the Store

  • Books
  • DVDs
  • Taunton Workshops

More

  • FHB Ambassadors
  • Reader Projects
  • Podcast
  • Customer Support

Account

  • Log In
  • Join

Newsletter

Get home building tips, offers, and expert advice in your inbox

Signing you up...

This site is protected by reCAPTCHA and the Google Privacy Policy and Terms of Service apply.
See all newsletters
See all newsletters

Follow

  • twitter
  • facebook
  • instagram
  • pinterest

Join All Access

Become a member and get instant access to thousands of videos, how-tos, tool reviews, and design features.

Start Your Free Trial

Subscribe

FHB Magazine

Start your subscription today and save up to 70%

Subscribe

We hope you’ve enjoyed your free articles. To keep reading, become a member today.

Get complete site access to expert advice, how-to videos, Code Check, and more, plus the print magazine.

Start your FREE trial

Already a member? Log in