FHB Logo Facebook LinkedIn Email Pinterest Twitter Instagram Plus Icon Close Icon Navigation Search Icon Navigation Search Icon Arrow Down Icon Video Guide Icon Article Guide Icon Modal Close Icon Guide Search Icon Skip to content
Subscribe
Log In
  • How-To
  • Design
  • Tools & Materials
  • Videos
  • Blogs
  • Forum
  • Magazine
  • Members
  • FHB House
  • Podcast
Log In

Fine Homebuilding Project Guides

Tiling

Guide Home
Chapter
  • Selecting Tile
  • Tools & Techniques
  • Installation Materials
  • Preparation
  • Tiling Floors
  • Tiling Walls & Backsplashes
  • Tiling Showers
  • Grouting, Sealing & Caulking
  • Maintenance & Repair
How-To

Removing Old Countertops and Backsplashes

Prep counters and walls before creating the new tile surface.

By Robin Nicholas, Michael Schweit

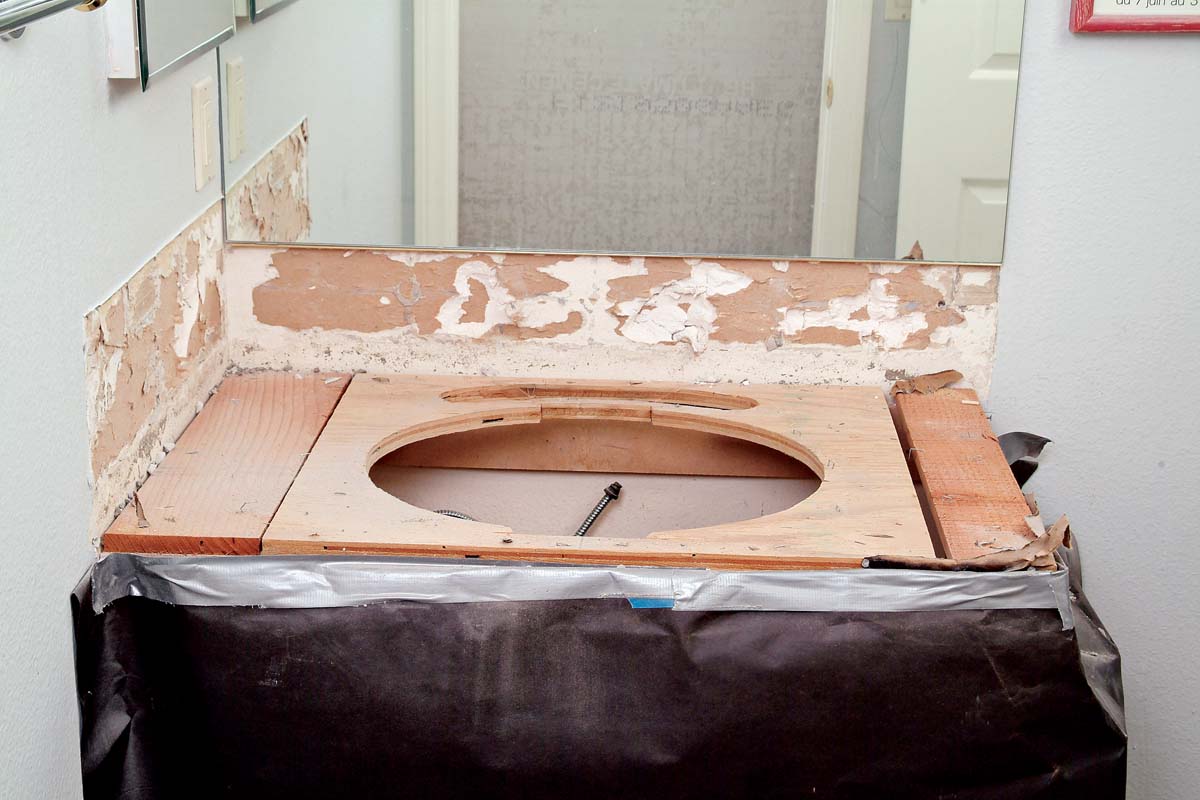
Whether you have old tile, plastic laminate, or some other kind of countertop, you should remove it before creating a new tile counter. If water damage is apparent or if the wood rough top under the countertop is out of level, it too should be removed. The time you take tearing out an old counter surface will be repaid with a flat, stable tile surface.

Removing Laminate-Covered Countertops

A laminate-covered countertop may seem like a smooth durable surface for setting tile. But in most cases, you’ll end up with a better tile job if you remove the countertop and attach a new plywood substrate to set your tile on. To remove your old laminate countertop without damaging your cabinets, first cut off the front edge of the laminate. To avoid cutting into the face of your cabinet, measure the overhang distance from the cabinet to the countertop’s edge 1 and subtract 1/8 in. from your measurement. Mark each end of the countertop at this distance 2, then use a level or straightedge to draw a line connecting the marks 3. Cut along this line with a circular saw (set to cut no deeper than 3/4 in.) to remove the countertop edge 4. Now you can pry off the countertop with your prybar and a hammer 5. Lift the laminate up at the corners or at the ends of the cabinet, above the cabinet base—don’t pry where the top is unsupported, or you may damage the cabinet.

Measure the overhang to the cabinet before cutting of the front lip. 
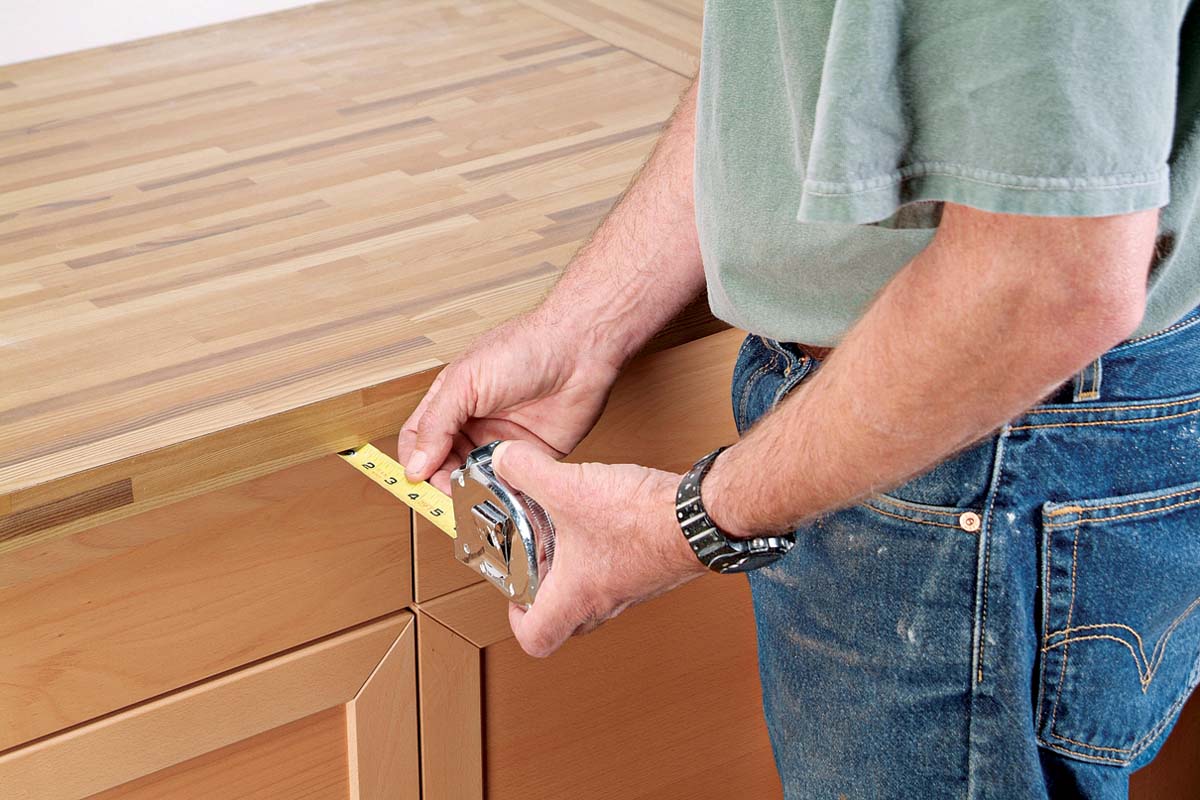
1. Measure the overhang to the cabinet before cutting of the front lip.
Transfer the measurement to the top of the counter, less 1/8 in. 
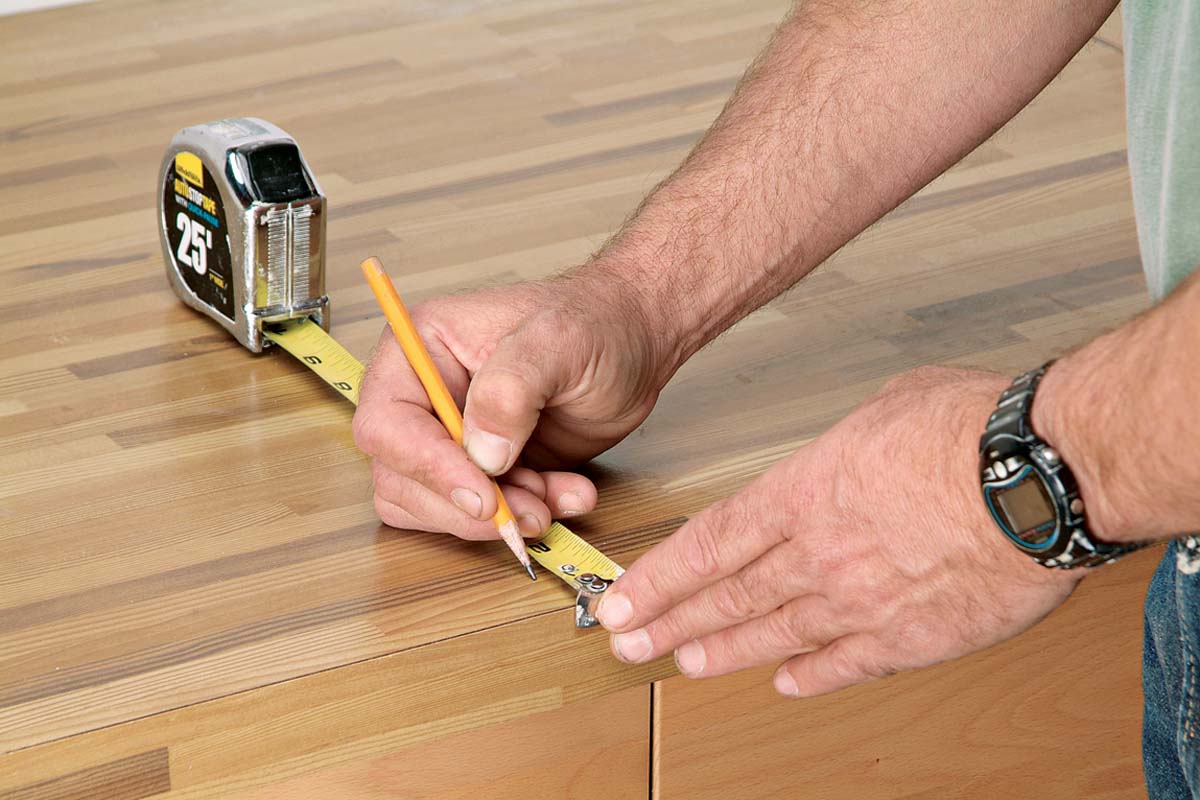
2. Transfer the measurement to the top of the counter, less 1/8 in.
Connect the pencil marks with a straightedge to give you a line of cut. 
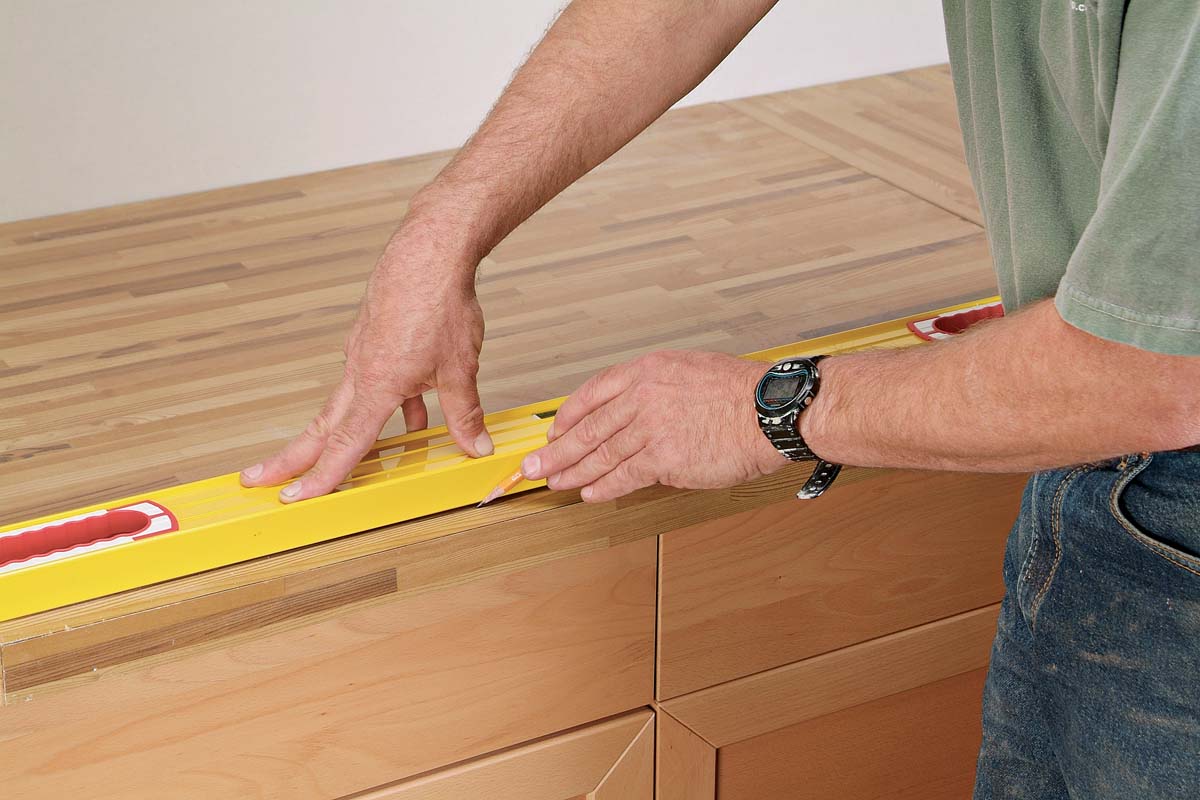
3. Connect the pencil marks with a straightedge to give you a line of cut.
Set the cutting depth to slightly more than the counter thickness. 
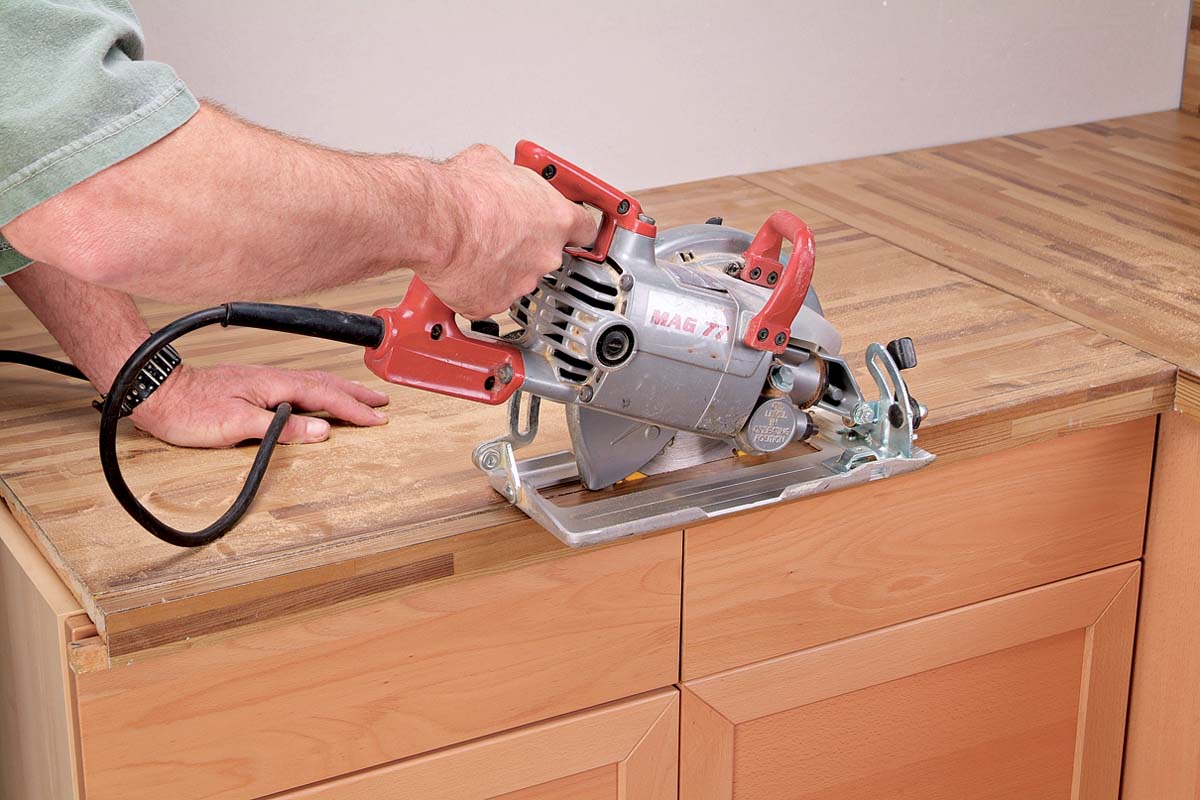
4. Set the cutting depth to slightly more than the counter thickness.
Insert a prybar under the countertop and lift it from the cabinet frames. 
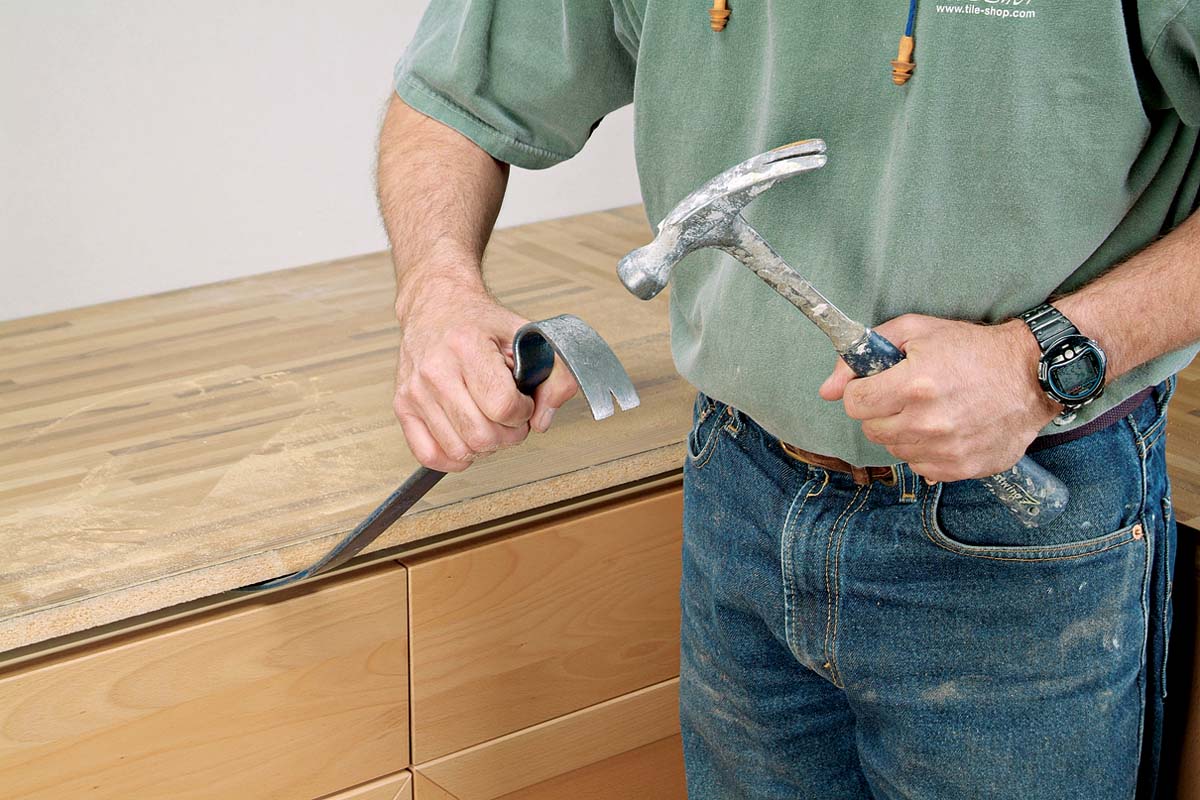
5. Insert a prybar under the countertop and lift it from the cabinet frames.

What can go wrong

Particleboard is not a good substrate for tile work under any circumstances. If it gets wet from water seeping around a sink edge or a leak from a supply line underneath, it will swell up and lift your entire counter, including the tile.

Removing Tiled Mortar-Bed Countertops

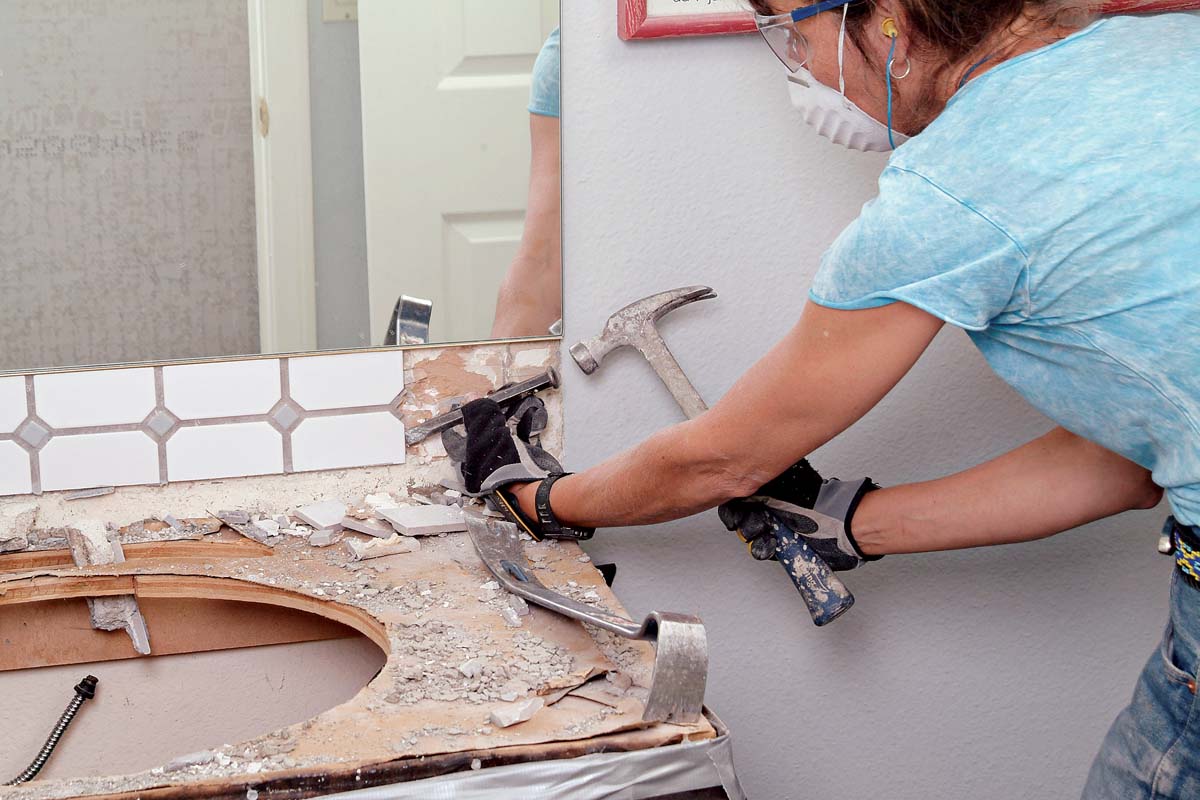
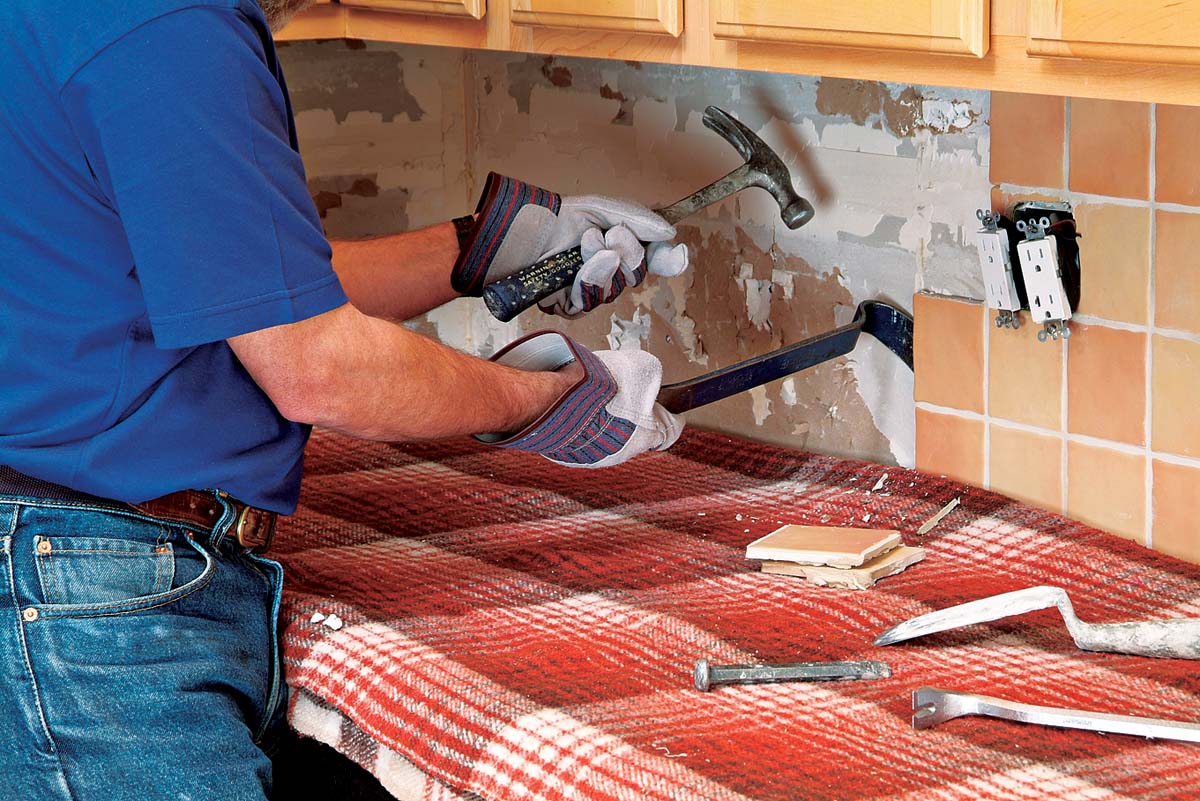
Removing a tile countertop that’s been professionally set on a mud mortar bed is very dusty, dirty, and noisy work, so be sure to don safety gear, including a dust mask, safety glasses, and hearing protectors. Start by knocking off the tiled front edges with a hammer to expose the underlying mortar bed 1. If there’s a metal cap strip, pull it off with a prybar 2. To remove the mortar bed, drive the pry bar underneath it at a corner or at the cross-members of the cabinet, and lift 3. Lift the sink out (if there is one), then remove the counter’s backsplash by knocking the tiles off with a hammer and chisel 4. Sweep or vacuum up the dust and debris 5. Underneath the old tile and mortar, you’ll find a wood substrate or rough top of some kind—plywood, particleboard, or 2x6s. Check the condition of the rough top. If it’s out of level or has water damage, remove and replace it.

Hammer off the edge trim tiles into a bucket to start your countertop demolition. 
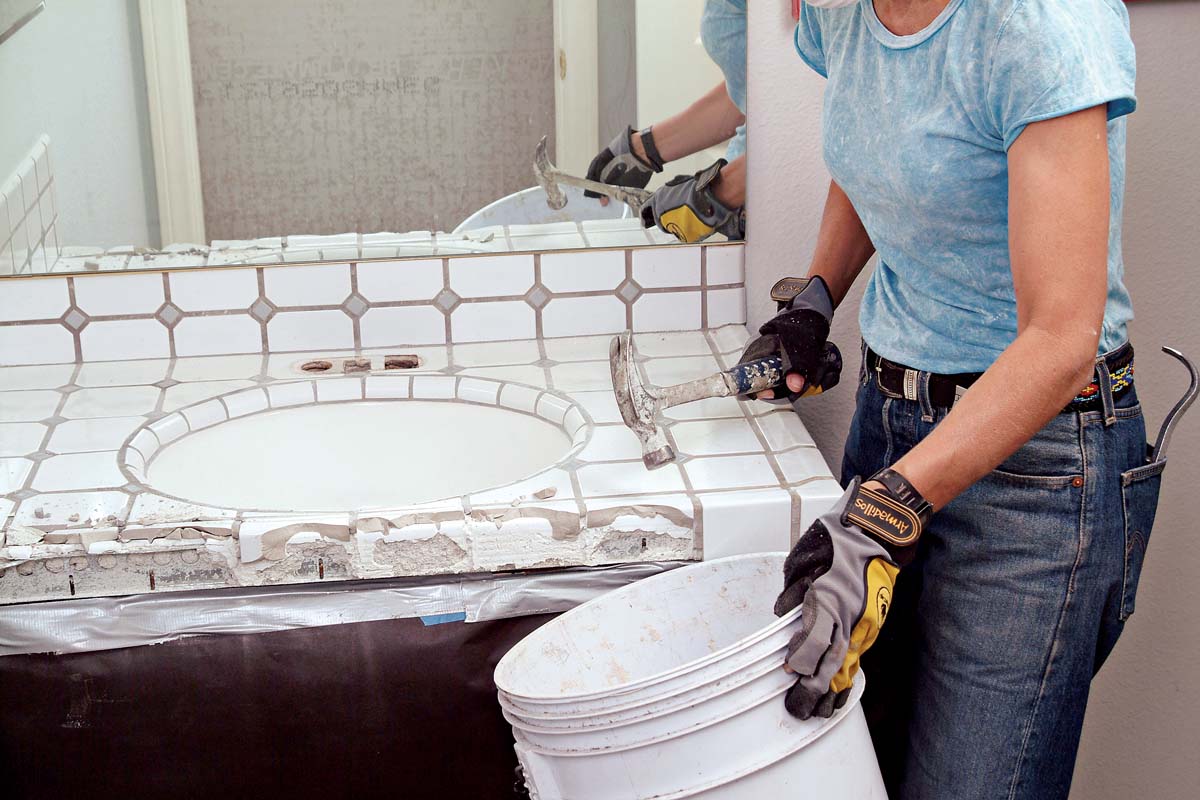
1. Hammer off the edge trim tiles into a bucket to start your countertop demolition.
Use a prybar to carefully pull the metal cap strip from the countertop edge. 
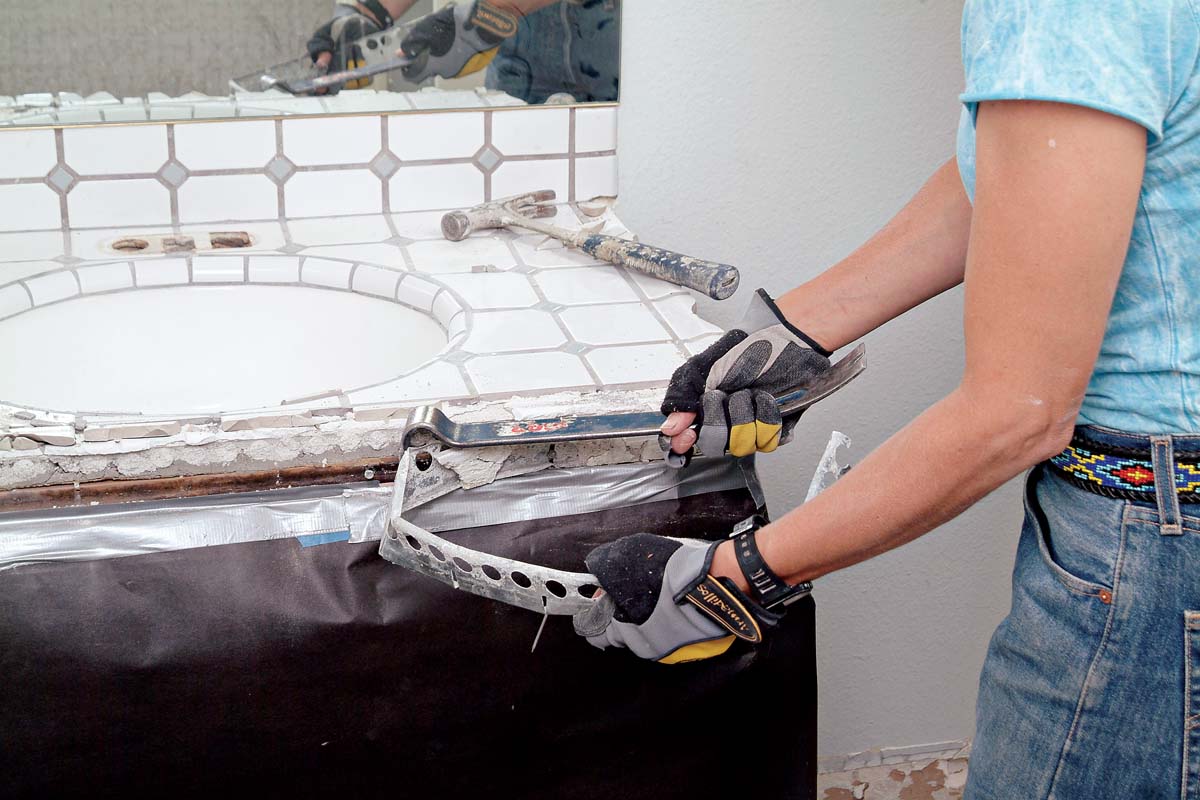
2. Use a prybar to carefully pull the metal cap strip from the countertop edge.
Use a hammer and prybar to separate and lift the mortar from the cabinet’s rough top or plywood base. 3. Use a hammer and prybar to separate and lift the mortar from the cabinet’s rough top or plywood base.
Carefully remove a tiled backsplash by starting at the edge, then work inward. 4. Carefully remove a tiled backsplash by starting at the edge, then work inward.
If the old rough top is level and has no water damage, waterproof it and proceed with the tile installation. 5. If the old rough top is level and has no water damage, waterproof it and proceed with the tile installation.

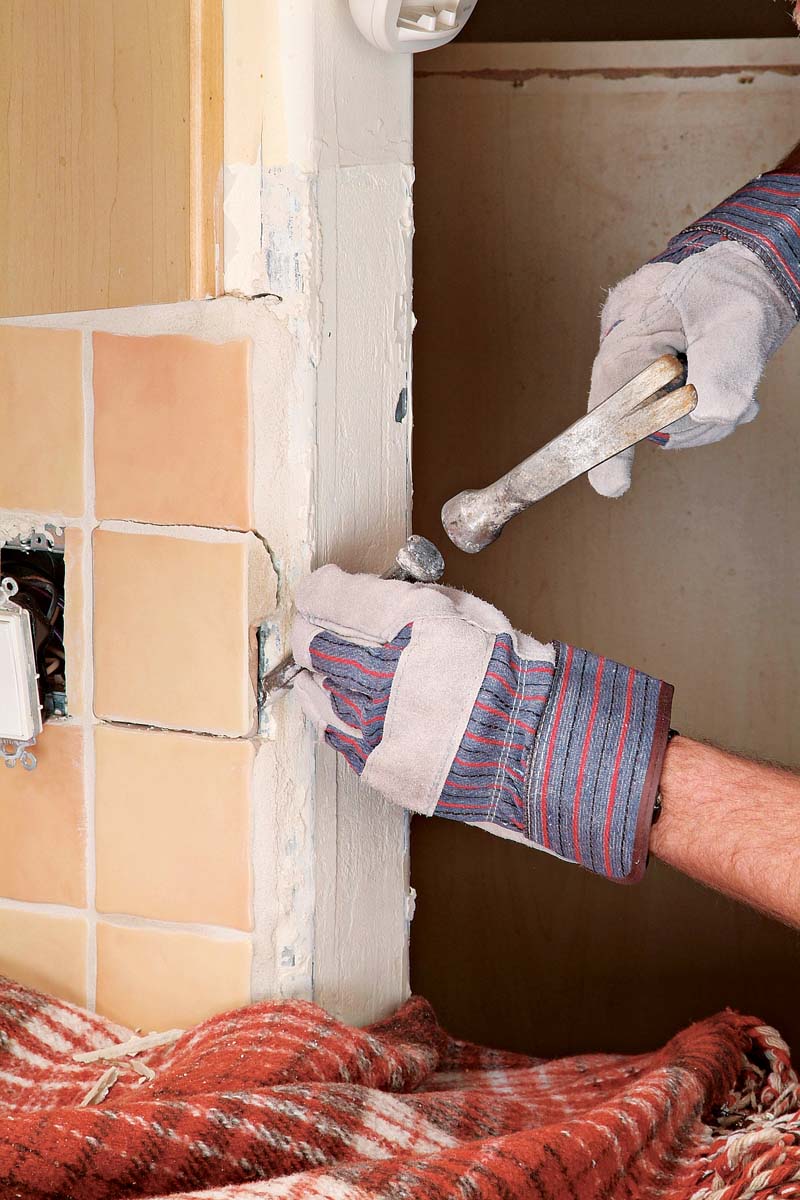
Removing Tile from a Backsplash

If you need to remove old tile from the backsplash, start by prying up any edge trim or edge tiles 1. Place your chisel between the grouted edge and the wall. If the tile is set directly to the wall, the tiles should come off easily when pried with a margin trowel 2. If the tile is over a mud bed, it’ll take more effort to remove the old backsplash. You can try using a prybar or hammer claw to get under the tiles and pry them off 3. To avoid punching holes in the wall surface, try to restrict heavy prying to areas where the wallboard is attached to studs.

Carefully use a hammer and chisel to remove edge tiles. 1. Carefully use a hammer and chisel to remove edge tiles.
A margin trowel may also be used to lift or pull tiles away from the wall. 2. A margin trowel may also be used to lift or pull tiles away from the wall.
Carefully remove backsplash tiles, to prevent excessive damage to the drywall. 3. Carefully remove backsplash tiles, to prevent excessive damage to the drywall.


Tiling Complete, 2nd EditionExcerpted from Tiling Complete, 2nd Edition by Robin Nicholas and Michael Schweit.

Available in the Taunton Store and at Amazon.com.

Sign up for eletters today and get the latest how-to from Fine Homebuilding, plus special offers.

Signing you up...

This site is protected by reCAPTCHA and the Google Privacy Policy and Terms of Service apply.
See all newsletters
See all newsletters
Previous: Removing Old Flooring Next: Get Existing Floors Ready for Tile

Guide

Tiling

Chapter

Preparation

Log in or create an account to post a comment.

Sign up Log in

Become a member and get full access to FineHomebuilding.com

Tiling

Tiling

Trusted, comprehensive guidance from the pros for a great-looking tile job in any room of the house

View Project Guide

View All Project Guides »

Become a member and get unlimited site access, including the Tiling Project Guide.

Start Free Trial

Selecting Tile
  • The Basics
  • Tile Options
Tools & Techniques
  • Job-Preparation Tools
  • Cutting Tiles
  • Setting & Grouting Tools
Installation Materials
  • Membranes & Substrates
  • Adhesives & Mortars
  • Grout
  • Sealers & Caulk
  • Spacers, Hardware & Trim
Preparation
  • The Prep Job
  • Repairs & Surface Prep
  • Installing Backerboard
Tiling Floors
  • Layout & Installation
  • Setting Specialty Tiles
Tiling Walls & Backsplashes
  • Preparation
  • Backsplashes
  • Walls
Tiling Showers
  • Tile Shower Basics
  • Waterproofing
  • Shower Pans
  • Shower Drains
  • Shower Niches
  • Video Series: Tile a Shower
  • Video Series: Tile a Barrier-Free Bathroom
Grouting, Sealing & Caulking
  • Grouting
  • Caulking
  • Sealing
Maintenance & Repair
  • Maintenance
  • Tile Repair
  • Grout Repair

Fine Homebuilding

Follow

  • twitter
  • facebook
  • instagram
  • pinterest

Newsletter

Get home building tips, offers, and expert advice in your inbox

Signing you up...

This site is protected by reCAPTCHA and the Google Privacy Policy and Terms of Service apply.
See all newsletters
See all newsletters

Membership & Magazine

  • Online Archive
  • Start Free Trial
  • Magazine Subscription
  • Magazine Renewal
  • Gift a Subscription
  • Customer Support
  • Privacy Preferences

Taunton Network

  • Green Building Advisor
  • Fine Woodworking
  • Fine Gardening
  • Threads
  • About
  • Contact
  • Advertise
  • Careers
  • Copyright
  • Terms of Use
  • Site Map
  • Do not sell or share my information
  • Privacy Policy
  • Accessibility
  • California Privacy Rights

© 2023 The Taunton Press, Inc. All rights reserved.

X
X
This is a dialog window which overlays the main content of the page. The modal window is a 'site map' of the most critical areas of the site. Pressing the Escape (ESC) button will close the modal and bring you back to where you were on the page.

Main Menu

  • How-To
  • Design
  • Tools & Materials
  • Video
  • Blogs
  • Forum
  • Reader Projects
  • Magazine
  • Members
  • FHB House

Podcasts

  • FHB Podcast
  • ProTalk

Webinars

  • Upcoming and On-Demand

Podcasts

  • FHB Podcast
  • ProTalk

Webinars

  • Upcoming and On-Demand

Popular Topics

  • Kitchens
  • Business
  • Bedrooms
  • Roofs
  • Architecture and Design
  • Green Building
  • Decks
  • Framing
  • Safety
  • Remodeling
  • Bathrooms
  • Windows
  • Tilework
  • Ceilings
  • HVAC

Magazine

  • Current Issue
  • Past Issues
  • Magazine Index
  • Subscribe
  • Online Archive
  • Author Guidelines

All Access

  • Member Home
  • Start Free Trial
  • Gift Membership

Shop the Store

  • Books
  • DVDs
  • Taunton Workshops

More

  • FHB Ambassadors
  • Reader Projects
  • Podcast
  • FHB House
  • Customer Support

Account

  • Log In
  • Join

Newsletter

Get home building tips, offers, and expert advice in your inbox

Signing you up...

This site is protected by reCAPTCHA and the Google Privacy Policy and Terms of Service apply.
See all newsletters
See all newsletters

Follow

  • twitter
  • facebook
  • instagram
  • pinterest

Join All Access

Become a member and get instant access to thousands of videos, how-tos, tool reviews, and design features.

Start Your Free Trial

Subscribe

FHB Magazine

Start your subscription today and save up to 70%

Subscribe

We hope you’ve enjoyed your free articles. To keep reading, become a member today.

Get complete site access to expert advice, how-to videos, Code Check, and more, plus the print magazine.

Start your FREE trial

Already a member? Log in