FHB Logo Facebook LinkedIn Email Pinterest Twitter X Instagram Tiktok YouTube Plus Icon Close Icon Navigation Search Icon Navigation Search Icon Arrow Down Icon Video Guide Icon Article Guide Icon Modal Close Icon Guide Search Icon Skip to content
Subscribe
Log In
  • How-To
  • Design
  • Tools & Materials
  • Restoration
  • Videos
  • Blogs
  • Forum
  • Magazine
  • Members
  • FHB House
  • Podcast
Log In

Fine Homebuilding Project Guides

Tiling

Guide Home
  • Selecting Tile
  • Tools & Techniques
  • Installation Materials
  • Preparation
  • Tiling Floors
  • Tiling Walls & Backsplashes
  • Tiling Showers
  • Grouting, Sealing & Caulking
  • Maintenance & Repair
How-To

Removing Old Flooring

Learn how to take up the existing floor covering before you lay a new tile floor.

By Robin Nicholas, Michael Schweit
  • X
  • facebook
  • linkedin
  • pinterest
  • email
  • add to favorites Log in or Sign up to save your favorite articles

Whether you have carpeting, hardwood flooring, resilient flooring, or an existing tile floor, you’ll first have to remove the old floor covering before you lay a new tile floor.

Removing Carpeting

Use a sharp razor knife to cut through the carpet, starting at a doorway. If you’re keeping the carpet in the adjacent room, cut it longer than necessary and fold it back for trimming later. Grab a corner of the carpet with pliers (to save your knuckles from the sharp tack strip) and pull up 1. Pull carpet away from tack strips 2. Cut the carpet into strips 3 ft. to 4 ft. wide and roll it up. This makes it easier to carry out and to fit in the trash.

Be sure to wear a dust mask. If the padding is stapled or glued down, it will come up in pieces 3. Work your way around the room, removing the wood tack strips as you go with a hammer and prybar 4. If nails pull out of the strip, pull them out of the floor, too. Keep a trash bucket nearby to throw the strips into 5. Remove any remaining staples (on a wood subfloor) or scrape off any glue residue (from a concrete slab) with a wall scraper and blade 6.

Grab a corner of the carpeting with pliers to start your removal.
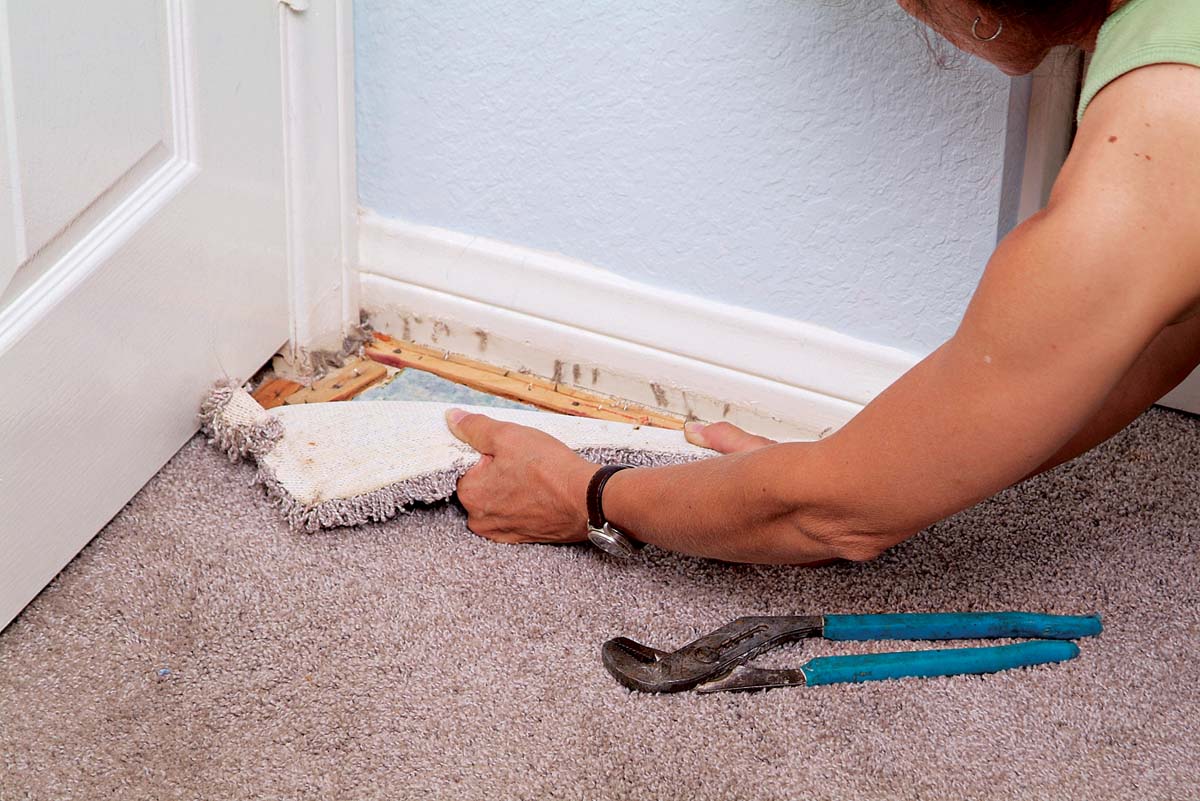
1. Grab a corner of the carpeting with pliers to start your removal.


Carefully pull the carpet away from the tack strip at the doorway.
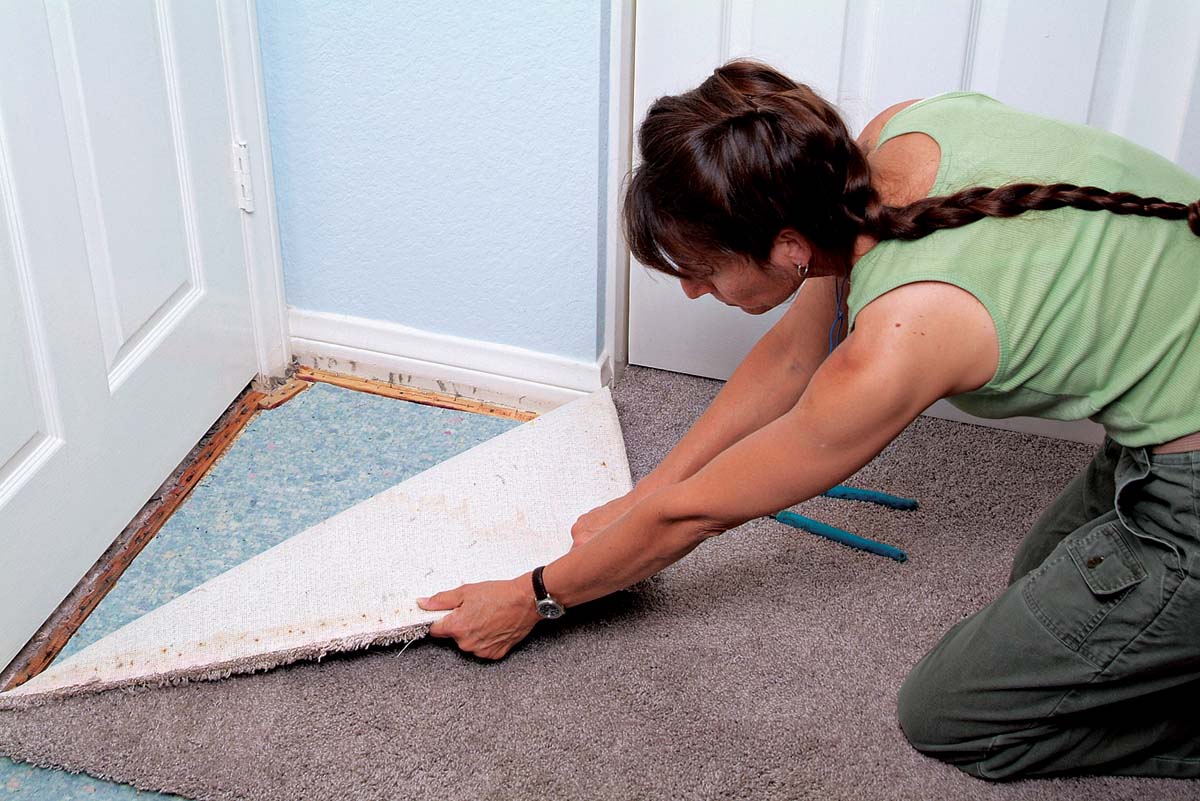
2. Carefully pull the carpet away from the tack strip at the doorway.
Peel the carpet padding back from the floor, being careful to watch for staples.
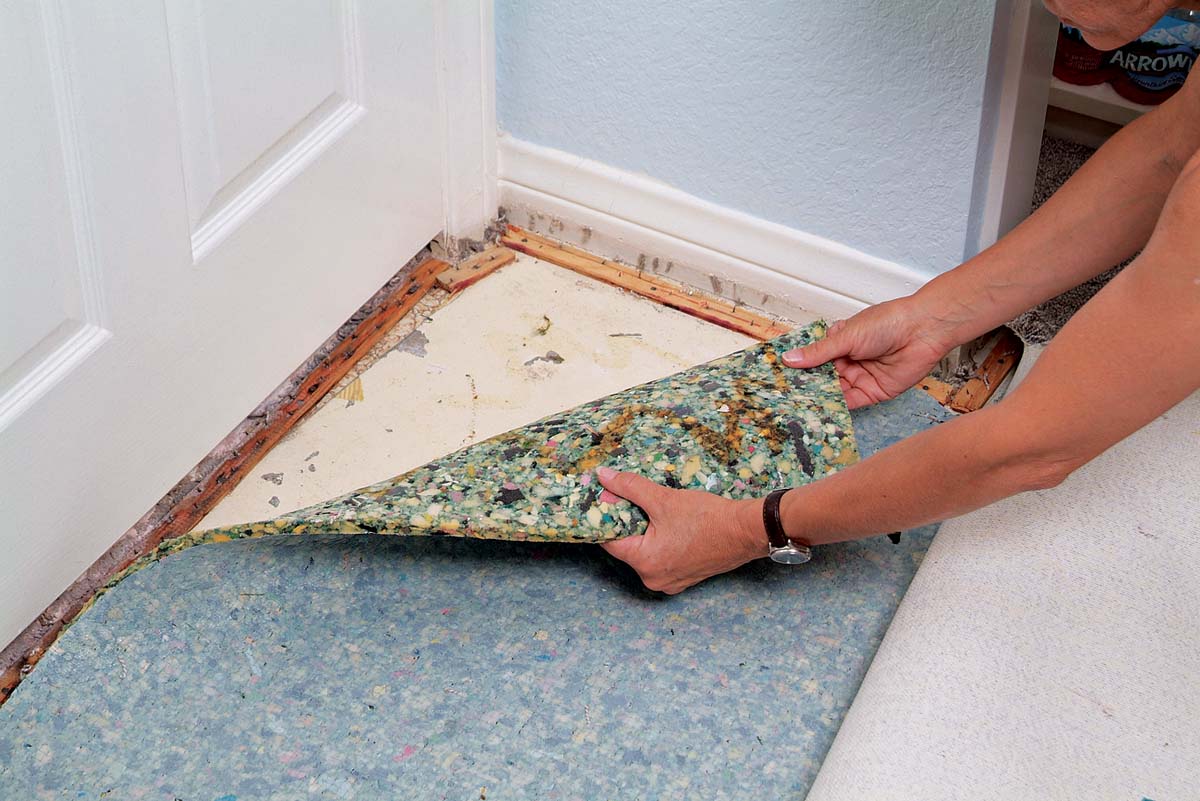
3. Peel the carpet padding back from the floor, being careful to watch for staples.
Remove any nails that pull out of the tack strip and any staples from the floor.
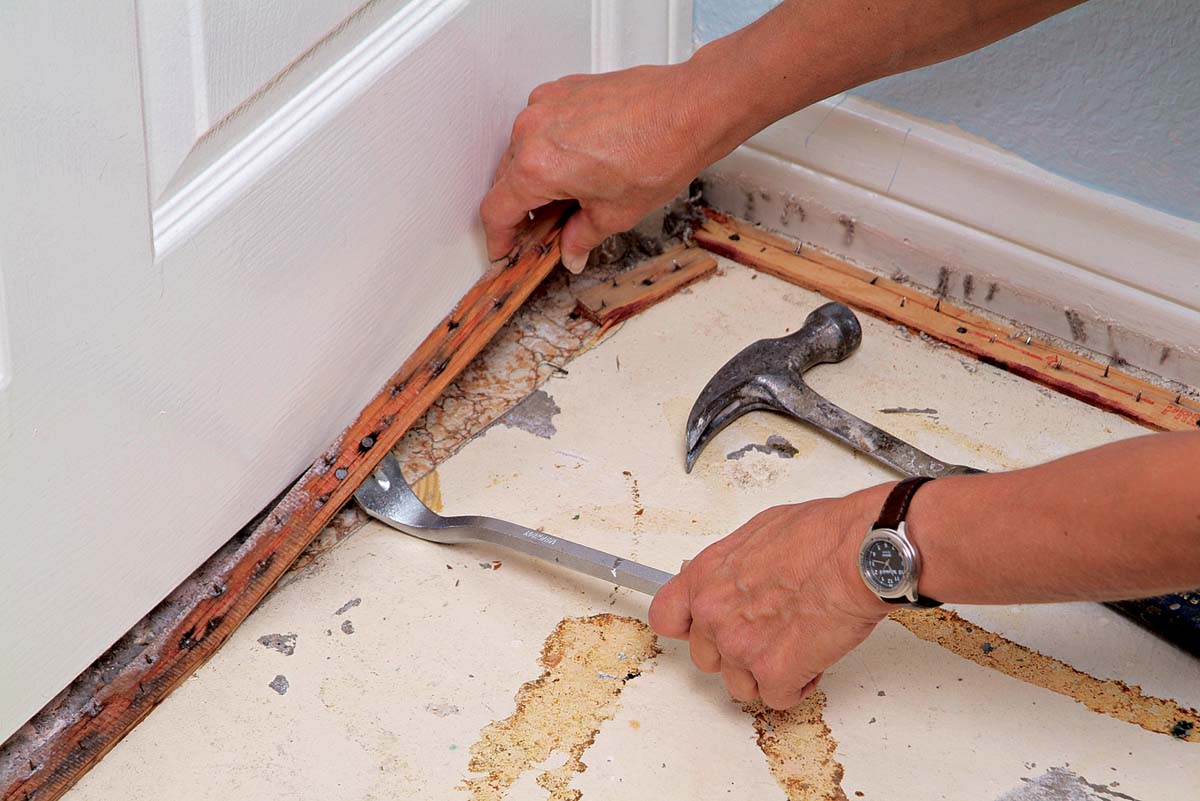
4. Remove any nails that pull out of the tack strip and any staples from the floor.
Store sharp carpet tack strips in a bucket to prevent injuries.
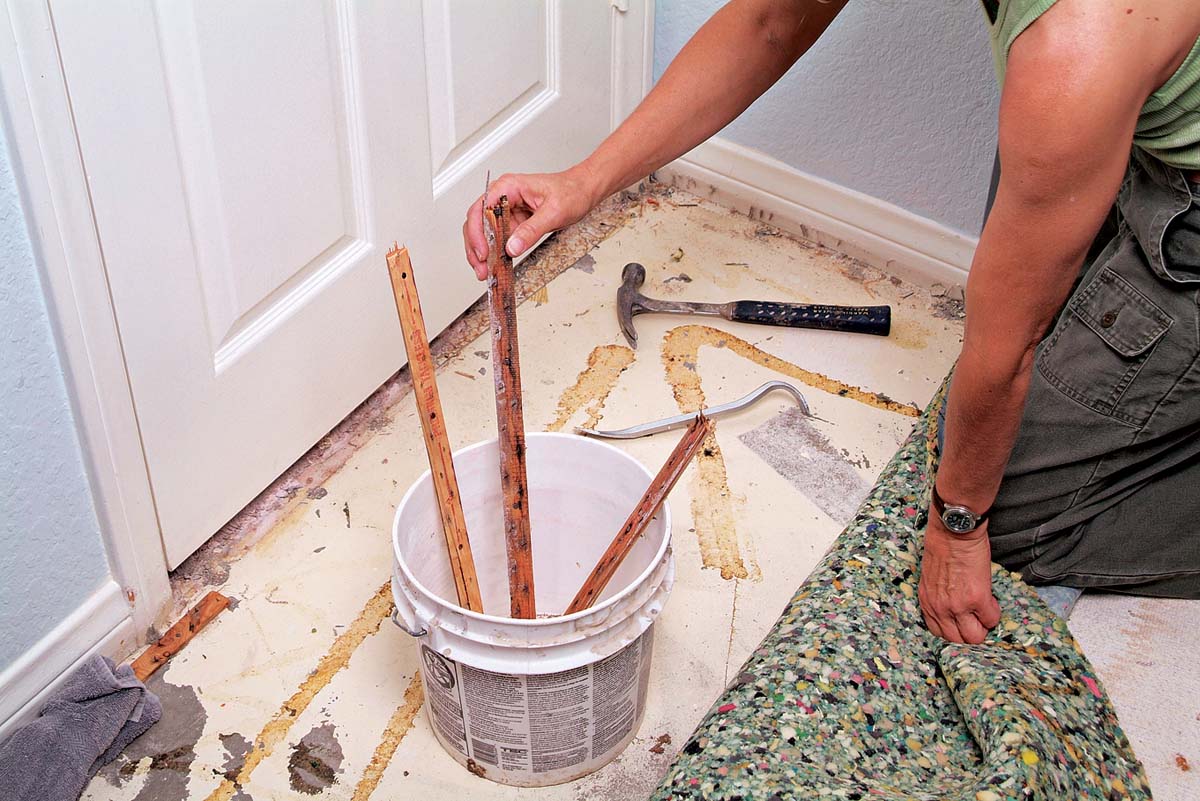
5. Store sharp carpet tack strips in a bucket to prevent injuries.
Use a wall scraper to remove any loose paint or glue from the concrete slab.
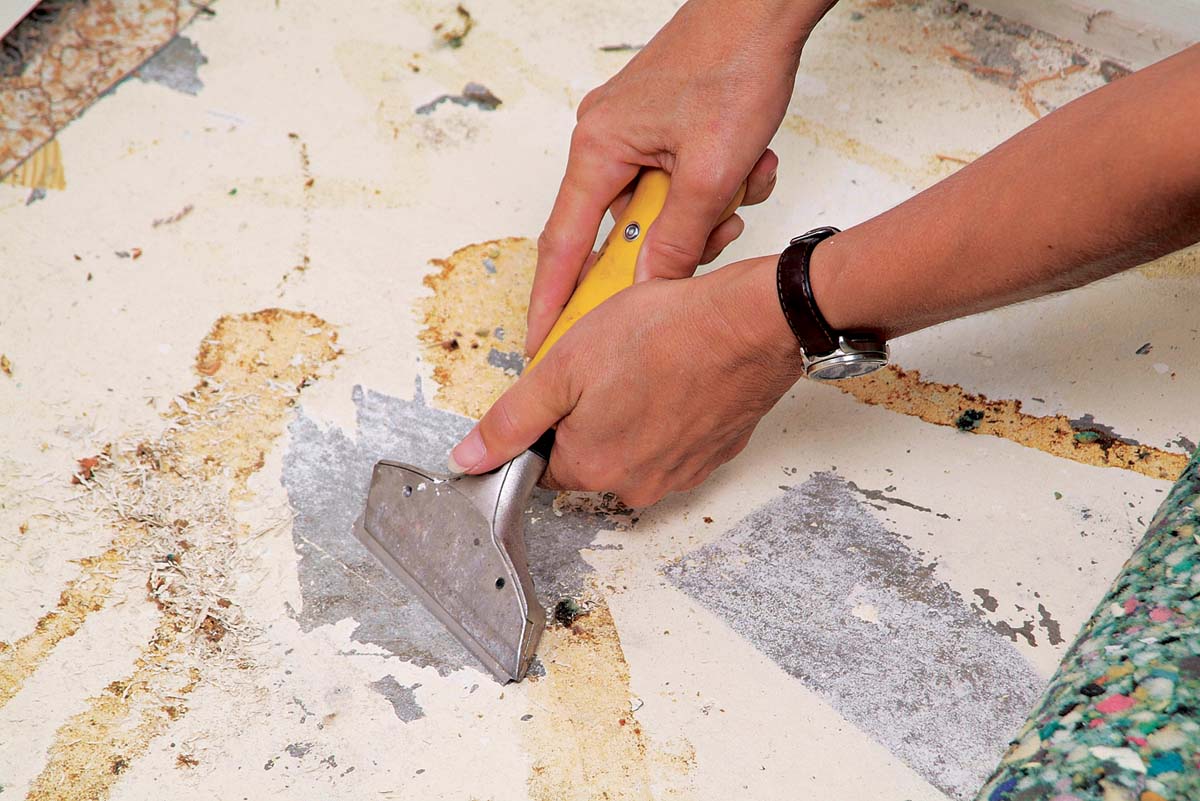
6. Use a wall scraper to remove any loose paint or glue from the substrate.


Removing Baseboards

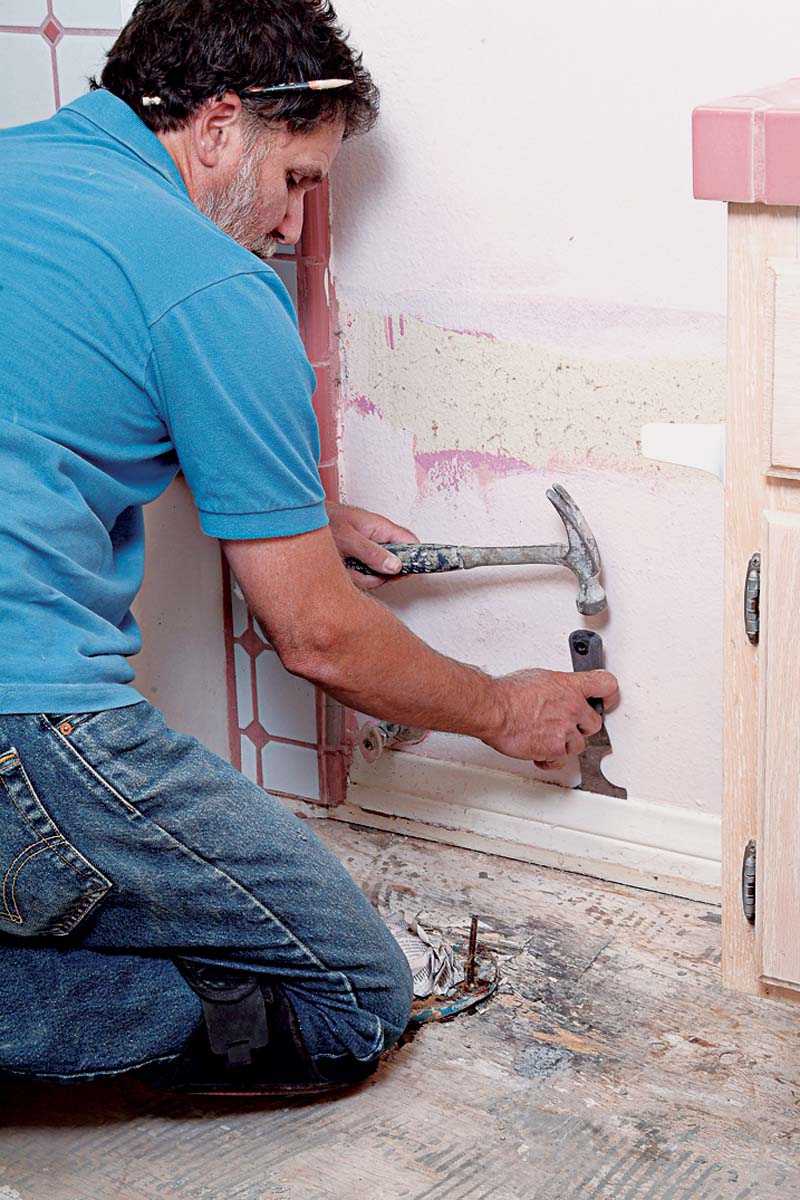
Baseboard and shoe molding usually sit on top of the floor around a room. You’ll need to remove these before taking up the old floor. Start by cutting any caulking present along the top of the baseboard 1, to free it from the paint or wallpaper. Use a prybar to pull the baseboard and shoe molding away from the wall. Place a dustpan or small piece of wood against the wall to protect it from prying damage 2. Pry close to wherever you see the finish nails holding the baseboard in place.

Break the caulking at the top of the baseboard with a putty knife.
1.
Break the caulking at the top of the baseboard with a putty knife.
A dustpan protects walls when you pry off the baseboard.
2.
A dustpan protects walls when you pry off the baseboard.

Removing Hardwood Flooring

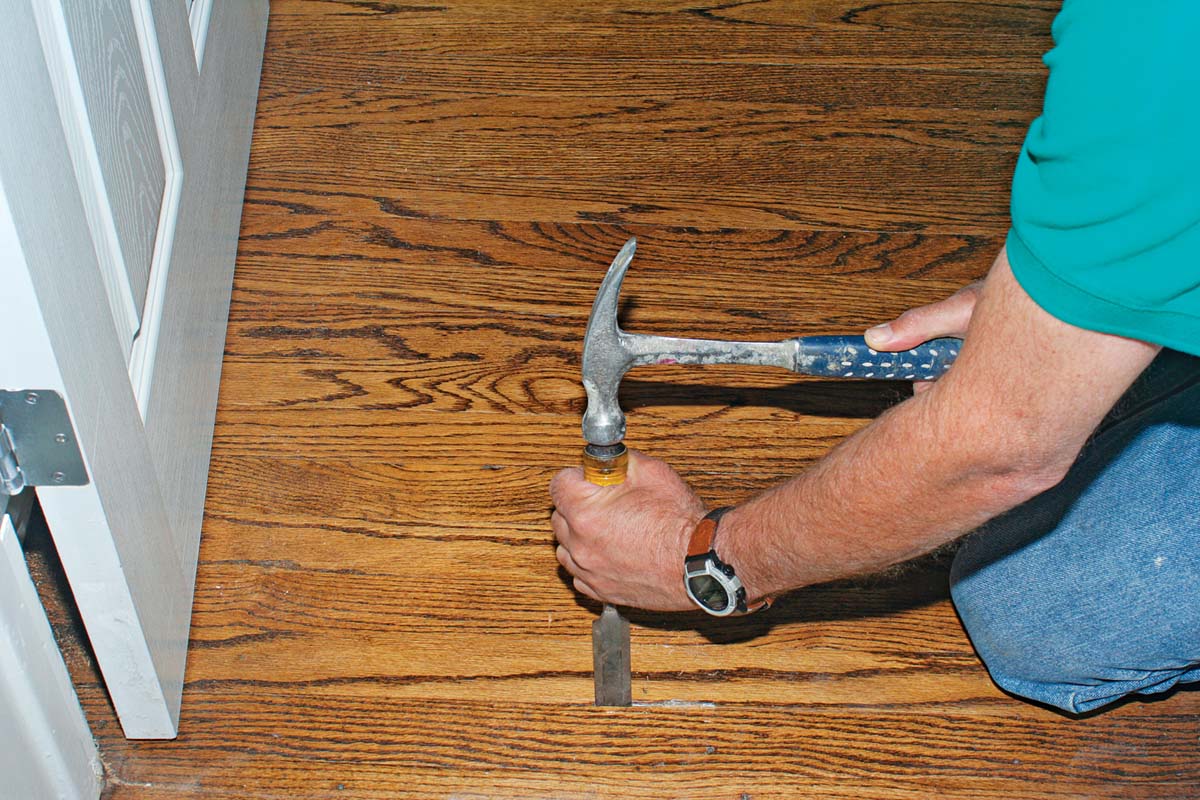
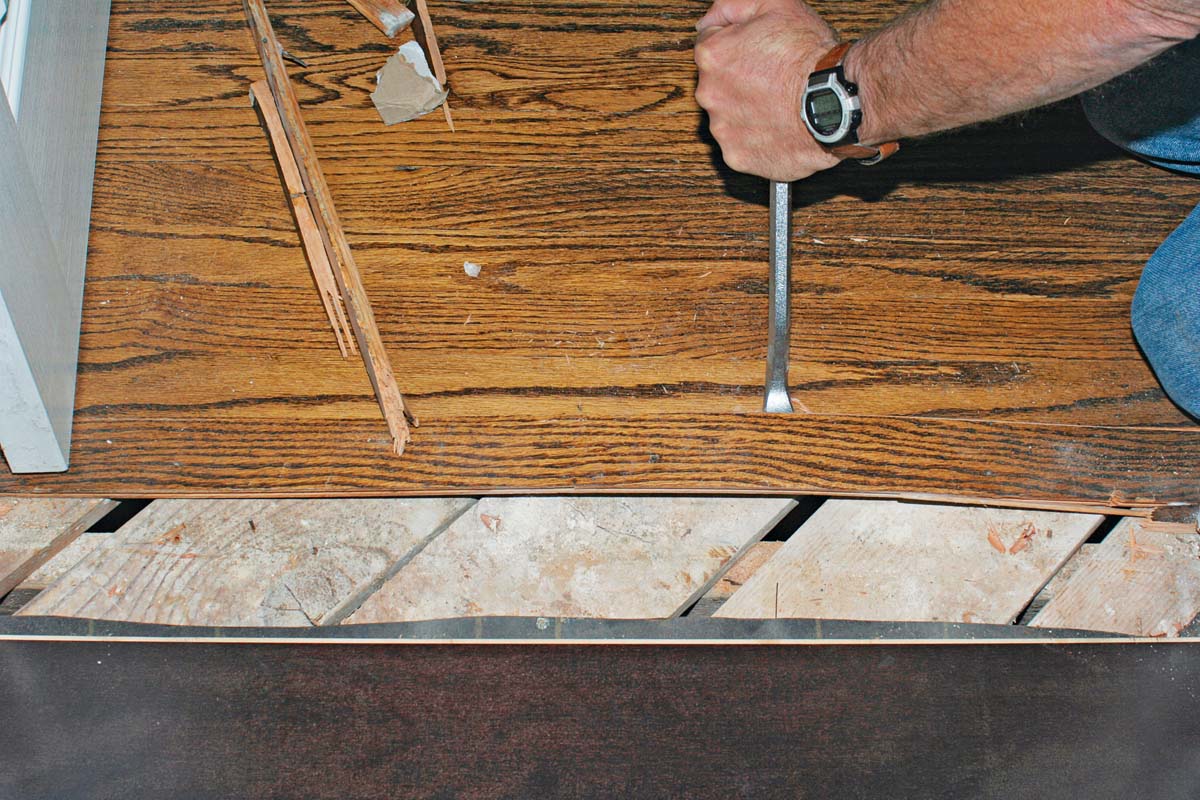
Most wood floors do not provide a solid or stable enough surface for tile. Also, installing new tile over old hardwood will raise the level of the floor much higher than the adjacent flooring. Therefore, it’s best to remove the hardwood flooring, beginning at a doorway or wherever you want the tile to begin. If you start at a doorway, draw a cut line midway under the door when it is closed. Use a sharp wood chisel and hammer to cut through the wood 1, and then use a prybar to get under the planks, strips, or squares 2. Be sure to wear protective eyewear since wood splinters can fly.

If your hardwood floor is over concrete, it may no longer be fully bonded to the substrate and may come up easily. If it is over a wood subfloor, it’ll be harder to pry up, as there will be plenty of nails and/or glue. In either case, remove all the adhesive residue and fasteners to leave a nice clean subfloor.

Use a sharp wood chisel and hammer to cut through the finished floor.
1.
Use a sharp wood chisel and hammer to cut through the finished floor.


Then use a prybar to get under your wood planks, strips, or squares.
2.
Then use a prybar to get under your wood planks, strips, or squares.

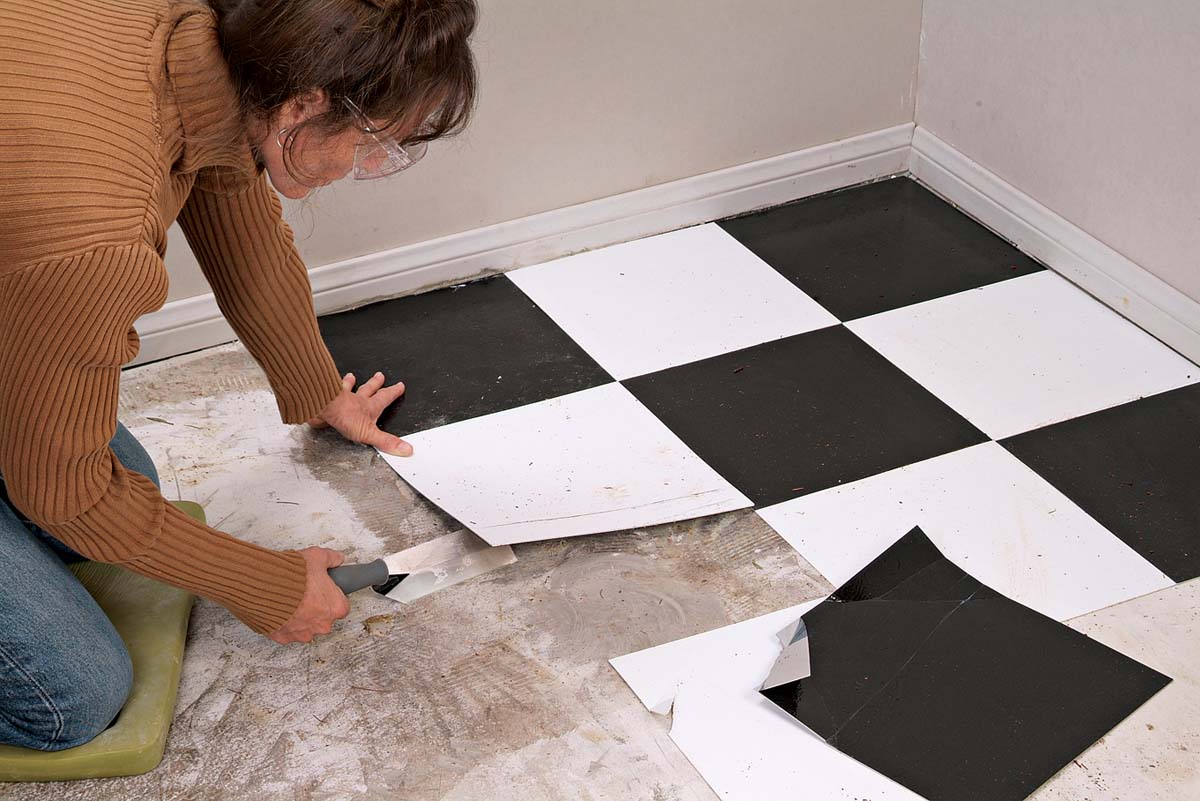
Removing Resilient Flooring

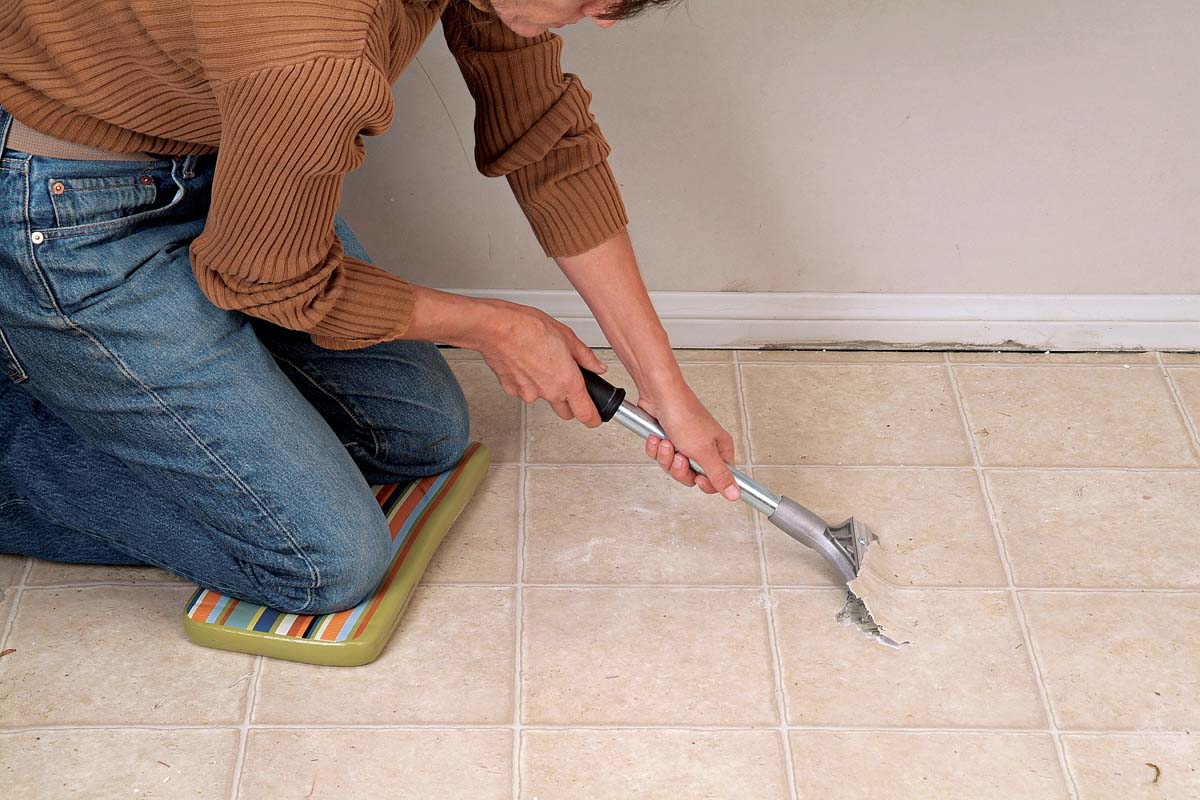
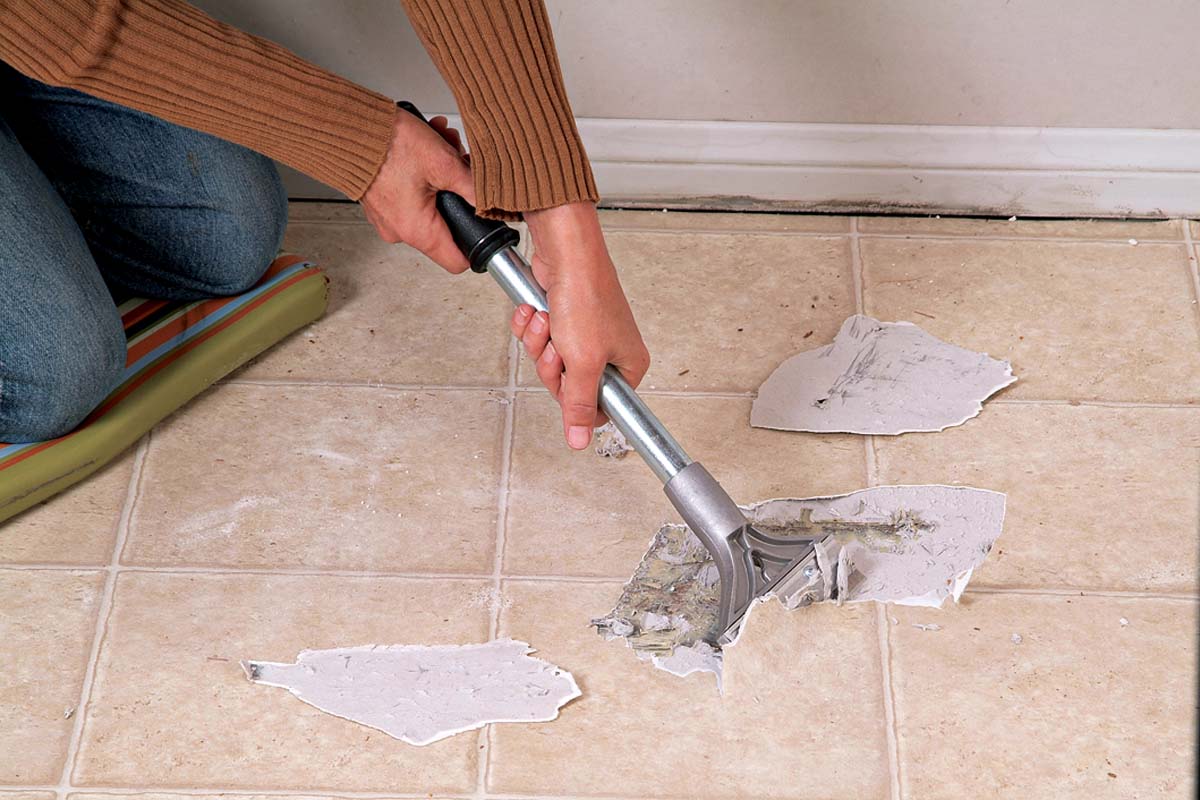
Backerboard can be laid directly over rigid vinyl flooring that was applied over plywood or a wood subfloor. However, a floor that’s made up of multiple layers of vinyl or the cushioned type of vinyl will need to be removed. Before you remove any type of vinyl flooring, it’s crucial to find out if the flooring or the adhesive used to bond it contain asbestos.

Removing vinyl from concrete

Once you’ve confirmed that your floor does not contain asbestos, start by removing the baseboards, then begin your demo at a doorway or a loose section 1. If necessary, use a razor knife to cut a channel at the doorway or possibly under a refrigerator. Then, use a long-handled floor scraper to peel the vinyl from the concrete 2. You’ll get the best results if you replace the blade regularly. With any luck, your floor will scrape into long rolls or pop up as individual squares 3. After you’ve removed the flooring, you may find some of its backing still remains stuck to the floor 4. Continue with the floor scraper, or you may want to try a heat gun if the material is particularly stubborn.

Removing vinyl over a wood subfloor

For vinyl installed over a wood floor, it’s a good idea to remove the underlayment (plywood or particleboard) that’s on top of your home’s subfloor along with the vinyl. This will allow your new tile floor to be closer to the height of existing floors in adjacent rooms. First, drill a 1-in. pilot hole down to the subfloor, to see how thick the underlayment is 5. Set a circular saw to this depth and cut the flooring into 2-ft.-sq. sections you can lift out and throw away 6. Use a prybar to lift the vinyl and underlayment up from the subfloor and remove all protruding nails.

Slice a channel with a razor knife. Push the floor scraper under the flooring.
1. Slice a channel with a razor knife. Push the floor scraper under the flooring.


Scrape the flooring from the concrete substrate.
2. Scrape the flooring from the concrete substrate.


Vinyl squares lift up easily with a margin trowel or floor scraper.
3. Vinyl squares lift up easily with a margin trowel or floor scraper.
Use two hands on a scraper to remove glue residue.
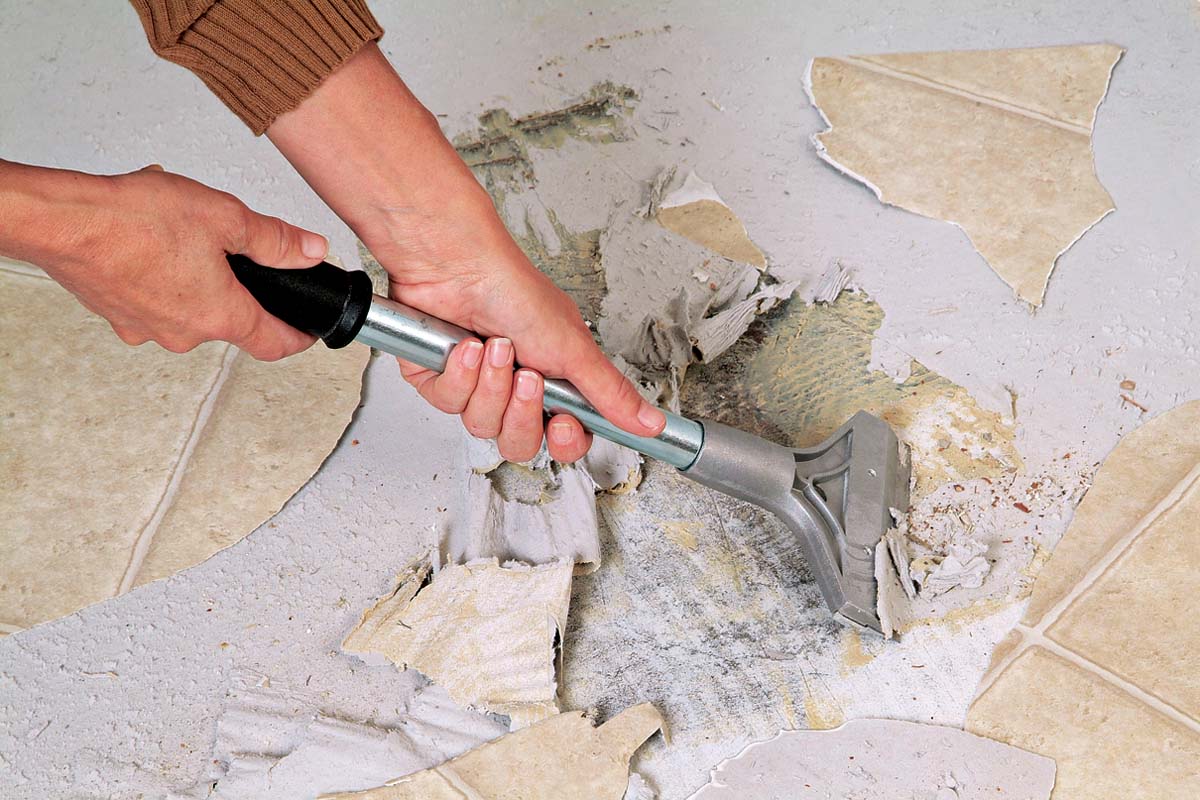
4. Use two hands on a scraper to remove glue residue.
Drilling a 1-in. pilot hole will tell you how thick the subfloor is.
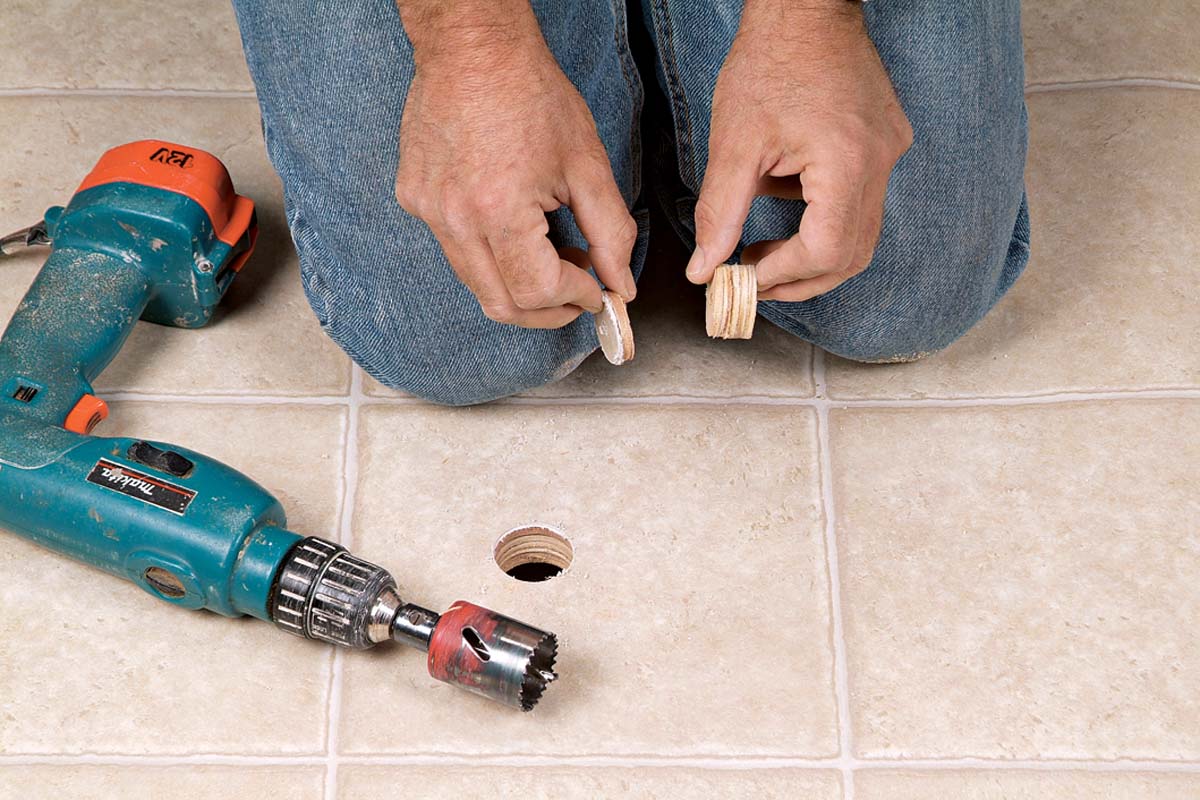
5. Drilling a 1-in. pilot hole will tell you how thick the subfloor is.
Set your circular saw to the depth of the subfloor.
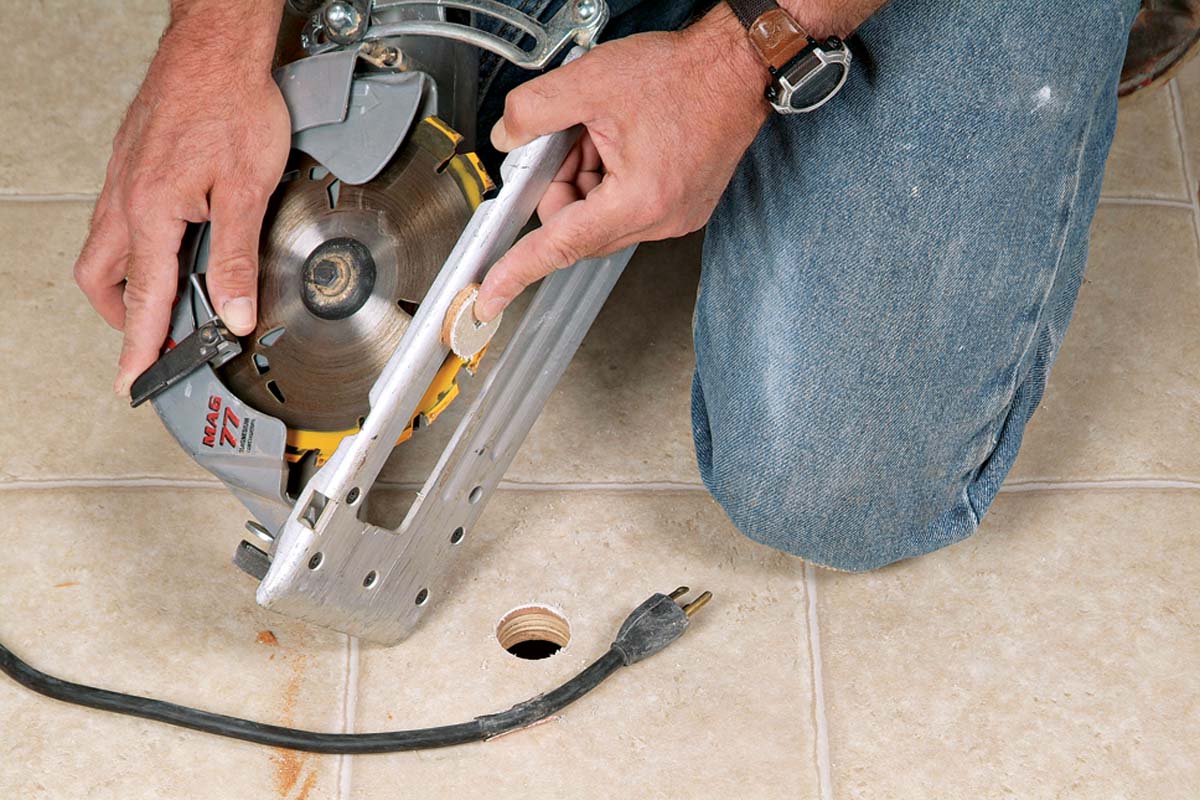
6. Set your circular saw to the depth of the subfloor.

Warning

Some vinyl and linoleum flooring installed before the 1970s contained asbestos—a serious health hazard (even the adhesives used to bond these floors often contained asbestos). In some homes, it’s also possible that new flooring was laid on top of old asbestos flooring. If you don’t know whether your floor contains asbestos, assume that it does and have it tested by an abatement company. If asbestos is present, do not remove the floor yourself; contact a professional to remove it.

Removing a Tile Floor from Concrete

If your tile was laid on a concrete slab, you can use a hammer and carbide-tipped chisel to remove the old tile, but it can take forever. An easier method is to use an electric chipping hammer with a breaker point, which you can rent at a local tool rental store 1. Start chipping into the tile at a doorway or work into a grout joint to get under the tile, picking up debris as you go. If you encounter an antifracture membrane or old vinyl flooring under the tile, remove that too 2. If there is any remaining thinset under the tile, remove it with a flat-tipped chisel on the chipping hammer 3.

An electric chipping hammer makes short work of removing stone and other hard materials from concrete slabs.
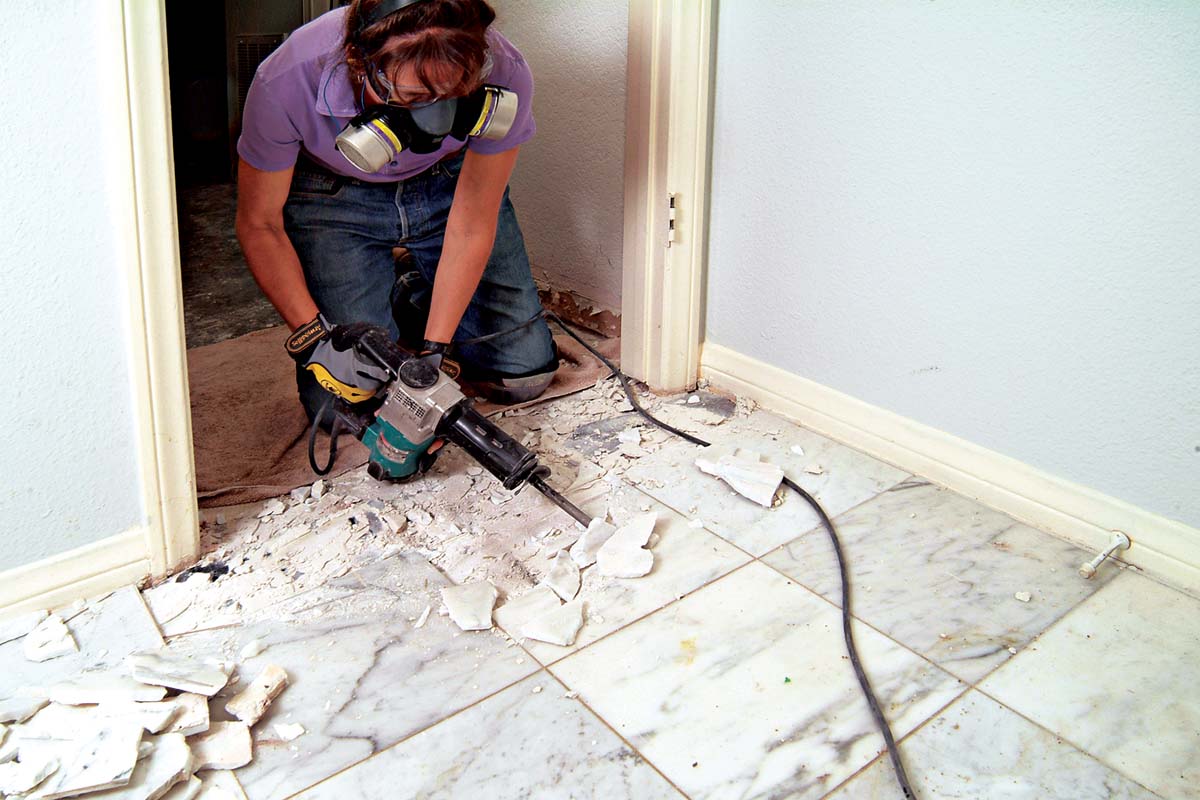
1. An electric chipping hammer makes short work of removing stone and other hard materials from concrete slabs.
Any membrane left under a tile floor cannot be reused and must be removed.
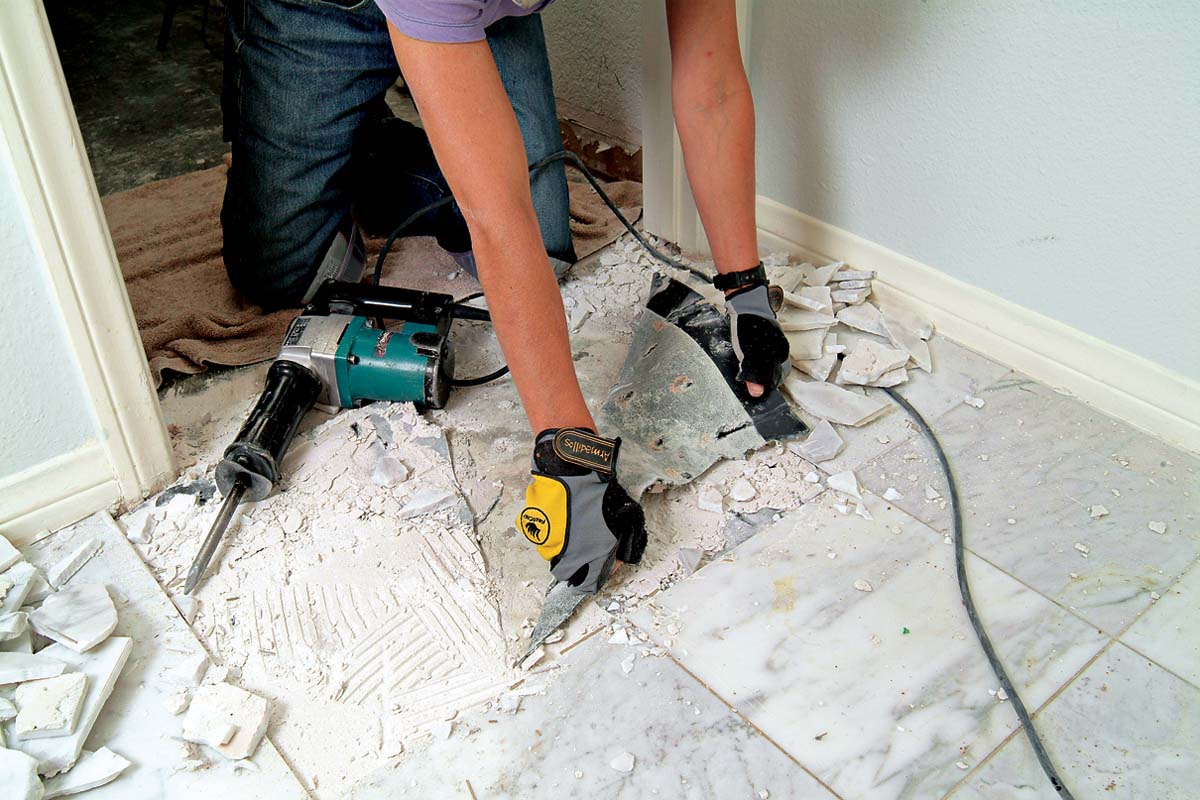
2. Any membrane left under a tile floor cannot be reused and must be removed.
A flat-tipped chisel and a chipping hammer remove all remaining thinset from the concrete.
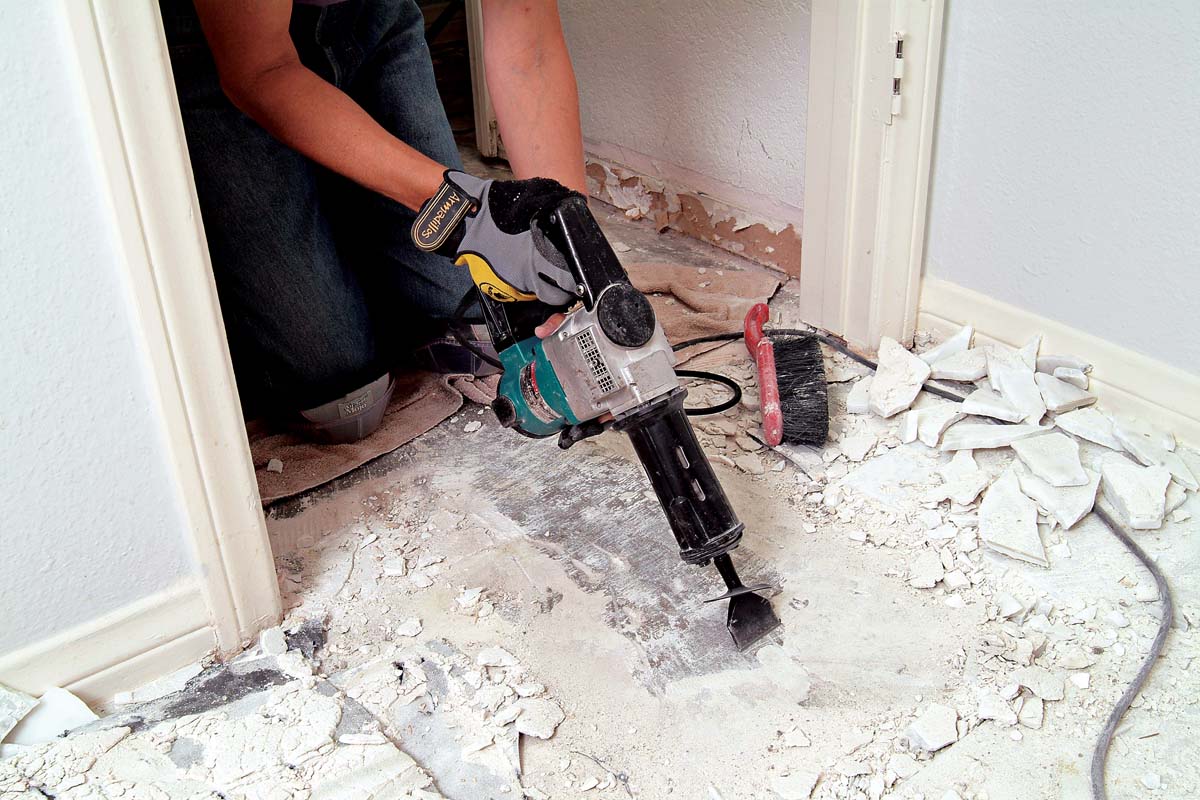
3. A flat-tipped chisel and a chipping hammer remove all remaining thinset from the concrete.


Should I remove the old tile? 

This may be the number one question we’re asked in our contracting business: Can we lay new tile over our existing ceramic tile? While it’s true that you can lay new tile over old if the original tile is solidly bonded to a sound substrate (there are no cracked tiles or hollow spots), in most cases, you must bond the new tile with epoxy mortar—a toxic, odorous material that’s best used by professionals. Therefore, we recommend that you remove your old tile and substrate before installing new tile. That way, there’ll be no hidden problems, and you know your new tile job will last.


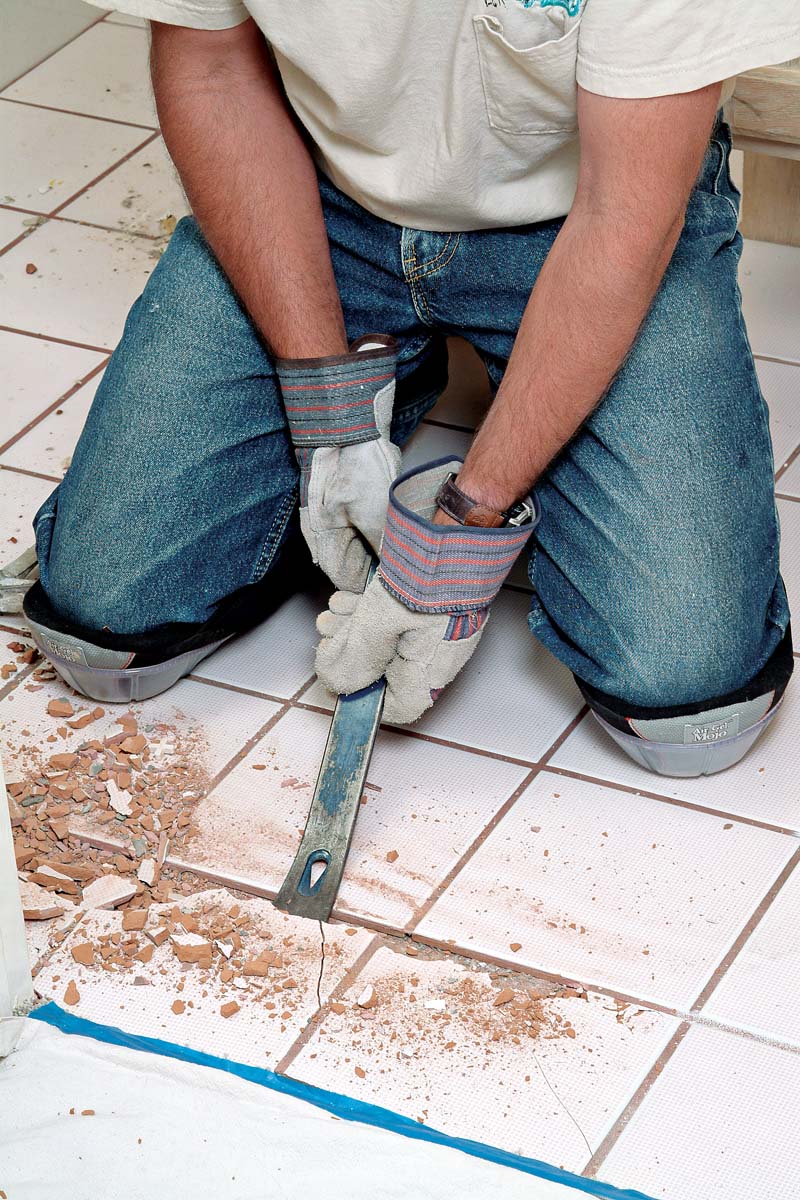
Removing Tile from a Wood Subfloor

After protecting the area and donning your safety gear, use a hammer 1 to smash a channel into the tile surface. Sometimes you can break through the backerboard or mortar bed down to the wood subfloor. If not, first use a prybar to remove the tiles 2. Now use the claw of the hammer 3 to pry open a channel in the backerboard or mortar bed. Put your prybar in the channel and you’ll be able to start lifting sections of your old flooring 4. Continue until the floor is clean and remove any excess nails, staples, or dried thinset from the wood subfloor.

Start demolition by hammering a channel into the tile, to provide a starting place for a prybar.
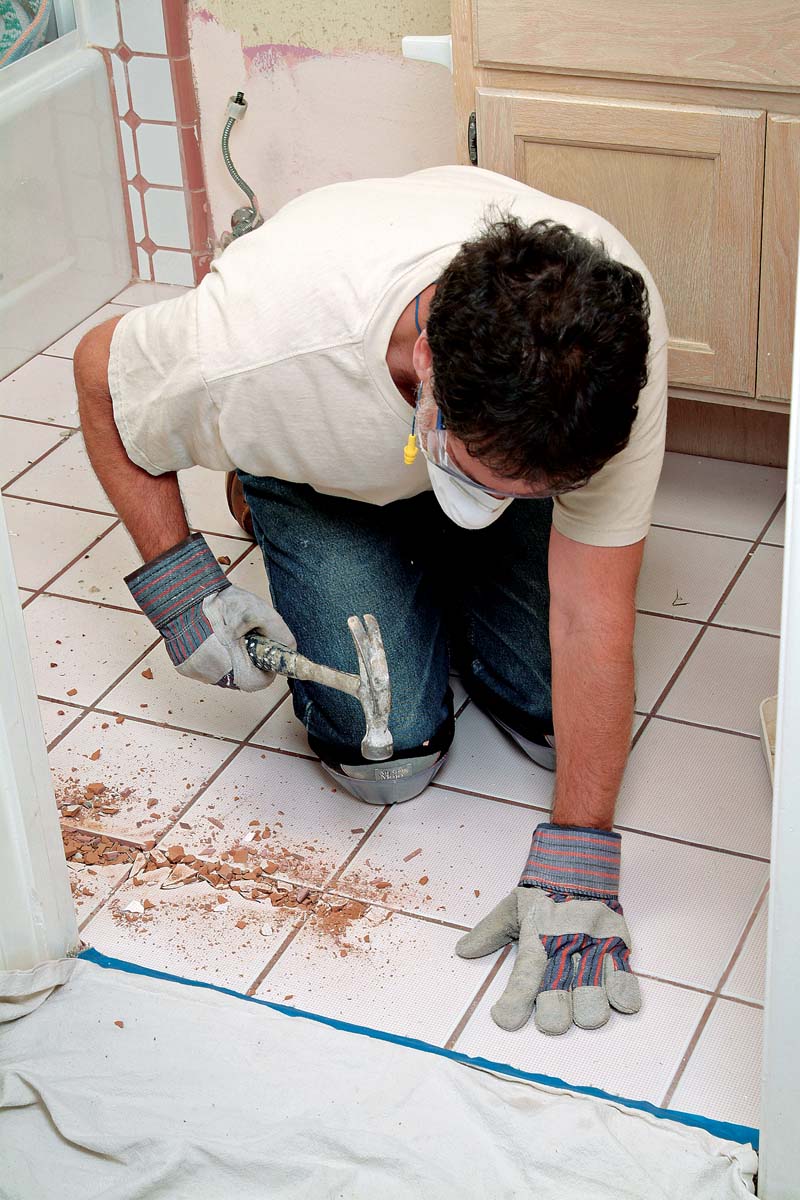
1. Start demolition by hammering a channel into the tile, to provide a starting place for a prybar.
Use the prybar to remove the first row of tile, then reverse direction and continue removing subsequent rows.
2. Use the prybar to remove the first row of tile, then reverse direction and continue removing subsequent rows.
Remove all tile and backerboard down to the subfloor. Remove all nails and staples too.
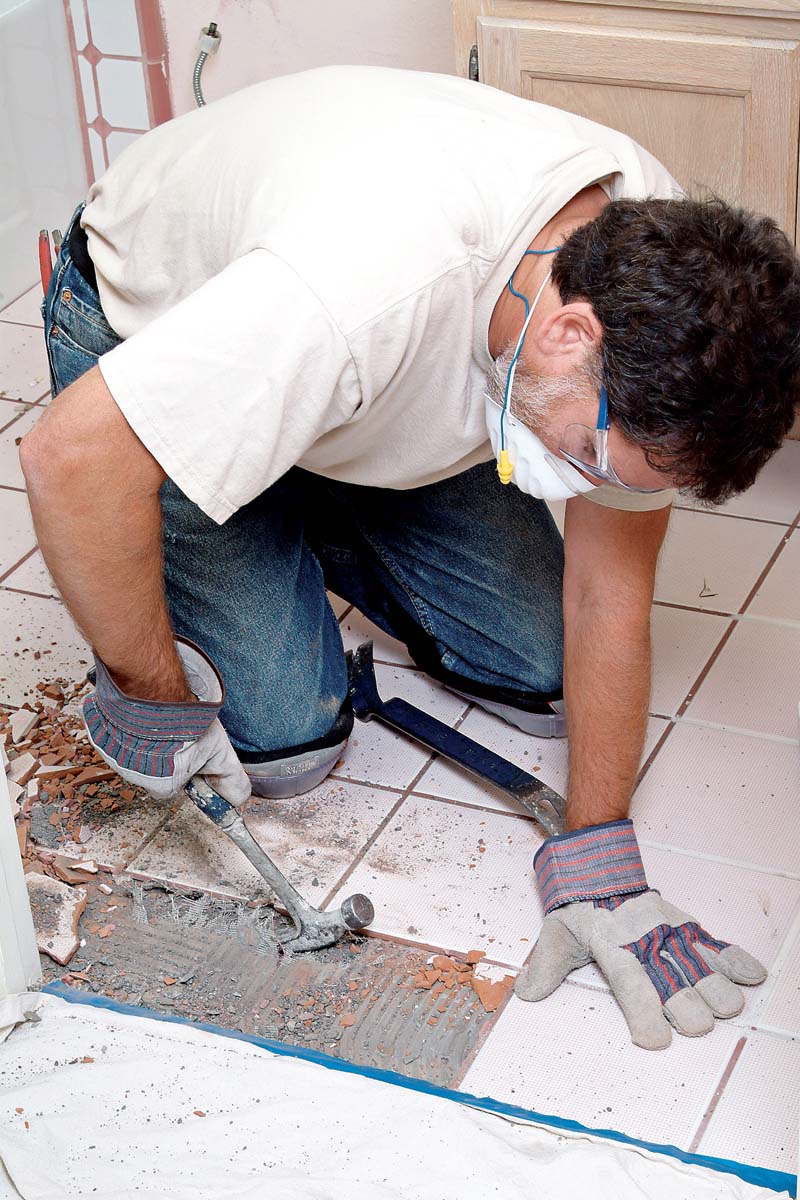
3. Remove all tile and backerboard down to the subfloor. Remove all nails and staples too.
Continue to lift tiles and backerboard or mortar with a prybar.
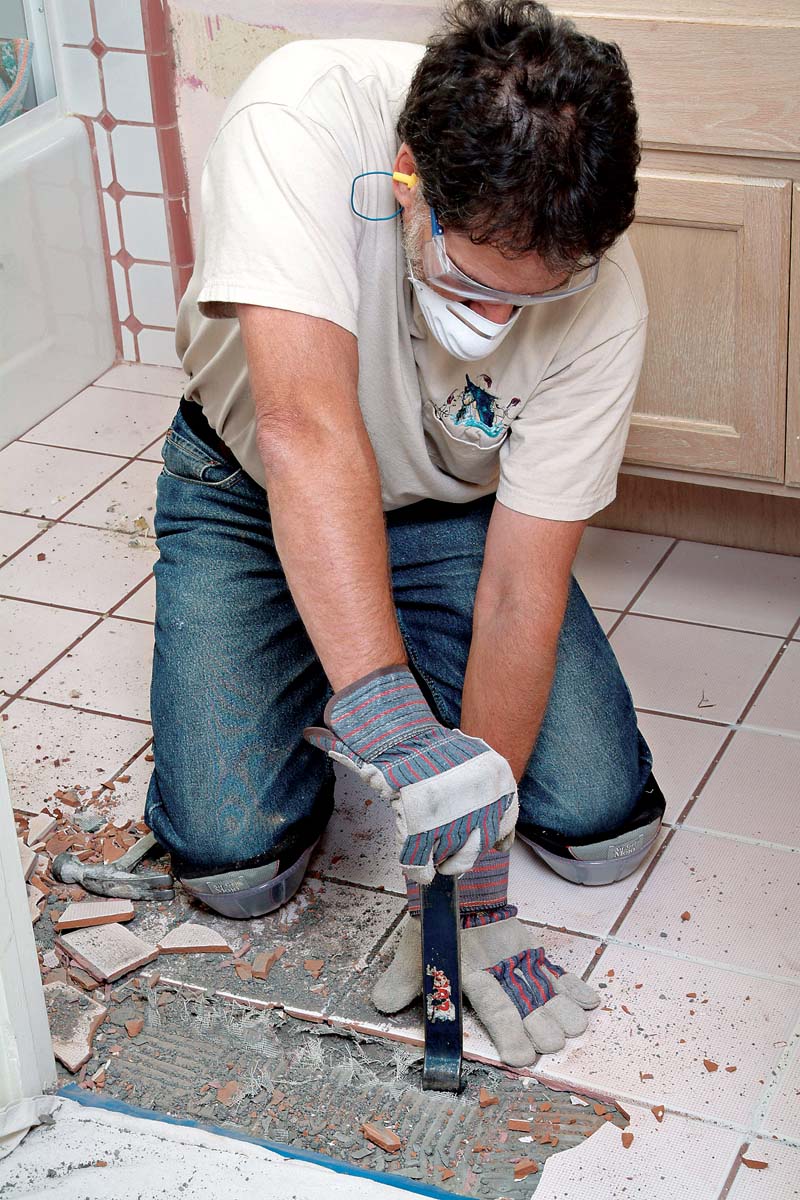
4. Continue to lift tiles and backerboard or mortar with a prybar.


Warning

Always wear safety glasses or goggles when breaking up tile as flying chips can injure your eyes. Wear a dust mask to protect your lungs from fine dust.


Tiling Complete, 2nd EditionExcerpted from Tiling Complete, 2nd Edition by Robin Nicholas and Michael Schweit.

Available in the Taunton Store and at Amazon.com.

Previous: Prepping the Jobsite for Tile Installation Next: Removing Old Countertops and Backsplashes

Guide

Tiling

Chapter

Preparation

Sign up for eletters today and get the latest how-to from Fine Homebuilding, plus special offers.

Signing you up...

This site is protected by reCAPTCHA and the Google Privacy Policy and Terms of Service apply.
See all newsletters
See all newsletters

Log in or create an account to post a comment.

Sign up Log in

Become a member and get full access to FineHomebuilding.com

Tiling

Tiling

Trusted, comprehensive guidance from the pros for a great-looking tile job in any room of the house

View Project Guide

View All Project Guides »

Become a member and get unlimited site access, including the Tiling Project Guide.

Start Free Trial

Selecting Tile
  • The Basics
  • Tile Options
Tools & Techniques
  • Job-Preparation Tools
  • Cutting Tiles
  • Setting & Grouting Tools
Installation Materials
  • Membranes & Substrates
  • Adhesives & Mortars
  • Grout
  • Sealers & Caulk
  • Spacers, Hardware & Trim
Preparation
  • The Prep Job
  • Repairs & Surface Prep
  • Installing Backerboard
Tiling Floors
  • Layout & Installation
  • Setting Specialty Tiles
Tiling Walls & Backsplashes
  • Preparation
  • Backsplashes
  • Walls
Tiling Showers
  • Tile Shower Basics
  • Waterproofing
  • Shower Pans
  • Shower Drains
  • Shower Niches
  • Video Series: Tile a Shower
  • Video Series: Tile a Barrier-Free Bathroom
Grouting, Sealing & Caulking
  • Grouting
  • Caulking
  • Sealing
Maintenance & Repair
  • Maintenance
  • Tile Repair
  • Grout Repair

Fine Home Building

Newsletter Sign-up

  • Fine Homebuilding

    Home building tips, offers, and expert advice in your inbox.

  • Green Building Advisor

    Building science and energy efficiency advice, plus special offers, in your inbox.

  • Old House Journal

    Repair, renovation, and restoration tips, plus special offers, in your inbox.

Signing you up...

This site is protected by reCAPTCHA and the Google Privacy Policy and Terms of Service apply.
See all newsletters

Follow

  • Fine Homebuilding

    Dig into cutting-edge approaches and decades of proven solutions with total access to our experts and tradespeople.

    Start Free Trial Now
    • Facebook
    • Instagram
    • X
    • LinkedIn
  • GBA Prime

    Get instant access to the latest developments in green building, research, and reports from the field.

    Start Free Trial Now
    • Facebook
    • YouTube
  • Old House Journal

    Learn how to restore, repair, update, and decorate your home.

    Subscribe Now
    • Facebook
    • Instagram
    • X

Membership & Magazine

  • Online Archive
  • Start Free Trial
  • Magazine Subscription
  • Magazine Renewal
  • Gift a Subscription
  • Customer Support
  • Privacy Preferences
  • About
  • Contact
  • Advertise
  • Careers
  • Terms of Use
  • Site Map
  • Do not sell or share my information
  • Privacy Policy
  • Accessibility
  • California Privacy Rights

© 2025 Active Interest Media. All rights reserved.

Fine Homebuilding receives a commission for items purchased through links on this site, including Amazon Associates and other affiliate advertising programs.

  • Home Group
  • Antique Trader
  • Arts & Crafts Homes
  • Bank Note Reporter
  • Cabin Life
  • Cuisine at Home
  • Fine Gardening
  • Fine Woodworking
  • Green Building Advisor
  • Garden Gate
  • Horticulture
  • Keep Craft Alive
  • Log Home Living
  • Military Trader/Vehicles
  • Numismatic News
  • Numismaster
  • Old Cars Weekly
  • Old House Journal
  • Period Homes
  • Popular Woodworking
  • Script
  • ShopNotes
  • Sports Collectors Digest
  • Threads
  • Timber Home Living
  • Traditional Building
  • Woodsmith
  • World Coin News
  • Writer's Digest
Active Interest Media logo
X
X
This is a dialog window which overlays the main content of the page. The modal window is a 'site map' of the most critical areas of the site. Pressing the Escape (ESC) button will close the modal and bring you back to where you were on the page.

Main Menu

  • How-To
  • Design
  • Tools & Materials
  • Video
  • Blogs
  • Forum
  • Project Guides
  • Reader Projects
  • Magazine
  • Members
  • FHB House

Podcasts

  • FHB Podcast
  • ProTalk

Webinars

  • Upcoming and On-Demand

Podcasts

  • FHB Podcast
  • ProTalk

Webinars

  • Upcoming and On-Demand

Popular Topics

  • Kitchens
  • Business
  • Bedrooms
  • Roofs
  • Architecture and Design
  • Green Building
  • Decks
  • Framing
  • Safety
  • Remodeling
  • Bathrooms
  • Windows
  • Tilework
  • Ceilings
  • HVAC

Magazine

  • Current Issue
  • Past Issues
  • Magazine Index
  • Subscribe
  • Online Archive
  • Author Guidelines

All Access

  • Member Home
  • Start Free Trial
  • Gift Membership

Online Learning

  • Courses
  • Project Guides
  • Reader Projects
  • Podcast

More

  • FHB Ambassadors
  • FHB House
  • Customer Support

Account

  • Log In
  • Join

Newsletter

Get home building tips, offers, and expert advice in your inbox

Signing you up...

This site is protected by reCAPTCHA and the Google Privacy Policy and Terms of Service apply.
See all newsletters
See all newsletters

Follow

  • X
  • YouTube
  • instagram
  • facebook
  • pinterest
  • Tiktok

Join All Access

Become a member and get instant access to thousands of videos, how-tos, tool reviews, and design features.

Start Your Free Trial

Subscribe

FHB Magazine

Start your subscription today and save up to 70%

Subscribe

This is your last free article.

Don't miss another expert tip or technique from building pros. Start your free trial today.

Start your FREE trial

Already a member? Log in

We hope you’ve enjoyed your free articles. To keep reading, become a member today.

Get complete site access to expert advice, how-to videos, Code Check, and more, plus the print magazine.

Start your FREE trial

Already a member? Log in

Privacy Policy Update

We use cookies, pixels, script and other tracking technologies to analyze and improve our service, to improve and personalize content, and for advertising to you. We also share information about your use of our site with third-party social media, advertising and analytics partners. You can view our Privacy Policy here and our Terms of Use here.

Cookies

Analytics

These cookies help us track site metrics to improve our sites and provide a better user experience.

Advertising/Social Media

These cookies are used to serve advertisements aligned with your interests.

Essential

These cookies are required to provide basic functions like page navigation and access to secure areas of the website.

Delete My Data

Delete all cookies and associated data