FHB Logo Facebook LinkedIn Email Pinterest Twitter Instagram Plus Icon Close Icon Navigation Search Icon Navigation Search Icon Arrow Down Icon Video Guide Icon Article Guide Icon Modal Close Icon Guide Search Icon Skip to content
Subscribe

In every issue you'll find...

  • Expert insights on techniques and principles
  • Unbiased tool reviews
  • Step-by-step details to master the job
  • Field-tested advice and know-how
Subscribe Now!
Subscribe
  • How-To
  • Design
  • Tools & Materials
  • Videos
  • Blogs
  • Forum
  • Magazine
  • Members
  • FHB House
  • Podcast
  • Join
  • Log In
Subscribe

Fine Homebuilding Project Guides

Wiring

Guide Home
Chapter
  • Working with Electricity
  • Tools and Materials
  • Receptacles and Switches
  • Lights and Fans
  • Rough-In
  • Outdoor Wiring
  • Panels and Subpanels

Choosing Electrical Boxes

The box you need largely depends on the wiring installation.

By Mike Litchfield, Michael McAlister

There is a huge selection of electrical boxes, varying by size, shape, mounting device, and composition. One of the first distinctions to note is that of new work boxes and remodel or cut-in boxes. New work boxes are designed to be attached to exposed framing, as is often the case in new construction and sometimes in renovations where walls and ceilings are gutted. Cut-in boxes are designed for attachment to existing finish surfaces—which frequently involves cutting into plaster or drywall.

But of all the variables to consider when choosing boxes, size (capacity) usually trumps the others. Correctly sized boxes are required by code and make your job easier because you don’t have to struggle to fit wires and devices into a space that’s too small.

Box-Fill Worksheet


Box capacity

The most common shape is a single-gang box. A single-gang box 3 1⁄2 in. deep has a capacity of roughly 22 1⁄2 cu. in., enough space for a single device (receptacle or switch), three 12–2 w/grd cables, and two wire connectors. Double-gang boxes hold two devices; triple-gang boxes hold three devices. Remember: Everything that takes up space in a box must fit without cramping—devices, cable wires, wire connectors, and cable clamps—so follow NEC recommendations for the maximum number of conductors per box.

You can get the capacity you need in a number of ways. Some pros install shallow 4-squares (4 in. by 4 in. by 1 1⁄2 in. deep) throughout a system because such boxes are versatile and roomy. If a location requires a single device, pros simply add a mud-ring cover. Because of their shallow depth, these boxes can also be installed back to back within a standard 2×4 wall. This allows you to keep even back-to-back switch boxes at the same height from one room to the next. Shallow pancake boxes (4 in. in diameter by 1⁄2 in. deep) are commonly used to flush-mount light fixtures.

Where you’re installing GFCI receptacles or need more room for connectors and devices, use a 4S deep box. Finally, cover 4-square boxes with a mud-ring cover.

selection of electrical boxes


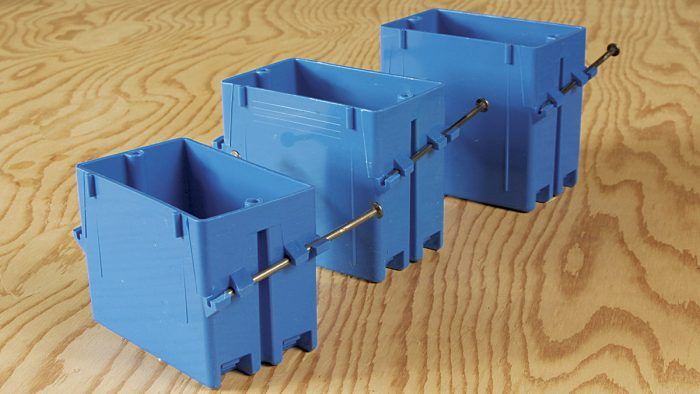
Single-gang boxes
Single-gang boxes come in three sizes: 18 cu. in., 20.4 cu. in., and 22.5 cu. in. Bigger is better.

4-in. box
Throw a single- or double-gang mud-plaster ring on a 4-in. box and it’s hard to overfill.


Metal vs. plastic boxes

Metal boxes are sturdy and are available in more sizes than are plastic boxes. Some metal boxes can be interlocked for larger capacity. Also, metal boxes are usually favored for mounting ceiling fixtures because steel is stronger than plastic. If code requires steel conduit, armored cable (BX), or MC cable, you must use steel boxes. All metal boxes must be grounded.

For most other residential installations, plastic is king. (Plastic boxes may be polyvinyl chloride [PVC], fiberglass, or thermoset.) Electricians use far more plastic boxes because they are less expensive. Also, because they are nonconductive, they’re quicker to install because they don’t need to be grounded. However, even if a box doesn’t need to be grounded, all electrical devices inside must be grounded by a ground wire that doesn’t depend on a device for continuity.

Cut-in boxes

The renovator’s mainstay is the cut-in box (remodel box) because it mounts directly to finish surfaces. These boxes are indispensable when you want to add a device but don’t want to destroy a large section of a ceiling or wall to attach the box to the framing. Most cut-in boxes have metal or plastic flanges that keep them from falling into the wall cavity. Where they vary is with the tabs or mechanisms that hold them snugly to the back side of the wall: screw-adjustable ears, metal-spring ears, swivel ears, or bendable metal tabs also called “battleships” (Grip-Lok® is one brand).


Safety Alert: All cut-in boxes, whether plastic or metal, must contain cable clamps inside that fasten cables securely. That is, it’s impossible to staple cable to studs and joists when they are covered by finish surfaces, so you need clamps to keep the cables from getting tugged or chafed.


adjustable box
The screw on the side of an adjustable box enables you to raise or lower the face of the box to make it flush to the finish wall.

remodel box
A remodel box (cut-in box) mounts to a wall surface such as drywall or plaster—rather than mounting to a stud. Typically, “ears” on the box flip out at the turn of a screw, and as they are tightened they draw the box tight to the wall.

Cut-In Remodel Boxes

Cut-In Remodel Boxes


Wiring Complete, 3rd Edition

Excerpted from Wiring Complete, 3rd Edition (The Taunton Press, 2017) by Michael Litchfield and Michael McAlister

Available in the Taunton Store and at Amazon.com.

Sign up for eletters today and get the latest how-to from Fine Homebuilding, plus special offers.

Signing you up...

This site is protected by reCAPTCHA and the Google Privacy Policy and Terms of Service apply.
See all newsletters
See all newsletters
Previous: Easy-Read Wire Strippers Next: Fixture Boxes

Guide

Wiring

Chapter

Tools and Materials

Log in or create an account to post a comment.

Sign up Log in

Become a member and get full access to FineHomebuilding.com

Wiring

Wiring

Trusted, code-compliant guidance from the pros for working safely on any wiring project

View Project Guide

View All Project Guides »

Become a member and get unlimited site access, including the Wiring Project Guide.

Start Free Trial

Working with Electricity
  • Basics
  • Safety
  • Troubleshooting and Upgrades
Tools and Materials
  • Electrical Tools
  • Electrical Boxes
  • Cables and Wires
Receptacles and Switches
  • Materials
  • Wiring Receptacles
  • Wiring Switches
Lights and Fans
  • Lighting Design
  • Installing Lights
  • Fans
Rough-In
  • Planning
  • Installing Electrical Boxes
  • Running Cable
  • Retrofit Work
  • Making Connections in Boxes
  • Electrical Conduit
Outdoor Wiring
  • Basics
  • Outlets
  • Installing Lighting
Panels and Subpanels
  • Understanding Panels
  • Circuits
  • Installing a Subpanel

Fine Homebuilding

Follow

  • twitter
  • facebook
  • instagram
  • pinterest

Newsletter

Get home building tips, offers, and expert advice in your inbox

Signing you up...

This site is protected by reCAPTCHA and the Google Privacy Policy and Terms of Service apply.
See all newsletters
See all newsletters

Membership & Magazine

  • Online Archive
  • Start Free Trial
  • Magazine Subscription
  • Magazine Renewal
  • Gift a Subscription
  • Customer Support
  • Privacy Preferences

Taunton Network

  • Green Building Advisor
  • Fine Woodworking
  • Fine Gardening
  • Threads
  • About
  • Contact
  • Advertise
  • Careers
  • Copyright
  • Terms of Use
  • Site Map
  • Do not sell or share my information
  • Privacy Policy
  • Accessibility
  • California Privacy Rights

© 2023 The Taunton Press, Inc. All rights reserved.

X
X
This is a dialog window which overlays the main content of the page. The modal window is a 'site map' of the most critical areas of the site. Pressing the Escape (ESC) button will close the modal and bring you back to where you were on the page.

Main Menu

  • How-To
  • Design
  • Tools & Materials
  • Video
  • Blogs
  • Forum
  • Reader Projects
  • Magazine
  • Members
  • FHB House

Podcasts

  • FHB Podcast
  • ProTalk

Webinars

  • Upcoming and On-Demand

Account

  • Log In
  • Join

Podcasts

  • FHB Podcast
  • ProTalk

Webinars

  • Upcoming and On-Demand

Popular Topics

  • Kitchens
  • Business
  • Bedrooms
  • Roofs
  • Architecture and Design
  • Green Building
  • Decks
  • Framing
  • Safety
  • Remodeling
  • Bathrooms
  • Windows
  • Tilework
  • Ceilings
  • HVAC

Magazine

  • Current Issue
  • Past Issues
  • Magazine Index
  • Subscribe
  • Online Archive
  • Author Guidelines

All Access

  • Member Home
  • Start Free Trial
  • Gift Membership

Shop the Store

  • Books
  • DVDs
  • Taunton Workshops

More

  • FHB Ambassadors
  • Reader Projects
  • Podcast
  • Customer Support

Account

  • Log In
  • Join

Newsletter

Get home building tips, offers, and expert advice in your inbox

Signing you up...

This site is protected by reCAPTCHA and the Google Privacy Policy and Terms of Service apply.
See all newsletters
See all newsletters

Follow

  • twitter
  • facebook
  • instagram
  • pinterest

Join All Access

Become a member and get instant access to thousands of videos, how-tos, tool reviews, and design features.

Start Your Free Trial

Subscribe

FHB Magazine

Start your subscription today and save up to 70%

Subscribe

We hope you’ve enjoyed your free articles. To keep reading, become a member today.

Get complete site access to expert advice, how-to videos, Code Check, and more, plus the print magazine.

Start your FREE trial

Already a member? Log in