FHB Logo Facebook LinkedIn Email Pinterest Twitter X Instagram Tiktok YouTube Plus Icon Close Icon Navigation Search Icon Navigation Search Icon Arrow Down Icon Video Guide Icon Article Guide Icon Modal Close Icon Guide Search Icon Skip to content
Subscribe
Log In
  • How-To
  • Design
  • Tools & Materials
  • Restoration
  • Videos
  • Blogs
  • Forum
  • Magazine
  • Members
  • FHB House
  • Podcast
Log In

Fine Homebuilding Project Guides

Wiring

Guide Home
  • Working with Electricity
  • Tools and Materials
  • Receptacles and Switches
  • Lights and Fans
  • Rough-In
  • Outdoor Wiring
  • Panels and Subpanels
How-To

Installing a Ceiling Fan

Mount the fan box securely, and then wire and hang the fan.

By Mike Litchfield, Michael McAlister
  • X
  • facebook
  • linkedin
  • pinterest
  • email
  • add to favorites Log in or Sign up to save your favorite articles

All fans must be securely mounted to framing, but this is especially true of ceiling fans, which are weighty and subject to vibration and wobbling. All fans must be installed in a ceiling box rated for fan use—that is, capable of supporting 50 lb. or more. Check your fan’s installation specs. If your fan is particularly heavy or complex, it may require a box with a higher weight rating or additional bracing.


Damp or Dry

Most ceiling fans are intended for dry indoor rooms. If you will be installing the fan in a humid indoor location, buy a UL-listed fan marked “Suitable for damp locations.” If the fan will be installed outdoors, such as in a porch or a gazebo, select a UL-listed fan marked “Suitable for wet locations.” Wet-rated fans will have sealed motors, rust-resistant housings and hardware, and all-weather blades.


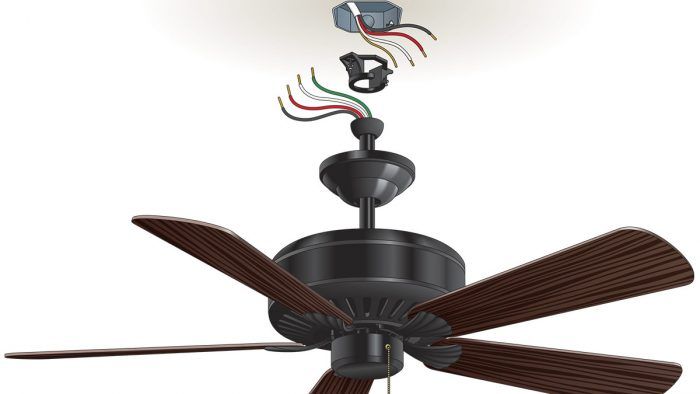
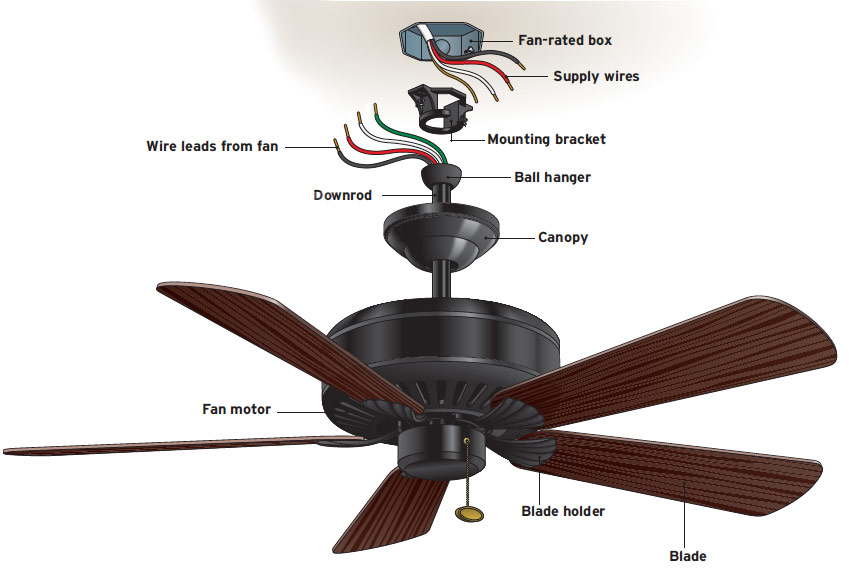
Ceiling Fan Elements

Mounting details and fan assemblies vary (shown here is an old-style fan, still common in many homes): Follow the installation instructions that come with your unit. Add downrod extensions as needed to locate the fan blades 8 ft. to 10 ft. above the floor.

Ceiling-Fan-Elements


Mounting a Ceiling Fan Box

If ceiling joists are exposed, you have several options. You can install a piece of 2×4 or 2×6 blocking to the ceiling joists (or rafters), then mount a 2-in.-deep octagonal metal box to the blocking. Mark the location of the blocking so the box will be flush to the finished ceiling surface. Then drive three 3-in. toenailed wood screws through each end of the blocking and into the joists, keeping the blocking on your marks.

If you must hang a fan from a ceiling joist’s edge, screw a 1⁄2-in.-deep metal pancake box directly to the joist. Before doing so, however, be sure there is enough room inside the fan’s canopy to hide electrical connections—because there’s no room for them in the pancake box! If not, move the fan or modify your plans.

An alternative is to mount an adjustable hanger to the framing. Bar hangers are strong, easier than nailing up blocking, and easily positioned by sliding the box along its support bar. Remodel bar hangers are also available.

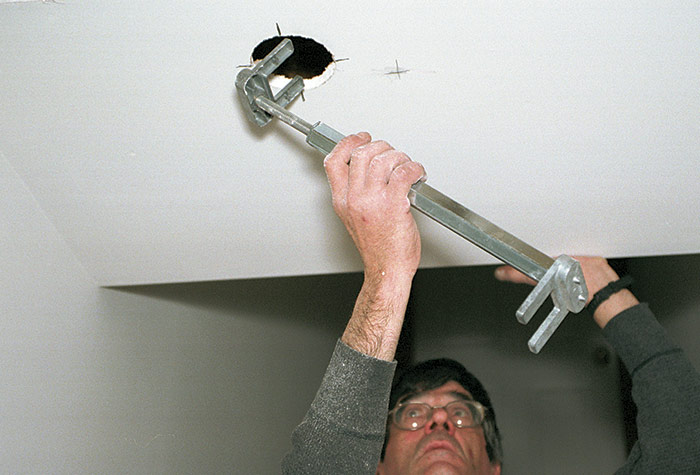
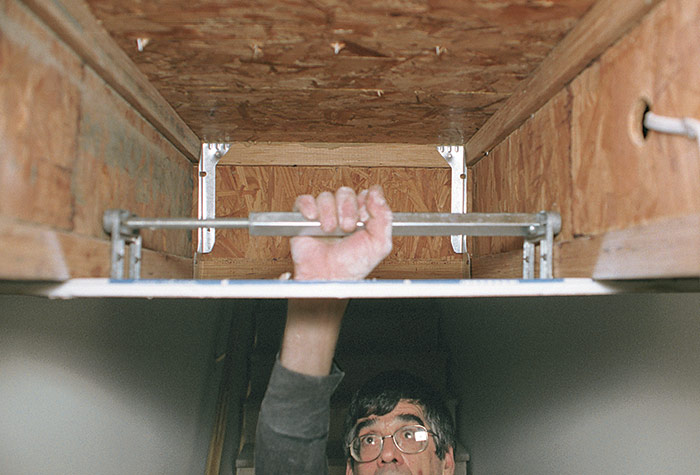
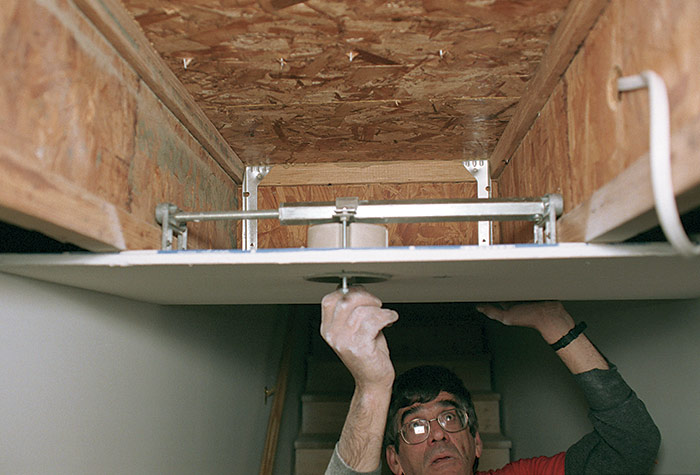
If joists are not exposed, install a remodel bar (a braced box) if there’s a finish ceiling. Locate the fan, cut a 4-in.-diameter hole in the ceiling, insert the bar into the hole 1, and maneuver it until its feet stand on top of the drywall. Then hand-turn the bar to expand it. When the bar touches a joist on both ends, turn the bar with a wrench to drive the bar points into the joists 2. Finally, bolt the ceiling box to the remodel bar using the hardware provided 3.

1  Insert a remodel bar through the ceiling cutout.
1) Insert a remodel bar through the ceiling cutout.
2  Expand the remodel bar by hand. Then force the pointed ends into the joists by turning the bar with a wrench.
2) Expand the remodel bar by hand. Then force the pointed ends into the joists by turning the bar with a wrench.
3  Attach the fan box to the remodel bar.
3) Attach the fan box to the remodel bar.


Safety Alert

If there’s an existing fan box, turn off the power to it and test before proceeding. If the box is plastic, check the screw holes that the fan mounting bracket attaches to. If the screw holes are at all stripped, if the box is cracked or deformed, or if you have any doubts that it can support the new fan, replace the box.


Installation

The photos here show the installation of a Haiku L Series ceiling fan, which we chose because it’s well made and utilizes devices such as prewired harnesses and snap connectors to simplify and speed installation. Also, its ceiling bracket is a sturdy type used by many fan makers. To give you a concise overview we condensed a 34-page installation guide, so, of necessity, some steps were omitted. Note: Every fan is a bit different, so the guide that came with your fan is the final authority on its installation. Follow it closely.


PRO TIP: If you get confused while installing your fan, take a digital photo of the assembly point that’s baffling you. Then call tech support. If they can’t quickly solve the problem, email the photo to help them better understand. In general, sending a photo is a faster way to find a solution than trying to describe a welter of unfamiliar fan parts. If you are still unsure how to proceed, hiring a licensed electrician may be money well spent.


Mounting the ceiling bracket

A ceiling fan must be mounted to an outlet box rated for fan use—typically, capable of supporting 50 lb.—which is securely mounted to a ceiling joist or beam. Before beginning, disconnect power to the outlet box by turning off the circuit breaker or removing the fuse that controls it. Then use a voltage tester to make sure the power is off.

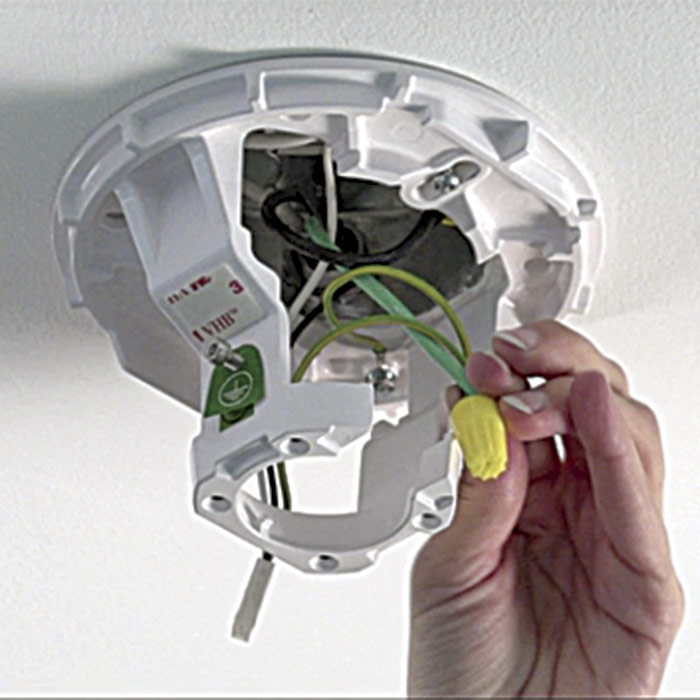
Using wire nuts, attach the supply wires in the outlet box to the fan wire harness: ground to ground, neutral to neutral, hot to hot. Tuck the supply wires and wire nuts into the outlet box, then install the mounting bracket to the outlet box using the machine screws that came with the box. If the mounting bracket itself has a grounding wire, as the Haiku bracket does, attach it now to the supply ground and the ground of the wire harness 1.

1  If the mounting bracket has a grounding wire, attach it to the supply ground and the ground of the wire harness.
1) If the mounting bracket has a grounding wire, attach it to the supply ground and the ground of the wire harness.

2  Bolt or screw airfoils (fan blades) securely to the fan’s motor unit.
2) Bolt or screw airfoils (fan blades) securely to the fan’s motor unit.

3  Fan downrods run from the ceiling bracket to the top of the motor unit; these are prewired.
3) Fan downrods run from the ceiling bracket to the top of the motor unit; these are prewired.

Important: If you are mounting a similar bracket on a sloping ceiling, install it so that its open side faces upslope.

Connecting airfoils and the downrod

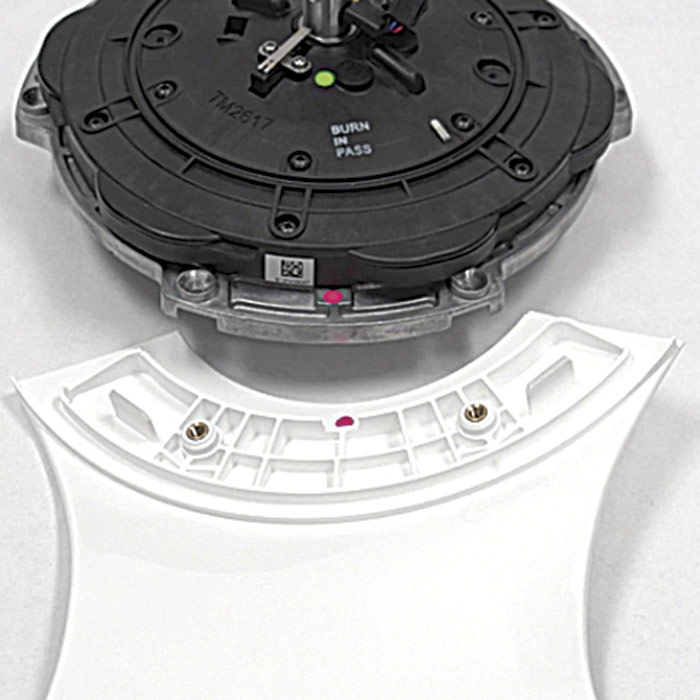
In the factory, quality fan makers carefully balance airfoils (fan blades) to the motor unit to ensure that the fan will run efficiently and smoothly. The process is a little like fine-tuning the balance of a tire, with incrementally smaller adjustments made until the balance is perfect in all directions. Before removing the airfoils for shipping, the manufacturer will often color-code each to an attachment point (hub) on the motor unit.

When attaching the airfoils to the fan’s motor unit, it is thus important to match the colored sticker on each airfoil to the corresponding color on a motor hub 2.

Press each airfoil firmly to a hub and screw it securely to the motor, using the screws or bolts provided. Use the washers provided to ensure that airfoils do not work loose during operation.

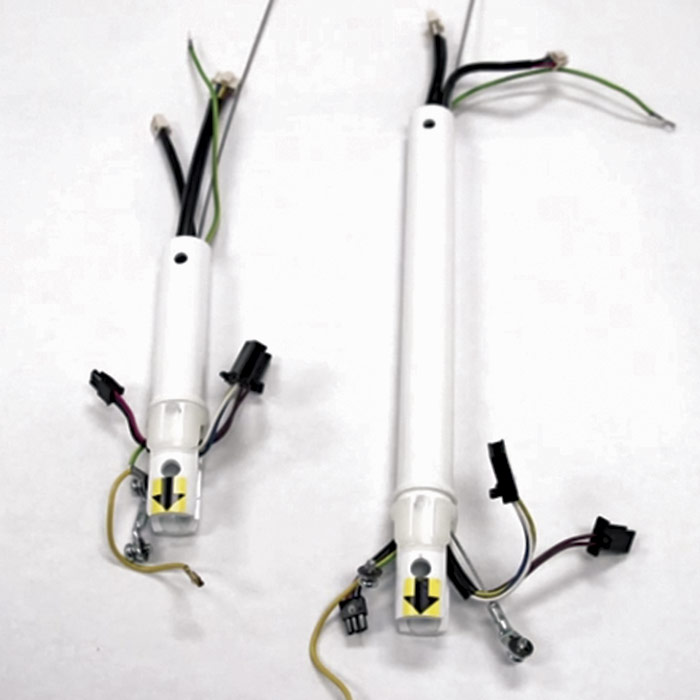
The fan’s downrod (support rod) is a hollow tube that runs from the ceiling bracket to the top of the motor unit and doubles as a conduit for the wiring that powers the fan and its light (if any). On older or economy-style fans, you may need to feed wires through the downrod, but our model’s downrod comes prewired, with its lower wires terminating in wiring harnesses that will snap into receptacles on the motor unit 3.

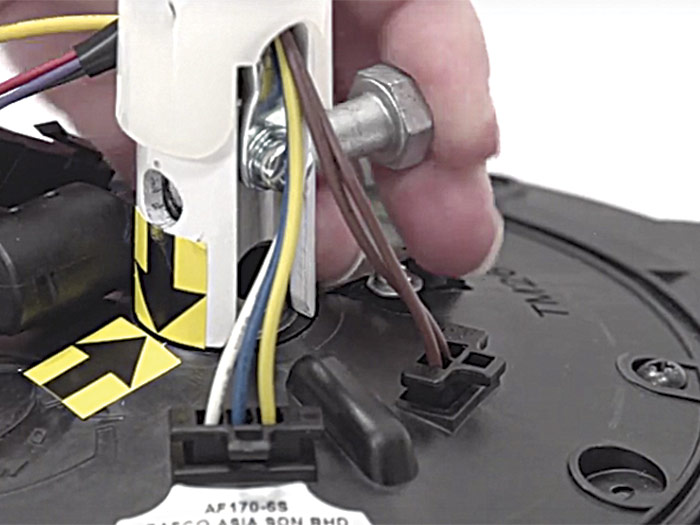
To attach the downrod, lower it onto the motor shaft so that the alignment marks on the downrod (here, arrows) line up to those on the shaft. This will align the bolt holes in the downrod and shaft. To join the two parts, insert the bolt provided 4 and secure it with a washer and locknut.

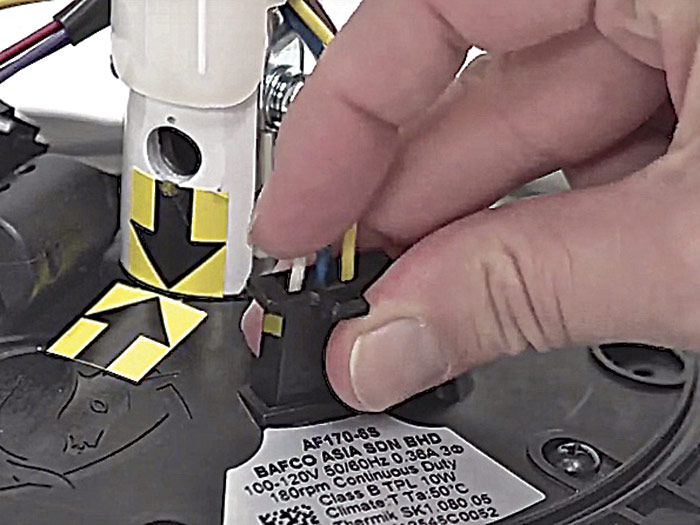
Next make electrical connections. Follow your installation guide, but typically an electrician will first connect the ground wire emerging from the downrod to a captive ground screw on the motor shaft 5. Then plug the wire harnesses into the receptacles on the motor. Finally, to remove slack, gently pull up on the wires coming out of the top of the downrod.

4  Align the downrod marks to those on the shaft, then join parts with the bolt provided.
4) Align the downrod marks to those on the shaft, then join parts with the bolt provided.

5  Here, a female ground connector attaches to a male connector on the motor.
5) Here, a female ground connector attaches to a male connector on the motor.


Cover connections on the motor unit

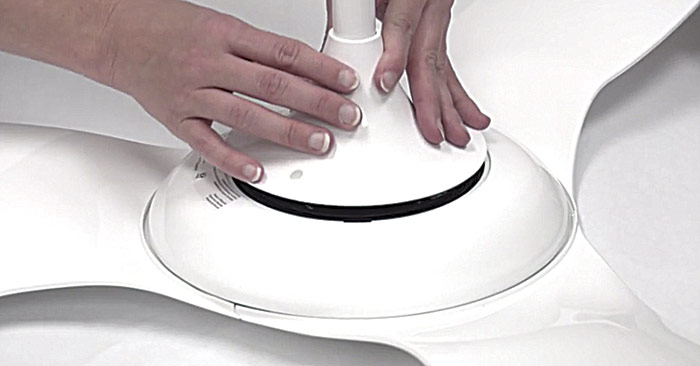
Once you have connected the ground wire and all wire harnesses, slide the cover down the downrod and secure it to the motor unit 6. If the cover has two pieces, first lower the larger ring and rotate it till it seats snugly atop the motor unit. Then lower the (upper) trim piece onto the cover ring. Secure the covers with the screws provided.

Note: After you install the cover(s) there may be a gap between the lower ring and the airfoils. This is a common detail on many fans that allows heat from the motor to dissipate. Check your installation guide to be sure.

6  Once all ground wires and wire harnesses are connected, slide the cover down and secure it to the motor unit.
6) Once all ground wires and wire harnesses are connected, slide the cover down and secure it to the motor unit.

Mounting the fan

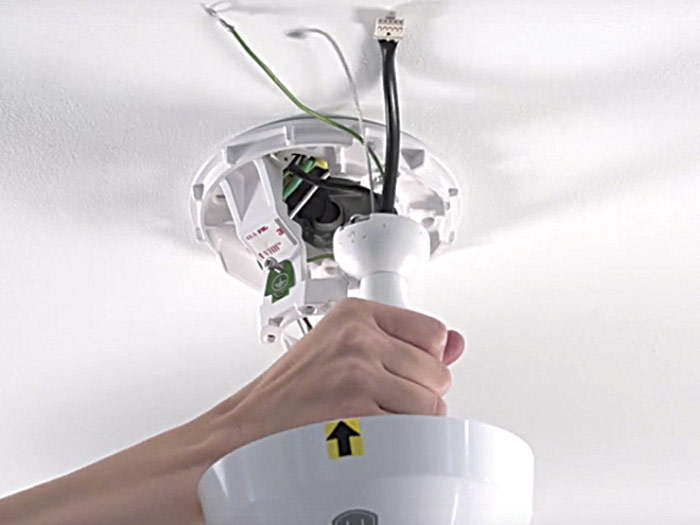
Before hanging your fan from the mounting bracket in the ceiling, it will be necessary to slide the upper wiring cover and the mounting ball onto the downrod—in that order. More advanced fans, such as the Haiku L Series, may also have an LED diffuser ring. If so, slide the diffuser ring onto the downrod first—but do not seat the ring in the wiring cover yet.

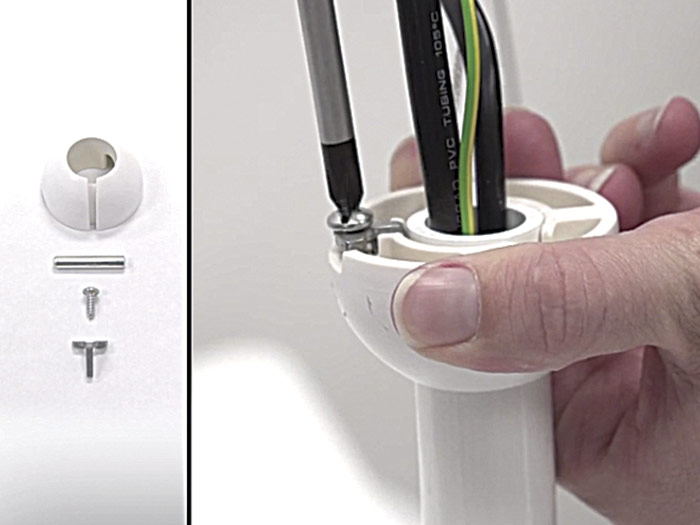
Now attach the mounting ball to the top of the downrod. Here again, details will vary. In our sequence, first slide a short steel pin through holes at the top of the downrod, then slide the mounting ball up till the ends of the pin seat in the inner slots of the ball. Insert the provided steel wedge into the mounting ball slot and tighten the screw to secure the parts and hold the mounting ball in place 7.

Now you’re ready to hang the fan in the mounting bracket. Align the slot in the mounting ball to the rib in the bracket, insert the mounting ball, and let it hang freely 8. Gently twist the downrod to make sure the mounting ball is fully seated.

7 Attach the mounting ball to the top of the downrod.
7) Attach the mounting ball to the top of the downrod.

8  Insert the mounting ball in the bracket, aligning the slot in the ball to the rib in the bracket.
8) Insert the mounting ball in the bracket, aligning the slot in the ball to the rib in the bracket.

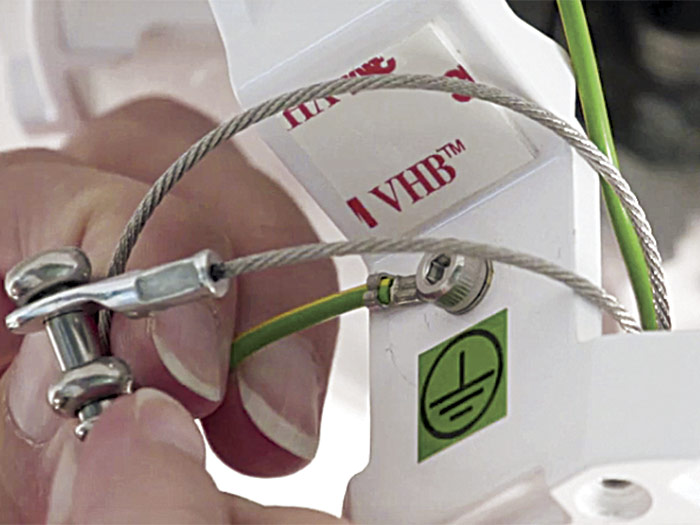
Thread the ground wire sticking out of the downrod through the mounting bracket and secure it to the captive screw on the outside of the bracket. If your fan also has a safety cable to prevent a fan’s disengaging from the mounting bracket, install it now 9. Note that some local building codes require that the safety cable be attached to a ceiling joist or to a metal brace mounted to two ceiling joists.

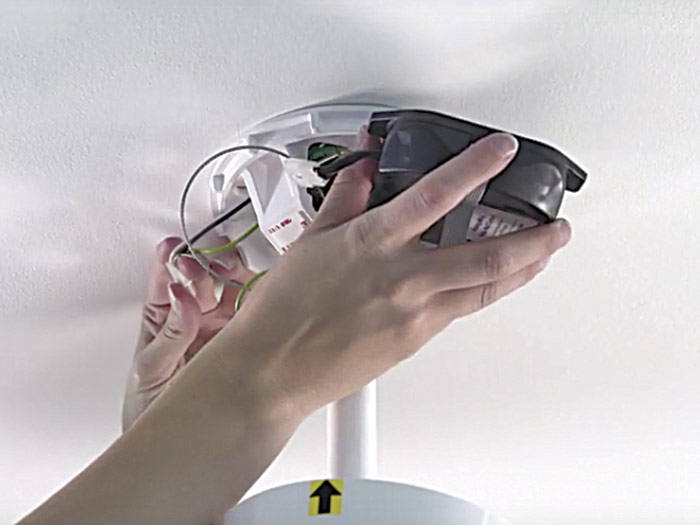
If your fan will be controlled by a wall unit, as the Haiku L Series fan is, insert its Wi-Fi module into the fan control box and slide it into the mounting bracket now 10. Be careful not to pinch the wires between the mounting bracket and the control box.

9  If the fan has a safety cable, attach it now to keep the mounting ball securely in the bracket.
9) If the fan has a safety cable, attach it now to keep the mounting ball securely in the bracket.

10 Slide the fan’s Wi-Fi module into the fan control box on the mounting bracket.
10) Slide the fan’s Wi-Fi module into the fan control box on the mounting bracket.

Snap the LED indicator into the gap in the mounting bracket. Then connect the wiring harnesses from the control box to the harnesses from the power supply in the outlet box. Last, connect the wire harnesses emerging from the top of the downrod to the corresponding receptacles on the control box.


Safety Alert: Although there are plastic ceiling boxes rated for fans, many installers won’t touch them. Spooked by the possibility of stripped screw holes and crashing fans, they insist on using a metal fan box.


Installing the wiring cover

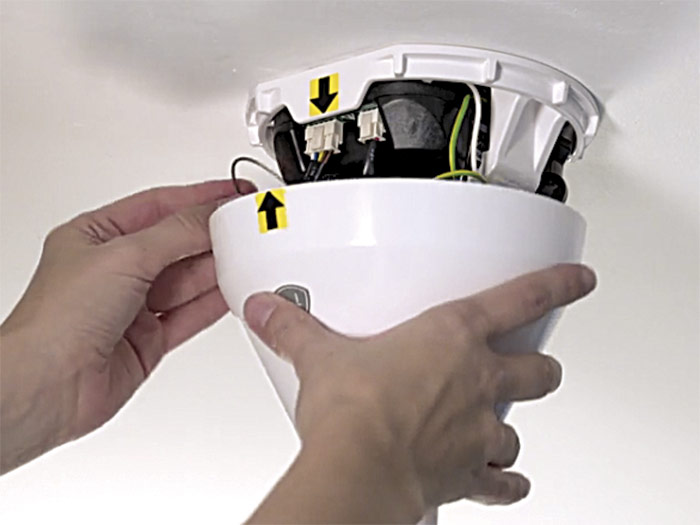
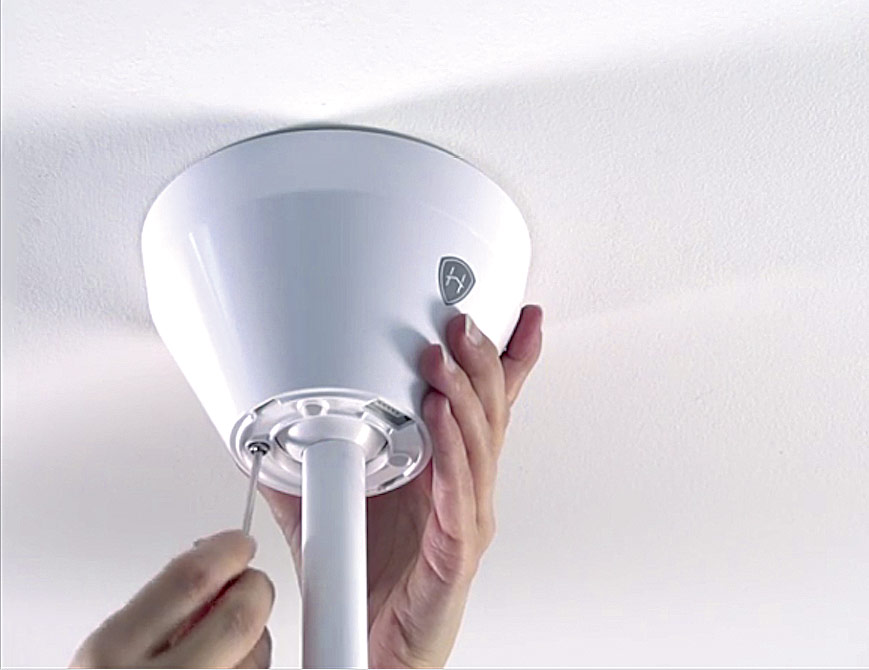
Aligning the arrows on the mounting bracket to those on the wiring cover, slide the cover up until it sits flush with the mounting bracket 11. After making sure all wiring is safely tucked inside the cover, screw it to the bracket 12. If your fan model has an LED diffuser ring, slide it up and plug it into the LED indicator receptacle, accessible through an opening in the underside of the cover. Snap the diffuser ring securely into place.

11 Slide the cover up until it sits flush with the mounting bracket.
11) Slide the cover up until it sits flush with the mounting bracket.

12 After making sure all wiring is safely tucked inside the cover, screw it to the bracket.
12) After making sure all wiring is safely tucked inside the cover, screw it to the bracket.

Restore power to the fan outlet box. Use the remote control to turn on the fan and test its various functions. If you also purchased a wall control, follow its instruction guide to set it up.


Wiring a Fan-Light Combination

Fans are frequently configured with both fans and lights. Running a 3-wire cable (12/3 with ground or 14/3 with ground) enables you to operate the fan and light separately. When a ceiling fan’s junction box is closer to the power source than to the switch box, as shown in the drawing above right, the switch is called a “back-fed switch.” Note: Because of code changes, back-fed switches are not suitable for new construction.

Wiring a Fan-Light Combination


Photo sequence courtesy of Haiku Home/Big Ass Solutions


Wiring Complete, 3rd Edition

Excerpted from Wiring Complete, 3rd Edition (The Taunton Press, 2017) by Michael Litchfield and Michael McAlister

Available in the Taunton Store and at Amazon.com.

Previous: Retrofitting a Ceiling Fan Next: Installing a Bathroom Fan

Guide

Wiring

Chapter

Lights and Fans

Sign up for eletters today and get the latest how-to from Fine Homebuilding, plus special offers.

Signing you up...

This site is protected by reCAPTCHA and the Google Privacy Policy and Terms of Service apply.
See all newsletters
See all newsletters

Log in or create an account to post a comment.

Sign up Log in

Become a member and get full access to FineHomebuilding.com

Wiring

Wiring

Trusted, code-compliant guidance from the pros for working safely on any wiring project

View Project Guide

View All Project Guides »

Become a member and get unlimited site access, including the Wiring Project Guide.

Start Free Trial

Working with Electricity
  • Basics
  • Safety
  • Troubleshooting and Upgrades
Tools and Materials
  • Electrical Tools
  • Electrical Boxes
  • Cables and Wires
Receptacles and Switches
  • Materials
  • Wiring Receptacles
  • Wiring Switches
Lights and Fans
  • Lighting Design
  • Installing Lights
  • Fans
Rough-In
  • Planning
  • Installing Electrical Boxes
  • Running Cable
  • Retrofit Work
  • Making Connections in Boxes
  • Electrical Conduit
Outdoor Wiring
  • Basics
  • Outlets
  • Installing Lighting
Panels and Subpanels
  • Understanding Panels
  • Circuits
  • Installing a Subpanel

Fine Home Building

Newsletter Sign-up

  • Fine Homebuilding

    Home building tips, offers, and expert advice in your inbox.

  • Green Building Advisor

    Building science and energy efficiency advice, plus special offers, in your inbox.

  • Old House Journal

    Repair, renovation, and restoration tips, plus special offers, in your inbox.

Signing you up...

This site is protected by reCAPTCHA and the Google Privacy Policy and Terms of Service apply.
See all newsletters

Follow

  • Fine Homebuilding

    Dig into cutting-edge approaches and decades of proven solutions with total access to our experts and tradespeople.

    Start Free Trial Now
    • Facebook
    • Instagram
    • X
    • LinkedIn
  • GBA Prime

    Get instant access to the latest developments in green building, research, and reports from the field.

    Start Free Trial Now
    • Facebook
    • YouTube
  • Old House Journal

    Learn how to restore, repair, update, and decorate your home.

    Subscribe Now
    • Facebook
    • Instagram
    • X

Membership & Magazine

  • Online Archive
  • Start Free Trial
  • Magazine Subscription
  • Magazine Renewal
  • Gift a Subscription
  • Customer Support
  • Privacy Preferences
  • About
  • Contact
  • Advertise
  • Careers
  • Terms of Use
  • Site Map
  • Do not sell or share my information
  • Privacy Policy
  • Accessibility
  • California Privacy Rights

© 2025 Active Interest Media. All rights reserved.

Fine Homebuilding receives a commission for items purchased through links on this site, including Amazon Associates and other affiliate advertising programs.

  • Home Group
  • Antique Trader
  • Arts & Crafts Homes
  • Bank Note Reporter
  • Cabin Life
  • Cuisine at Home
  • Fine Gardening
  • Fine Woodworking
  • Green Building Advisor
  • Garden Gate
  • Horticulture
  • Keep Craft Alive
  • Log Home Living
  • Military Trader/Vehicles
  • Numismatic News
  • Numismaster
  • Old Cars Weekly
  • Old House Journal
  • Period Homes
  • Popular Woodworking
  • Script
  • ShopNotes
  • Sports Collectors Digest
  • Threads
  • Timber Home Living
  • Traditional Building
  • Woodsmith
  • World Coin News
  • Writer's Digest
Active Interest Media logo
X
X
This is a dialog window which overlays the main content of the page. The modal window is a 'site map' of the most critical areas of the site. Pressing the Escape (ESC) button will close the modal and bring you back to where you were on the page.

Main Menu

  • How-To
  • Design
  • Tools & Materials
  • Video
  • Blogs
  • Forum
  • Project Guides
  • Reader Projects
  • Magazine
  • Members
  • FHB House

Podcasts

  • FHB Podcast
  • ProTalk

Webinars

  • Upcoming and On-Demand

Podcasts

  • FHB Podcast
  • ProTalk

Webinars

  • Upcoming and On-Demand

Popular Topics

  • Kitchens
  • Business
  • Bedrooms
  • Roofs
  • Architecture and Design
  • Green Building
  • Decks
  • Framing
  • Safety
  • Remodeling
  • Bathrooms
  • Windows
  • Tilework
  • Ceilings
  • HVAC

Magazine

  • Current Issue
  • Past Issues
  • Magazine Index
  • Subscribe
  • Online Archive
  • Author Guidelines

All Access

  • Member Home
  • Start Free Trial
  • Gift Membership

Online Learning

  • Courses
  • Project Guides
  • Reader Projects
  • Podcast

More

  • FHB Ambassadors
  • FHB House
  • Customer Support

Account

  • Log In
  • Join

Newsletter

Get home building tips, offers, and expert advice in your inbox

Signing you up...

This site is protected by reCAPTCHA and the Google Privacy Policy and Terms of Service apply.
See all newsletters
See all newsletters

Follow

  • X
  • YouTube
  • instagram
  • facebook
  • pinterest
  • Tiktok

Join All Access

Become a member and get instant access to thousands of videos, how-tos, tool reviews, and design features.

Start Your Free Trial

Subscribe

FHB Magazine

Start your subscription today and save up to 70%

Subscribe

This is your last free article.

Don't miss another expert tip or technique from building pros. Start your free trial today.

Start your FREE trial

Already a member? Log in

We hope you’ve enjoyed your free articles. To keep reading, become a member today.

Get complete site access to expert advice, how-to videos, Code Check, and more, plus the print magazine.

Start your FREE trial

Already a member? Log in

Privacy Policy Update

We use cookies, pixels, script and other tracking technologies to analyze and improve our service, to improve and personalize content, and for advertising to you. We also share information about your use of our site with third-party social media, advertising and analytics partners. You can view our Privacy Policy here and our Terms of Use here.

Cookies

Analytics

These cookies help us track site metrics to improve our sites and provide a better user experience.

Advertising/Social Media

These cookies are used to serve advertisements aligned with your interests.

Essential

These cookies are required to provide basic functions like page navigation and access to secure areas of the website.

Delete My Data

Delete all cookies and associated data