FHB Logo Facebook LinkedIn Email Pinterest Twitter X Instagram Tiktok YouTube Plus Icon Close Icon Navigation Search Icon Navigation Search Icon Arrow Down Icon Video Guide Icon Article Guide Icon Modal Close Icon Guide Search Icon Skip to content
Subscribe
Log In
  • How-To
  • Design
  • Tools & Materials
  • Restoration
  • Videos
  • Blogs
  • Forum
  • Magazine
  • Members
  • FHB House
  • Podcast
Log In

Fine Homebuilding Project Guides

Wiring

Guide Home
  • Working with Electricity
  • Tools and Materials
  • Receptacles and Switches
  • Lights and Fans
  • Rough-In
  • Outdoor Wiring
  • Panels and Subpanels
How-To

Rough-In Basics

A licensed electrician and a building pro break down how to get ready for rough-in wiring.

By Michael McAlister, Mike Litchfield
  • X
  • facebook
  • linkedin
  • pinterest
  • email
  • add to favorites Log in or Sign up to save your favorite articles
When running cable around doors and windows, find the easiest path. Consider drilling through top or bottom plates and running cable in the space above or below.

Wait until rough carpentry is complete before you begin rough-in wiring. Part of an electrician’s job is setting boxes so they’ll be flush to finished surfaces. Before an electrician starts working, modifications to the framing—such as furring out or planing down irregular studs and ceiling joists—must be complete.

Safety Alert

Make an emergency plan. It may be as simple as carrying a cell phone or having a friend close by—never do electrical work alone. Calling 911 is an obvious first step if an emergency occurs. On the job site, you should also post directions to the nearest hospital and a list of phone numbers of people to contact.


Where to start

Wait until the plumbers are gone. Waste pipes are large and often difficult to locate, which usually means a lot of drilling and cutting into studs and joists. Once the plumbing pipes are in place, you’ll clearly see what obstacles you face and will have more room to move around.

Check your plans often. If there’s not a table on-site where you can roll out your electrical plans, staple them to a stud—preferably at eye level so you can read them easily. Checking and rechecking the plans is particularly important if you’re not a professional electrician.

Be flexible. As you lay out devices, you’ll realize that not everything specified on the plans is possible; most plans are developed without knowing exactly what the framing looks like or where obstructions are. Do all the rough-in wiring with the power off.
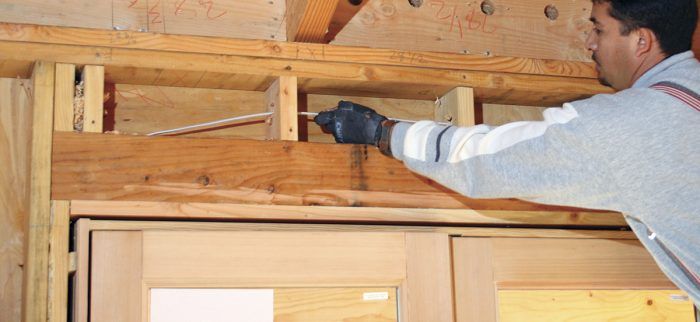
Organize your work

Perform one task at a time. Each task—such as setting boxes or drilling—requires a different set of tools. So once you have the tools out to do a given task, go around the room and complete all similar tasks. You’ll become more proficient as you go: You waste less time changing tools, and the job goes much faster. In general, the sequence of rough-in tasks looks like this:

  1. Walk the room with plans, marking outlet locations on walls and floor.
  2. Snap chalklines or shoot laser lines to pinpoint box elevations.
  3. Attach boxes to studs and ceiling joists.
  4. Drill holes for cable runs.
  5. Pull cable through holes and into boxes.
  6. Make up boxes—strip wire ends, splice grounds, splice current-carrying conductors, attach mud rings, and push wires into boxes.
  7. Rough-in inspection.

After the inspection, finish surfaces are installed. Then, at the trim-out or finish stage, wires are attached to the devices and fixtures.

Find the easiest path when running cable around doors and windows.
When running cable around doors and windows, find the easiest path. Consider drilling through top or bottom plates and running cable in the space above or below.

The rough-in inspection

At the rough-in stage, inspectors look for a few key signs of a job well done: cables properly sized for the loads they’ll carry; the requisite number and type of outlets specified by code; cables protected by nail plates as needed; neat, consistent work throughout the system; and, above all, ground wires spliced and, in metal boxes, secured to a ground screw. If grounds aren’t complete, you won’t pass the rough-in inspection.

Solid ground wire splices
During the rough-in inspection, inspectors demand solid ground-wire splices and, in metal boxes, a ground screw or clip that secures the ground wire.

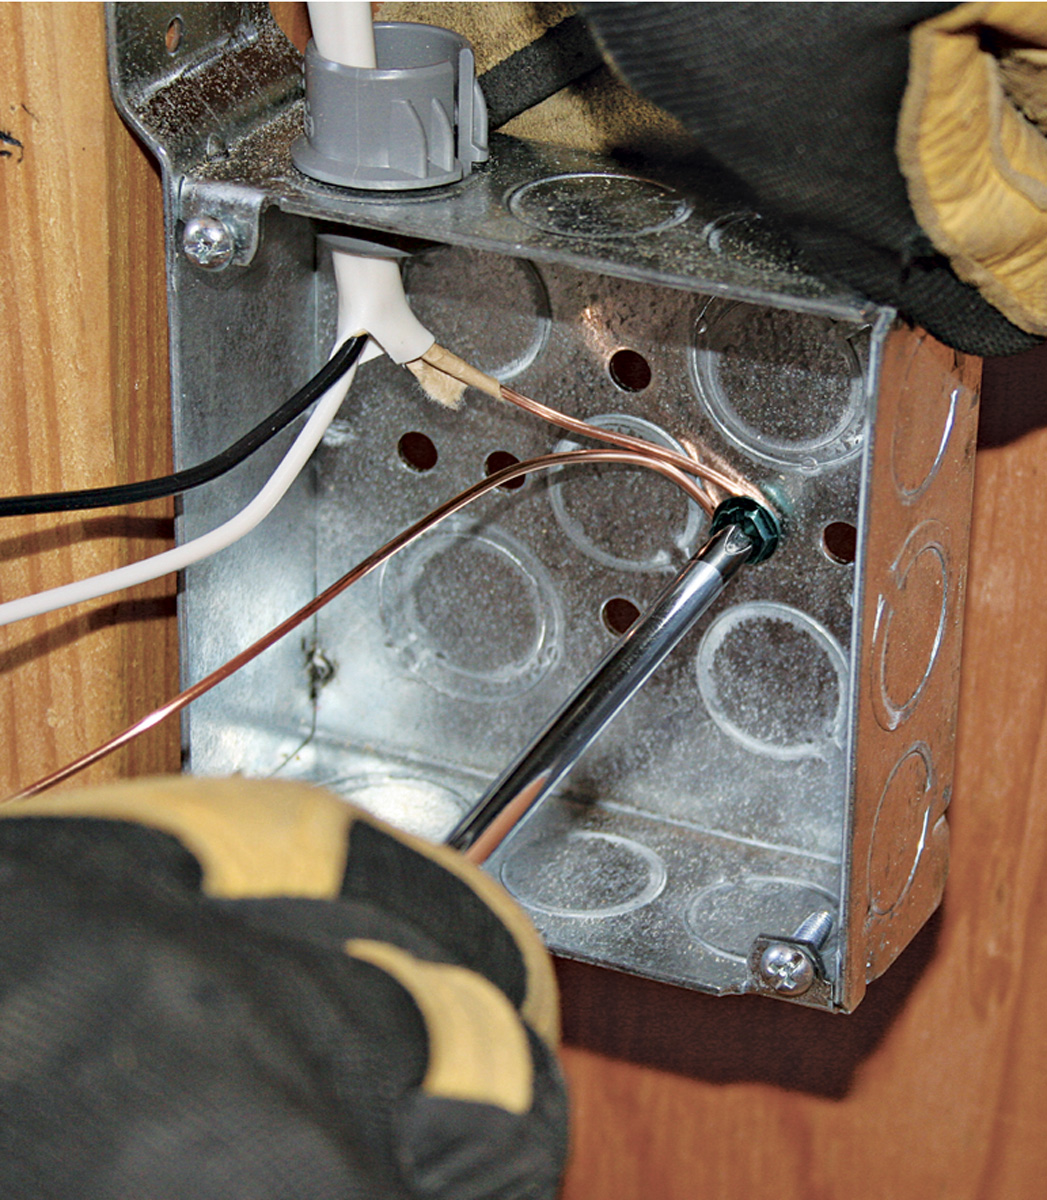
At this inspection, only grounds need to be spliced. But since you’ve got the tools out, it makes sense to splice neutrals and continuous hot wires (those not attached to switches).

When all splices are complete, carefully fold the wire groups into the box. When you come back to do the trim-out stage, simply pull the wires out of the box, connect wires to devices, and install devices and cover plates.

Connecting circuit wires to a main panel or subpanel is the very last step of an installation. As noted throughout this book, you should avoid handling energized cables or devices.

Remodel Wiring Safety Essentials

Before removing box covers or handling wires, turn off the power to the area and use a voltage tester to be sure it’s off.

Always use a voltage tester before touching any cables devices or fixtures.
Always use a voltage tester to test for power before touching cables, devices, or fixtures. Then follow up with a probe tester. Here, a noncontact tester detects voltage through cable insulation.

First remove the fuse or flip off the circuit breaker controlling the circuit and post a sign on the main panel warning people of work in progress. Better yet, if you’ve got circuit breakers, do as the pros do and install a breaker lockout so it will be impossible for anyone to turn it on. Breaker lockouts are available at electrical supply houses and most home centers.

Testing for power is particularly important in remodel wiring, because walls and ceilings often contain old cables that are energized. Always test the tester first—on an outlet you know is energized—to be sure the tester is working correctly. A noncontact tester is especially useful in remodel situations. Touch the tester tip to cable sheathing or wire insulation: If a cable, wire, or electrical device is energized, the tip will glow. Whenever possible, do a follow-up test with a probe tester.

Whatever tester you use, test it first on an outlet that you know is live to make sure the tester is working properly.


Wiring Complete, 3rd Edition

Excerpted from Wiring Complete, 3rd Edition (The Taunton Press, 2017) by Michael Litchfield and Michael McAlister

Available in the Taunton Store and at Amazon.com.


Previous: General Wiring Guidelines Next: Developing a Floor Plan

Guide

Wiring

Chapter

Rough-In

Sign up for eletters today and get the latest how-to from Fine Homebuilding, plus special offers.

Signing you up...

This site is protected by reCAPTCHA and the Google Privacy Policy and Terms of Service apply.
See all newsletters
See all newsletters

Log in or create an account to post a comment.

Sign up Log in

Become a member and get full access to FineHomebuilding.com

Wiring

Wiring

Trusted, code-compliant guidance from the pros for working safely on any wiring project

View Project Guide

View All Project Guides »

Become a member and get unlimited site access, including the Wiring Project Guide.

Start Free Trial

Working with Electricity
  • Basics
  • Safety
  • Troubleshooting and Upgrades
Tools and Materials
  • Electrical Tools
  • Electrical Boxes
  • Cables and Wires
Receptacles and Switches
  • Materials
  • Wiring Receptacles
  • Wiring Switches
Lights and Fans
  • Lighting Design
  • Installing Lights
  • Fans
Rough-In
  • Planning
  • Installing Electrical Boxes
  • Running Cable
  • Retrofit Work
  • Making Connections in Boxes
  • Electrical Conduit
Outdoor Wiring
  • Basics
  • Outlets
  • Installing Lighting
Panels and Subpanels
  • Understanding Panels
  • Circuits
  • Installing a Subpanel

Fine Home Building

Newsletter Sign-up

  • Fine Homebuilding

    Home building tips, offers, and expert advice in your inbox.

  • Green Building Advisor

    Building science and energy efficiency advice, plus special offers, in your inbox.

  • Old House Journal

    Repair, renovation, and restoration tips, plus special offers, in your inbox.

Signing you up...

This site is protected by reCAPTCHA and the Google Privacy Policy and Terms of Service apply.
See all newsletters

Follow

  • Fine Homebuilding

    Dig into cutting-edge approaches and decades of proven solutions with total access to our experts and tradespeople.

    Start Free Trial Now
    • Facebook
    • Instagram
    • X
    • LinkedIn
  • GBA Prime

    Get instant access to the latest developments in green building, research, and reports from the field.

    Start Free Trial Now
    • Facebook
    • YouTube
  • Old House Journal

    Learn how to restore, repair, update, and decorate your home.

    Subscribe Now
    • Facebook
    • Instagram
    • X

Membership & Magazine

  • Online Archive
  • Start Free Trial
  • Magazine Subscription
  • Magazine Renewal
  • Gift a Subscription
  • Customer Support
  • Privacy Preferences
  • About
  • Contact
  • Advertise
  • Careers
  • Terms of Use
  • Site Map
  • Do not sell or share my information
  • Privacy Policy
  • Accessibility
  • California Privacy Rights

© 2025 Active Interest Media. All rights reserved.

Fine Homebuilding receives a commission for items purchased through links on this site, including Amazon Associates and other affiliate advertising programs.

  • Home Group
  • Antique Trader
  • Arts & Crafts Homes
  • Bank Note Reporter
  • Cabin Life
  • Cuisine at Home
  • Fine Gardening
  • Fine Woodworking
  • Green Building Advisor
  • Garden Gate
  • Horticulture
  • Keep Craft Alive
  • Log Home Living
  • Military Trader/Vehicles
  • Numismatic News
  • Numismaster
  • Old Cars Weekly
  • Old House Journal
  • Period Homes
  • Popular Woodworking
  • Script
  • ShopNotes
  • Sports Collectors Digest
  • Threads
  • Timber Home Living
  • Traditional Building
  • Woodsmith
  • World Coin News
  • Writer's Digest
Active Interest Media logo
X
X
This is a dialog window which overlays the main content of the page. The modal window is a 'site map' of the most critical areas of the site. Pressing the Escape (ESC) button will close the modal and bring you back to where you were on the page.

Main Menu

  • How-To
  • Design
  • Tools & Materials
  • Video
  • Blogs
  • Forum
  • Project Guides
  • Reader Projects
  • Magazine
  • Members
  • FHB House

Podcasts

  • FHB Podcast
  • ProTalk

Webinars

  • Upcoming and On-Demand

Podcasts

  • FHB Podcast
  • ProTalk

Webinars

  • Upcoming and On-Demand

Popular Topics

  • Kitchens
  • Business
  • Bedrooms
  • Roofs
  • Architecture and Design
  • Green Building
  • Decks
  • Framing
  • Safety
  • Remodeling
  • Bathrooms
  • Windows
  • Tilework
  • Ceilings
  • HVAC

Magazine

  • Current Issue
  • Past Issues
  • Magazine Index
  • Subscribe
  • Online Archive
  • Author Guidelines

All Access

  • Member Home
  • Start Free Trial
  • Gift Membership

Online Learning

  • Courses
  • Project Guides
  • Reader Projects
  • Podcast

More

  • FHB Ambassadors
  • FHB House
  • Customer Support

Account

  • Log In
  • Join

Newsletter

Get home building tips, offers, and expert advice in your inbox

Signing you up...

This site is protected by reCAPTCHA and the Google Privacy Policy and Terms of Service apply.
See all newsletters
See all newsletters

Follow

  • X
  • YouTube
  • instagram
  • facebook
  • pinterest
  • Tiktok

Join All Access

Become a member and get instant access to thousands of videos, how-tos, tool reviews, and design features.

Start Your Free Trial

Subscribe

FHB Magazine

Start your subscription today and save up to 70%

Subscribe

This is your last free article.

Don't miss another expert tip or technique from building pros. Start your free trial today.

Start your FREE trial

Already a member? Log in

We hope you’ve enjoyed your free articles. To keep reading, become a member today.

Get complete site access to expert advice, how-to videos, Code Check, and more, plus the print magazine.

Start your FREE trial

Already a member? Log in

Privacy Policy Update

We use cookies, pixels, script and other tracking technologies to analyze and improve our service, to improve and personalize content, and for advertising to you. We also share information about your use of our site with third-party social media, advertising and analytics partners. You can view our Privacy Policy here and our Terms of Use here.

Cookies

Analytics

These cookies help us track site metrics to improve our sites and provide a better user experience.

Advertising/Social Media

These cookies are used to serve advertisements aligned with your interests.

Essential

These cookies are required to provide basic functions like page navigation and access to secure areas of the website.

Delete My Data

Delete all cookies and associated data