
A Slick Approach to Straightening Walls
String and springboards make it easy to get walls straight and the second floor off to a great start.
Synopsis: After the first-floor walls of a house are up, it’s time to make sure they are straight — before work begins on the second floor. In this book excerpt, Roe A. Osborn describes his one-man technique for straightening walls using string and springboards. The process begins with the use of a string to create a reference line. While there are several string options, a chalkline is an easy and handy choice. With the reference line set, springboards and kicker boards are set in place. Adjusting the kicker boards either up or down moves the springboard, which shifts the top plate in or out. When the wall is aligned and straight, drive a nail through the springboard into the kicker to lock it in place. Finally, double-check the reference line to make sure the wall is straight. If the wall is aligned, it’s safe to lock it in place.
The framer’s version of the classic chicken-or-egg question relates to straightening walls. Is straightening the final step in first-floor wall construction or the start of the second-floor deck? I think it’s the latter, and here’s why. Let’s say you finish framing the walls on a Thursday. Friday it rains, so you don’t work. You’re off for the weekend, and Monday is a holiday. If you’d straightened the walls on Thursday, they would have had four days to move around in the wind and weather, and you’d probably have to tweak them again before framing the floor above. The floor framing locks in your straightening efforts, so that’s why I associate straightening walls with framing the second floor.
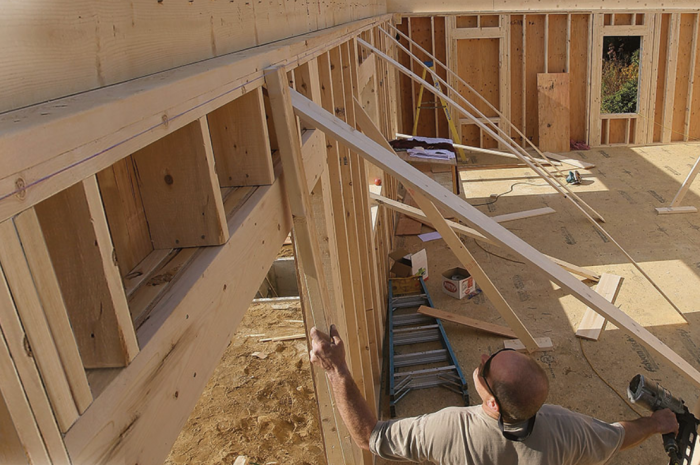
The project shown here is a good illustration of how to straighten walls. Built to engineers’ specs that satisfy the new 110-mph wind-zone requirement, this framing is much beefier than normal, and therefore a little tougher to push back into a straight line. Still, with this technique, much of the work is a one-person job.
 Create a reference line with string
Over the years, I’ve seen lots of methods, special tools, and jigs for straightening walls, but in my opinion, the springboard method I learned when I first started building houses still works best. It’s a two-step process that starts with stringing the walls. Begin by nailing 2x blocks to the inside corners of all four walls. Then drive two additional nails partway into each block. These nails act as anchor pegs for the string. Many framers use strong mason’s twine for stringing because it can be stretched extremely taut. A chalkline can work just as well, though, and it has the advantage of having a hook on the end that can slip over the bottom nail on one block.
Tie or hook the string to the bottom nail, and lead it over the top nail. Then stretch the string as tight as possible to the block at the other end of the wall. At this end, lead the string over the top nail, pull it tight, and wrap it several times around the bottom nail. Then wrap the string back over itself on the nail to keep it tight. The trick here is not to tie a knot that might have to be untied later. You now have a straight reference line running the length of the wall.
Let kicker boards do the work
Remove the temporary bracing used to hold the wall upright. (Unless conditions are very windy, even a fairly long wall should stand on its own for now.) The trick is to push the wall in or out to make it perfectly parallel to the string, which is where the springboards come in. For springboard material, I use 12-ft. 1×8 rough-sawn pine boards because they’re flexible, strong, and inexpensive. Also, they come in handy around the job site after they’ve fulfilled their springing duties. Taller walls require longer boards.
Walls are usually straightened one at a time, and it really doesn’t matter which one is first. Choose a wall, and position springboards every 8 ft. or so along the wall. Long headers at rough openings for windows and doors may require a springboard at each end. Also, be conscious of any hinge points, such as sheathing joints, that would make the wall bend. This is particularly important with tall walls.
Starting at one end of the wall, nail one end of a springboard to the underside of the top plate. Secure the other end to the deck, giving the board a slight downward bend as you nail it. This actually pushes on the wall, which means you’ll likely be letting in the wall later.
Now nail the bottom of a 4-ft.-long 1×8 kicker to the deck below the springboard. Bring the top of the kicker snug against the springboard, but don’t nail that end yet. Pushing the kicker board in or out changes the amount of arc in the springboard, which in turn moves the wall in or out.
Once the springboards are in place, you can begin to straighten the wall. Slide a 2x gauge block up to the string, then push on the kicker until the gauge block just slips under the string. Then drive nails through the springboard and into the end of the kicker to hold the wall straight.
After working down the length of one wall, sight the string and plate for a final check. This is your last opportunity to make sure the walls are dead straight before locking them in with the second-floor framing. The slightest deviation in the wall can turn into a major wave once the exterior siding and trim are applied.
 From Fine Homebuilding #214
To view the entire article, please click the View PDF button below.
Fine Homebuilding Recommended Products
Fine Homebuilding receives a commission for items purchased through links on this site, including Amazon Associates and other affiliate advertising programs.

Speed Square
Short Blade Chisel

Bluetooth Earmuffs
