
Advanced Wall Framing
Residential designer and carpenter Michael Maines describes framing details that can make a home more efficient to build and to heat.
The development of platform framing, the system for framing houses that was developed in the 1940’s and is still in general use today, was a big factor in being able to frame houses quickly in the post-WWII building boom. Compared to timber framing, with its bulky members and complex joinery, or balloon framing, which required long studs and tedious notching (not to mention stud bays that became chimneys in a house fire), platform framing had many advantages. With very few changes, anyone who learned to frame in the 1940’s, through the 1980’s (including me), or the 2000’s, and in most places still today, all learned essentially the same system.
I imagine framers of the future will chuckle when they see certain techniques from the platform-framed era, the same way I chuckle when I see a timber-framed element make its way into a balloon-framed house, such as a solid corner post–a vestige of an old-timer running the crew who hadn’t yet fully adapted to the “modern” way to build. Old habits die hard.
If you have torn apart as many old houses as I have, you know that most of what we build now is overkill. Sometimes it’s amazing to see how little it takes to hold a house up for decades. Not that I advocate for building dangerously, but I realize that not everyone has had the opportunity to see inside a wide range of houses built from the 1700’s through today, and all the changes that occurred over the years, and the things that stayed the same.
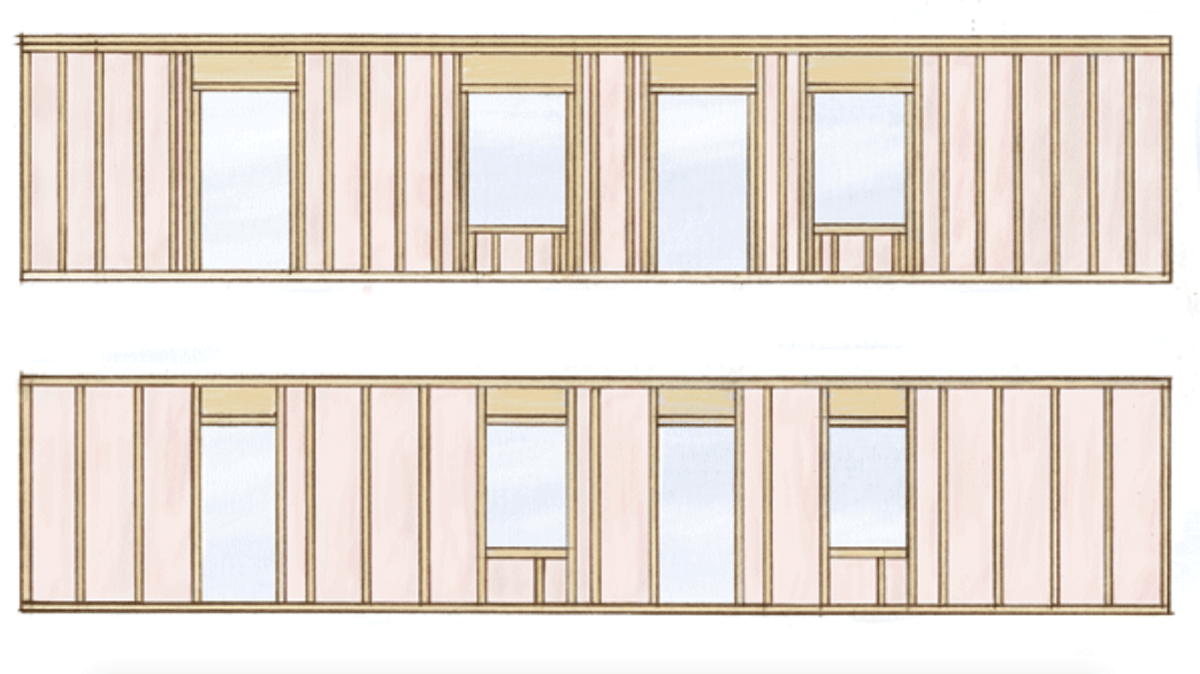
For example: cripple studs at both ends of every window sill used to make sense, when they were hand-nailed in place and stud layout could be random. Since the advent of nail guns, framing walls flat on the deck, and using sheet goods with standard dimensions, these cripple studs have not been necessary. As long as there is a cripple stud on layout, “cripple jacks” add nothing except reduced R-value in the wall assembly. (Side note, at some point it will probably become politically incorrect to use the term “cripple,” and for good reason, but for now it’s the standard term for that framing member.)
Doubling up the rough sill at windows is another example. Doing so serves no purpose other than providing additional nailing. At least that’s the only viable reason I hear people using to defend the practice. (To be fair, in my early days of designing having the extra sill was handy on a couple of projects when the windows I had spec’d were too tall for the rough openings; removing the top sill was a convenient solution. A better solution would have been to get the R.O. correct.) The doubled sill is not necessary for any structural reason. A single sill can easily support the weight of a window that is not supported by flanges or other methods, unless the window is enormous. If your design really requires continuous nailing at the rough sill height, go ahead and add material. I can’t think of a situation where this would be the case, though, so if it’s not needed for any reason other than habit and tradition, why waste the material?
Headers are the most common location for paint cracks, and for good reason. Builders seem to take pride in how big they can make their headers. The amount of weight actually bearing on most window headers is not that large, and when large headers shrink they cause cracking in the finish, so why not “right-size” the header for the situation? In fact, at least for first-floor walls in two-story homes, there is a continuous rim joist not far above the window, which happens, in most cases, to be able to span the average window opening just fin. In old timber-framed homes like mine (built in 1830), the builders understood that the girt supporting the floor joists carried all the load, and that all they needed at the window opening was something to stiffen the sheathing and to provide a place for nailing. In fact, many times I’ve seen no header at all, with just the sheathing spanning the top of the opening, with no ill effects. I still recommend running a horizontal 2x across the opening; the sheathing does need to be well-nailed around any openings to resist horizontal loads without buckling, but that’s all that’s necessary. “But nailing….” Fine, if you have a built-up header on the interior or exterior that requires continuous nailing, then add some material to make nailing easier. I’ve installed a lot of trim, including some fancy head trim, and can’t think of time where having lots of nailing saved anything more than my pulling out a stud finder.
Good framers take pride in stacking framing members. At least that’s how I learned to do it, with everything 16” on center. It’s stronger, makes it easier to run MEP (mechanical, electrical and plumbing), drywall and trim, and it just looks neater and more professional. For the FHB House we are using 24” o.c. spacing for everything, which should probably be a blog post subject on its own; on other projects I often use a mix of 16” o.c. and 24” o.c., which makes it impossible to stack all members, but even then I like to see the members that can be, stacked.
There are a few good reasons to use double top plates, but they are not always necessary. One reason is that a doubled top plate happens to be strong enough to allow framing members to be offset; for example, a floor joist can land over the center of a stud bay and not deflect excessively. When the framing is stacked, as mentioned above, there is no need for the top plate to also act as a beam. Sometimes the top plate needs to be oversized to act as a horizontal beam; on a couple of occasions I have used oversized top plates to resist rafter thrust. In the vast majority of cases, though, the top plate is not expected to handle any horizontal load; it’s transferred to other parts of the framing. “Tying the wall together” is a reason I hear a lot. OK, just how much tying together is really necessary once the rim joist is nailed directly above, ideally spanning the joint, and sheathing (and sometimes metal straps) are added as required by code? Is this a place anyone has ever seen or heard of a building actually failing? Not me. Finally, straightening the plate. The idea is that the lumber is not straight and doubling it will make it straight and/or easier to straighten with wall jacks. If your plate material is reasonably straight, and it should be, just use an extra wall brace or two (if necessary) until the rim joist is nailed, and boom, the wall is straight. Even better, use engineered lumber for the plates and they will be just about perfectly straight on their own. If your lumber is so wavy that you really need a second plate to make it usable, I may be going out on a limb but you might want to look for a better source of lumber.
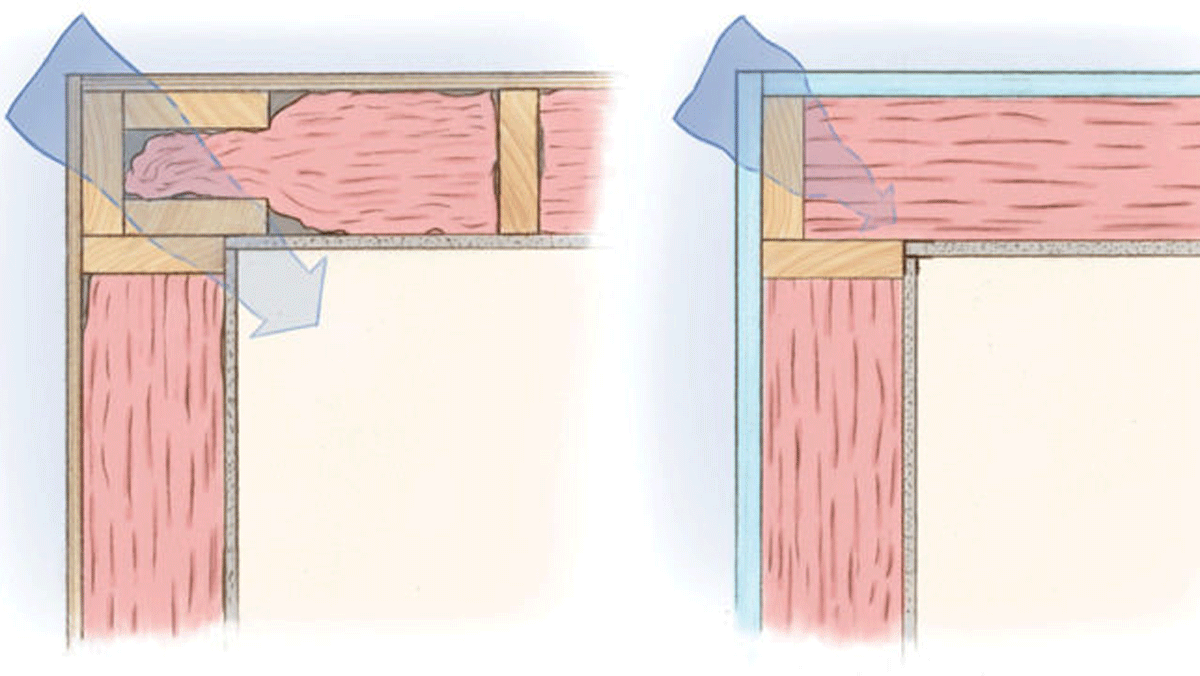
Outside corners built of a solid assemblage of 2x’s are rarely needed for structural reasons. (An exception would be if you have window or door openings pushed tight to the corner.) Aside from the timber framers out there, we’re not using knee braces anymore to resist horizontal forces, and plywood or osb sheathing does a great job as a shear diaphragm, so the extra “meat” in the corner is largely a leftover from timber-framing days. Studs are very effective at picking up loads from above, so we don’t need heavy corner posts to support vertical loads. The argument again comes down to nailing. There is almost always a way to arrange corner studs to minimize material and thermal bridging, without a meaningful loss in strength. If you need multiple members to create a straight corner, again, I might suggest finding better lumber.
When you understand what each piece of framing is doing and why it is there, or you understand which pieces are structurally redundant, it’s hard to see the value in keeping extra material in the frame except out of habit. If your measure of quality is how much lumber you have used, then why not just build log homes? Nothing against log homes (except that they are a terrible way to build, in my opinion—my mom owns one and it’s a nightmare to heat and maintain) but they really pack the wood in there. Or go with a timber frame, where you can appreciate the beauty of all that wood. Dry framing lumber has an insulating value of only about R-1.25/in, and framing can take up to 15-20% of the total wall area, so it’s worth considering ways to reduce lumber use. Platform framing was one of the most important developments in building of the 20th century, as balloon framing was in the century before. Now it’s time to take a step toward efficiency of material and energy use, and get rid of the parts and pieces that are there mainly out of habit.
The FHB House is in a high-wind zone and we were required to use a structural engineer, so there is more wood in it than Mike Guertin or I had hoped, but we still fought to keep it to only the pieces we really needed.
Fine Homebuilding Recommended Products
Fine Homebuilding receives a commission for items purchased through links on this site, including Amazon Associates and other affiliate advertising programs.

Magoog Tall Stair Gauges
Musings of an Energy Nerd: Toward an Energy-Efficient Home
Portable Wall Jack

View Comments
Is there a comprehensive resource you could recommend for a more in-depth look at advanced framing?
I would check out Mike Guertin's book on framing: http://www.tauntonstore.com/precision-framing-mike-guertin-070570.html.