FHB Logo Facebook LinkedIn Email Pinterest Twitter X Instagram Tiktok YouTube Plus Icon Close Icon Navigation Search Icon Navigation Search Icon Arrow Down Icon Video Guide Icon Article Guide Icon Modal Close Icon Guide Search Icon Skip to content
Subscribe
Log In
  • How-To
  • Design
  • Tools & Materials
  • Restoration
  • Videos
  • Blogs
  • Forum
  • Magazine
  • Members
  • FHB House
  • Podcast
Log In

Fine Homebuilding Project Guides

Framing

Guide Home
  • Introduction to Framing
  • Framing Tools, Techniques, and Materials
  • Framing Floors
  • Framing Walls
  • Framing Stairs
  • Framing Roofs
  • Efficient Framing Methods
  • Timber Framing

Choosing and Adjusting a Circular Saw

Beyond the choice of sidewinder or worm-drive, there are many other saw and sawblade features to consider.

By Roe Osborn
  • X
  • facebook
  • linkedin
  • pinterest
  • email
  • add to favorites Log in or Sign up to save your favorite articles
A circular saw is a framer’s workhorse. It is lightweight, easy to use, and can be locked at an angle for bevel cuts.

My earliest recollection of carpentry is of my dad finishing the attic in our rambling Rhode Island ranch house. He used only hand tools and was a sucker for unfinished lauan mahogany paneling. No drywall for him, no sirree. Looking back, I can remember him sweating as he sawed 2×s by hand.

I bought my first circular saw when I was in college to help with building display bases for sculptures. It worked okay. But in 1980, I decided to make my living as a carpenter, and that’s when I bought my first professional-quality circular saw. I still have that saw, and it still works well; it just feels good in my hands. If you’re planning to frame your own home, invest in a good saw—it will pay dividends in accuracy and enjoyment.

Sidewinders versus Worm-Drive Saws

My circular saw is the type known as a sidewinder. The most common version uses a 7¼-in.-dia. blade and is fairly light in weight. But there are other saws. In the late 1980s, I worked on a couple of timber-frame projects. I needed a saw with much more torque to chew through the timbers, so I bought an 8¼-in. worm-drive saw that could cut through red oak at a maximum depth without bogging down. It was years before I realized that carpenters tend to differ in their saw preferences depending on where they live.

West Coast framers use worm-drive saws almost exclusively and consider sidewinders to be toys. The torque of a worm-drive makes it easy to gang-cut stacked lumber, a faster technique than cutting boards one by one. But using a worm-drive all day long is hard work because the tool is just plain heavy. Framers skilled at using a worm-drive saw can use that weight to their advantage when cutting, but veteran wormies will be the ones wearing forearm braces down the road. East Coast framers, on the other hand, prefer sidewinders.

Saw manufacturers seem to change their circular saws like most people change socks. There always seems to be a new gadget or gimmick to make the newest saw a little better than last year’s model. Look beyond the gimmicks when choosing your saw. Read tool reviews in trade magazines and online to see which tools are recommended for longevity, ease of use, and safety. Then go to a tool dealer that carries several different brands. Most professional tool dealers will let you try out a saw at the store.

Be aware of the weight, the size of the handle, and the ease with which you can access the trigger. I know guys with big hands who can’t get their fingers on the trigger of some saws, especially with gloves on. Check to see how easily you can hold the saw while holding the guard in a raised position, a maneuver you must be able to do when cutting steep angles. If you have small hands, difficulty with this feature can be a deal breaker. By the way, you should never remove the guard or clamp it in a permanent retracted position.

After that, look at features such as cord length and amperage. At this point, I would not be tempted to buy a cordless circular saw for constant use because of battery life. A longer cord is helpful, but 6 ft. is usually more than enough. Many companies tout the amperage of the saw motors as a selling point. But if you run the saw off long extension cords, higher amp motors are more likely to trip the job-site circuit.

A Good Blade Is a Must

To make any circular saw work at its best, fit it with a good sharp blade. And make sure the blade you get is for framing, not finish work. Most manufacturers label their blades as such. Framing blades typically have 24 teeth set at a positive hook angle for fast, aggressive cutting. You might think that more teeth make a better blade, but when it comes to cutting framing lumber, extra teeth just slow things down.

Most framing blades for circular saws are thin-kerf blades, meaning that the width of the teeth is relatively narrow. A thin-kerf blade removes less wood so it cuts more quickly, an advantage in framing. However, thin-kerf blades may not be the best choice for more precise finish work, where speed is less important than a smooth cut.

sharp blade for saw
Good cuts start with good blades. These blades are designed specifically for framing work. They have thin-kerf, aggressive carbide teeth. Always keep a sharp blade in your saw for fast, accurate, and safe cuts.

Steel sawteeth were once common, but these days hardly anyone bothers with them. The best blades have a carbide tip on each tooth that stays sharp far longer than steel. In the course of framing a moderate-size house, you can expect to run through four to six good blades. Carbide chips if it hits something hard, such as an embedded nail or screw, and even carbide wears down eventually. When you feel yourself having to apply a lot of pressure to keep the saw moving through a board, or if the saw starts to bog down during cuts or consistently pulls to right or left, stop and put in a new blade. If a blade is dull but the carbide teeth are still good, I send it out to be resharpened, but always have a couple of sharp blades on hand to replace it.

Most carbide-tooth blades meet their demise when the carbide on one or more teeth chips or breaks off completely. There are outfits that can recarbide teeth or machine all the teeth down to match a chipped tooth, but those options typically cost more than the blade is worth.

Basic Saw Adjustments

One of the nice features of a circular saw is that relatively few adjustments are needed in the course of a day. But those few adjustments are critical for safety and performance, so practice them a bit before you tackle a project.

Changing a blade The blade in a circular saw is always mounted so the teeth face toward the front underside of the saw’s table. In that configuration, the action of the blade pushes the stock toward the base. Every saw has an arrow (usually on the guard) to indicate the proper direction of the teeth.

When changing the blade, always unplug the saw before you start. Most saws have a shaft lock that keeps the blade from turning as you loosen or tighten the bolt that holds it in place. Engage the shaft lock, then loosen the bolt carefully. Always make sure the saw baseplate is sitting securely on a flat surface and always push the wrench down and away from the  n in the opposite direction of the blade rotation, and every saw I know has the blade direction stamped on the housing as a reminder of this.

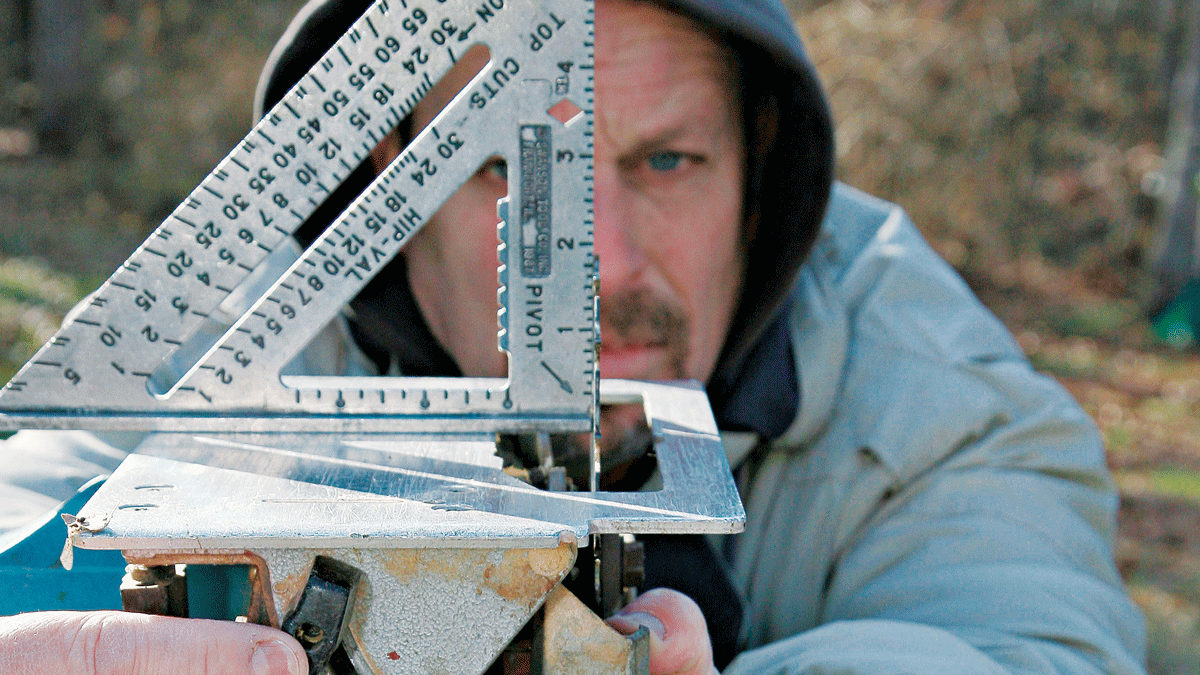
Squaring the blade to the saw table One last check I always make before starting a cut is to make sure that the blade is perpendicular to the saw’s baseplate. If the blade is tilted even slightly one way or the other, your cuts won’t be square and the joints won’t be tight.

To square the blade, first unplug the saw and then adjust the cutting depth so the blade is at its lowest (most exposed) position. Turn the saw upside down, retract the blade guard, and rest a triangular square against the blade as shown in the top photo on the facing page. If there’s a light background behind the saw, you’ll easily see any gap between the blade and the square. Adjust the angle of the baseplate until the gap disappears. When the blade is set, make a test cut and check to make sure that it’s square. Many saws have a set screw or a stop that lets you return the blade to exactly 90 degrees after you’ve cut at an angle. Once you’ve established that the blade is square, set the stop so that you don’t have to square the blade every time you change cutting angles.

Person using triangular square against blade
To set the blade square to the baseplate, place a triangular square against the blade and then look for gaps between them.

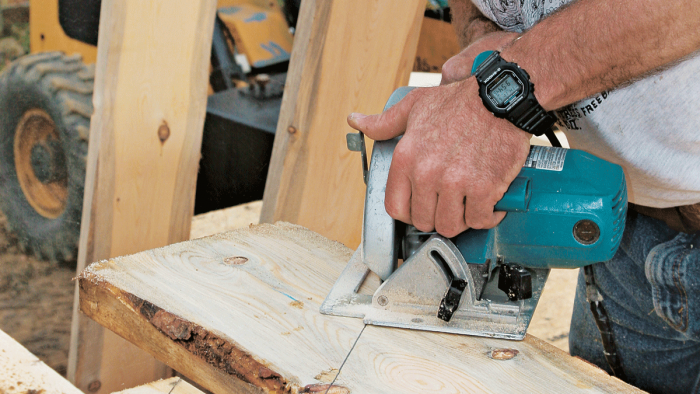
Setting the blade depth Circular saws cut more smoothly and safely when the depth of the blade is set just slightly greater (about ¼ in.) than the thickness of the stock. If too much blade is exposed below the stock, you just might cut through more than you had in mind. But an overexposed blade also increases the chance that the saw will bind and kick back at you (see “Preventing Kickback”). Kickback is a hazard created when the blade of a circular saw twists or gets pinched in the midst of a cut. When kickback occurs, the saw jerks away from the work with such a sudden and violent force that you lose control of the saw before the blade has time to stop. You can imagine the consequences.

To provide an extra measure of protection against kickback, always position yourself beside the saw as you cut; never stand directly behind it.

The easiest way to set the blade depth is to place the saw directly on the stock with the guard pulled up, so that the blade is exposed alongside the stock. Next, release the lever that locks the height adjustment and lower the blade until the proper amount is exposed. Tighten the lever, and you’re almost ready to start cutting.

Preventing Kickback

  • Whenever you crosscut with a circular saw, support the board so that the saw kerf won’t close up as you make your cut and pinch the blade.
  • If the board is supported on either side of the cut, keep the board as straight as possible until you’ve completed the cut.
  • If the board is supported to one side of the cut, make sure the waste can fall away cleanly after you’ve cut through.
  • Make sure the blade is set to the proper depth and operate the saw while standing to one side of the saw, not directly behind it.
  • Make sure the work is held securely at all times so it doesn’t shift as you cut, twisting the blade into the wood.
  • If necessary, use clamps to secure small pieces while they’re being cut.

Fine Homebuilding Recommended Products

Fine Homebuilding receives a commission for items purchased through links on this site, including Amazon Associates and other affiliate advertising programs.

Magoog Tall Stair Gauges

These are a must-have when laying out stairs with a framing square. They attach easily and save time, especially on long or multiple stringers.
Buy at Amazon

Stabila Extendable Plate to Plate Level

This level raises the bar for accuracy and quality. The extensions are designed to contact and plumb from bottom to top plates, avoiding studs that may be bowed.
Buy at Amazon

Speed Square

When it comes to framing, it doesn’t get much more fundamental than a speed square — and with its sturdy metal build, Swanson’s will not let you down. Some of our team members have had theirs for 20 years.
Buy at Amazon
Previous: How it Works: Nails Next: Metabo/Hitachi Worm Drive Circular Saw

Guide

Framing

Chapter

Framing Tools, Techniques, and Materials

Sign up for eletters today and get the latest how-to from Fine Homebuilding, plus special offers.

Signing you up...

This site is protected by reCAPTCHA and the Google Privacy Policy and Terms of Service apply.
See all newsletters
See all newsletters

Log in or create an account to post a comment.

Sign up Log in

Become a member and get full access to FineHomebuilding.com

Framing

Framing

Trusted, in-depth guidance from the pros for framing a durable, code-compliant house

View Project Guide

View All Project Guides »

Become a member and get unlimited site access, including the Framing Project Guide.

Start Free Trial

Introduction to Framing
  • House Framing Concepts, Tips, and More
Framing Tools, Techniques, and Materials
  • Tools
  • Techniques
  • Framing Lumber
  • Steel
Framing Floors
  • Floor Framing
  • Engineered Floors
  • Floor Sheathing
Framing Walls
  • Wall Framing Basics
  • Layout
  • Wall Assembly
  • Raising and Straightening Walls
  • Framing Rough Openings
  • Blocking
Framing Stairs
  • Stair Layout
  • Building Stairs
Framing Roofs
  • Roof-Framing Basics
  • Roof Design
  • Laying Out and Cutting Rafters
  • Framing Valleys
  • Working with Trusses
  • Dormers
  • Special Situations
Efficient Framing Methods
  • Advanced Framing
  • Double-Stud Walls
Timber Framing
  • Timber-Frame Construction
  • Timber-Frame Design

Fine Home Building

Newsletter Sign-up

  • Fine Homebuilding

    Home building tips, offers, and expert advice in your inbox.

  • Green Building Advisor

    Building science and energy efficiency advice, plus special offers, in your inbox.

  • Old House Journal

    Repair, renovation, and restoration tips, plus special offers, in your inbox.

Signing you up...

This site is protected by reCAPTCHA and the Google Privacy Policy and Terms of Service apply.
See all newsletters

Follow

  • Fine Homebuilding

    Dig into cutting-edge approaches and decades of proven solutions with total access to our experts and tradespeople.

    Start Free Trial Now
    • Facebook
    • Instagram
    • X
    • LinkedIn
  • GBA Prime

    Get instant access to the latest developments in green building, research, and reports from the field.

    Start Free Trial Now
    • Facebook
    • YouTube
  • Old House Journal

    Learn how to restore, repair, update, and decorate your home.

    Subscribe Now
    • Facebook
    • Instagram
    • X

Membership & Magazine

  • Online Archive
  • Start Free Trial
  • Magazine Subscription
  • Magazine Renewal
  • Gift a Subscription
  • Customer Support
  • Privacy Preferences
  • About
  • Contact
  • Advertise
  • Careers
  • Terms of Use
  • Site Map
  • Do not sell or share my information
  • Privacy Policy
  • Accessibility
  • California Privacy Rights

© 2025 Active Interest Media. All rights reserved.

Fine Homebuilding receives a commission for items purchased through links on this site, including Amazon Associates and other affiliate advertising programs.

  • Home Group
  • Antique Trader
  • Arts & Crafts Homes
  • Bank Note Reporter
  • Cabin Life
  • Cuisine at Home
  • Fine Gardening
  • Fine Woodworking
  • Green Building Advisor
  • Garden Gate
  • Horticulture
  • Keep Craft Alive
  • Log Home Living
  • Military Trader/Vehicles
  • Numismatic News
  • Numismaster
  • Old Cars Weekly
  • Old House Journal
  • Period Homes
  • Popular Woodworking
  • Script
  • ShopNotes
  • Sports Collectors Digest
  • Threads
  • Timber Home Living
  • Traditional Building
  • Woodsmith
  • World Coin News
  • Writer's Digest
Active Interest Media logo
X
X
This is a dialog window which overlays the main content of the page. The modal window is a 'site map' of the most critical areas of the site. Pressing the Escape (ESC) button will close the modal and bring you back to where you were on the page.

Main Menu

  • How-To
  • Design
  • Tools & Materials
  • Video
  • Blogs
  • Forum
  • Project Guides
  • Reader Projects
  • Magazine
  • Members
  • FHB House

Podcasts

  • FHB Podcast
  • ProTalk

Webinars

  • Upcoming and On-Demand

Podcasts

  • FHB Podcast
  • ProTalk

Webinars

  • Upcoming and On-Demand

Popular Topics

  • Kitchens
  • Business
  • Bedrooms
  • Roofs
  • Architecture and Design
  • Green Building
  • Decks
  • Framing
  • Safety
  • Remodeling
  • Bathrooms
  • Windows
  • Tilework
  • Ceilings
  • HVAC

Magazine

  • Current Issue
  • Past Issues
  • Magazine Index
  • Subscribe
  • Online Archive
  • Author Guidelines

All Access

  • Member Home
  • Start Free Trial
  • Gift Membership

Online Learning

  • Courses
  • Project Guides
  • Reader Projects
  • Podcast

More

  • FHB Ambassadors
  • FHB House
  • Customer Support

Account

  • Log In
  • Join

Newsletter

Get home building tips, offers, and expert advice in your inbox

Signing you up...

This site is protected by reCAPTCHA and the Google Privacy Policy and Terms of Service apply.
See all newsletters
See all newsletters

Follow

  • X
  • YouTube
  • instagram
  • facebook
  • pinterest
  • Tiktok

Join All Access

Become a member and get instant access to thousands of videos, how-tos, tool reviews, and design features.

Start Your Free Trial

Subscribe

FHB Magazine

Start your subscription today and save up to 70%

Subscribe

This is your last free article.

Don't miss another expert tip or technique from building pros. Start your free trial today.

Start your FREE trial

Already a member? Log in

We hope you’ve enjoyed your free articles. To keep reading, become a member today.

Get complete site access to expert advice, how-to videos, Code Check, and more, plus the print magazine.

Start your FREE trial

Already a member? Log in

Privacy Policy Update

We use cookies, pixels, script and other tracking technologies to analyze and improve our service, to improve and personalize content, and for advertising to you. We also share information about your use of our site with third-party social media, advertising and analytics partners. You can view our Privacy Policy here and our Terms of Use here.

Cookies

Analytics

These cookies help us track site metrics to improve our sites and provide a better user experience.

Advertising/Social Media

These cookies are used to serve advertisements aligned with your interests.

Essential

These cookies are required to provide basic functions like page navigation and access to secure areas of the website.

Delete My Data

Delete all cookies and associated data