FHB Logo Facebook LinkedIn Email Pinterest Twitter Instagram Tiktok YouTube Plus Icon Close Icon Navigation Search Icon Navigation Search Icon Arrow Down Icon Video Guide Icon Article Guide Icon Modal Close Icon Guide Search Icon Skip to content
Subscribe
Log In
  • How-To
  • Design
  • Tools & Materials
  • Videos
  • Blogs
  • Forum
  • Magazine
  • Members
  • FHB House
  • Podcast
Log In

Fine Homebuilding Project Guides

Framing

Guide Home
  • Introduction to Framing
  • Framing Tools, Techniques, and Materials
  • Framing Floors
  • Framing Walls
  • Framing Stairs
  • Framing Roofs
  • Efficient Framing Methods
  • Timber Framing
How-To

Cutting an Acute Bevel

Carpenter Andy Engel explains how to make a cheek cut that's beyond a standard saw's capability.

By Andy Engel Issue 257 - Feb/Mar 2016

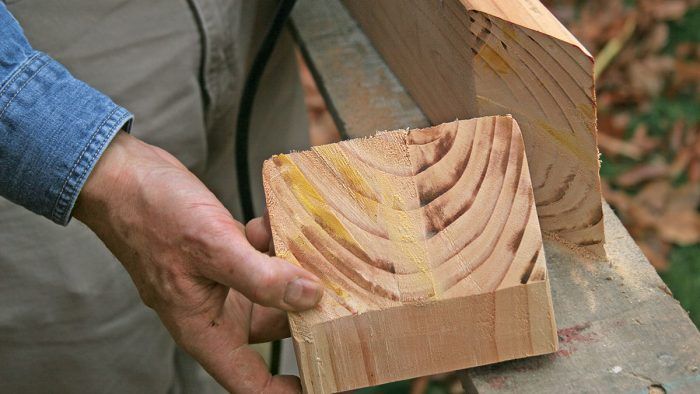
Standard circular saws and miter saws can cut bevel angles up to about 54°. While that handles most day-to-day needs, every so often you need to make a cheek cut that a standard saw can’t accommodate. For example, I recently found myself having to cut a 71° bevel on a piece of 2×6 blocking for a set of winding stairs.

The technique is simply to cut the angle on each edge of the board using a circular saw and then to connect the cuts using a reciprocating saw or a handsaw. In fact, you could make the entire cut with either of those tools, but it’s hard to cut accurately with a recip saw, and using a handsaw is tedious.

Working with square-edged lumber is crucial. If the edge isn’t square to the face, your cuts won’t align. Careful layout also is important, because the accuracy of the second layout line depends on aligning it with the first. Likewise, the third line’s accuracy depends on how it intersects the second line. Errors can accumulate rapidly.

Cutting an Acute Bevel: Step By Step

Start with square-edged stock.
1. Start with square-edged stock. Framing lumber may be manufactured with square edges, but changes in moisture content can alter its geometry. Pick through the lumber pile to locate a piece with square edges.
Mark one edge.
2. Mark one edge. Use a T-bevel, protractor, or framing square to lay out the angle on the lumber.

Compensate for the roundover.
3. Compensate for the roundover. The eased edges on lumber make it harder to accurately transfer the cutline from the edge to the face. Sight directly down on the T-bevel and the face of the lumber, and mark the intersection of the two.
Draw a square line on the face.
4. Draw a square line on the face. This line determines where you mark the angle on the second edge, and it provides a reference when cutting.
Mark the angle on the second edge.
5. Mark the angle on the second edge. To again compensate for the roundover, sight down on the T-bevel to align it with the square line on the lumber face, then mark the second cutline.
Set up a circular saw.
6. Set up a circular saw. Use a sharp, thin-kerf blade. Don’t trust the bevel settings on the saw; they’re rarely accurate. Instead, use a square to ensure that the blade is at 90° relative to the saw’s base.
Make the first cut.
7. Make the first cut. Clamp the stock in place. Set the saw’s base firmly on the lumber edge, and don’t rock the saw as you cut. As it exits the cut, the blade should follow the square line on the lumber.
Flip the board over.
8. Flip the board over. Repeat the cut from the opposite edge.
Finish the cut.
9. Finish the cut. A reciprocating saw makes quick work of the job, but a handsaw isn’t much slower. The reason for the thin-kerf blade in the circular saw is to match more closely the kerf width of either a recip saw or a handsaw.

Angle-marking tools

FRAMING SQUARE
Framing Square

FRAMING SQUARE

An old-school tool for laying out angles, a framing square provides angles in rafter-pitch increments, such as 12-in-12, rather than degrees. One shortcoming is that it’s hard to use this tool to measure some angles, especially if the pieces being measured are short.

T-BEVEL
T-Bevel

T-BEVEL

The simplest method of transferring angles, a T-bevel is simply held in place to duplicate an angle, and then its locking screw is tightened down. It provides no measurement increments, but transfers angles directly.

RAFTER SQUARE
Rafter Square

RAFTER SQUARE

Most carpenters have a rafter square at hand, often in their tool belt. While they provide rafter-pitch increments like a framing square, rafter squares also measure in degrees.

ANGLE FINDER
Angle Finder

ANGLE FINDER

A bit of a specialty tool, this protractor can be used to measure angles in degrees like a rafter square, and to transfer angles directly like a T-bevel.


Photos by Rodney Diaz

From Fine Homebuilding #257

Sign up for eletters today and get the latest how-to from Fine Homebuilding, plus special offers.

Signing you up...

This site is protected by reCAPTCHA and the Google Privacy Policy and Terms of Service apply.
See all newsletters
See all newsletters
Previous: Faster, Stronger Sawhorses Next: How to Cut a Notch with a Circular Saw

Guide

Framing

Chapter

Framing Tools, Techniques, and Materials

Log in or create an account to post a comment.

Sign up Log in

Become a member and get full access to FineHomebuilding.com

Framing

Framing

Trusted, in-depth guidance from the pros for framing a durable, code-compliant house

View Project Guide

View All Project Guides »

Become a member and get unlimited site access, including the Framing Project Guide.

Start Free Trial

Introduction to Framing
  • House Framing Concepts, Tips, and More
Framing Tools, Techniques, and Materials
  • Tools
  • Techniques
  • Framing Lumber
  • Steel
Framing Floors
  • Floor Framing
  • Engineered Floors
  • Floor Sheathing
Framing Walls
  • Wall Framing Basics
  • Layout
  • Wall Assembly
  • Raising and Straightening Walls
  • Framing Rough Openings
  • Blocking
Framing Stairs
  • Stair Layout
  • Building Stairs
Framing Roofs
  • Roof-Framing Basics
  • Roof Design
  • Laying Out and Cutting Rafters
  • Framing Valleys
  • Working with Trusses
  • Dormers
  • Special Situations
Efficient Framing Methods
  • Advanced Framing
  • Double-Stud Walls
Timber Framing
  • Timber-Frame Construction
  • Timber-Frame Design

Fine Homebuilding

Follow

  • YouTube
  • instagram
  • facebook
  • pinterest
  • Tiktok
  • twitter

Newsletter

Get home building tips, offers, and expert advice in your inbox

Signing you up...

This site is protected by reCAPTCHA and the Google Privacy Policy and Terms of Service apply.
See all newsletters
See all newsletters

Membership & Magazine

  • Online Archive
  • Start Free Trial
  • Magazine Subscription
  • Magazine Renewal
  • Gift a Subscription
  • Customer Support
  • Privacy Preferences

Taunton Network

  • Green Building Advisor
  • Fine Woodworking
  • Fine Gardening
  • Threads
  • About
  • Contact
  • Advertise
  • Careers
  • Copyright
  • Terms of Use
  • Site Map
  • Do not sell or share my information
  • Privacy Policy
  • Accessibility
  • California Privacy Rights

© 2023 The Taunton Press, Inc. All rights reserved.

X
X
This is a dialog window which overlays the main content of the page. The modal window is a 'site map' of the most critical areas of the site. Pressing the Escape (ESC) button will close the modal and bring you back to where you were on the page.

Main Menu

  • How-To
  • Design
  • Tools & Materials
  • Video
  • Blogs
  • Forum
  • Project Guides
  • Reader Projects
  • Magazine
  • Members
  • FHB House

Podcasts

  • FHB Podcast
  • ProTalk

Webinars

  • Upcoming and On-Demand

Podcasts

  • FHB Podcast
  • ProTalk

Webinars

  • Upcoming and On-Demand

Popular Topics

  • Kitchens
  • Business
  • Bedrooms
  • Roofs
  • Architecture and Design
  • Green Building
  • Decks
  • Framing
  • Safety
  • Remodeling
  • Bathrooms
  • Windows
  • Tilework
  • Ceilings
  • HVAC

Magazine

  • Current Issue
  • Past Issues
  • Magazine Index
  • Subscribe
  • Online Archive
  • Author Guidelines

All Access

  • Member Home
  • Start Free Trial
  • Gift Membership

Shop the Store

  • Books
  • DVDs
  • Taunton Workshops

More

  • FHB Ambassadors
  • Reader Projects
  • Podcast
  • FHB House
  • Customer Support

Account

  • Log In
  • Join

Newsletter

Get home building tips, offers, and expert advice in your inbox

Signing you up...

This site is protected by reCAPTCHA and the Google Privacy Policy and Terms of Service apply.
See all newsletters
See all newsletters

Follow

  • YouTube
  • instagram
  • facebook
  • pinterest
  • Tiktok
  • twitter

Join All Access

Become a member and get instant access to thousands of videos, how-tos, tool reviews, and design features.

Start Your Free Trial

Subscribe

FHB Magazine

Start your subscription today and save up to set_percent%

Subscribe

We hope you’ve enjoyed your free articles. To keep reading, become a member today.

Get complete site access to expert advice, how-to videos, Code Check, and more, plus the print magazine.

Start your FREE trial

Already a member? Log in