
Designing Gable Dormers
Right-scaled gable dormers can both bring in light and add interest to a plain roof.
There are many reasons you might want to add dormers to a roof. You might want more daylight, better views, or a little extra headroom. Or, well-designed dormers might just add some character to the house.
When the primary goal is simply to add usable floor area while preserving the lines of the main roof, a shed dormer is often the most practical solution. Large shed dormers can significantly alter the look of the house, however, so sometimes they’re best placed in the back. Gable dormers are another solution, but when they get too large, they quickly overwhelm the lower floors of the house and make it look top-heavy. That said, should a dormer become large enough to be considered a cross gable, it will hold its own as a major design element. Combining dormer designs can solve some difficult design decisions even while complicating roof framing.
Appropriately scaled gable dormers bring in light while adding charm and interest to a large or plain roof. If designed well, they don’t compete with the lines of the main house; instead, they reinforce, complement, and enrich the house’s personality.
Show restraint
By far, the most common mistake is making dormers too big. It’s understandable to maximize the bang for your buck, but big dormers quickly compromise the design, especially on smaller houses that have low eaves. Think of the window as the main reason the dormer exists, and provide the minimum framework necessary around the window for structure and insulation.
Here, I’ve designed gable dormers for a 1940s Cape—a style of home that often calls for dormers. The upper floor is to be finished as living space, so light, views, and egress are important factors driving the redesign. It’s important to factor in egress when designing dormers to make sure the dormers will meet code requirements.
The house has low eaves, simple trim, and an asymmetrical front facade. It’s in a historic district, so the dormer additions need to be done carefully to enhance, not detract from, the home’s character.

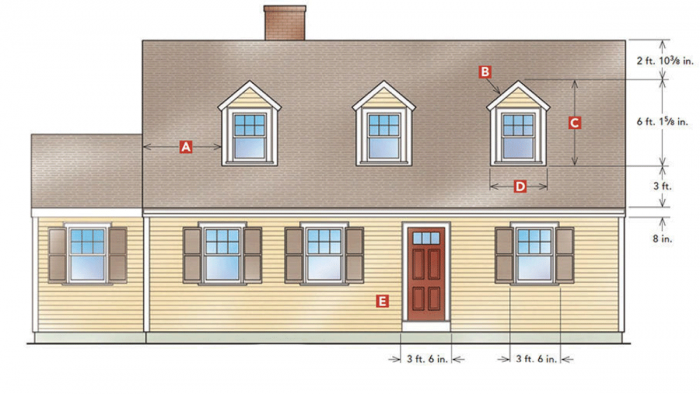
A) Spacing
There are no hard-and-fast rules when it comes to dormer spacing, but start with geometric patterns. For example, these three dormers happen to look best if evenly spread across the roof, but often the end dormers can be cheated a bit to the outside.
B) Roof slope
The most conventional approach is to match the house’s roof slope. Here, that slope is 10-in-12. However, certain designs can support various slopes. When the dormer gable is inspired by a classical pediment, the pitch can be lower than the house roof, down to about 5-in-12.
C) Height
When the house’s facade is tall, the dormers can be tall. Similarly, when the facade is short, the dormers can be short. However, height shouldn’t be a control in itself; rather, dormer height should always be driven by the size and scale of the windows to be used in the dormer.
D) Width
In her book Get Your House Right, Marianne Cusato suggests that the total width of a dormer be the same as that of the windows, including trim, on the main house below. This is a noble goal on straightforward, classical architecture. When adding a dormer to a house that does not already have perfect classical details, you have to use the house as a reference. For example, on a bungalow, the dormer may look best with a little extra width to create more horizontal proportions.
E) Main-house reference
On many houses, you can ignore the base of the house and focus simply on how well the dormers look on the roof. Because the dormers are in a different plane from the main-house wall, and because the roof eave provides a strong horizontal break, alignment with elements below is less important than the massing—that is, how the dormers “feel” on the roof.

F) Placement
Dormer placement is driven by many factors. Ideally, the window heads would align with any gable windows on each end of the house, and the ceiling in the dormer would be in plane with the other ceilings on the interior. From an exterior point of view, it’s a massing decision, and one best viewed in three dimensions. The “center of gravity” of the dormer—generally about two thirds of the height of the cheek wall or half the overall height of the dormer—should land near the center of the roof. It’s OK to move it down a bit, but don’t move it higher.
G) Rake overhang
When there is little or no rake overhang on the main house, detail the dormer to match. When the house has a larger rake overhang, reduce the overhang depth on the dormer by 25% to 50%, unless your intention is to draw attention to the dormer roof.
H) Trim size
As a rule, I scale the trim down by 10% to 25% compared to the roof trim on the main house.
I) Trim profiles
This house has simple eave trim: a vertical 1×8 with a gutter that creates a basic cornice. It doesn’t make sense to use gutters on dormers because any rain is directed into the gutters below. To create a different yet still appropriate cornice molding, use a flat fascia board set on a 40° to 45° angle.
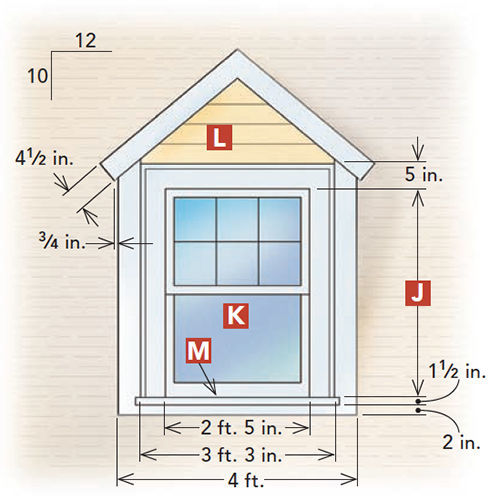
J) Window size
When sizing windows, choose units that reflect the first-floor windows but are scaled down by 10% to 25%. Keep the aspect ratio—the proportion of a window’s height to its width— the same, or make the windows slightly squat.
K) Egress
If any dormers are in a bedroom, remember that at least one window in each bedroom must meet code for egress. An egressable window has a distance from the floor no greater than 44 in., a minimum net-clear opening of 5.7 sq. ft., a minimum width of 20 in., and a minimum height of 24 in. This does not mean that an opening of 20 in. by 24 in. meets code. For example, a 20 in.-wide window has to be at least 42 in. high to meet the 5.7-sq.-ft. requirement. Also, because only half of a double-hung unit can be opened at a time, the net-clear opening is drastically diminished—down to 4.2 sq. ft. for the window in the drawing. Fortunately, manufacturers make casement windows that look like double-hung units for this purpose. For this project, such a casement window would have a net-clear opening of 8.4 sq. ft.
L) Gable material
If the house details are simple, as they are here, matching the house siding is the conventional approach. If the house has more elaborate trim, or the dormers are particularly small, or if you want to add some visual interest, the gable and cheek walls can be finished and painted to match the trim. This makes the entire dormer a trim element.
M) Sill height
Visually, less is best. Holding the sill at least 2 in. off the roof keeps the sill above snow and ice and creates a vertical dam against blowing rain.
Drawings: Mike Maines
From Fine Homebuilding #245
For more on dormers:
Four Steps to Flash a Dormer – Veteran remodeler Mike Guertin shows hot to flash a dormer with details that will keep water out.
Framing a Dramatic Dormer – If doghouse dormers or shed dormers aren’t dressy enough, A-dormers can add an exciting design note, and they’re easier to seal against the elements.
Raising an Eyebrow – Adding a gracefully curved eyebrow window to a roof takes precise planning, some unusual framing, and curved templates for roof sheathing. Here’s how to add this stylist detail of the late 19th century.
Fine Homebuilding Recommended Products
Fine Homebuilding receives a commission for items purchased through links on this site, including Amazon Associates and other affiliate advertising programs.

Roofing Gun

Ladder Stand Off

Roof Jacks
