FHB Logo Facebook LinkedIn Email Pinterest Twitter Instagram Plus Icon Close Icon Navigation Search Icon Navigation Search Icon Arrow Down Icon Video Guide Icon Article Guide Icon Modal Close Icon Guide Search Icon Skip to content
Subscribe

In every issue you'll find...

  • Expert insights on techniques and principles
  • Unbiased tool reviews
  • Step-by-step details to master the job
  • Field-tested advice and know-how
Subscribe Now!
Subscribe
  • How-To
  • Design
  • Tools & Materials
  • Videos
  • Blogs
  • Forum
  • Magazine
  • Members
  • FHB House
  • Podcast
  • Join
  • Log In
Subscribe

Fine Homebuilding Project Guides

Framing

Guide Home
Chapter
  • Introduction to Framing
  • Framing Tools, Techniques, and Materials
  • Framing Floors
  • Framing Walls
  • Framing Stairs
  • Framing Roofs
  • Efficient Framing Methods
  • Timber Framing
How-To

Framing Stairs with a Landing

An L-shaped staircase is less complicated than you might think, and the framing techniques shown here will improve even the most basic set of stairs.

By Rick Arnold Issue 210

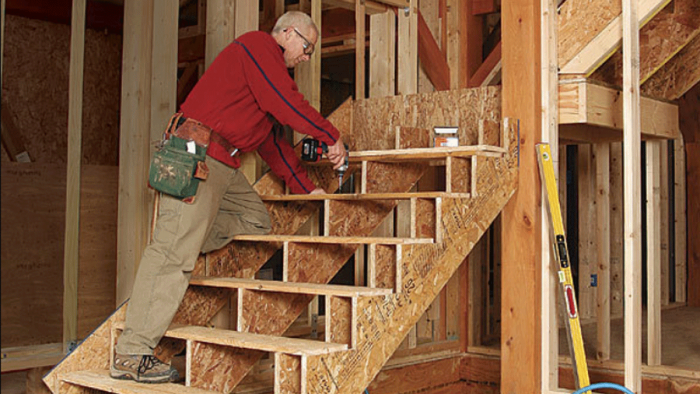
Synopsis: A staircase with a landing isn’t as challenging to build as you might think. It requires the same basic processes and calculations as a regular set of stairs, according to FHB contributing editor Rick Arnold. As with a regular set of stairs, you first need to determine an accurate rise by measuring where the stairs begin and end. Then you can determine the riser height. Next, using the measurements you’ve calculated so far, you can build the stringer. Before cutting the stringers for an L-shaped staircase, you need to figure out the location of the landing. After the stringer is cut, it becomes a template for two additional stringers. Finally, the stringers are set in place, and you can finish building the stairs.


When builders struggle with a stair layout, it’s almost always because they get hung up on the rise portion of the calculation, especially with the adjustments for flooring and stair treads that haven’t been installed yet. Add a landing to the equation, and eyes will glaze over altogether. In truth, accurately laying out a set of stairs, even with a landing, isn’t as complicated as it seems. Once you think about the landing as just another stair tread, the rest of the math falls into place. An L shaped stair is three separate pieces, but only after the calculations are done and the stringers are marked is the stair separated into three sections. By then, the hard work is done.

Everything depends on an accurate rise

1. Begin with a level line.

To get an accurate measurement of the total rise, strike a level reference line from one end of the staircase to the other. The height of the line doesn’t matter, but it must be dead level. I prefer to use a tripod-mounted laser, make pencil marks, and then connect them by snapping chalklines, which will later be used as a reference for building the landing.

person building stairs with a landing

2. Measure the rise in the right places.

Stretching a tape measure between the lower and upper levels to find the total rise won’t take into account any slight changes in height caused by out-of-level floors. Instead, take measurements where the stairs begin and end. First, measure down from the upper floor to the reference line, and then measure from the subfloor at the foot of the stairs up to the reference line. Add these two measurements together to get the total rise.

3. Find the adjusted total rise.

The finished floor usually isn’t installed during stair framing, so it has to be accounted for mathematically after the subfloor-to-subfloor rise measurement has been taken. To find the adjusted total rise, take the total rise measured in step 2, add in the thickness of the finished flooring on the upper level, and subtract the thickness of the finished flooring on the lower level.

4. Keep treads simple.

The tread depth depends on homeowner preference and local codes, but it typically can’t be less than 10 in., which is the number I use because it’s easy to work with and provides a comfortable finished step. The only time I shorten this depth is when I have a limited amount of floor space in which to fit the stairway.

5. Choose a riser height.

The maximum height allowed by code is 7-3⁄4 in., but I typically begin with 7-1⁄2 in. simply because it’s more easily divisible. To calculate the number of risers for a given stairway, divide the adjusted total rise by 7.5. The resulting number likely will have a digit or two to the right of the decimal point.

magazine layout For more photos and the four steps to perfect stringers, click the View PDF button below. 

From Fine Homebuilding #210

Sign up for eletters today and get the latest how-to from Fine Homebuilding, plus special offers.

Signing you up...

This site is protected by reCAPTCHA and the Google Privacy Policy and Terms of Service apply.
See all newsletters
See all newsletters
View PDF
Previous: Installing Interior Stair Framing Next: Building an L-Shaped Stair

Guide

Framing

Chapter

Framing Stairs

Log in or create an account to post a comment.

Sign up Log in

Become a member and get full access to FineHomebuilding.com

Framing

Framing

Trusted, in-depth guidance from the pros for framing a durable, code-compliant house

View Project Guide

View All Project Guides »

Become a member and get unlimited site access, including the Framing Project Guide.

Start Free Trial

Introduction to Framing
  • House Framing Concepts, Tips, and More
Framing Tools, Techniques, and Materials
  • Tools
  • Techniques
  • Framing Lumber
  • Steel
Framing Floors
  • Floor Framing
  • Engineered Floors
  • Floor Sheathing
Framing Walls
  • Wall Framing Basics
  • Layout
  • Wall Assembly
  • Raising and Straightening Walls
  • Framing Rough Openings
  • Blocking
Framing Stairs
  • Stair Layout
  • Building Stairs
Framing Roofs
  • Roof-Framing Basics
  • Roof Design
  • Laying Out and Cutting Rafters
  • Framing Valleys
  • Working with Trusses
  • Dormers
  • Special Situations
Efficient Framing Methods
  • Advanced Framing
  • Double-Stud Walls
Timber Framing
  • Timber-Frame Construction
  • Timber-Frame Design

Fine Homebuilding

Follow

  • twitter
  • facebook
  • instagram
  • pinterest

Newsletter

Get home building tips, offers, and expert advice in your inbox

Signing you up...

This site is protected by reCAPTCHA and the Google Privacy Policy and Terms of Service apply.
See all newsletters
See all newsletters

Membership & Magazine

  • Online Archive
  • Start Free Trial
  • Magazine Subscription
  • Magazine Renewal
  • Gift a Subscription
  • Customer Support
  • Privacy Preferences

Taunton Network

  • Green Building Advisor
  • Fine Woodworking
  • Fine Gardening
  • Threads
  • About
  • Contact
  • Advertise
  • Careers
  • Copyright
  • Terms of Use
  • Site Map
  • Do not sell or share my information
  • Privacy Policy
  • Accessibility
  • California Privacy Rights

© 2023 The Taunton Press, Inc. All rights reserved.

X
X
This is a dialog window which overlays the main content of the page. The modal window is a 'site map' of the most critical areas of the site. Pressing the Escape (ESC) button will close the modal and bring you back to where you were on the page.

Main Menu

  • How-To
  • Design
  • Tools & Materials
  • Video
  • Blogs
  • Forum
  • Reader Projects
  • Magazine
  • Members
  • FHB House

Podcasts

  • FHB Podcast
  • ProTalk

Webinars

  • Upcoming and On-Demand

Account

  • Log In
  • Join

Podcasts

  • FHB Podcast
  • ProTalk

Webinars

  • Upcoming and On-Demand

Popular Topics

  • Kitchens
  • Business
  • Bedrooms
  • Roofs
  • Architecture and Design
  • Green Building
  • Decks
  • Framing
  • Safety
  • Remodeling
  • Bathrooms
  • Windows
  • Tilework
  • Ceilings
  • HVAC

Magazine

  • Current Issue
  • Past Issues
  • Magazine Index
  • Subscribe
  • Online Archive
  • Author Guidelines

All Access

  • Member Home
  • Start Free Trial
  • Gift Membership

Shop the Store

  • Books
  • DVDs
  • Taunton Workshops

More

  • FHB Ambassadors
  • Reader Projects
  • Podcast
  • Customer Support

Account

  • Log In
  • Join

Newsletter

Get home building tips, offers, and expert advice in your inbox

Signing you up...

This site is protected by reCAPTCHA and the Google Privacy Policy and Terms of Service apply.
See all newsletters
See all newsletters

Follow

  • twitter
  • facebook
  • instagram
  • pinterest

Join All Access

Become a member and get instant access to thousands of videos, how-tos, tool reviews, and design features.

Start Your Free Trial

Subscribe

FHB Magazine

Start your subscription today and save up to 70%

Subscribe

We hope you’ve enjoyed your free articles. To keep reading, become a member today.

Get complete site access to expert advice, how-to videos, Code Check, and more, plus the print magazine.

Start your FREE trial

Already a member? Log in