FHB Logo Facebook LinkedIn Email Pinterest Twitter Instagram Plus Icon Close Icon Navigation Search Icon Navigation Search Icon Arrow Down Icon Video Guide Icon Article Guide Icon Modal Close Icon Guide Search Icon Skip to content
Subscribe
Log In
  • How-To
  • Design
  • Tools & Materials
  • Videos
  • Blogs
  • Forum
  • Magazine
  • Members
  • FHB House
  • Podcast
Log In

Fine Homebuilding Project Guides

Framing

Guide Home
Chapter
  • Introduction to Framing
  • Framing Tools, Techniques, and Materials
  • Framing Floors
  • Framing Walls
  • Framing Stairs
  • Framing Roofs
  • Efficient Framing Methods
  • Timber Framing
How-To

Pulling stubborn nails

Sometimes, a hammer claw is ideal; other situations might require a cat's paw or a pair of nippers.

By John Ross Issue 193

My second job in construction—after I got through scraping a big stack of foundation formboards—was to remove the nails from a pile of salvaged 2x4s. It didn’t take long for me to discover how easy it is to break a wooden-handled hammer while pulling nails. At the time, I didn’t own two hammers, but my boss did. Before he would let me borrow one of his hammers, he taught me a few tricks.

In its nail-pulling function, a hammer works like a lever. I learned that reducing the distance from the nail head to the fulcrum, or pivot point, reduces stress on the hammer. You can do this in a couple of ways just by changing the hammer’s position. Also, a couple of common tools, such as a cat’s paw and a pair of end-cutting nippers, make nail-pulling easier.

For pulling finish or siding nails, I like to have a flat bar handy. I can put it under the hammer or nippers and avoid denting the wood.

If you spend any time pulling nails, you’ll quickly realize that the rough-textured surface on galvanized nails makes them much harder to pull out. They’re also more likely to bend or break. For these reasons, I use galvanized nails only when I am absolutely sure I won’t have to remove them.

A hammer has more than one lever point

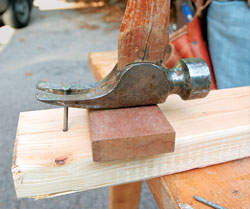
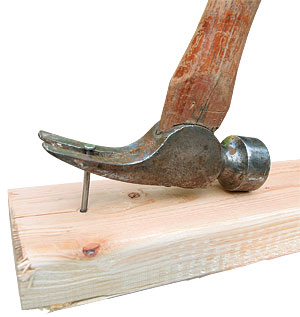
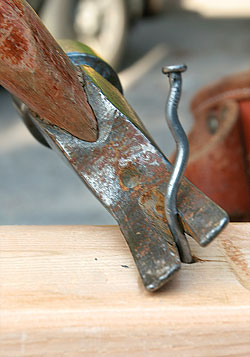
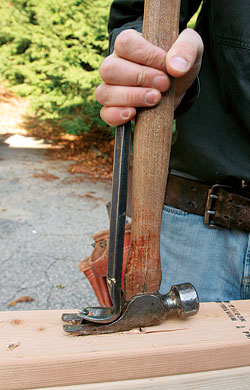
Pulling straight back is the hardest way. With a straight-clawed framing hammer, the fulcrum quickly moves to the front of the hammer, the point farthest from the nail. This is the least-preferred method for removing tough nails. It requires the most effort and puts the most stress on the hammer handle. Placing a block under the head of the hammer will help. It reduces the fulcrum’s distance to the nail and makes it easier to pull out the nail.

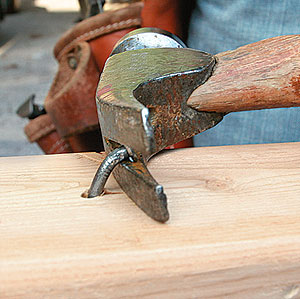
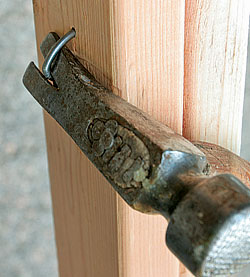
Levering to the side is easier. Using the side of the hammer’s claw as the fulcrum provides the most leverage. Unfortunately, the nail will be removed a correspondingly short distance.

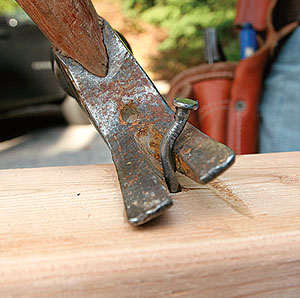
Reengage the nail. By reengaging the nail and levering the hammer back and forth, you can pull out the nail in increments.

One turn will work. Instead of rocking back and forth, the hammer can be levered in one direction. If the hammer handle can pass by the edge of the wood, as shown at left, the nail can be twisted out with one motion.

Lighter puller

A hammer and a cat’s paw make up a significant chunk of my tool bag’s heft. Luckily, Stiletto Tools (www.stiletto.com) has found a way for me to shed some weight without shedding tools.

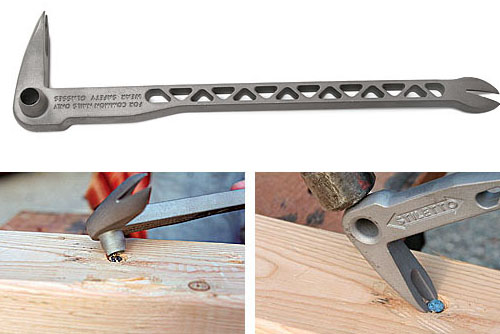
Besides their famously light hammers, Stiletto has introduced a claw bar (model TICLW12) that tips the scale at just over 8 oz., about half the weight of the one I usually carry. This lighter titanium tool is pound for pound much stronger than steel. It has an engineered webbed handle and sharp pry tongs.

The cool feature on this claw bar is its Dimpler, located on the side of the head. When positioned over a nail head and struck with a hammer, it crushes the wood fibers and allows the pry tongs to grab the nail easily.

The Dimpler lets me remove an embedded nail without digging into the wood. The only drawback is that at $89, the lighter weight and convenience of this claw bar don’t come cheap.

Other tools make pulling nails easier

A cat’s paw grabs an embedded nail. The hook of a cat’s paw is designed to be driven under the head of a nail flush with the surface.

The force is in the curve. The tight curve on a cat’s paw provides plenty of pulling force as you push the handle.

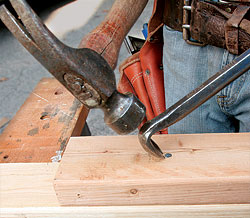
A hammer provides more travel. One pull with a cat’s paw typically won’t free a nail. By slipping a hammer under the cat’s paw, the travel will be enough to clear the nail.

Nippers take care of the finish

Pulling nails through the back saves the surface. The smaller head of a finish nail allows it to be pulled through the back of a board with a pair of end-cutting nippers. This prevents the “show” side of the molding from being damaged.

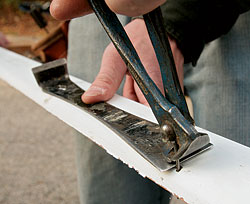
A flat bar protects the trim. If the nail has to be removed from the front, put a flat bar under the nippers or hammer. The pressure from the nippers then is spread over a larger area, minimizing the chances of denting the wood.

Photos by: John Ross, except where noted

Sign up for eletters today and get the latest how-to from Fine Homebuilding, plus special offers.

Signing you up...

This site is protected by reCAPTCHA and the Google Privacy Policy and Terms of Service apply.
See all newsletters
See all newsletters
Previous: Nailing Basics Next: Cutting with a Handsaw

Guide

Framing

Chapter

Framing Tools, Techniques, and Materials

View Comments

  1. VirginiaGuy | Nov 22, 2019 03:30pm | #1

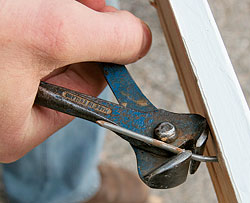
    Pulling finish nails or pulling through the back (works great to preserve older molding faces) is not all that hard once you clamp locking pliers (Vice Grip is a common brand) on the nail.
    Slip the pry bar around the nail.
    Clamp the locking pliers on the portion of the nail sticking above the pry bar.
    They meed to be clamped as tight as you can get them.
    Now pry against the jaws of the locking pliers.

    It is a little slower than pulling common nails, but once you get the pliers set tight enough is pretty fast.
    For longer nails you can simply unlock the pliers, slide mire of the nail into the jaws, lock them again, and pry another section out.

    It works on common nails that have corroded heads that strip off also.

Log in or create an account to post a comment.

Sign up Log in

Become a member and get full access to FineHomebuilding.com

Framing

Framing

Trusted, in-depth guidance from the pros for framing a durable, code-compliant house

View Project Guide

View All Project Guides »

Become a member and get unlimited site access, including the Framing Project Guide.

Start Free Trial

Introduction to Framing
  • House Framing Concepts, Tips, and More
Framing Tools, Techniques, and Materials
  • Tools
  • Techniques
  • Framing Lumber
  • Steel
Framing Floors
  • Floor Framing
  • Engineered Floors
  • Floor Sheathing
Framing Walls
  • Wall Framing Basics
  • Layout
  • Wall Assembly
  • Raising and Straightening Walls
  • Framing Rough Openings
  • Blocking
Framing Stairs
  • Stair Layout
  • Building Stairs
Framing Roofs
  • Roof-Framing Basics
  • Roof Design
  • Laying Out and Cutting Rafters
  • Framing Valleys
  • Working with Trusses
  • Dormers
  • Special Situations
Efficient Framing Methods
  • Advanced Framing
  • Double-Stud Walls
Timber Framing
  • Timber-Frame Construction
  • Timber-Frame Design

Fine Homebuilding

Follow

  • twitter
  • facebook
  • instagram
  • pinterest

Newsletter

Get home building tips, offers, and expert advice in your inbox

Signing you up...

This site is protected by reCAPTCHA and the Google Privacy Policy and Terms of Service apply.
See all newsletters
See all newsletters

Membership & Magazine

  • Online Archive
  • Start Free Trial
  • Magazine Subscription
  • Magazine Renewal
  • Gift a Subscription
  • Customer Support
  • Privacy Preferences

Taunton Network

  • Green Building Advisor
  • Fine Woodworking
  • Fine Gardening
  • Threads
  • About
  • Contact
  • Advertise
  • Careers
  • Copyright
  • Terms of Use
  • Site Map
  • Do not sell or share my information
  • Privacy Policy
  • Accessibility
  • California Privacy Rights

© 2023 The Taunton Press, Inc. All rights reserved.

X
X
This is a dialog window which overlays the main content of the page. The modal window is a 'site map' of the most critical areas of the site. Pressing the Escape (ESC) button will close the modal and bring you back to where you were on the page.

Main Menu

  • How-To
  • Design
  • Tools & Materials
  • Video
  • Blogs
  • Forum
  • Reader Projects
  • Magazine
  • Members
  • FHB House

Podcasts

  • FHB Podcast
  • ProTalk

Webinars

  • Upcoming and On-Demand

Podcasts

  • FHB Podcast
  • ProTalk

Webinars

  • Upcoming and On-Demand

Popular Topics

  • Kitchens
  • Business
  • Bedrooms
  • Roofs
  • Architecture and Design
  • Green Building
  • Decks
  • Framing
  • Safety
  • Remodeling
  • Bathrooms
  • Windows
  • Tilework
  • Ceilings
  • HVAC

Magazine

  • Current Issue
  • Past Issues
  • Magazine Index
  • Subscribe
  • Online Archive
  • Author Guidelines

All Access

  • Member Home
  • Start Free Trial
  • Gift Membership

Shop the Store

  • Books
  • DVDs
  • Taunton Workshops

More

  • FHB Ambassadors
  • Reader Projects
  • Podcast
  • FHB House
  • Customer Support

Account

  • Log In
  • Join

Newsletter

Get home building tips, offers, and expert advice in your inbox

Signing you up...

This site is protected by reCAPTCHA and the Google Privacy Policy and Terms of Service apply.
See all newsletters
See all newsletters

Follow

  • twitter
  • facebook
  • instagram
  • pinterest

Join All Access

Become a member and get instant access to thousands of videos, how-tos, tool reviews, and design features.

Start Your Free Trial

Subscribe

FHB Magazine

Start your subscription today and save up to 70%

Subscribe

We hope you’ve enjoyed your free articles. To keep reading, become a member today.

Get complete site access to expert advice, how-to videos, Code Check, and more, plus the print magazine.

Start your FREE trial

Already a member? Log in