FHB Logo Facebook LinkedIn Email Pinterest Twitter Instagram Tiktok YouTube Plus Icon Close Icon Navigation Search Icon Navigation Search Icon Arrow Down Icon Video Guide Icon Article Guide Icon Modal Close Icon Guide Search Icon Skip to content
Subscribe
Log In
  • How-To
  • Design
  • Tools & Materials
  • Videos
  • Blogs
  • Forum
  • Magazine
  • Members
  • FHB House
  • Podcast
Log In

Fine Homebuilding Project Guides

Framing

Guide Home
  • Introduction to Framing
  • Framing Tools, Techniques, and Materials
  • Framing Floors
  • Framing Walls
  • Framing Stairs
  • Framing Roofs
  • Efficient Framing Methods
  • Timber Framing
How-To

Remove One Wall and Join Two Rooms

Hanging the ceiling joists from an engineered beam is the fast, simple way to replace a bearing wall.

By Mike Guertin Issue 250 - April/May 2015


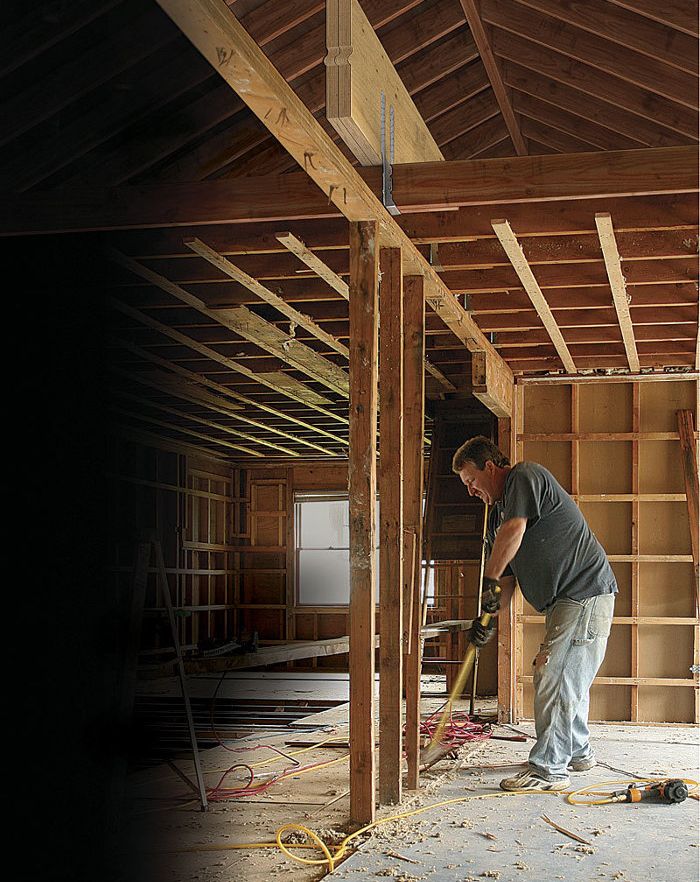
Synopsis: In this article, veteran contractor Mike Guertin replaces a bearing wall with a beam that supports the ceiling joists from above. Unlike other methods, there’s no need to build temporary support walls during construction, so the process is faster. A detailed drawing demonstrates the load paths present after the remodel. Photo: Andy Engel

Many of my remodeling clients want to remove a wall to create a more open floor plan by integrating the kitchen into the living and entertaining part of their home. A nonbearing wall is a cinch to remove. However, if the wall is bearing, which means that it carries ceiling or floor loads from above, removing it requires replacing it with a properly sized beam. The conventional approach is to remove part or all of the bearing wall and to support the framing with a header that sits below the ceiling plane. In this case, the owner wanted a clear, unbroken ceiling, so the beam had to be hidden above.

There are two ways of installing a hidden ceiling beam. One is to use a flush beam, where the ceiling joists are cut and the bottom of the beam is set flush with the bottoms of the joists. The joists are then attached to the beam with hardware. This can be a good choice, particularly when there are ducts above the joists that would be hard to relocate.

Alternatively, an attic beam can be installed above the joists, which hang from the beam with framing hardware. The attic-beam installation is much simpler than the flush-beam option. There is no need to cut joists, and there are no temporary support walls to build. A real benefit of this approach is that it’s only when the beam is fully installed that the existing bearing wall is removed. This saves labor with no difference in material cost.

Sizing the beam

On this job, my brother and I opted for a built-up LVL beam rather than a steel or PSL beam. Because it’s built from multiple plies that are joined in the attic, two workers can handle lifting each LVL into place separately. The beam is sized based on the span and the load. This beam needed to span 24 ft. and to support a ceiling 24 ft. wide. The load consists of two components: the dead load and the live load. Dead load is the weight of the ceiling framing, the drywall, and the insulation (calculated at 6 lb. per sq. ft.). The live load is the weight of people and things. That number comes from the IRC, which requires attic floors to be able to support 20 lb. per sq. ft.

Knowing that the local building official would require it, we had an engineer design the beam (some LVL suppliers provide this service). The engineer gave us a choice of either a double 18-in.-deep LVL or a triple 16-in.-deep LVL. Without a height issue in the attic, we opted for the more economical double 18-in. LVL. The engineer also specified adjustable truss hangers for attaching the joists to the beam, and both Simpson Strong-Tie and USP Structural Connectors make them. Truss hangers are like joist hangers with extralong straps. The hanger bottoms cradle the ceiling joists, and the straps nail into the beam.


For more photos, drawings, and details, click the View PDF button below:


Sign up for eletters today and get the latest how-to from Fine Homebuilding, plus special offers.

Signing you up...

This site is protected by reCAPTCHA and the Google Privacy Policy and Terms of Service apply.
See all newsletters
See all newsletters
View PDF
Previous: How to Install a Load-Bearing Beam Next: Decoding Framing-Lumber Stamps: Moisture Content, Species, and Grade

Guide

Framing

Chapter

Framing Tools, Techniques, and Materials

View Comments

  1. ct_yankee | Dec 24, 2020 08:00pm | #1

    A beam with this load & span requires other consideration when the joist are suspended below it. All load tables for a beam such as this assumes that the top of the beam (which is in compression) is laterally braced by the joists. Which would be the case if the joists bear on top or if the joists framed into the side. In this case they do not, and the design code for a wood member will require that the compression portion (the top) of the beam be braced a regular intervals AND at both supports.
    Caution is recommended here - a structural engineer should be consulted to insure that the beam is properly sized, and that adequate lateral bracing is provided.

    1. User avater
      mike_guertin | Jul 27, 2023 03:08pm | #3

      Thanks for emphisizing that engineering is required. The conditions for suspending the ceiling joists are indeed different than top loading a beam so the online beam calculators aren't a substitute for a full engineered calculation.

  2. Capstone_Structural | Jun 25, 2023 07:14am | #2

    It should also be noted that the bracing at the supports of the girder (column or wall supports) must prevent "rotation" as well as lateral movement, i.e., no "rollover" & no shifting either.

    1. User avater
      mike_guertin | Jul 27, 2023 03:10pm | #4

      You're right - the bracing to prevent rotation and lateral displacement are critical to the installation. It should be part if the engineered design for the beam.

Log in or create an account to post a comment.

Sign up Log in

Become a member and get full access to FineHomebuilding.com

Framing

Framing

Trusted, in-depth guidance from the pros for framing a durable, code-compliant house

View Project Guide

View All Project Guides »

Become a member and get unlimited site access, including the Framing Project Guide.

Start Free Trial

Introduction to Framing
  • House Framing Concepts, Tips, and More
Framing Tools, Techniques, and Materials
  • Tools
  • Techniques
  • Framing Lumber
  • Steel
Framing Floors
  • Floor Framing
  • Engineered Floors
  • Floor Sheathing
Framing Walls
  • Wall Framing Basics
  • Layout
  • Wall Assembly
  • Raising and Straightening Walls
  • Framing Rough Openings
  • Blocking
Framing Stairs
  • Stair Layout
  • Building Stairs
Framing Roofs
  • Roof-Framing Basics
  • Roof Design
  • Laying Out and Cutting Rafters
  • Framing Valleys
  • Working with Trusses
  • Dormers
  • Special Situations
Efficient Framing Methods
  • Advanced Framing
  • Double-Stud Walls
Timber Framing
  • Timber-Frame Construction
  • Timber-Frame Design

Fine Homebuilding

Follow

  • YouTube
  • instagram
  • facebook
  • pinterest
  • Tiktok
  • twitter

Newsletter

Get home building tips, offers, and expert advice in your inbox

Signing you up...

This site is protected by reCAPTCHA and the Google Privacy Policy and Terms of Service apply.
See all newsletters
See all newsletters

Membership & Magazine

  • Online Archive
  • Start Free Trial
  • Magazine Subscription
  • Magazine Renewal
  • Gift a Subscription
  • Customer Support
  • Privacy Preferences

Taunton Network

  • Green Building Advisor
  • Fine Woodworking
  • Fine Gardening
  • Threads
  • About
  • Contact
  • Advertise
  • Careers
  • Copyright
  • Terms of Use
  • Site Map
  • Do not sell or share my information
  • Privacy Policy
  • Accessibility
  • California Privacy Rights

© 2023 The Taunton Press, Inc. All rights reserved.

X
X
This is a dialog window which overlays the main content of the page. The modal window is a 'site map' of the most critical areas of the site. Pressing the Escape (ESC) button will close the modal and bring you back to where you were on the page.

Main Menu

  • How-To
  • Design
  • Tools & Materials
  • Video
  • Blogs
  • Forum
  • Project Guides
  • Reader Projects
  • Magazine
  • Members
  • FHB House

Podcasts

  • FHB Podcast
  • ProTalk

Webinars

  • Upcoming and On-Demand

Podcasts

  • FHB Podcast
  • ProTalk

Webinars

  • Upcoming and On-Demand

Popular Topics

  • Kitchens
  • Business
  • Bedrooms
  • Roofs
  • Architecture and Design
  • Green Building
  • Decks
  • Framing
  • Safety
  • Remodeling
  • Bathrooms
  • Windows
  • Tilework
  • Ceilings
  • HVAC

Magazine

  • Current Issue
  • Past Issues
  • Magazine Index
  • Subscribe
  • Online Archive
  • Author Guidelines

All Access

  • Member Home
  • Start Free Trial
  • Gift Membership

Shop the Store

  • Books
  • DVDs
  • Taunton Workshops

More

  • FHB Ambassadors
  • Reader Projects
  • Podcast
  • FHB House
  • Customer Support

Account

  • Log In
  • Join

Newsletter

Get home building tips, offers, and expert advice in your inbox

Signing you up...

This site is protected by reCAPTCHA and the Google Privacy Policy and Terms of Service apply.
See all newsletters
See all newsletters

Follow

  • YouTube
  • instagram
  • facebook
  • pinterest
  • Tiktok
  • twitter

Join All Access

Become a member and get instant access to thousands of videos, how-tos, tool reviews, and design features.

Start Your Free Trial

Subscribe

FHB Magazine

Start your subscription today and save up to set_percent%

Subscribe

We hope you’ve enjoyed your free articles. To keep reading, become a member today.

Get complete site access to expert advice, how-to videos, Code Check, and more, plus the print magazine.

Start your FREE trial

Already a member? Log in