Choosing Roofing Underlayment
Building paper is still widely used, but waterproof shingle underlayment is a popular choice for valleys and other leak-prone areas.

Once limited to asphalt-impregnated building paper, now there are many options for weatherproofing your roof sheathing before the roofing material goes down, and the options fall into two categories: weather-resistant underlayment and waterproof shingle underlayment. Let’s take a look at the basic choices and their applications.
Weather-Resistant Underlayment
Asphalt felt (AKA building paper) has been the go-to substrate for roof shingles for more than a century, and it’s still quite popular because of how well it works and how affordable it is. But nowadays you might be more likely to see synthetic underlayments on roofing projects because of their durability, ease of installation, and slip-resistance (something anyone working on a sloped roof can appreciate). You can read Fine Homebuilding editorial adviser Mike Guertin’s comprehensive survey of synthetic roofing underlayments to see which material fits your needs best.
Traditionally, asphalt felt underlayment has been 36-in.-wide, 15-lb. or 30-lb. felt-impregnated paper, and it is used as a weather-resistant layer over the entire roof surface. It keeps sheathing dry until shingles are installed, serves as a backup layer when water gets under shingles or flashing, and prolongs shingle life by separating sheathing and shingles. (Without underlayment, shingle asphalt can leech into wood sheathing, or resins in sheathing can degrade the shingle.) Heavy-duty, 30-lb. felt paper is often specified in high-wear, high-water areas such as eaves and valleys. A standard roll of 3-ft.-wide, 15-lb. felt paper covers roughly 400 sq. ft.; the same-size roll of 3-ft.-wide, 30-lb. paper covers only 200 sq. ft. because it’s roughly twice as thick.
If you live in a cold region where ice dams are common in wintertime, you may also be required to use a waterproof shingle underlayment (WSU) in leak-prone parts of the roof. Learn more about that in the second half of this article.
Eaves, Rake, and Underlayment Details
Because unreinforced lighter grades of building paper (15 lb.) tear easily and wrinkle when wet, some types are now reinforced with fiberglass. Moreover, all asphalt-impregnated building papers dry out and become less water-resistant when exposed to sunlight, so the sooner they’re covered by shingles, the better. Building paper was never intended to be an exterior membrane.

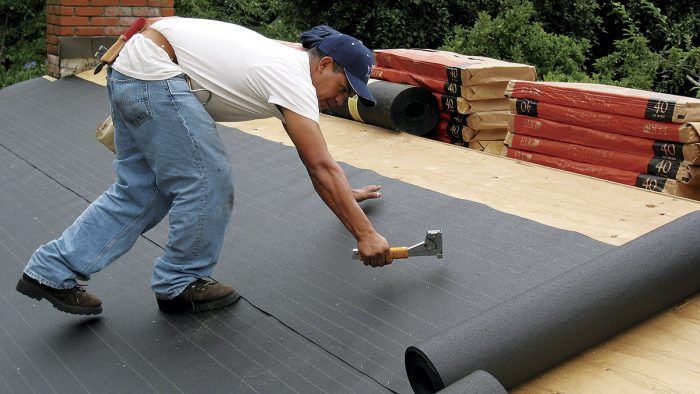
When installing building paper on a sloped roof, have a helper and work from the bottom up. As you roll the paper out, it will tend to slide down the roof, so be sure to unroll it straight across the roof. The first course of paper should overlap a metal drip-edge nailed along the eaves. Align the paper’s lower edge to the lower metal edge and unroll the paper, stapling as you go. Staples are only temporary fasteners to keep the paper from bunching or sliding. Paper should be nailed down with tabbed roofing nails (also called Simplex nails) shown on p. 80. Along roof edges and where the ends of the building paper overlap, space nails every 6 in.; don’t nail within 1 in. of the edge. In the field, place nails in a zigzag pattern, spacing them 12 in. to 15 in. apart.
For steep-slope roofs (4-in-12 or steeper), overlap horizontal courses of building paper 2 in. Overlap ends of seams (end laps) at least 6 in. To prevent water backup on low-slope roofs (less than 4-in-12), building codes often specify two plies of 36-in.-wide underlayment, with horizontal seams overlapped at least 19 in. and (vertical) end seams overlapped 12 in. Check your local code to be sure, for it may also specify self-sticking waterproof shingle underlayment along the eaves.
If you’re installing wood shakes or slate, use shake liner, 18-in.-wide rolls of 30-lb. building paper alternated between roofing courses.
Waterproof Shingle Underlayment
Waterproof shingle underlayment (WSU) is a heavy peel-and-stick bituminous membrane that protects areas most likely to leak because of concentrated water flows in valleys, ice dams at eaves, or high winds at eaves and rake edges. Many building codes also specify WSU in lieu of building paper where asphalt shingles are installed on low-slope roofs. In addition to being self-adhering, WSU also self-seals around nails, making it a truly waterproof membrane.
WSU comes in 9-in. to 36-in. widths. Brand names include CertainTeed Winterguard, W.R. Grace Ice & Water Shield, and GAF Weather Watch.

It’s vastly easier to install WSU along valleys than it is to use roll roofing or aluminum flashing. And with WSU, there’s no need to trowel on wide swaths of roofing cement between 30-lb. building-paper layers to protect eaves from ice dams. Snap a chalkline to position the WSU. Then unroll and cut the membrane to length, align it to the chalkline, peel off its release-sheet backing, and press the material down. Most manufacturers recommend rolling it once it’s down to make sure it’s well adhered.
WSU is more easily installed with two people, but if you’re working alone, fold the WSU in half lengthwise, and temporarily staple one edge of the membrane to a chalked guideline. Peel off the release-sheet backing from the unstapled half of the WSU, and flop the adhesive side of the membrane over onto the sheathing. Finally, yank the stapled edge free, peel off the backing from the second half, and stick it to the sheathing. Because WSU is self-adhering, you needn’t nail it; you need to use staples only to keep the sheet from sliding around before sticking it down.
Fine Homebuilding Recommended Products
Fine Homebuilding receives a commission for items purchased through links on this site, including Amazon Associates and other affiliate advertising programs.

Fall Protection

Flashing Boot

Peel & Stick Underlayment

