Learn step by step how to fabricate a beautiful, durable, and waterproof surround for pipe penetrations in roofs.
Slate roofs can last a century, so you need flashings that can last just as long. In this web slideshow, longtime roofer Jess Barkley shows how to make a soldered pipe-vent flashing boot from sheet copper and a piece of 4-in. copper downspout.
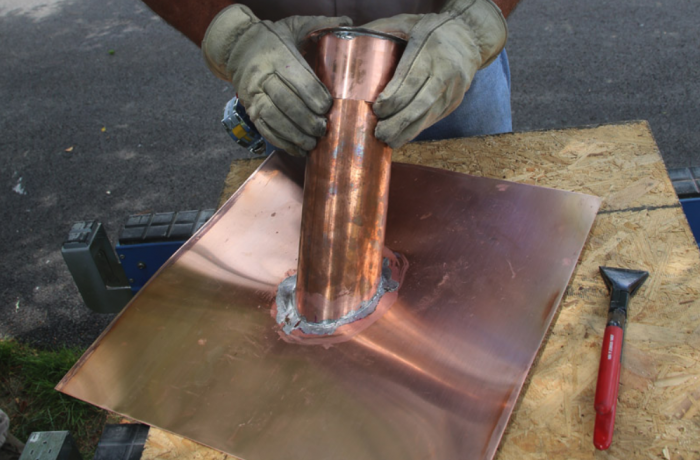
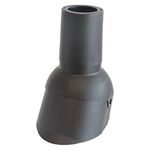
You can make the tube that surrounds the vent pipe from sheet copper, but it’s easier to make it from round copper downspout. Use a hacksaw to cut a piece about 16 in. long.Cut a piece of sheet copper big enough to correspond with the head and side laps of the slate. In this instance, a piece 16 in. square is enough, but depending on the size of the slate, it may not be big enough. Then use a T-bevel to hold the piece of copper downspout at the correct roof pitch and use a pair of dividers to transfer the pitch to the downspout.Cut the downspout to match the roof pitch using aviation snips……and then check the fit using the bevel to make sure it’s angled to match the roof pitch.Next, make a starter hole in the sheet copper with a hole saw, and then enlarge the hole with snips to match the diameter of the downspout section.Make a series of 1/2-in. long cuts every 1/2 in. around the circumference of the downspout section on the angled end that matches the roof pitch to make a series of tabs for soldering. Bend the tabs so they stick out at a 90° angle from the pipe as shown.Slip the flat copper over the downspout section and then check the angle again with the bevel. Adjust the tabs so the downspout section matches the roof pitch.Before soldering, check to make sure the sides of the downspout section are at a right angle to the roof or the flashing may be crooked.Coat the two parts where they meet with liquid acid flux using a flux brush.Clean the soldering iron’s angled tip with a wire brush and then heat the iron before coating it with tallow, which prevents the solder from sticking to it.Heat the joint to be soldered with the iron and then touch the solder to the joint. Work your way around the pipe, heating and then touching solder to the heated section.When the joint has cooled, turn over the flashing boot and flatten the tabs so the flashing boot fits tightly to the roof.Unlike a no-caulk flashing boot, the copper version doesn’t fit tight to the pipe, so you have to make a cap to make it watertight. Cut a strip of copper about 3 in. wide and wrap it around a piece of downspout to determine the circumference of the copper cap.Clamp the 3-in. strip and solder the seam along its entire length.Make a copper disk slightly larger in diameter than the copper cylinder made in the previous step. Make a hole in the center with a 1 -1/4-in. hole saw. Clamp the disk so it doesn’t spin while you’re drilling.Cut a piece of 1-in. diameter copper water tubing about 5 in. long and solder it to the copper disk, centering it over the hole and clamping it in place so it stays straight.Slip a piece of downspout inside the cap’s sides to make sure it’s round and then solder it to the disk that forms the top of the cap.Slip the cap over the flashing boot to check the fit. The completed pipe flashing is now ready for the roof. It should provide trouble-free service for centuries.
Fine Homebuilding receives a commission for items purchased through links on this site, including Amazon Associates and other affiliate advertising programs.
Peel & Stick Underlayment
Often required by code, this durable, slip resistant, self-sealing, and self-adhered roofing underlayment is easy to install and ensures maximum protection along roof eaves, rakes, and valleys.
Cutting asphalt shingles is made faster, easier, and safer when using a hook-blade. Suitable for any standard utility knife, these are a must-have on any roofing project.
Prolonged exposure to the sun and weather can compromise the rubber gasket on standard vent flashing. Use this to quickly and permanently fix failed seals or to help protect the gasket in new-construction applications.
This is a dialog window which overlays the main content of the page. The modal window is a 'site map' of the most critical areas of the site. Pressing the Escape (ESC) button will close the modal and bring you back to where you were on the page.