FHB Logo Facebook LinkedIn Email Pinterest Twitter Instagram Plus Icon Close Icon Navigation Search Icon Navigation Search Icon Arrow Down Icon Video Guide Icon Article Guide Icon Modal Close Icon Guide Search Icon Skip to content
Subscribe
Log In
  • How-To
  • Design
  • Tools & Materials
  • Videos
  • Blogs
  • Forum
  • Magazine
  • Members
  • FHB House
  • Podcast
Log In

Fine Homebuilding Project Guides

Roofing

Guide Home
Chapter
  • Tools and Materials
  • Roof Replacement and Reroofing
  • Roof Ventilation
  • Waterproofing
  • Installing Asphalt Shingles
  • Installing Other Types of Roofs
  • Roof Maintenance and Repair

Pyramid Pattern for Three-Tab Shingles

Follow these layout and installation guidelines when shingling with the pyramid pattern.

By Mike Guertin

You’ll probably find that shingling a roof using the pyramid pattern is faster and easier than the racking pattern in most instances. You don’t have to lift the loose end of every other shingle to slip a new one beneath. There are a couple of installation techniques you can use.

The main drawback to using the pyramid pattern with three-tab shingles is cutout-slot control. Although the pyramid pattern is the preferred method for installing random-style laminated shingles, it isn’t as precise for controlling the slots in three-tab shingles.

If you are using three-tab shingles, follow the steps below.
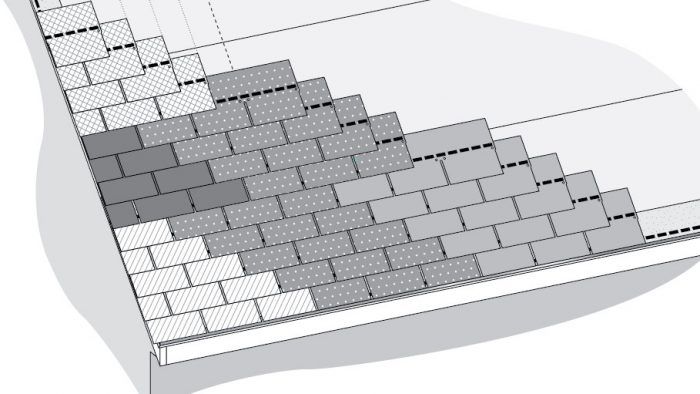
Starting a Pyramid

Pyramid Pattern for Three-Tab Shingles

  1. Establish control lines. If you are using three-tab shingles, snap a ­primary control chalkline just inside of a rake edge for the end of a 3-ft. shingle and additional offset control lines for the 6-in. or 4-in. course offsets.
  2. Install the first starter kit. Install the longest shingle in your starter kit with the top edge aligned to a horizontal control line and the factory edge flush to the vertical control line. For the first kit in a 6-in. offset pattern, this will be a full shingle. Then install the next-longest shingle in the kit to its vertical and horizontal control lines and so on until you’ve exhausted your first set of starter shingles. As you are fastening each shingle along the rake edge, remember that about 3/4 in. to 1-1/2 in. of the shingle extends beyond the inside edge of the rake board. Hold back the end fastener at least 3/4 in. inside the edge of the rake board to prevent it from breaking through the surface of the trim.
  3. Add full shingles. When you reach the top of the first starter kit, install a full shingle against the end of each starter shingle.
  4. Add additional starter kits. Return back to the eaves and apply the longest shingle in your next starter kit against the appropriate control line. In the case of a 6-in. offset pattern, this shingle will be 30 in. long. When you finish the second kit, add the full shingles against them and continue up the roof. You can see in the illustration how the pyramid develops and extends diagonally across the roof as you continue installing shingles.
Random-style shingles
Random-style shingles, such as these laminated ones, make it easy to start and follow a pyramid-application sequence. Note how the shingle offsets vary an inch or two between courses; since there are no cutout slots to keep lined up between courses, equal offsets aren’t necessary.

Sign up for eletters today and get the latest how-to from Fine Homebuilding, plus special offers.

Signing you up...

This site is protected by reCAPTCHA and the Google Privacy Policy and Terms of Service apply.
See all newsletters
See all newsletters
Previous: Keeping Things Aligned Next: Preparing Vertical Lines on Hip Roofs

Guide

Roofing

Chapter

Installing Asphalt Shingles

Log in or create an account to post a comment.

Sign up Log in

Become a member and get full access to FineHomebuilding.com

Roofing

Roofing

A complete resource that includes the best materials and the right techniques to build a sturdy, leak-free, attractive roof on any house

View Project Guide

View All Project Guides »

Become a member and get unlimited site access, including the Roofing Project Guide.

Start Free Trial

Tools and Materials
  • Roof Coverings
  • Roofing Materials
  • Power Tools
  • Handy Helpers
  • Staging and Ladders
  • Safety Equipment
Roof Replacement and Reroofing
  • Preparing the Old Roof
  • Sheathing
  • Installing the New Roof
Roof Ventilation
  • Venting Basics
  • Installation
Waterproofing
  • Underlayment
  • Drip Edge
  • Flashing Adjoining Walls
  • Dormer and Skylight Flashing
  • Chimney Flashing
  • Vent Flashing
  • Gutters
Installing Asphalt Shingles
  • Calculating Shingles
  • Layout
  • Installation
  • Valleys
Installing Other Types of Roofs
  • Cedar Shingles
  • Metal
  • Low-Slope Roofs
  • Slate and Tile
Roof Maintenance and Repair
  • Assessing the Problem
  • Repairing Asphalt-Shingle Roofs
  • Other Roofing Repairs

Fine Homebuilding

Follow

  • twitter
  • facebook
  • instagram
  • pinterest

Newsletter

Get home building tips, offers, and expert advice in your inbox

Signing you up...

This site is protected by reCAPTCHA and the Google Privacy Policy and Terms of Service apply.
See all newsletters
See all newsletters

Membership & Magazine

  • Online Archive
  • Start Free Trial
  • Magazine Subscription
  • Magazine Renewal
  • Gift a Subscription
  • Customer Support
  • Privacy Preferences

Taunton Network

  • Green Building Advisor
  • Fine Woodworking
  • Fine Gardening
  • Threads
  • About
  • Contact
  • Advertise
  • Careers
  • Copyright
  • Terms of Use
  • Site Map
  • Do not sell or share my information
  • Privacy Policy
  • Accessibility
  • California Privacy Rights

© 2023 The Taunton Press, Inc. All rights reserved.

X
X
This is a dialog window which overlays the main content of the page. The modal window is a 'site map' of the most critical areas of the site. Pressing the Escape (ESC) button will close the modal and bring you back to where you were on the page.

Main Menu

  • How-To
  • Design
  • Tools & Materials
  • Video
  • Blogs
  • Forum
  • Reader Projects
  • Magazine
  • Members
  • FHB House

Podcasts

  • FHB Podcast
  • ProTalk

Webinars

  • Upcoming and On-Demand

Podcasts

  • FHB Podcast
  • ProTalk

Webinars

  • Upcoming and On-Demand

Popular Topics

  • Kitchens
  • Business
  • Bedrooms
  • Roofs
  • Architecture and Design
  • Green Building
  • Decks
  • Framing
  • Safety
  • Remodeling
  • Bathrooms
  • Windows
  • Tilework
  • Ceilings
  • HVAC

Magazine

  • Current Issue
  • Past Issues
  • Magazine Index
  • Subscribe
  • Online Archive
  • Author Guidelines

All Access

  • Member Home
  • Start Free Trial
  • Gift Membership

Shop the Store

  • Books
  • DVDs
  • Taunton Workshops

More

  • FHB Ambassadors
  • Reader Projects
  • Podcast
  • FHB House
  • Customer Support

Account

  • Log In
  • Join

Newsletter

Get home building tips, offers, and expert advice in your inbox

Signing you up...

This site is protected by reCAPTCHA and the Google Privacy Policy and Terms of Service apply.
See all newsletters
See all newsletters

Follow

  • twitter
  • facebook
  • instagram
  • pinterest

Join All Access

Become a member and get instant access to thousands of videos, how-tos, tool reviews, and design features.

Start Your Free Trial

Subscribe

FHB Magazine

Start your subscription today and save up to 70%

Subscribe

We hope you’ve enjoyed your free articles. To keep reading, become a member today.

Get complete site access to expert advice, how-to videos, Code Check, and more, plus the print magazine.

Start your FREE trial

Already a member? Log in