Retrofitting a Curbed Skylight - Fine Homebuilding FHB Logo Facebook LinkedIn Email Pinterest Twitter Instagram Plus Icon Close Icon Navigation Search Icon Arrow Down Icon Video Guide Icon Article Guide Icon Modal Close Icon Guide Search Icon Skip to content
Main Menu
Subscribe

In every issue you'll find...

  • Expert insights on techniques and principles
  • Unbiased tool reviews
  • Step-by-step details to master the job
  • Field-tested advice and know-how
Subscribe Now!
Subscribe
  • How-To
  • Design
  • Tools & Materials
  • Videos
  • Blogs
  • Forum
  • Magazine
  • Members
  • FHB House
  • Podcast
  • Join
  • Log In
Main Menu Subscribe

Fine Homebuilding Project Guides

Roofing

Guide Home
Chapter
  • Tools and Materials
  • Roof Replacement and Reroofing
  • Roof Ventilation
  • Waterproofing
  • Installing Asphalt Shingles
  • Installing Other Types of Roofs
  • Roof Maintenance and Repair
Sponsored by logo
Sponsored by logo
How-To

Retrofitting a Curbed Skylight

Get the flashing right to ensure leak-free skylights.

By Jim Blodgett Issue 141
Article Image

Synopsis: Step-by-step instructions for installing a curbed skylight in an existing roof, with an emphasis on flashing details that keep water out.

I can count on two things to happen every spring. April 15 will roll around, and my phone will ring with customers wanting skylights cut into their roofs. Adding a skylight can turn a dark, gloomy room into a warm, inviting space.

Here in the Northwest, we usually mount skylights on site-built curbs. I’m told that in some regions of the country, skylights with integral curbs are commonly used, but I’ve never installed one like that. Part of the reason is doubtlessly regional tradition, but economics plays into it, too.

Cutting the opening, building and flashing the curb, and mounting a skylight in an asphalt-shingled roof, using stock materials, takes me less than a day.

The skylight in this article is a standard unit built to fit in a roof whose trusses or rafters are spaced 24 in. o. c. You might want a different-size skylight, or your house framing may be spaced differently. In these cases, reframing is called for.

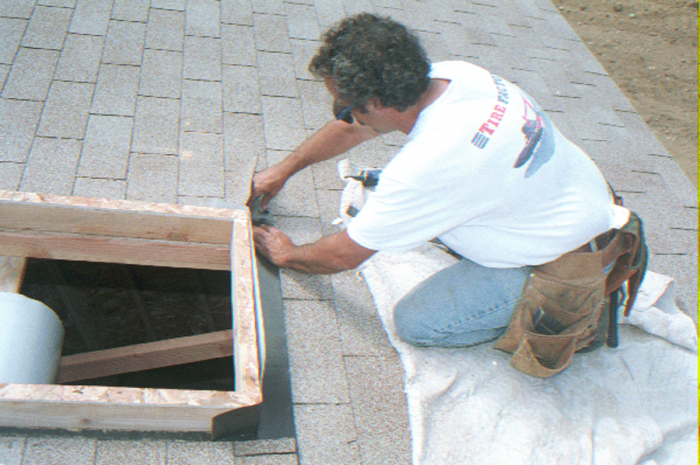
Nails driven through the roof mark the opening

To mark the four corners of the inside of the curb, I drive nails through the roof sheathing from below, about where I want the skylight’s corners to be. I may have to move the curb’s location up or down a few inches from these nails. It’s important that there be a full course of shingles 2 in. above the skylight curb; I’ll explain why later. I snap lines on the shingles 2 in. to the outside of these nails. When the shingles are cut back to these lines, the extra 2 in. allows for the 2×4 curb, plus 1/2 in. to leave room for water to flow freely along the flashing between the curb and the edges of the shingles.

Using a hook blade in a utility knife, I cut through the shingles one layer at a time until I get to the tar paper, which is left in place as an added layer of protection. I then snap lines from nail to nail and cut the tar paper on these lines. With the four corner nails driven back through it, I cut the sheathing to the inner lines, leaving the hole for the skylight.

Washington’s building code requires skylight curbs to be 4 in. higher than the surrounding roof. To achieve this height, I build the curbs from 2x4s capped with 1/2-in. sheathing. This 2-ft. by 4-ft. skylight required a 25 1/2-in. by 49 1/2-in. curb. These outside dimensions allow the curb to bear directly over framing members on 24-in. centers.

For more photos, illustrations, and details, click the View PDF button below:

Sign up for eletters today and get the latest how-to from Fine Homebuilding, plus special offers.

Sign Up
View PDF
X
X
Previous: Installing a Tubular Skylight: Step 3 Next: Skylights in a Flat Roof

Guide

Roofing

Chapter

Framing a New Roof

Log in or create an account to post a comment.

Sign up Log in

Become a member and get full access to FineHomebuilding.com

Roofing

Roofing

A complete resource that includes the best materials and the right techniques to build a sturdy, leak-free, attractive roof on any house

View Project Guide

View All Project Guides »

Become a member and get unlimited site access, including the Roofing Project Guide.

Start Free Trial

Tools and Materials
  • Roof Coverings
  • Roofing Materials
  • Power Tools
  • Handy Helpers
  • Staging and Ladders
  • Safety Equipment
Roof Replacement and Reroofing
  • Preparing the Old Roof
  • Sheathing
  • Installing the New Roof
Roof Ventilation
  • Venting Basics
  • Installation
Waterproofing
  • Underlayment
  • Drip Edge
  • Flashing Adjoining Walls
  • Dormer and Skylight Flashing
  • Chimney Flashing
  • Vent Flashing
  • Gutters
Installing Asphalt Shingles
  • Calculating Shingles
  • Layout
  • Installation
  • Valleys
Installing Other Types of Roofs
  • Cedar Shingles
  • Metal
  • Low-Slope Roofs
  • Slate and Tile
Roof Maintenance and Repair
  • Assessing the Problem
  • Repairing Asphalt-Shingle Roofs
  • Other Roofing Repairs

Fine Homebuilding

Follow

Newsletter

Get home building tips, offers, and expert advice in your inbox

Sign Up See all newsletters

Membership & Magazine

  • Online Archive
  • Start Free Trial
  • Magazine Subscription
  • Magazine Renewal
  • Gift a Subscription
  • Customer Support
  • Manage Preferences

Taunton Network

  • Green Building Advisor
  • Fine Woodworking
  • Fine Gardening
  • Threads
  • About
  • Contact
  • Advertise
  • Privacy Policy
  • Careers
  • Copyright
  • Terms of Use
  • Accessibility

© 2021 The Taunton Press, Inc. All rights reserved.

    Main Menu

  • How-To
  • Design
  • Tools & Materials
  • Video
  • Blogs
  • Forum
  • Reader Projects
  • Magazine
  • Members
  • FHB House
  • Podcasts

  • FHB Podcast
  • ProTalk
  • Account

  • Log In
  • Join

    Podcasts

  • FHB Podcast
  • ProTalk
  • Popular Topics

  • Kitchens
  • Business
  • Bedrooms
  • Roofs
  • Architecture and Design
  • Green Building
  • Decks
  • Framing
  • Safety
  • Remodeling
  • Bathrooms
  • Windows
  • Tilework
  • Ceilings
  • HVAC

    Magazine

  • Current Issue
  • Past Issues
  • Magazine Index
  • Subscribe
  • Online Archive
  • Author Guidelines

    All Access

  • Member Home
  • Start Free Trial
  • Gift Membership

    Shop the Store

  • Books
  • DVDs
  • Taunton Workshops

    More

  • FHB Ambassadors
  • Reader Projects
  • Podcast
  • Customer Support

    Account

  • Log In
  • Join

Newsletter

Get home building tips, offers, and expert advice in your inbox

Sign Up See all newsletters

Follow

Join All Access

Become a member and get instant access to thousands of videos, how-tos, tool reviews, and design features.

Start Your Free Trial

Subscribe

FHB Magazine

Start your subscription today and save up to 52%

Subscribe

We hope you’ve enjoyed your free articles. To keep reading, become a member today.

Get complete site access to expert advice, how-to videos, Code Check, and more, plus the print magazine.

Start your FREE trial

Already a member? Log in