FHB Logo Facebook LinkedIn Email Pinterest Twitter Instagram Plus Icon Close Icon Navigation Search Icon Navigation Search Icon Arrow Down Icon Video Guide Icon Article Guide Icon Modal Close Icon Guide Search Icon Skip to content
Subscribe

In every issue you'll find...

  • Expert insights on techniques and principles
  • Unbiased tool reviews
  • Step-by-step details to master the job
  • Field-tested advice and know-how
Subscribe Now!
Subscribe
  • How-To
  • Design
  • Tools & Materials
  • Videos
  • Blogs
  • Forum
  • Magazine
  • Members
  • FHB House
  • Podcast
  • Join
  • Log In
Subscribe

Fine Homebuilding Project Guides

Roofing

Guide Home
Chapter
  • Tools and Materials
  • Roof Replacement and Reroofing
  • Roof Ventilation
  • Waterproofing
  • Installing Asphalt Shingles
  • Installing Other Types of Roofs
  • Roof Maintenance and Repair
Job Site Diaries

Seal Rake-Edge Shingles to Reduce Blow-offs

You can hand-seal the rake shingles down to the drip edge or use a double-sided roofing tape.

By Mike Guertin

Shingles along rake edges are vulnerable to being blown off in high winds. Often the nails alone won’t hold the shingles fast to the roof.  The risk is that once the shingles along the edge are blown off, the field shingles may be more prone to being blown off too.

There are a couple methods I employ to help hold the shingles down along rake edges: Double-nailing the end of the shingle is an easy upgrade and only takes a second. Another is to bed the shingles in a wide strip of asphalt roof cement. This is a recommended practice by FEMA and the Institute for Business and Home Safety as part of their Fortified Home Program.

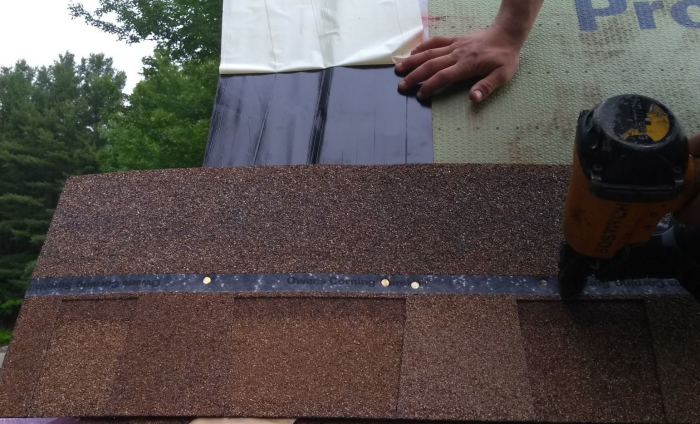
Rather than dealing with roof cement, I have been using a double-sided self-adhering roofing tape: ProtectoWrap’s Roof Edge Seal.  It’s 12 in. wide—wider than the 8 in. of roof cement recommended by the Fortified Home program guide. Unless it’s sunny or hot out, the Roof Edge Seal adhesive is not aggressive, but once it’s been down for a day (even in cool weather), it bonds tight to the drip edge and the roof shingle. Keep in mind that the sealant only bonds the head lap of the shingle down. The exposure portion of the shingle is still only bonded down by the shingle’s self-seal strip. So you can further improve wind uplift resistance by hand-sealing the exposure portion to the shingle beneath with roof cement.

Roof Edge SealIn order for the Roof Edge Seal or a band of roof cement to be effective at holding shingles down, they must be bonded directly to wide metal drip edge. I usually use drip edge with a minimum 5-in.-wide roof leg. Then I nail it down at about 4 in. in a W pattern along each length.

In addition to helping to hold the shingles from blowing off, sealing the shingles down can help block wind-driven rain from getting between the drip edge and the shingle, and making its way onto the underlayment.

mikeguertin.com  IG / @mike_guertin

Sign up for eletters today and get the latest how-to from Fine Homebuilding, plus special offers.

Signing you up...

This site is protected by reCAPTCHA and the Google Privacy Policy and Terms of Service apply.
See all newsletters
See all newsletters
Previous: Project: Windproof a Roof Next: How to Install Shingles on a Steep Turret

Guide

Roofing

Chapter

Installing Asphalt Shingles

View Comments

  1. User avater
    Artisanalcreations86 | Sep 12, 2018 12:38am | #1

    Fantastic information in an entertaining way! The blog gives so much insight into the subject matter that it does not only become quite easy to understand the concept but to implement it as well.

  2. dewatering | Sep 13, 2018 10:34pm | #2

    thank you very much

  3. User avater
    Blue_Oak | Oct 03, 2018 04:00pm | #3

    What's up with all the prior fluff comments. Is somebody getting compensated to make comments?

    1. User avater
      mike_guertin | Oct 18, 2018 09:57am | #4

      I wonder that myself.

Log in or create an account to post a comment.

Sign up Log in

Become a member and get full access to FineHomebuilding.com

Roofing

Roofing

A complete resource that includes the best materials and the right techniques to build a sturdy, leak-free, attractive roof on any house

View Project Guide

View All Project Guides »

Become a member and get unlimited site access, including the Roofing Project Guide.

Start Free Trial

Tools and Materials
  • Roof Coverings
  • Roofing Materials
  • Power Tools
  • Handy Helpers
  • Staging and Ladders
  • Safety Equipment
Roof Replacement and Reroofing
  • Preparing the Old Roof
  • Sheathing
  • Installing the New Roof
Roof Ventilation
  • Venting Basics
  • Installation
Waterproofing
  • Underlayment
  • Drip Edge
  • Flashing Adjoining Walls
  • Dormer and Skylight Flashing
  • Chimney Flashing
  • Vent Flashing
  • Gutters
Installing Asphalt Shingles
  • Calculating Shingles
  • Layout
  • Installation
  • Valleys
Installing Other Types of Roofs
  • Cedar Shingles
  • Metal
  • Low-Slope Roofs
  • Slate and Tile
Roof Maintenance and Repair
  • Assessing the Problem
  • Repairing Asphalt-Shingle Roofs
  • Other Roofing Repairs

Fine Homebuilding

Follow

  • twitter
  • facebook
  • instagram
  • pinterest

Newsletter

Get home building tips, offers, and expert advice in your inbox

Signing you up...

This site is protected by reCAPTCHA and the Google Privacy Policy and Terms of Service apply.
See all newsletters
See all newsletters

Membership & Magazine

  • Online Archive
  • Start Free Trial
  • Magazine Subscription
  • Magazine Renewal
  • Gift a Subscription
  • Customer Support
  • Privacy Preferences

Taunton Network

  • Green Building Advisor
  • Fine Woodworking
  • Fine Gardening
  • Threads
  • About
  • Contact
  • Advertise
  • Careers
  • Copyright
  • Terms of Use
  • Site Map
  • Do not sell or share my information
  • Privacy Policy
  • Accessibility
  • California Privacy Rights

© 2023 The Taunton Press, Inc. All rights reserved.

X
X
This is a dialog window which overlays the main content of the page. The modal window is a 'site map' of the most critical areas of the site. Pressing the Escape (ESC) button will close the modal and bring you back to where you were on the page.

Main Menu

  • How-To
  • Design
  • Tools & Materials
  • Video
  • Blogs
  • Forum
  • Reader Projects
  • Magazine
  • Members
  • FHB House

Podcasts

  • FHB Podcast
  • ProTalk

Webinars

  • Upcoming and On-Demand

Account

  • Log In
  • Join

Podcasts

  • FHB Podcast
  • ProTalk

Webinars

  • Upcoming and On-Demand

Popular Topics

  • Kitchens
  • Business
  • Bedrooms
  • Roofs
  • Architecture and Design
  • Green Building
  • Decks
  • Framing
  • Safety
  • Remodeling
  • Bathrooms
  • Windows
  • Tilework
  • Ceilings
  • HVAC

Magazine

  • Current Issue
  • Past Issues
  • Magazine Index
  • Subscribe
  • Online Archive
  • Author Guidelines

All Access

  • Member Home
  • Start Free Trial
  • Gift Membership

Shop the Store

  • Books
  • DVDs
  • Taunton Workshops

More

  • FHB Ambassadors
  • Reader Projects
  • Podcast
  • Customer Support

Account

  • Log In
  • Join

Newsletter

Get home building tips, offers, and expert advice in your inbox

Signing you up...

This site is protected by reCAPTCHA and the Google Privacy Policy and Terms of Service apply.
See all newsletters
See all newsletters

Follow

  • twitter
  • facebook
  • instagram
  • pinterest

Join All Access

Become a member and get instant access to thousands of videos, how-tos, tool reviews, and design features.

Start Your Free Trial

Subscribe

FHB Magazine

Start your subscription today and save up to 70%

Subscribe

We hope you’ve enjoyed your free articles. To keep reading, become a member today.

Get complete site access to expert advice, how-to videos, Code Check, and more, plus the print magazine.

Start your FREE trial

Already a member? Log in